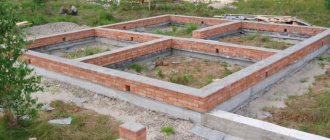
Every developer knows that the foundation is the basis of the house and the durability of the entire structure depends on its reliability. But it is also known that this is one of the most expensive construction expenses. But if it is observed step-by-step instructions for building a foundation It is quite possible to cope with such work with your own hands and save money.
At the same time, it is important to take into account all the features of the future building, the geological situation on the site and many other factors in order to choose the most optimal type of foundation for the house.
Construction of the foundation of a house
The word "foundation" comes from the Latin "fundamentum" - foundation. It is a fundamental part of any building. You can invest huge amounts of money in a house, but if the foundation is bad, then the house, even on the most solid soil, will float, crack, and collapse.
Foundation is an underground or underwater part of a structure that transfers to its soil foundation the static load created by the weight of the structure, and additional dynamic loads created by wind or the movement of water, people, equipment or vehicles. A properly designed foundation transfers all loads to the ground in such a way that the possibility of unacceptable settlement and destruction of the structure is eliminated.
Collier's Encyclopedia
https://dic.academic.ru/
Which one is more suitable?
You can build the foundation yourself, and it’s not difficult to understand the drawings and calculations. Moreover, there are not so many types of foundations, and they are strictly tied to the types of soil and the weight of your house.
This is how a foundation of stones and concrete is built in Goa, India; photo by Jorge Royan
The foundation is bad when it is built without regard to the soil; there were violations in its design or simplifications were introduced into initially correct calculations; you tried to save on materials or violated the pouring technology. To prevent this from happening, let's consider everything in order.
Kinds
There are only four main types of foundations; they differ structurally:
- Tape.
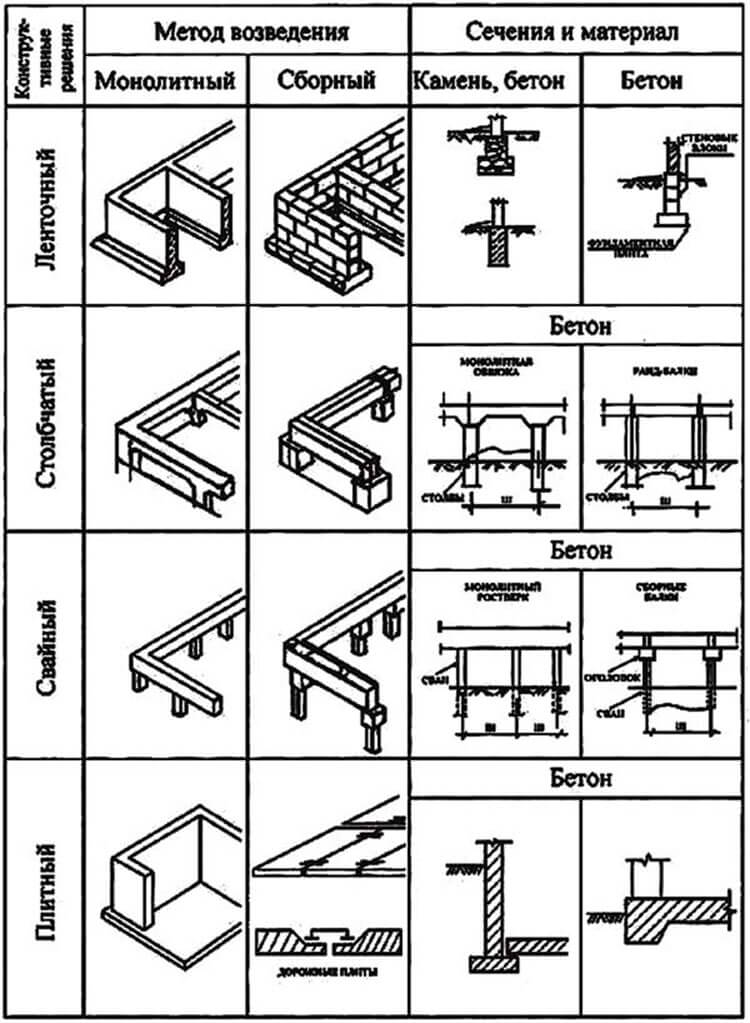
Diagram of a strip foundation - it clearly shows the sequence of its construction and specification - Columnar.
Diagram of a columnar foundation - it clearly shows the sequence of its construction and specification - Slab.
Diagram of a slab foundation - it clearly shows the sequence of its construction with the laying of reinforcement and specification - Pile.
Foundation diagram on screw piles - all specifications and principles of construction are clearly visible
But among them there are also a lot of varieties, and there are foundations combined in shape.
The construction is regulated by a number of reference books; absolutely everything is covered in them.
SNiP - building codes and regulations
- SP (Code of Rules) SP 24.13330.2011 (Updated edition of SNiP 2.02.03–85, 1995, as amended - 2003, text) “Pile foundations”;
- SP 50–101–2004 “Design and installation of foundations and foundations of buildings and structures”;
- SP 50–102–2003 “Design and installation of pile foundations”;
- SNiP 2.02.04–88 “Foundations and foundations on permafrost soils”;
- GOST 13580–85 “Reinforced concrete slabs for strip foundations. Technical conditions";
- SNiP 2.02.01–83* “Foundations of buildings and structures”;
Summing up
From the information provided, it is clear that you need to start building the foundation for your country house with preparatory and ground work. Without them, it will not be possible to create a solid and reliable foundation for a home. In this case, it is necessary to build the foundation using only high-quality materials, while observing the proportions and technological process.
It is better to pour the solution not alone, but together with a partner. Then you will be able to complete such a process quickly, and it will be completed efficiently. Start building walls, partitions and roofing only after the concrete has completely set.
Foundation structure
All varieties have common features. This includes penetration into the soil, a cushion of drainage material (crushed stone, sand, pebbles), the foundation itself and waterproofing. Only pile types do not have a cushion, and only if they do not have a recessed grillage.
Photo gallery: drawings of different types
A slab foundation (drawing) shows the principles and technology of its construction. A strip foundation (drawing) of two types: made of aerated concrete blocks and concrete: similarities and differences. Similarities and differences between a pile foundation made from different types of piles. A column foundation (drawing in two positions) shows the principles of its construction. Drawing slab foundation with insulation and full specification Drawing of a slab foundation with insulation and drainage (and full specification)
Main types of foundations by design and manufacturing method
The construction of a private house can be carried out in one of four main types:
- tape;
- pile;
- columnar;
- monolithic slab, the so-called slab foundation.
They differ from each other not only structurally, but also in cost, volume of work, including excavation, load-bearing capacity, and diversity within their type.
There is a similar article on this topic - DIY strip foundation.
Soil mechanics
The choice of foundation primarily depends on the characteristics of the soil: its composition, depth of freezing and groundwater, and only then on the design of the house and its materials.
The type of foundation is selected depending on the soil
Soils
The contact area of the foundation with the soil must correspond to the load, taking into account the expected resistance of the soil. The maximum resistance (reactive pressure) of the soil is determined experimentally based on the principles of soil mechanics, and state building codes provide tables of permissible soil resistance for certain geographic zones.
Collier's Encyclopedia
https://dic.academic.ru/
Before designing a house, it is better to order a professional survey of the site. Moreover, you should not use the results of your neighbor: sometimes even neighboring areas differ greatly in their characteristics. But you can do it yourself: dig a hole from half a meter to a meter deep, then use a garden drill to make a hole two meters deep, studying the soil from different depths.
If the site is located in a populated village, then it is good to talk with the owners of neighboring sites and look at their sites. This will help a lot.
According to the reference book “Soils. Foundations. Choosing the optimal foundation” There are three types of soils:
- rocky - massifs of homogeneous crystalline rock (rock) and sedimentary layered rock: dolomite, shale, sandstone, limestone;
- conglomerate - any soil with a large percentage (more than half) of fragments of crystalline or layered sedimentary rocks;
- non-rocky, which, in turn, is divided into related ones - loams and clays;
- unbound - sands and sandy loams.
The classification of soils is clearly shown in the diagram
Soil cohesion also changes depending on humidity. Soil connectivity is independently determined visually - by the angle between the slope of the soil thrown out of the pit and the horizontal.
Our strip is characterized by non-rocky soils.
If your soil is virgin sandstone or gravel, then you are lucky (even luckier if it is rocky). Sand is a wonderful base for the home. It is quite reliable if the soil is plastic, dense and dry loam, or gravel, or even compacted construction waste. The trouble is that clays are never completely dry, and wet clay tends to swell and bulge.
Table: minimum depth of the foundation structure for construction in sandy and clayey soil
| Position | Soil characteristics | Minimum foundation depth (cm) |
| 1 | Sand | 50 cm |
| 2 | Clay | 70 cm |
If it is easily and unevenly compressible soil - forest or garden fill soil, or, what is much worse - swampy soil, then your construction will cost you much more due to the forced compensation for these problems. In the case of quicksand (resembling dust or flour) or silt, building a house is not advisable at all.
Freezing
In addition to the composition of the soil, you need to know to what depth it freezes in winter. In our “latitudes” the freezing depth is usually from eighty to one hundred centimeters.
The base of the foundation should be below the maximum freezing depth of the soil to prevent swelling of the soil when freezing. The safe depth depends on annual temperature variations, the type and range of local soil variations, and the normal groundwater level. In addition, seasonal changes in the volume of clay soils are sometimes observed, which should not be allowed under a foundation laid on a natural foundation.
Collier's Encyclopedia
https://dic.academic.ru/
Ground water level
This is also an indicator on which not only the “model” of the foundation depends, but also the depth of its laying; it is assessed in relation to the depth of soil freezing. If in winter the water does not rise below 2 meters to the freezing depth (for brevity, let’s denote it by the letter Q), and your soil is fine and silty sand or hard clay, then the depth of the foundation will not depend on the freezing depth in principle.
Table: dependence of foundation laying depth on groundwater depth
| Position | Ground water level | Groundwater level (m) | Foundation laying depth (m) | Note |
| 1 | Short | Below Q+2 m | Not less than 0.5 m | |
| 2 | Higher | Above Q+2 m | To frost depth or below | The foundation must be installed on a drainage bed of sand and gravel |
But if the soil in the area is mixed, and there is sand or peat on top of the clay, then after precipitation, so-called “lenses” appear inside the soil - moisture seeps from above through the permeable layer and falls on the impenetrable clay. And this is very dangerous for the foundation due to its unpredictability.
Diagram of soil permeable from above, which creates internal “lenses” of water that are very dangerous for construction
Therefore, it is better to order a full survey of the site from professionals and receive a number of necessary documents about the condition of the soil. They should include the following information:
- Topographic plan with soil water curves and different types of soil.
An example of a topographic survey of a private land plot: it is too difficult to do on your own - Mechanical properties of soils: possibility of subsidence and sliding, heaving, cohesion, ability to support the foundation without special efforts.
- Physical and chemical qualities of soils - freezing depth, wetting ability; what substances it releases when wet, and how they will affect the foundation material.
- Diagram of groundwater depth and its changes depending on the season and temperature.
A diagram of groundwater on a personal plot shows what type of foundation your future home needs
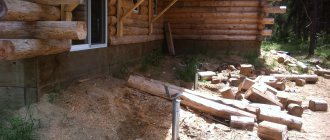
Under the old house
If you live in an old country house, then you probably know that it needs to be renovated from time to time. Poor quality work on the foundation and poor materials can lead to a violation of the integrity of the house. What if your house has no foundation at all? This problem is typical for wooden houses. Be that as it may, we suggest that you familiarize yourself with the instructions for pouring a new or replacing an old foundation for a house that has been built a long time ago.
Beginning of work
Before you begin any action, stock up on the following tools and materials:
- Sand.
- Shovel.
- Waterproofing material.
- Supports.
- Roulette.
- Water.
- Tamping.
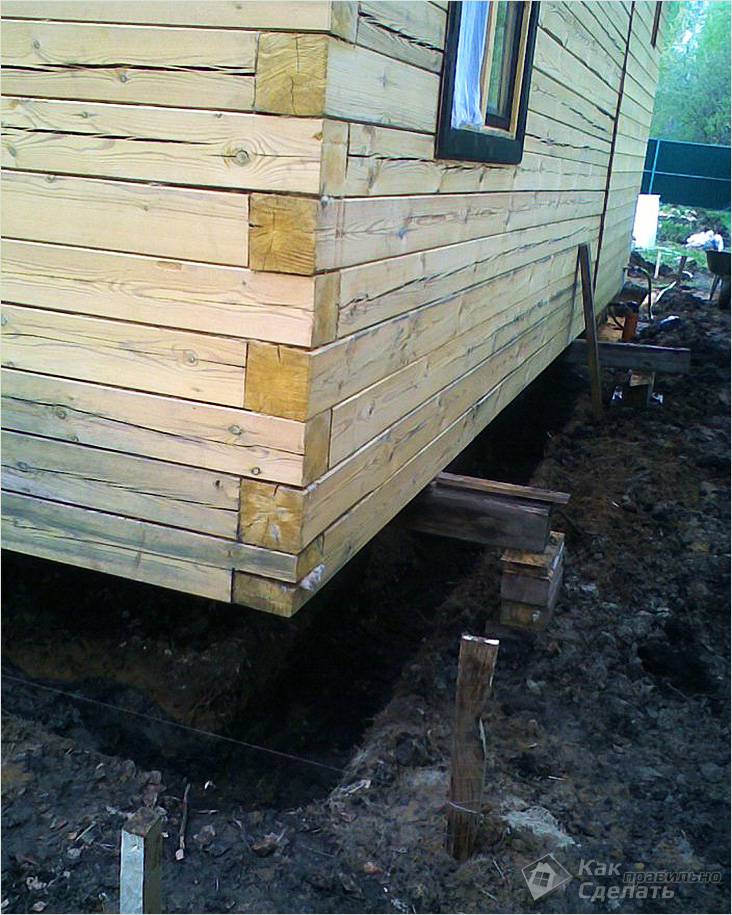
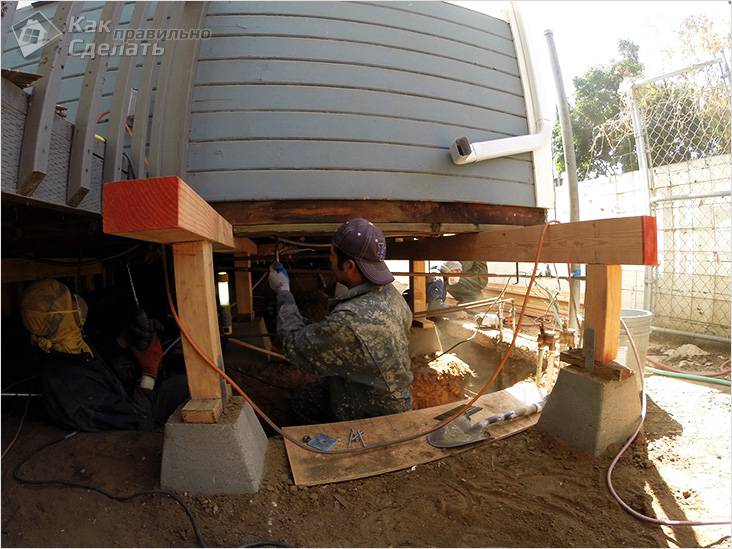
If you need to pour a foundation for the interior walls of the house, you will have to crawl under the structure. But, if the size of the house is not so large and its weight is moderate, then it is enough to fill the foundation around the perimeter of the building. The depth of the foundation pit in this case should be two spade bayonets.
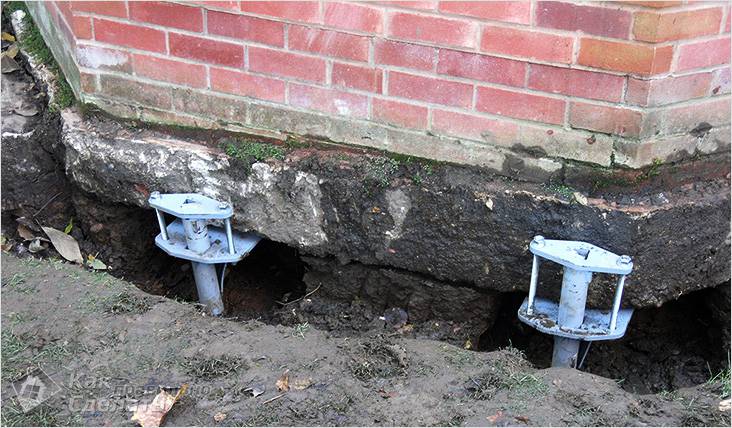
In order for the foundation under the old house to ultimately be strong enough, supports should be installed in the trench/pit at a certain distance from each other so that on one side they rest against the base of the pit, and on the other, against the base of the house.
Reinforced concrete or wooden columns can be used as such supports. Whatever type of pillars you choose, it is important to waterproof them. This can be done using special materials or chemical solutions. This is done to protect reinforced concrete from destruction, and wood from rotting due to exposure of these materials to high humidity.

Support pillars
The width of the pit depends on the size of the columns/support pillars. After installing the supports, you can begin constructing the bottom of the foundation. Cover it with sand. Compact the sand cushion. In this case, its thickness should be about 10–15 cm. This thickness is sufficient to evenly distribute the load from the foundation to the soil. It is important to comply with this condition, because poor-quality production of the sand cushion can lead to cracking and destruction of the finished foundation, which is under the weight of the house.
For high-quality compaction of sand, it needs to be spilled with water. However, before pouring concrete, you need to wait for the sand to dry. Or compact it manually, but keep in mind that wet sand compacts easier and faster.
If you need to make a foundation under the house's interior walls or partitions, you will also need to dig trenches, install support posts and make a sand bed.
Internal formwork
The next step is to install the formwork. This is done from the inside of the external foundation. To do this, you will need edged boards that are approximately 2–3 cm thick. You can replace the boards with a sheet of plywood or chipboard. You will need to make walls for the formwork from one of the proposed materials.
So, to make formwork you need to purchase:
- Edged boards/plywood/chipboard.
- Hammer-sledgehammer.
- Screwdriver and screws.
- Metal stands.
- Saw.
You cannot simply install wooden panels (or chipboard/plywood) formwork into the ground, as these actions will not allow you to create strong restraints. Under the pressure of concrete, such formwork will quickly collapse. The formwork can be secured using metal stands. They will hold the structure. It is important to place them at the corners. Another option for making formwork is to combine several of its parts into one. This can be done with self-tapping screws and a screwdriver.
Waterproofing
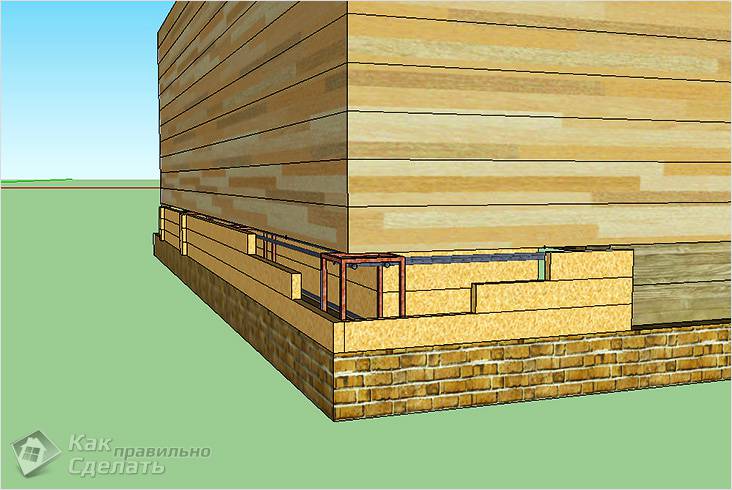
A certain distance or hole should be left in one side of the foundation. With its help, you can pull out the formwork walls after the foundation is poured and the concrete has hardened. But, if you don’t need the formwork in the future, you can leave it in the foundation for good.
The foundation must be poured taking into account the groundwater level. They are known to have a destructive effect on this part of the house. Therefore, it is important to make sure that the groundwater level in your home does not rise so high during the snow melt and rainy season that it can undermine the foundation of the house.
If you left a hole in the foundation, then after completing all construction work you need to decorate it. This can be done in different ways. For example, install a sash that will allow you to crawl under the floor of the house if necessary in the future. Or build a flowerbed in front of the hole that will block this hole in the foundation.
Reinforcement and external formwork
After installing the inside of the formwork, the foundation should be reinforced. This event will help strengthen the foundation of the house, making it more durable and reliable. Some experts argue that it is unnecessary to reinforce the foundation of an old wooden house, because concrete and support pillars will already create a fairly strong foundation. But if you do not want to return to the issue of foundation repair for a long time in the future, then it is better to carry out reinforcement.
To maximize the strength of the foundation, connect the reinforced belt with the previously installed support pillars of the structure.
The reinforcing material can be steel wire, mesh, metal rods, steel grating or wire rod. Alternatively, you can use reinforcement of a suitable length.
After this, you need to build and install the outer side of the formwork. When making formwork from edged boards, there is a high probability that concrete may pour out through small cracks. To avoid this situation, cover the shield with two layers of plastic film. You can attach it to a wooden board using a construction stapler.
Finishing work
Fine crushed stone should be poured into the pit. This must be done in view of the fact that the stone of a large fraction leads to the fact that the solution penetrates into the reinforced belt unevenly, as a result of which the quality of the filling suffers. This will lead to a deterioration in the strength characteristics of the foundation, and the house as a whole. It is very important to complete all work conscientiously.

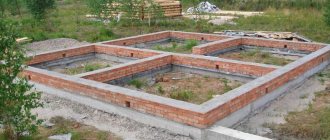
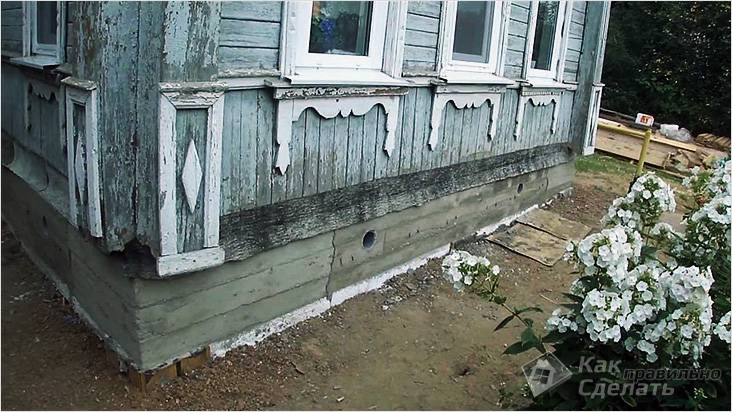
Brick foundation for an old house
As the formwork is filled with concrete, it is important to compact it, although this will not be easy, due to the fact that there will not be such a large gap between the ground surface and the house. Carrying out this work requires patience. If this quality is poorly developed in you, then perhaps it is worth considering other types of foundation construction for an old house.
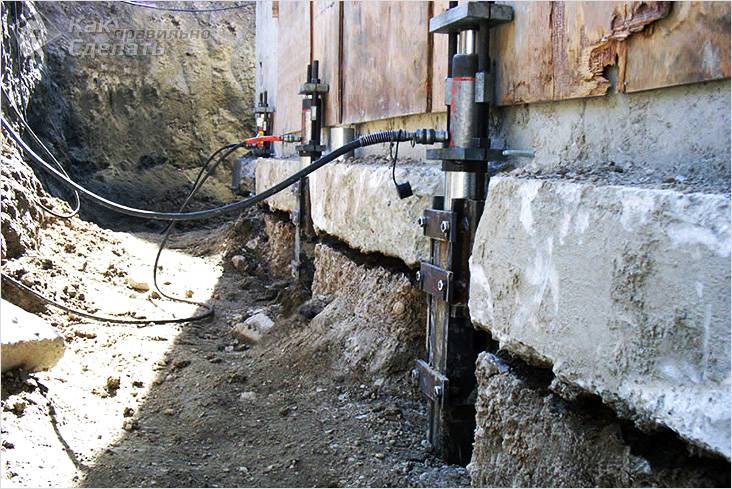
Manufacturing of pile foundations
You already know what a pile foundation is. Of course, the process of installing piles for a finished house is slightly different from making such a foundation for a house that has not yet been built. In our case, screw piles should be installed around the perimeter of the house, directly under its base. Installation of piles is carried out as follows: piles are gradually screwed into the soil. This is done before installing the piles in a dense layer of soil. The support pillars need to be concreted. They are installed at the base of the house. Then the building is lifted using jacks and installed on stilts.
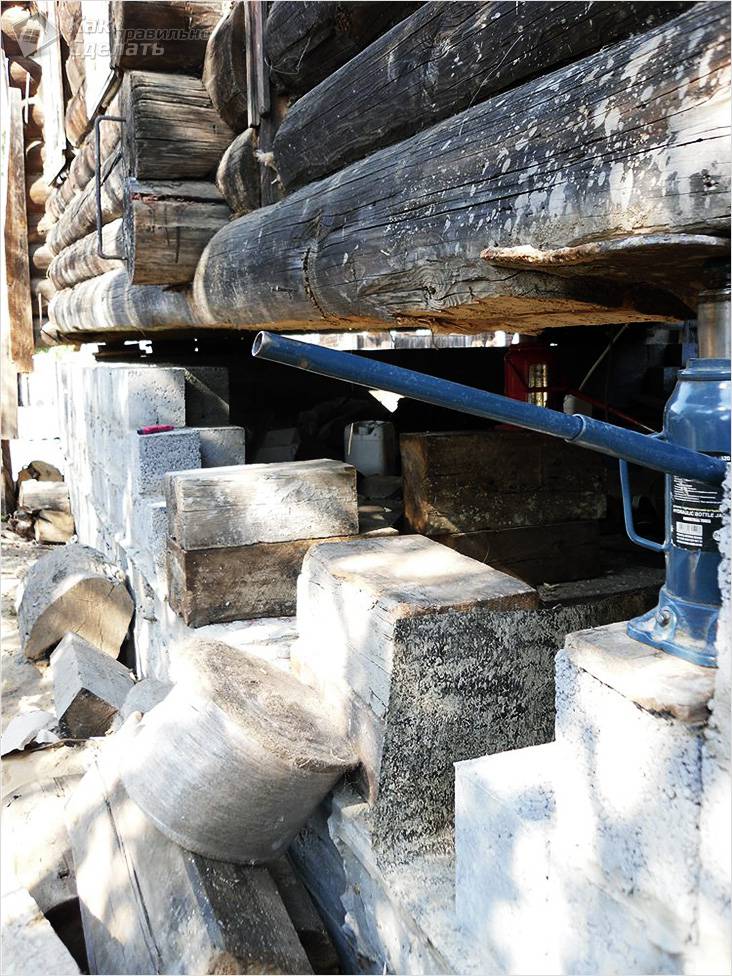
House raised by jacks
This type of foundation is easier to make than the previous version, and the work process itself takes much less time. However, the choice in favor of a pile foundation can only be made if we are talking about its manufacture for a small-sized house structure.
A strong foundation of the house will be the key to its durability, and, therefore, reliability. Of course, writing about how to pour a foundation is easier than completing this task. But, it is worth noting that although this is a labor-intensive process, it is quite doable.
Type selection
Let's look at the types of foundations in more detail.
- One of the easiest types to implement on your own is a columnar foundation.
It is suitable for light wooden house structures. Such a foundation can also be shallow, but this is more suitable for gazebos and barbecues - for a house it is too ephemeral. It is placed in pits (on a bed of drainage material) made of factory-made concrete blocks. Pros: ease of implementation, low price, suitable for any soil. Cons: not suitable for heavy house structures; The underground floor is poorly insulated. A recessed columnar foundation made of ready-made concrete blocks is one of the simplest solutions - Pile columnar foundation is suitable for unstable soils and slopes.
It dampens movements well and is made from asbestos-cement pipes, which are concreted into pits with drainage filler. Pros: relatively simple and cheap to construct, resistant to subsidence and landslides. Cons: the same as the previous one. A columnar foundation made of pipes is used on unreliable, floating and heaving soils, damping movements - Pile-grillage welded foundation made of metal, from ordinary and screw piles, is ideal for unreliable soils.
Pros: aesthetics and reliability, high durability. Cons: very expensive due to the cost of metal for a heavy grillage and requires welding. The metal welded pile-grillage foundation is beautiful and reliable, but very expensive - Slab foundation.
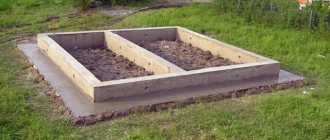
Excellent for unstable or subsiding soil; in addition, it is often used if the house will have a very large weight. Pros: solidity, reliability. Disadvantages: labor intensive, lack of underground, high cost. A monolithic slab foundation is almost ideal for a large house, but does not have a subfloor - Most often, the best option is a buried or shallowly buried (for light wooden houses) strip foundation.
It can be made from ready-mixed concrete, cement mortar, or concrete blocks with mortar. Pros: comparative simplicity and financial accessibility of its construction. Disadvantages: it cannot be placed on unreliable soils with close soil water, on clay and sand. But almost one hundred percent of the experts will recommend it to you, even if your site consists of unfavorable soils - but with amendments to the design: it will be necessary to make the “ribbon” of the foundation wider and deeper. Strip concrete foundation is used more often than others due to its high functionality and not very high price.
But foundations in one form from combined materials are widespread.
Photo gallery: foundations combined in material
Strip foundation made of blocks; inside - drainage material Slab foundation made of blocks and concrete: the blocks here are permanent formwork A strip foundation made of brick on a concrete base is beautiful, but expensive and not very strong Slab foundation made of brick and concrete: here the brick wall plays the role of permanent formwork A strip foundation made of rubble stone and mortar will save you a lot of mortar Options for grillages on a columnar foundationE wooden, metal, concrete
What will be required for construction?
Before you find out where to start building the foundation of a house, you should familiarize yourself with the list of what will be required during such work. The list of materials and tools is as follows:
- cord;
- pegs;
- roulette;
- level;
- shovel;
- mounting rods;
- knitting wire;
- rake;
- boards;
- nails;
- self-tapping screws;
- slate nails;
- fittings;
- sand;
- concrete;
- cement;
- Master OK;
- hammer;
- grater;
- water;
- crushed stone;
- tamping;
- concrete mixer;
- roofing felt
Components of the structure
After we have chosen the type of foundation, we need to choose what we will use: concrete or cement mortar; and - ready-made or self-made.
Concrete or cement mortar
Many people confuse these concepts and often call all poured structures concrete.
- Cement mortar is made from cement, sand and water, and sometimes from cement, lime or clay, sand and water, in the ratio determined by SNiP. Often additives are added to it to increase strength, water and frost resistance; plasticizers that increase setting speed and viscosity.
- Concrete is also created by mixing cement, water and fillers in a certain ratio. Instead of sand or together with sand, crushed stone, gravel, and pebbles are included in concrete. This solution produces the strongest artificial stone. Concrete is also used in the form of ready-made blocks and panels.
Components of good concrete: high-grade Portland cement, non-clayey fine river sand, fine crushed stone
You can order ready-made concrete, or you can make cement or concrete mortar yourself.
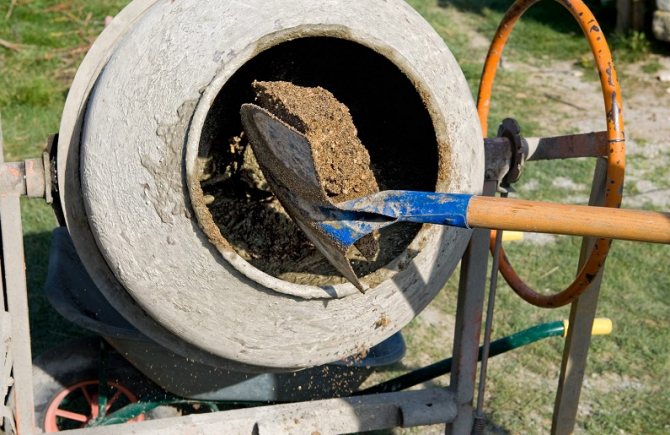
An electric cement mixer for preparing mortar will greatly facilitate the life of any craftsman.
The cement for mixing must bind the composition well, so heavy Portland cement grades M300–400 are used. The mixing ratio according to SNiP depends on the brand of cement, soil characteristics and foundation depth. Here is a useful table.
Table: ratio of cement and sand for laying foundations
| Position | Type of cement (brand) | Solution (parts ratio) | |||
| Low moisture soil (depth >3 meters from the surface) | Wet (depth 1–3 meters from the surface) | Saturated with moisture (depth 1 meter from the surface) | |||
| Cement + lime (mortar grade 10 - cement/lime paste/sand) | cement + clay (mortar grade 10 - cement/clay dough/sand) | Cement + lime or clay (mortar grade 25 - cement/lime paste or clay/sand) | cement (mortar grade 50 - cement/sand) | ||
| 1 | M300 | 1/2,2/15 | 1/1/11 | 1/0,8/8 | 1/5 |
| 2 | M400 | 1/2,2/15 | 1/1/11 | 1/0,8/:8 | 1/6 |
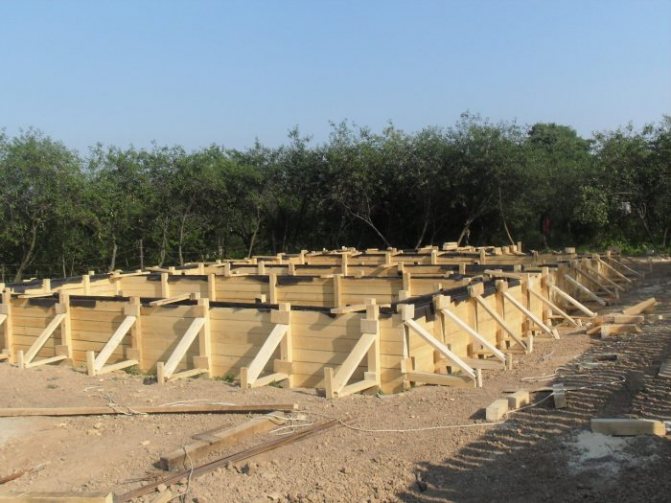
Formwork
Formwork is a structure made of boards (sometimes panels) and stops, necessary for fixing the form when pouring concrete and cement structures.
Formwork for strip foundations made from edged boards is the most common solution for us
There are two types:
- Removable - disassembled after the concrete/cement has set;
formwork made of boards and chipboards can be used up to 8 times. Industrial formwork - up to several hundred times. The principle of constructing removable formwork from boards is the simplest - Non-removable remains on the concrete. This is a recent invention, they are made from polystyrene and connected with special locks. It is quite expensive, but serves as insulation, which is very practical.
Fixed polystyrene foam formwork is connected with special locks and then serves as insulationPermanent formwork also includes hollow concrete blocks of various shapes, which are placed on a sand bed in a trench, connected with a metal rod and filled with concrete.
Fixed formwork made of hollow blocks is also very convenient, although difficult to implement
Products
They are absolutely necessary to ensure that the subfloor or space under the house is ventilated, and that excess dampness, fungi and mold do not grow there. The soil releases moisture and must dry. The vents are especially relevant for the log house we have chosen, as well as for any wooden structures, but only if there is an underground space in the case of a sealed monolithic strip foundation. If the floors are laid on a slab, or the foundation is piled, there is simply no need for them.
According to SNiP 31–01–2003 (updated as SP 54.13330.2011) “Residential multi-apartment buildings” (clause 9.10), the total area of vents should be 1 to 400 of the basement area, but be at least 0.8 square meters. One hole should be no less than 15x15 centimeters. If it is larger, it will require special reinforcement when pouring, so we will make smaller vents. There must be an even number of them, and they must be located opposite each other. They should be 90 centimeters or less from the corners.
The vents should be 90 centimeters or less from the corners
If there are internal foundation strips, then they should also have vents so that there are no sealed chambers left.
There should also be vents in the internal foundation strips so that there are no sealed chambers left
It is not necessary to close the vents for the winter, according to SNiP 11-3-79 “Construction Heat Engineering”, which regulate the ratio of temperatures in the underground and outdoors. It is better to insulate the floor well.
If for some reason you did not make holes when pouring the foundation, you can punch them later with a grinder or hammer drill. But this violates the integrity of the foundation and poses a difficult task.
If the vents are not made when pouring the foundation, you can punch them later with a grinder or hammer drill
You can close the vents from mice and other small animals with special grilles.
You can close the vents from mice and other small animals with special grilles.
Pillow under the foundation
A cushion of sand, crushed stone or gravel is necessary for drainage, thermal insulation, and better placement of the mortar. For a typical strip foundation, a thickness of about 30 centimeters is sufficient.
The pillow under the foundation is clearly visible in this diagram
Waterproofing
Waterproofing can be:
- with film, lining the boards until they harden - so that the boards can then be used for other purposes (optional);
Waterproofing formwork boards during the construction of a grillage for a pile foundation - roofing material (on top) and bitumen mortar (the entire base can be used) after hardening - to prevent moisture from penetrating into the walls (it is strictly necessary, and it is better to use both materials).
Waterproofing the foundation with bitumen and roofing felt is an absolutely necessary thing in construction.
Reinforcement
Concrete is quite fragile and is unable to resist bending under uneven deformations. Reinforcement is a guarantee of the strength of the foundation, saving it from cracking and shifting.
The reinforcement diagram shows its principle and necessity
There are simple rules:
- It is better to avoid welding or use it selectively, giving preference to tying reinforcement.
Tying reinforcement contributes to greater flexibility of the foundation - The diameter of the reinforcement is 0.1% of the cross-sectional area of the tape, taking into account its length.
It is accepted that if the length of the tape is more than three meters, then the cross-section of the rod is 12 mm. Foundation reinforcement is the key to the strength of the house - There are also rules for determining the distance between vertical and horizontal rods and their number per linear meter.
Determining the distance between vertical and horizontal bars
Insulation and finishing
You should not neglect the insulation of the foundation at all - you will greatly save money on heating the house and basement, and protect the house from dampness. Moreover, you can do this while pouring it, or you can do it after it has hardened. You may be pouring with polyurethane foam formwork, but you can also lay polymer panels in regular formwork. Or sheathe the finished foundation with such panels and cladding on top.
Insulation for the Penoplex foundation - expanded polystyrene PSB-C 25 2000x1000x100mm - laid on a waterproofing film
The foundation itself can be finished with any material. There is endless scope for creativity here!
Blind area
Then, after building the house, you must make a blind area around the foundation - a strip impenetrable to water, wider than the overhang of the eaves of the house, ideally with a well-thought-out storm drainage system and good drainage. Its main purpose is to prevent water from penetrating the foundation. Water that has saturated the ground can cause heaving of the soil and cracking of the foundation. Water can get inside the basement and cause the wooden house to rot from below.
The blind area can simply be made of asphalt, concrete or cement mortar (necessarily with reinforcement to prevent cracking, on a sand or gravel bed), it can be tiled, or it can be finished with the same material as the foundation itself. Its thinnest part should be at least 5–7 centimeters thick, and it must have a slope away from the house for better drainage of water.
The thinnest part of the blind area should be at least 5–7 centimeters thick, and it must have a slope away from the house for better water drainage
Sometimes the blind area is also insulated for better effect.
Insulating the foundation and blind area will completely protect the house from the cold
Photo gallery: options for blind areas and foundation linings
The foundation is faced with colored pebbles. Rubble stone and tiles are used here. Pebble stone cladding is a cheap, but very beautiful option. Rubble stone cladding is very beautiful. The blind area and foundation can be finished with granite. Concrete blind area and stone-trimmed foundation - a competent approach. Concrete blind area and stone-trimmed foundation - a very elegant solution. A blind area finished with tiles on concrete. An asphalt blind area is also an excellent and very simple solution. A blind area trimmed with pebbles in concrete.
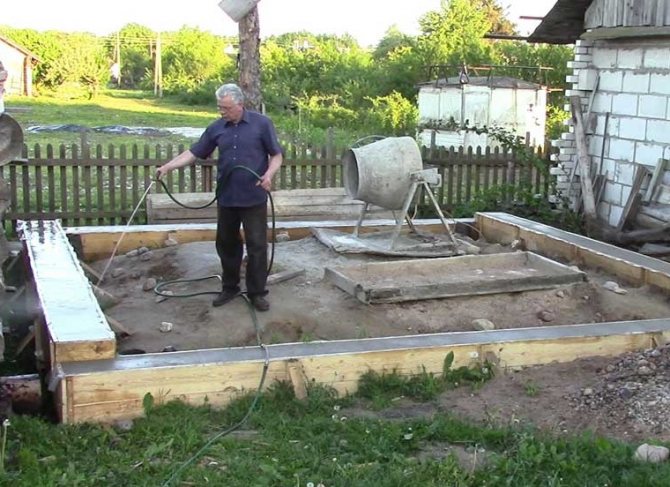
Why water concrete?
During the hardening process of concrete, special attention should be paid to moistening the composition. Why do you need to water concrete? There are a number of factors that prove this need.
- Water is the main element of cement mortar. It participates in physical and chemical processes, as a result of which it is quickly neutralized. For optimal hardening of the concrete mixture, a certain amount of moisture is required, which must be compensated.
- The hardening of cement occurs heterogeneously. The upper layers are characterized by weak exchange processes and, as a result, the unstable hardened surface quickly deforms when the concrete layer inside is still liquid. In order for the structure to gain strength, it is necessary to ensure optimally identical conditions.
- During hardening, the base decreases in volume. You can make up for losses using a dosed amount of liquid.
- Climatic conditions are a factor that has a direct impact on the formation of a durable structure. Hot air promotes rapid evaporation of water, so the foundation needs constant watering. Windy weather leads to the removal of moisture particles from the cement, which provokes the appearance of numerous cracks in the surface.
Microcracks are one of the risks when forming a foundation. Through them, rainwater, dirt and dust enter the product. As a result, the surface remains intact, but the internal part of the structure is deformed. The formation of cracks and cracks in the foundation occurs in winter with strong temperature changes. When moisture gets inside, it turns into ice, which has the properties to expand and increase the size of the crack. Swelling of the base occurs, and after the foundation, destruction proceeds to the main structure. Water is involved in hydration processes. The optimal level of moisture contributes to the development of strength characteristics.
Weather conditions during pouring
It is especially necessary to specify favorable weather conditions when pouring the foundation, since there are a lot of pitfalls when working in low temperatures.
- Regular cement mortar will not set if the outside temperature is below 50C, and your foundation will immediately begin to crumble.
- Digging in frozen ground is always unpleasant. It's just very difficult to do it manually, and when using machinery there is a risk of damaging the equipment.
- The sand and gravel cushion will be filled in poorly, because in winter both sand, pebbles, and crushed stone are in a frozen state, and it is extremely difficult to compact them well. When they thaw, the pillow will not have the required density and elasticity.
- If you want to use waterproofing of the formwork, then the film is brittle in winter, and it will be extremely difficult to do it carefully.
- The fittings have a high coefficient of thermal expansion. A reinforcement structure welded in the cold will certainly increase in size with warming.
- In addition, there is always a danger that when the temperature rises and the ground thaws, the soil will move, and this will certainly lead to shifts in the foundation and can also lead to its rapid destruction.
Pouring a foundation in winter is a dangerous undertaking
But if you are itching and you are ready to work at low temperatures, or the nature of your soil (sand) is such that winter is the only way to avoid crumbling during excavation work, then you need to fulfill some conditions so that troubles do not arise later.
- You will need special brands of cement or additives (mortar plasticizers) to reduce the temperature crystallization of water.
Antifreeze plasticizers increase the adhesion and strength of the solution, improve its contact with reinforcing structures, and reduce solution consumption. Anti-frost plasticizers increase the adhesion and strength of the solution, improve its contact with reinforcing structures, and reduce solution consumption - The solution is made not from cement and sand, but from cement and small crushed stone.
- It is necessary to especially carefully check the composition and consistency of the solution; it should not be “thin” and liquid.
- Not a single component of the solution should be frozen; there should be no ice or snow in them.
- It is necessary to heat the reinforcement structure, for which special cables are connected to it.
Heating of reinforcement structures using electrical cables - We must remember that all processes in the solution - setting and gaining strength - slow down.
Table of concrete setting at different temperatures
The figure clearly shows that the optimal temperature for pouring the solution into the formwork will be in the range of 15–250C.
Components of standard concrete
Concrete dough is relevant for the construction of strip, monolithic or columnar foundations.
Components of cement mortar
A typical concrete mass consists of the following raw materials:
- cement - has astringent properties that ensure the combination of ingredients into a single solution. To prepare a high-quality mass, you will need material marked M500;
- sand is one of the fillers of the mixture. Only bulk raw materials with uniform fractions from 1.5 to 5 mm are used. Foreign impurities are sifted through a fine sieve. To make the composition durable, use river sand;
- crushed stone is the main filler. In home construction conditions, crushed stone or gravel materials with fractions of 8 – 35 mm are purchased. To ensure a tight fit of the particles, small and large raw materials are mixed.
To prevent debris from getting into the mixture, the components are poured out on a clean tarpaulin. The binding element of the solution is water. The liquid is filtered before adding to the remaining ingredients.
Do I need to add plasticizers?
Experts recommend selecting additives to improve the workability of the mixture. Manufacturers of modern building materials produce the following products:
- ready-made slaked lime, which ensures the strength of the composition;
- plasticizers that impart fluidity or viscosity to the solution;
- reinforcing components - needed to strengthen the foundation in conditions of soil instability.
Before purchasing, it is important to study the technical characteristics and technology of using auxiliary components.

Solution calculation technology
At home, it is advisable to prepare the concrete composition manually. You will need 1 part cement mixture, 2 parts sand, 3 parts gravel, additives and water. Take into account the difference in the volumetric mass of the material and carry out the calculation in buckets: a bucket of sand will weigh 19 kg, cement - 15 kg, and crushed stone - 17.5 kg. Water is added to the ingredients and the solution is mixed until smooth. After pouring the foundation, what follows is a technologically complex physical and chemical reaction - the release of heat and evaporation of water, as a result of which an artificial stone is formed.
Foundation calculation
Of course, we have already chosen a place for the house. The humorous picture determines all the permitted places for construction on your garden plot according to SNiP.
Drawing of choosing a location for a house, taking into account all the buildings and trees on the site and the neighbor’s fence
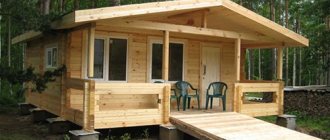
First, which is completely natural, we make a house project, relying on expert opinions or previously known data on soils and waters on the site. Choosing material for the house. We must not forget that a slab foundation occupies the entire area of the house, and a strip foundation and all types of pile foundation grillages must be under every wall of the house, even the inner one. Taking into account all the factors, we chose a one-story wooden house made of rounded logs with an area of 122 m2.
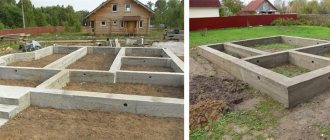
A one-story wooden house is the best project for unreliable soils, and a strip foundation that is not very deep is well suited for it.
For the house we have chosen, a non-buried monolithic concrete strip foundation is perfect, which is most often used for light wooden and frame houses. Under such a foundation, trenches for water supply and sewerage can then be laid. It is a continuous monolithic tape, buried 50–70 centimeters and protruding above the ground by 50 centimeters, the same in cross-section in all its places. Its protruding part serves as a base.
Now we need to calculate the materials for this foundation. You can search on the Internet, and you will definitely find the best and most complete calculator there.
Calculator
Do not forget that all external dimensions of the house and veranda are indicated in the center of the foundation strip, and not along its edges, and internal dimensions - according to the internal dimensions of the walls. If the number of internal walls indicated is insufficient for your project, their lengths can simply be summed up, which is what we did. The thickness of the foundation strip is set depending on our soil or our preferences.
Table: entering the necessary numbers in accordance with the house project
| Position | ||
| 1 | Main parameters (house dimensions, m) | |
| Length | 8,33 | |
| Width | 10,5 | |
| 2 | Additional parameters (lengths of internal walls, m) | |
| 1 additional wall | 21 | |
| 2 additional wall | 2,85 | |
| 3 additional wall | 11 | |
| 4 additional wall | 3,14 | |
| Length of the largest wall of the veranda | 10,5 | |
| Length of the smallest wall of the veranda | 2,84 | |
| 3 | Desired belt power | |
| Width (m) | 0,4 | |
| Depth into the ground (m) | 0,5 | |
| Base height above ground level (m) | 0,5 | |
| Thickness of sand cushion (m) | 0,3 | |
| Number of reinforcement bars per level | 3 | |
| Number of reinforcement levels per 1 meter of tape height | 2 | |
| Distance between vertical posts of reinforcement (m) | 1,5 | |
| 4 | Average prices for materials (RUB) | |
| Concrete M-250 (per 1 m3) | 3500 | |
| Sand for pillows (per 1 m3) | 500 | |
| Metal fittings D=12mm (per 1 linear meter) | 35 | |
| Edged board for formwork (40x150x6000mm, per 1 m3) | 6000 | |
After entering all the initial data, the calculator gives us an accurate calculation of the materials we need and their cost, based on current average prices.
Table: final calculation of necessary materials and approximate calculation of finances
| Position | ||
| 1 | Necessary materials | |
| Concrete M-250 | 36.7 m3 | |
| Sand | 11 m3 | |
| Metal fittings | 1030.1 m | |
| Edged board for formwork | 6.7 m3 | |
| Self-tapping screws | As needed | |
| Twine and pegs for marking | From improvised means | |
| 2 | Financial costs (RUB) | |
| Concrete M-250 | 128562 RUR | |
| Sand | RUB 5509.8 | |
| Metal fittings | RUB 36,054.8 | |
| Edged board for formwork | 40016.2 RUR | |
| Total total cost (excluding screws) | ||
| RUB 210,142.8 | ||
We will need tools:
- Bayonet and shovel shovels
- Wheelbarrow
- Manual rammer or vibratory rammer for compacting soil and sand
- Construction mixer for mixing cement (container for manual mixing)
- Welding machine for welding fittings
- Hammers
- Grinder for cutting reinforcement
- Nail puller
- Mount
- Hydraulic level or level
- Roulette
- Carpenter's meter
- Pliers
- Stitchers for finishing
- Circular saw for boards
- Electric drill for boards
- Board screwdriver
- Goats for cutting boards
Formwork calculation
Correctly carried out calculation of the formwork system allows you to find out in advance how much materials need to be used. In private construction, wood materials are most often used, for example:
- edged boards with a length of 4 to 6 meters and a thickness of 25 to 50 mm;
- wooden beam with a section of 50 by 50 or 100 by 100.
Let us give an example of calculating the number of boards for constructing the formwork of a private house. Available data:
- it is necessary to build a rectangular foundation 10 meters long and 8 meters wide;
- the height of the walls according to the project is 1.2 meters;
- The thickness of the cast slab is 30 cm.
We carry out calculations:
- First, let's calculate the perimeter of the future building or the total length of the strip foundation. In our example it will be: 8 x 2 + 10 x 2 = 36 meters;
- since during the construction of formwork forms the panels are installed on both sides, the resulting perimeter value must be doubled - 36 x 2 = 72 meters;
- the total area is calculated by multiplying twice the perimeter by the height of the cast structure. In our example – 72 x 1.2 = 86.4 m2;
- for example, it is planned to use a board 0.025 meters wide. This means that the production of shields should take the following number of boards: 86.4 x 0.025 = 2.16 m3;
- timber consumption, as a rule, is about 30% of the cubic capacity of the boards. In our example: 2.16 x 0.3 = 0.648 m3;
- consumption for fastening and losses is 10% of the main one, that is, 2.16 x 0.1 = 0.216 m3.
Thus, taking into account the inevitable generation of waste, you should purchase:
- edged boards 25 mm wide – 2.376 cubic meters;
- timber - 0.648 cubic meter.
In addition, you will need to purchase fasteners. In particular:
- ties for panels 40 cm long at the rate of 1 pin for every two meters of perimeter. In our example – 36: 2 = 18 pieces;
- for each stud it is necessary to purchase a PVC protective tube and two cone retainers;
- wire for making ties 10 meters long.
Advice! To calculate material consumption, you can use special calculators; they can be used online.
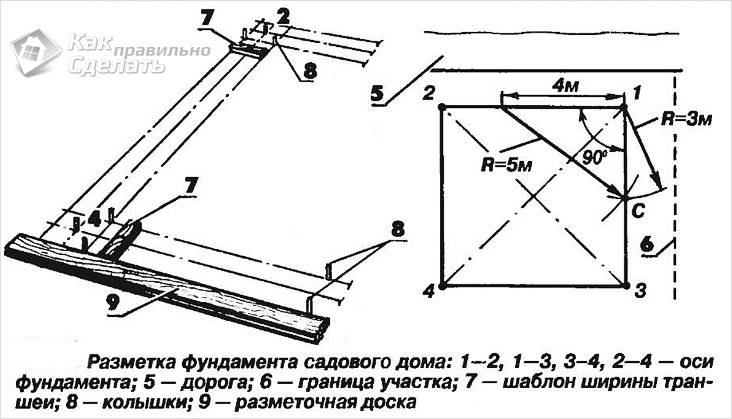
Marking and excavation work
We prepare the site: mow the grass, level the ground, uproot trees and stumps at the construction site. The construction site should be larger than the area of the house by at least a couple of meters in each direction.
We mark the trenches for the foundation strip with twine and pegs, not forgetting about the trenches for water supply and sewerage communications. The pegs must be driven in indented from the corners of the foundation so that the corners are marked by the intersection of the strings.
The height of the pegs should be equal to the base of the foundation - that is, the height to which the foundation strip protrudes above the ground.
Marking the foundation - parallel lines formed by strings are visible
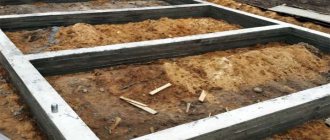
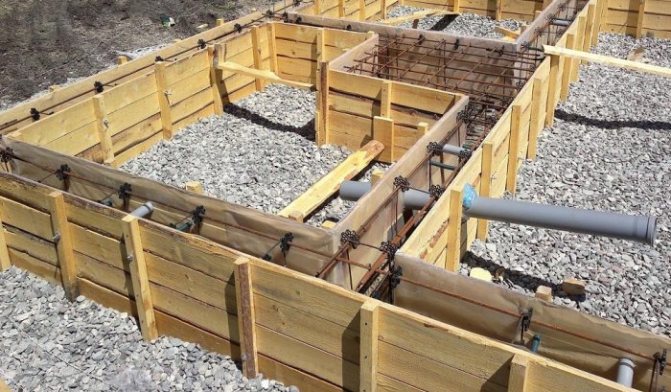
Next, we dig trenches according to the markings. We install a water supply and sewerage system. In our case, you can do without this and do this installation after pouring the tape, since it is shallow.
Trenches were dug for the foundation, water supply and sewerage
After this, you can begin installing the formwork and pouring the foundation.
Preparatory stage
Preparation before pouring the foundation for a house is of great importance. At this stage, it is necessary to mark the area for the foundation of the house according to the previously drawn up drawing. The depth and thickness of the foundation, its location on the site depends not only on the terrain, but also on the composition of the soil. For example, swampy or clayey soil requires a pile foundation, unstable soil requires a monolithic foundation, and a strip foundation is suitable when there is mixed soil.
Foundation marking scheme
Marking is carried out using rope and pegs. Having selected the desired type of foundation and made the markings according to the drawings, you can begin to organize the holes for the foundation. For a pile foundation with round piles, you must use a manual or electric drill; for a strip foundation, you must use a shovel and a drill if it is not possible to use special equipment. To obtain a monolithic foundation you will need powerful construction equipment.
DIY pouring
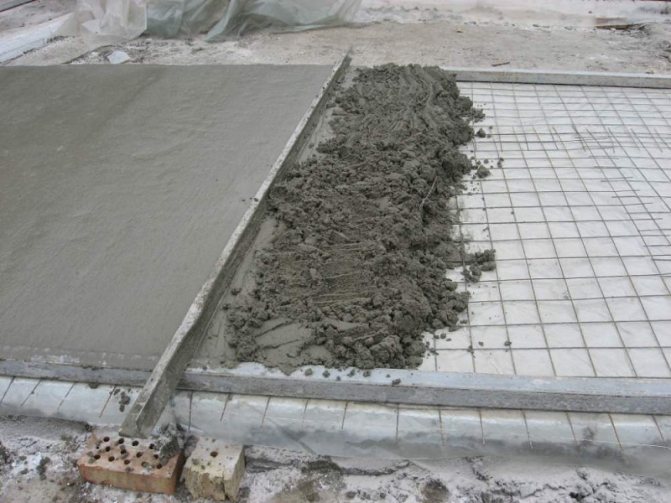
- A sand cushion 30 centimeters thick is poured.
The sand cushion under the strip foundation serves for drainage and leveling - It is spilled with water and compacted with a tamper or vibratory rammer.
The sand or pebble cushion under the strip foundation is compacted with a vibrating rammer - The edged board is sawn onto the formwork according to the required dimensions.
- The formwork is installed as high as the future base of the house, guided by the string.
Its uniformity in height is carefully verified using a hydraulic level or laser level. The formwork is installed as high as the future base of the house, guided by the string - You can waterproof the formwork with plastic film.
Insulating the formwork with film is done to keep the boards clean - We lay the reinforcement according to the calculation.
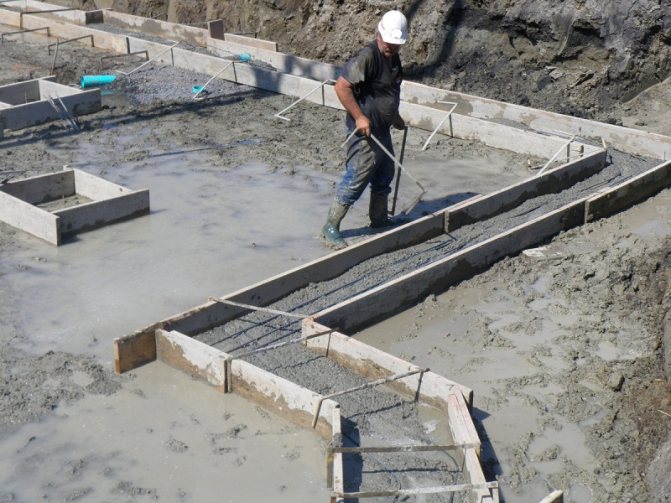
Reinforcement in concrete is a guarantee of the strength of the foundation, saving it from cracking and shifting - Mix the solution according to the calculation for the selected brand of cement in a mixer or manually.
Mix the solution according to the calculation for the selected brand of cement in a mixer and pour it into a wheelbarrow - We pour it inside the formwork. We mix it there with a stick or a vibrating rammer to avoid unfilled voids and air bubbles. This must be done in one day, otherwise the foundation will be fragile due to its ability to quickly “set” the solution.
- We make vents according to calculations.
For this purpose, ordinary sewer pipes of suitable diameter are often used. To create vents when pouring, use ordinary sewer pipes of suitable diameter - Using a trowel, level the surface of the fill.
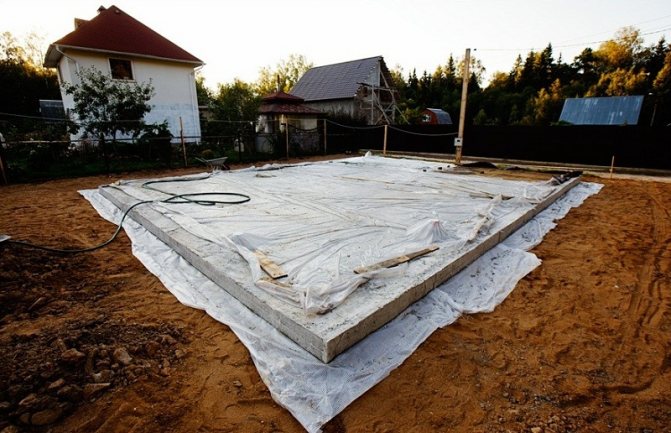
Level the filling surface with a trowel - We cover the foundation with plastic film. Under the film it must be constantly moistened.
- The formwork can be dismantled after a week.
But cement will reach its maximum strength only in a month. The cement will reach its maximum strength only in a month - After a month you can do waterproofing.
You can simply lay the roofing felt overlapping, or better yet duplicate it by coating it with hot bitumen. The edges of the roofing material must be trimmed so that they do not droop. After a month, you can make waterproofing from bitumen and roofing felt - We begin to assemble a log house on the foundation.
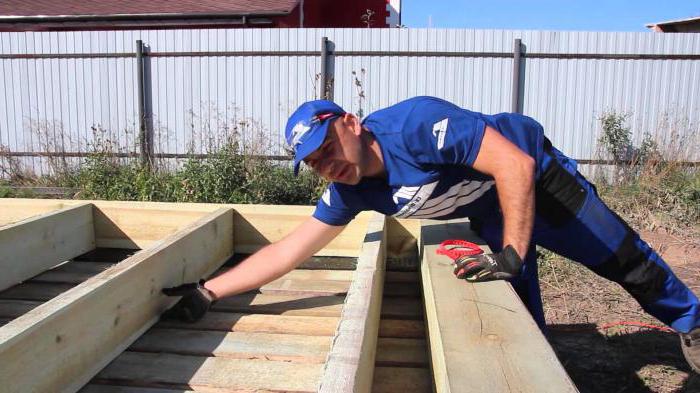
We begin to assemble the house on the finished foundation
Features of proper concrete care
Proper care of a concrete structure involves ensuring optimal conditions for hardening. They depend on climatic conditions, type of cement, type of product, etc. How many days does concrete need watering? This indicator is determined by the rate of hardening of the mixture for the following types:
- the structure, made of slowly hardening cement, needs to be wetted for about 4 weeks;
- Portland cement products - 2-3 weeks;
- systems made from aluminous quick-hardening concrete require about 8 days.
In the first day after pouring, it is better to cover the foundation with burlap or wet sawdust to protect it from overheating and slow down the evaporation of water.