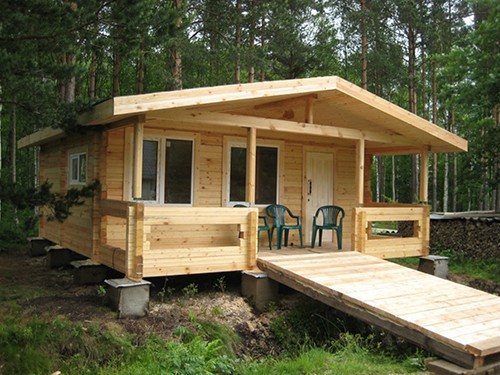
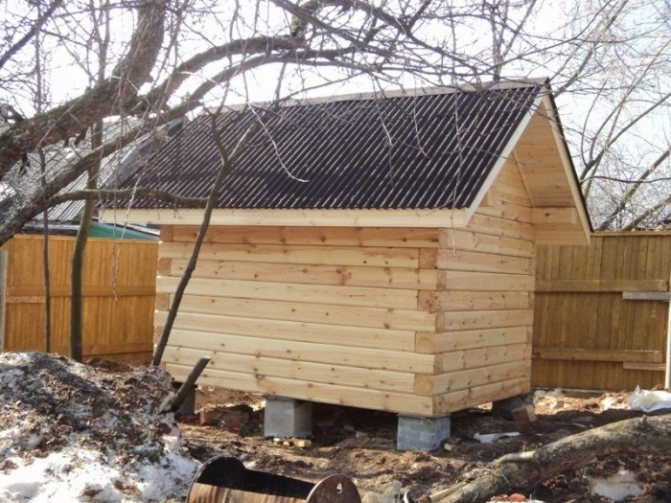
It’s always nice to have your own bathhouse near a private house or on a summer cottage. Building a bathhouse can be quite expensive. But if you have a small budget, this does not mean that you need to deny yourself the pleasure of visiting the bathhouse. Many people build a frame bathhouse or from timber; this design is quite inexpensive and light, so there is no need to spend money on a complex and expensive foundation; you can make a regular columnar foundation.
Bathhouse on a columnar foundation: structure and design features
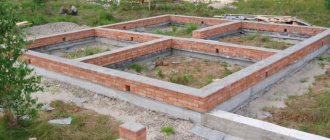
A columnar foundation is a structure consisting of pillars located along the perimeter of the future building. They are located in the corners of the building, at points where internal partitions pass, and in places with significant load. Typically, the pillars are placed at a distance of 1.5-2 m. The exact value depends on the material from which the bathhouse will be built. The heavier it is, the smaller the distance between the pillars.
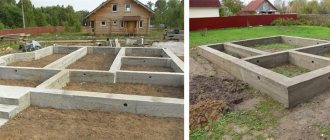
To make the structure more reliable and rigid, individual pillars are connected with grillages, which in the future will also be useful for installing the base.
Columnar foundation for a bathhouse. Video:
Ground work
Whatever material you choose for the support pillars, the method of installing them will be similar, with the exception of the foundation with a grillage.
The installation depth of the support pillars depends on:
- soil type;
- soil freezing depth;
- depth of groundwater location.
You can determine the groundwater level, as well as the type of soil, by digging a hole 1-1.2 m deep. If the soil is not heaving, that is, it does not freeze deeply, and also if groundwater is not found, then this foundation depth is considered optimal.
But if the soil contains clay (heaving soil), then you should measure the freezing depth and dig a hole under the foundation 40 cm deeper than this level. Note that the more clay, the deeper the ground freezes.
If these conditions are neglected, the columnar foundation for the bathhouse poured with your own hands will collapse very quickly.
Support pillars should be located at the corners of the building, along the entire perimeter, at the intersections of walls, under partitions, at a distance of 1.5-2 m, depending on the weight of the structure.
Recesses for posts can be made either with a shovel or with a special drill, which makes holes with perfectly smooth walls.
Depending on the material, the thickness of the recesses for the support pillars may vary, but in any case it should be 7-10 cm wider.
The optimal thickness of the columns made from various materials is as follows:
- 50×50 – for brick and stone columns;
- 60×60 – columns made of rubble stone;
- Ø200 mm – asbestos cement pipes;
- 30-35 cm2 – supports made of reinforced concrete;
- 25-30 cm2 – for intermediate posts.
Under each post, at the bottom of the hole, you need to lay a sand cushion, that is, a covered layer of sand, filled with water and carefully compacted. Next, we’ll tell you how to make a columnar foundation for a bathhouse.
Columnar foundation for a bathhouse: advantages
- possibility of installation on difficult terrain, for example, in hilly areas;
- inexpensive cost, which helps reduce the price of the entire bath;
- quick installation. The construction of a columnar foundation is quite simple, it can even be done in one day;
- ease of installation. Even a master without experience in this field can handle the construction of a columnar foundation. You just need to know how to mix concrete and use a level;
- Possibility of installation on unstable soils, as well as on soil with a large freezing depth. The strip foundation must be installed below the soil freezing level, but when this indicator is too high, the cost of the foundation increases significantly. In this case, it makes more sense to make a columnar foundation;
- the drawdown is lower than that of a strip foundation.
Installation of pillars
The next step is to install the pillars:
- First, the soil is compacted at the bottom of the created pits.
- After this, a sand cushion is created. About 15 cm of sand is poured into the bottom of each hole. The material must be moistened with water and compacted. If this is not done, shrinkage of the bath may occur.
- At the next stage, crushed stone is poured. After backfilling, it is necessary to compact the material; the layer thickness should be about 15 cm.
- After this, the material is poured with concrete to a height of about 20 cm. If the structure is wooden, the reinforcement frame is not installed.
- After the concrete hardens, the pillars are created. If they are built from brick, the material is laid directly on the concrete base. If concrete pillars are used, after they are installed, the space around them is filled with crushed stone. To ensure the durability of the base, it is necessary to waterproof the pillars. Typically, roofing felt is used for this. This material reliably protects from moisture and has a low cost.
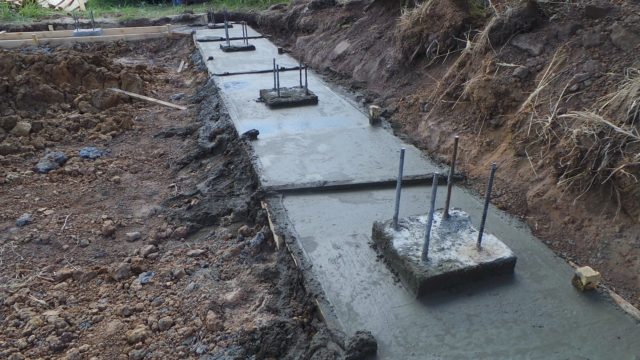
- In order for the load to be evenly distributed across all pillars, they are connected by a concrete grillage. You can make such a design yourself. To do this, a wooden formwork is created on ready-made supports, after which a reinforcement cage is installed into it, which is subsequently filled with concrete.
Columnar foundation and its types
According to the manufacturing method, there are two types of columnar foundations: monolithic and columnar.
A monolithic foundation is a single and seamless structure made of reinforced concrete; its technology resembles a strip foundation. A monolithic foundation has increased strength, but its installation is more complex, since formwork and reinforcement need to be done.
The columnar foundation has separate supports. This option is more popular because it is much cheaper and is also easy to install. It may also include the presence of a grillage, i.e., a special strapping that makes the structure stronger.
Depending on the type of supports, there are also several types of foundations:
- wood;
- brick;
- concrete;
- rubble concrete;
- reinforced concrete;
- blocky.
Wooden foundations are rarely made, since this material has the least strength. If you still decide to use it, then treat the material with an antiseptic and provide it with reliable waterproofing.
The most popular options are concrete and brick. Such designs are reliable and durable. They are also a great option if you are planning to do the foundation yourself. Foundations made of concrete and brick have a long service life, they are reliable and durable.
We recommend reading:
Warm floors in the bathhouse: types and features. How to make heated floors in a bathhouse?
Depending on the depth, a columnar foundation can be:
- buried;
- shallow.
When constructing a buried foundation, the supports are located 0.5-1 m below the soil freezing level. The foundation is built on clay soil, where there is a lot of water.
A shallow foundation is made at a depth of 0.4-0.7 m. It is usually installed on rocky, sandy and heaving soils. The main feature of this type of foundation is that the pouring depth should be approximately 20-30% less than the freezing level of the soil.
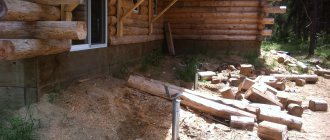
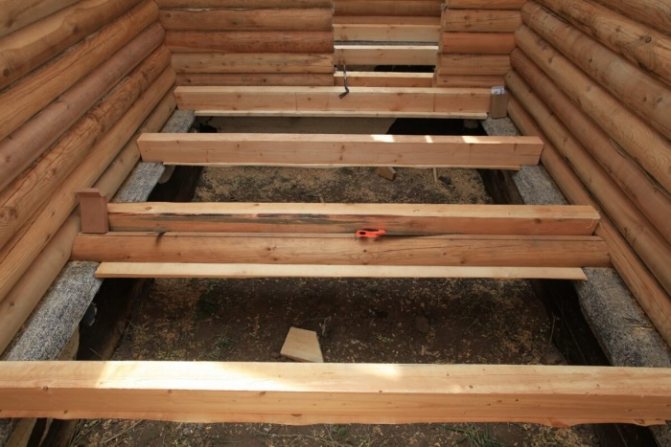
Bathroom floor installation
After the foundation has been erected and the walls have been erected, you can begin installing the floor in the bathhouse premises. To install the floor, special logs are installed that rest on the grillage.
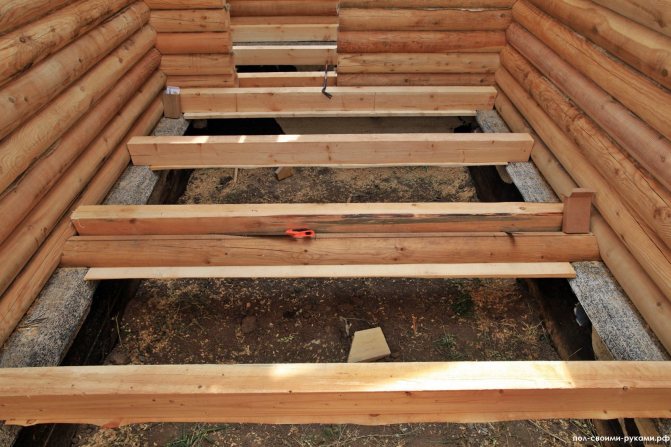
When installing the floor in a bathhouse on a columnar foundation, it is best to use double logs. The installation of a floor in a bathhouse on a columnar foundation can be as follows. Insulation with a material thickness of 100 mm is mounted on the lower joists. A slotted floor is laid on the upper joists. A tray is installed between the joists to collect water. A drain is connected to the pallet and removed beyond the foundation of the bathhouse. The pallet used in the floor construction must be leak-tight.
When arranging the floor, care must be taken to ensure that the floor is protected from the effects of high humidity coming from the ground. For this purpose, a waterproofing membrane and vapor barrier material are used. Foam can be used as insulation when installing the floor. When using polystyrene foam, the use of a waterproofing membrane is optional.
The water collection tray can be made from galvanized metal sheets, which are fastened together using blind rivets. All joints in the pallet are treated with waterproofing mastic, which protects it from corrosion.
How to make a columnar foundation for a bathhouse
Stage 1. Preparation
There are several types of columnar foundations; before choosing the appropriate option, you need to carefully study the soil. To determine the groundwater level, you need to dig a small hole in diameter about 1 m deep. If there is no groundwater at this level, and the soil itself is not heaving (without clay), then this depth will be quite enough for the pillars. Otherwise, you need to dig further, and the pillars must be placed at the level of freezing depth, increased by 0.4 m.
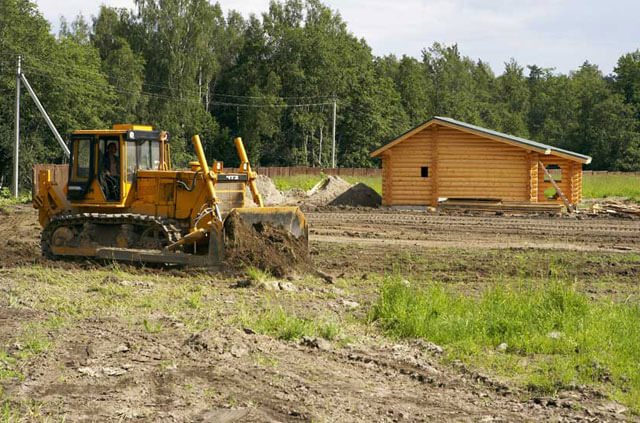
Afterwards, you need to prepare the territory itself: clear it of debris, trees, and bushes. To remove grass cover, it is best to cut off the top layer of soil (about 30 cm).
The area should be as level as possible, so all holes should be filled with sand or gravel, and the hillocks should be leveled.
Stage 2. Marking
Next, based on the design of the bathhouse, you need to decide where the foundation will be located. For marking you will need pegs and rope. The pegs need to be inserted into the ground in the corners of the future building, and then connected with a cord.
Check the evenness of the corners with a square, and also measure the diagonals. The difference in their length should not exceed a few centimeters, otherwise the marking will need to be done again.
Don't neglect this step! Make sure the markings are as even as possible. If the foundation turns out to be crooked, then the entire bathhouse will also be uneven! And this will lead to a decrease in its service life.
Stage 3. Preparing the pits
Pits should be made in the corners of rooms, under load-bearing walls, and also along the perimeter at a distance of 1.5-2 m. To prepare holes, you can use a cone-shaped drill or an escalator. If you don't have one, no worries, you can make holes by hand using a shovel.
The depth of the pits should be 0.2-0.3 m greater than the planned depth of the foundation, since sand backfill will need to be made.
The width is taken to be approximately 0.1 m larger than the width of the supports, so that you can easily insert the reinforcement cage.
At the bottom of each hole you need to make a sand cushion: fill it with a layer of sand about 0.2 m, add a little water to it, compact it.
Stage 4. Installation of pillars
As already mentioned, different materials can be used for columns; the installation of each of them has its own characteristics.
Columnar foundation for a brick bath
This is the best option for people with little construction experience. On top of the sand cushion you need to pour a concrete base, reinforced with reinforcement. To do this, you need to use reinforcement with a diameter of 12-14 mm.
You need to leave the concrete for a few days to dry, and then you can start laying bricks. Solid ceramic bricks are suitable for the foundation.
We recommend reading:
Bored foundation: features, advantages and disadvantages. DIY bored piles
The service life of the foundation can vary, it depends on the quality of the brick and masonry, climatic conditions, on average it is 50-100 years.
The bricks must be laid in a strictly vertical column; it is recommended to use cement mortar for masonry. Check each laid out “floor” with a level, this will help make the post as even as possible.
To increase the reliability of the foundation, make a reinforcing mesh every 3-4 rows.
Afterwards, the brick must be covered with a waterproofing material (roofing felt with hot bitumen or mastic).
Leave to dry, and after a week, cover the pillars with earth and compact them thoroughly.
Columnar foundation for a bathhouse made of blocks
To install this type of foundation, you need to use concrete blocks measuring 20x20x40 cm. They are laid similarly to bricks, but still have several differences.
Since concrete blocks are heavier, it is better to make the sand cushion thicker, not 0.2-0.3 m, but 0.5-0.7 m.
Next, you need to lay two blocks side by side. The next row also consists of two blocks, but they must be placed perpendicular to the previous ones. Then repeat in the same way until the pillars are 0.2-0.3 m above ground level.
To protect the seams and blocks from moisture and temperature changes, they must be covered with waterproofing material.
The gaps around the blocks must be filled with earth and compacted.
Columnar foundation for a pipe bath
To build this type of foundation, pipes with a diameter of at least 20 cm are needed; they can be metal or asbestos-cement. To protect pipes from moisture, they need to be wrapped in roofing felt with bitumen, treated with mastic or covered with waterproofing material.
The pipes must be lowered into the pits strictly vertically, the pillars must be 0.4 m above the ground level. The gaps on the outside of the pipes must be filled with earth and compacted.
To strengthen the foundation you need to make reinforcement. To do this, reinforcing bars are stuck into the pipes, which should be higher than the pipes themselves. Afterwards, concrete is poured into them step by step.
First you need to pour it into about 1/3 of the pipe, then lift the pipe a little so that it is distributed along the bottom.
Then fill the pipe with concrete to approximately 0.2-0.3 m in height and compact it with a vibropress. Repeat the procedure until the pipe is full.
Leave for 1-1.5 weeks for the concrete to dry.
Territory marking
In order to avoid mistakes during the installation of the foundation, it is worth carrying out all the work in stages, paying attention to each action. First, calculations are made and a drawing is created. It is best to entrust this work to specialists to avoid mistakes. If the calculations are made incorrectly, the foundation will not withstand the load and the structure may deform. To perform all the steps correctly, it is worth watching a video on how to create a columnar foundation for a bathhouse.
After creating the drawing, you can begin marking the territory. Transferring the drawing to the construction site occurs as follows:
- First, the site is leveled. It is not necessary to create a completely flat surface. But it is better to make the height differences insignificant. This can be done either using construction equipment or manually.
- After this, pegs are driven into the ground. They are placed in places where the corner supports of the building will be located. First, two pegs are driven in, the distance between them is equal to the width of the pillar being installed. After this, two more are installed on the opposite side. Cords are stretched between them. In this way, a marking of the external perimeter of the future building is created. Pegs are installed in other places in the same way. Where the cords intersect and form squares, foundation supports will be installed.
- After this, several holes are created according to the markings. Their depth is determined by the depth of soil freezing and the weight of the structure. It is important to consider that the pillars must be evenly distributed under the bathhouse so that the same load is applied to each of them. If the distance between adjacent supports is more than 2 meters, it is worth installing another pillar between them.
- The depth of all created holes must be the same.

It is more convenient to create holes using a drill. But in the absence of this tool, you can carry out all the work with a shovel.
Construction of a load-bearing building structure from various materials
Initially, the question arises of choosing a suitable and accessible material. The columnar foundation is made of:
- From wooden pillars - logs with a diameter of 200 or maybe timber using insulating materials and treatment with antiseptics. Least durable. Practical if the structure is being built for a period of up to 10 years;
- Made of brick, the size of the columns in plan is 380x380, stone 500x600;
- Made of concrete blocks 400x400;
- From steel pipes or asbestos-cement pipes filled with concrete;
- Made of monolithic concrete 400x400.
A bathhouse on a columnar foundation is being built on a prepared site; below are step-by-step instructions for its construction.
Preparation of work
First, the site is cleared of debris and graded. The top plant layer, at least 30 cm thick, is cut off. If necessary, the site is drained to drain the water. On clay soil, gravel-sand preparation of the required thickness is arranged with leveling. If there is a large difference in height between the sides of the site, it is necessary to level the surface to avoid distortions of the walls.
The plan of the bathhouse is transferred to the land using a tape measure, level, stakes and twine, marking the axes of the building.
Excavation
The laying depth of non-buried columns, as a rule, is from 40 to 50 cm; it should be less than the soil freezing depth by one third of the value.
It is typical for a recessed columnar foundation that the supports are laid to a depth less than the freezing depth by 50-70%. So, if the soil has a freezing depth of 1.2 m, then the laying depth should be from 60 to 80 cm.
Holes for supports are dug manually or using a drill. Their depth is greater than the calculated backfill depth by the thickness of the sand bedding. The cross-sectional size of the pits is made larger by 10-15 cm for ease of installation of the reinforcement frame and formwork.
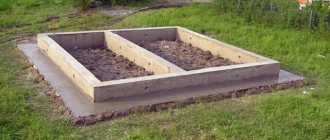
Strip foundation made of blocks - work algorithm
- Clear the construction site, remove the top fruit-bearing layer, dig a trench slightly wider than the block.
- Fill the bottom of the dug trench with sand to a depth of 20 cm; this can be done using crushed stone, level it and compact it.
- Lay roofing material on top in two layers.
- Carry out waterproofing.
For relatively heavy structures, a strip foundation will be a more reliable support.
Today, concrete foundation blocks are a popular material and are in demand. This option is economical and reliable. Concrete blocks are suitable for building foundations on most soils.
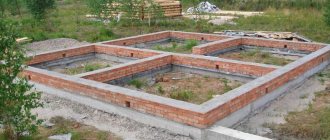
Concrete foundation
A concrete bathhouse foundation is more reliable than other types of foundations. The formation of a monolithic structure involves the implementation of preparatory measures and excavation work in accordance with the general technological process.
Concrete columnar foundations are characterized by high strength and durability
Then you need to perform the following operations:
- Using wire, assemble frames based on longitudinal rods with a diameter of up to 14 mm and cross-sections of round or square cross-section from 6–8 mm reinforcement.
- Assemble formwork made of wooden boards or chipboards, fixedly installed in the locations of the completed pits.
- Prepare a concrete solution based on traditionally used components - Portland cement grade M400, sifted sand, medium-fraction crushed stone and water.
- Fill the base of the prepared pit with a gravel-sand composition 20 cm thick, compact the mass, and cover it with roofing material that retains moisture in the solution.
- Load the pre-prepared reinforcement frames into the formwork assembled in pits, ensure the immobility of the structure and fill it with M400 concrete mortar.
- Vibrate the concrete mass to remove air bubbles, cover the finished support with plastic film to ensure normal cement hydration.