The quality of the foundation is the main criterion in the successful construction of any structure. When building a small country house or bathhouse, there is a need to choose the right type of foundation, because the reliability of the entire building depends on it. To do this, you first need to analyze
survey the area where construction is planned.
For example, near a reservoir, it is advisable to use a structure with supports that raise the structure above the ground, which will prevent possible flooding.
If there is no such threat, then it is much more profitable to build a simple brick foundation. Both options do not require any deep knowledge and skills in construction, which means that even a novice master will not have any difficulty in laying the foundation.
Plastic pipes
One of the most economical materials with a number of advantages. A columnar foundation made of plastic pipes is the simplest and most inexpensive option.
- Availability. Standard sewer pipes that are not expensive are perfect.
- No transport difficulties. The lightness of the material and its availability in any hardware store make it easy to deliver to the site by personal transport.
- Ease of processing operations. They are cut with ordinary tools and do not require additional physical effort during installation.
- Resistant to corrosion, rotting, and temperature changes.
Let's consider the pros and cons of ondulin roofing.
Let's get acquainted with ecowool material.
Waterproofing
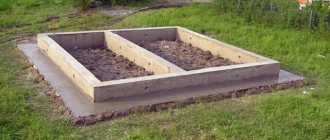
A month after the foundation is erected, the pillars are provided with waterproofing. In order to insulate the underground space, remove debris, etc., a fence is installed that encloses the wall located between the supports. It is possible to use different materials, but in most cases preference is given to brick or stone. There is also a concrete screed between the pillars, which serves as the base.
First, a concrete screed consisting of a frame and formwork is placed on a sand bed. After this, a intake is installed in which the technological windows necessary for supplying communication pipes are made. The supports are not connected to the pick-up, as cracks may appear as a result of uneven settlement. The height of the pick-up ranges from 40 cm or more. If this indicator is less, the resistance to moisture decreases.
The shallow columnar foundation provides several methods of waterproofing:
- alternating a layer of bitumen and roofing felt on the top of the pillars and the fence;
- The cement mortar is sprinkled with dry cement (2-3 mm), and after hardening, roofing felt is laid.
When hydrolyation is ready, the pillars are sprinkled with soil, then it is compacted.
Blocks
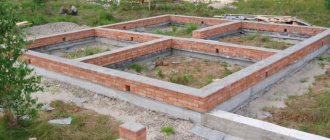
The most common masonry material for the load-bearing elements of a columnar prefabricated foundation is building blocks . You can use almost any variety, but the best option would be blocks made of heavy concrete with an expanded clay component. They have the following characteristics:
- The standard size is 20 × 20 × 40 cm. This allows you to get by with less. Up to 10 blocks are needed per pillar.
- High strength.
- They are not afraid of groundwater and temperature changes.
- Can withstand buildings of greater mass.
- Durable.
Which brick to choose for building a foundation?
Professionals recommend choosing solid red brick. This is due to its qualities, namely moisture permeability and strength.
The only difficulty in constructing such a foundation lies in the fact that a vertical excavation in the ground is required when laying bricks. If the terrain is uneven, then the mobility of loose soils will cause the entire structure to shift.
The advantage of solid red brick is its frost resistance, and it does not deform due to temperature changes.
Asbestos pipes
A type of pile construction. The advantages of a columnar foundation made of asbestos pipes include:
- There is no need to dig large pits.
- Simplicity of the installation process.
- Availability of materials and equipment.
- High speed of construction.
- They do not depend on temperature fluctuations, groundwater and decomposition processes, which makes the columnar foundation made of pipes durable.
Features of using different materials for pillars
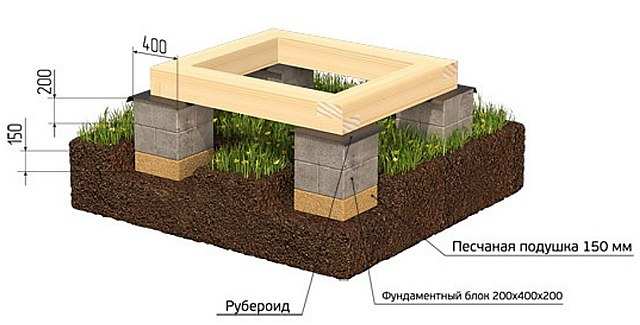
In the process of building a house made of wood, it is worthwhile to provide foundation blocks on the ground, which makes the work easier. In the future, it is on them that the building is installed. This construction method can be used in the case of non-heaving and slightly heaving soils. If heaving is inherent in the soil, but a decision is made to build a shallow columnar foundation, the load can be reduced by creating a cushion of sand, which is sprinkled on the soil.
The supports are made from ready-made foundation or wall blocks. Pillars can be made of brick in the form of masonry or concrete. When making supports from bricks, it is not recommended to use ceramic and silicate materials, which have low frost resistance.
If there is rocky or coarse soil, the pillars are mounted on hard sections of the soil, and unstable fragments are first removed. It is possible to use steel or asbestos pipes to create supports.
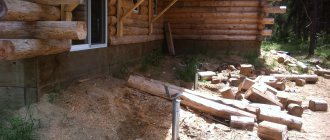
Sometimes it makes sense to use wood to make pillars. In this case, oak or pine logs with a diameter of 20 cm are used. However, such material has significant drawbacks, which are expressed in fragility. Wood can rot when exposed to moisture and can be destroyed by insects living in the soil.
Thus, before using such supports, it is recommended to treat them with special oils or tar.
To protect the foundation from groundwater, waterproofing is required. For this, bitumen mastic, roofing felt and other materials are used, which are placed at the junction of the building with the foundation.
Depth.
The depth of embedding of the pillars depends on several factors.
- Priming. Soil composition, presence of groundwater and freezing depth, criteria affecting the embedding of pillars. They depend on the location of the building site. If there is no reliable information in the technical documentation, you can determine these indicators yourself. It is necessary to dig a hole, reaching the “incompressible” layers. This will show not only the required size of the pillars, but also the possibility of flooding. Dimensions range from 50 cm to 2 m.
- The mass of the object. The more massive and heavier the future building, the greater the embedment depth should be. Pillars recessed by 50 cm can become a reliable foundation for an average veranda, gazebo or extension.
- Type of columnar foundation. Pipe bases require a different embedment depth than concrete or block posts. In the case of stone pillars, this figure increases.
Technology for the production of columnar foundations on heaving soils
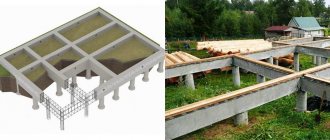
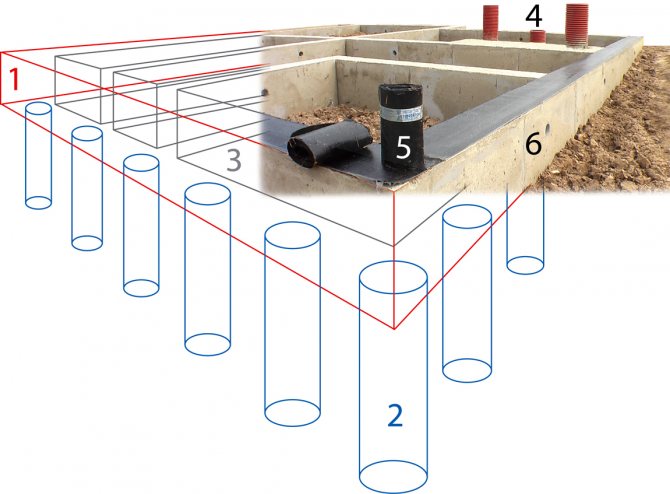
Installation diagram of a columnar foundation.
The technology of arrangement comes down to solving a number of problems:
- Design, calculations.
- Applying special markings to the soil surface.
- Excavation work.
- Production of monolithic concrete pads.
- Arrangement of formwork for support columns.
- Pouring with concrete mortar.
- Tying monolithic columns.
If a developer wants to build a shallow foundation on heaving soils on his own, he should know that design, compilation of a list of necessary building materials, and foundation calculations are carried out at the beginning of construction.
First, the freezing height of the soil in a given area is determined and its density is calculated. Having received data on the freezing depth, note the height of the concrete column, taking into account the fact that the monolithic pad should be below the frost line.
The procedure and example of calculation are presented in this material.
The cross-section of concrete pillars often has the shape of a square with sides of 25 cm, but other shapes are also found depending on the design features of the building. The amount of concrete mixture required to produce a monolithic pillar is calculated using the formula. Concrete mortar for the support pad is also added here.
Number of pillars
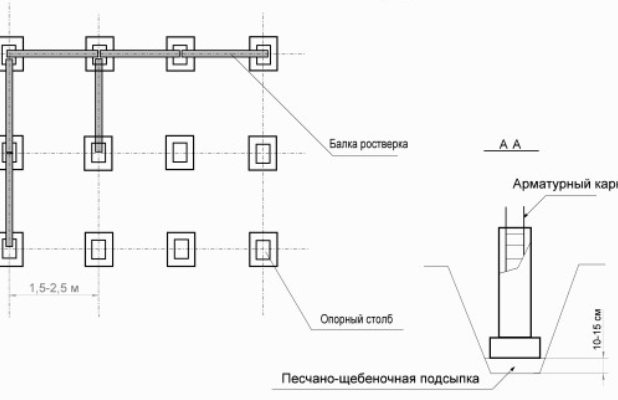
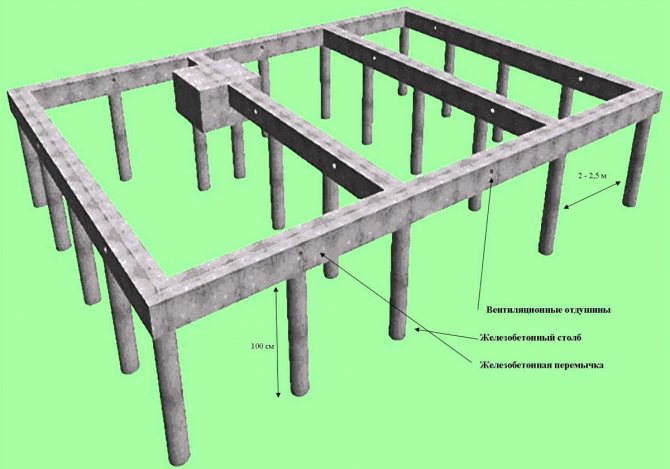
The technology for installing a columnar foundation involves installing pillars at the corners of the building and in the middle of each wall. The best option is a post every 1.5 - 2.5 meters in all directions. The heavier the future structure, the lower this figure.
Self-construction of a columnar foundation while maintaining high performance characteristics is a very real process. Compliance with all technologies and subtleties of production stages is the main condition for obtaining a reliable and durable base.
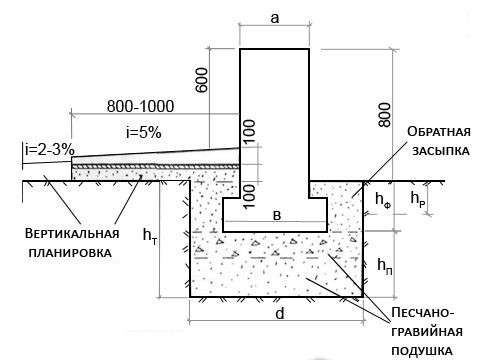
Approximate drawing of a columnar foundation
Calculations
Before proceeding directly to the construction process, it is necessary to perform certain calculations. First, the level of freezing is determined, as well as the density of the soil in the area where work is planned to be carried out. This is done experimentally; you can ask for help from specialists. Then you should calculate the length of the support, taking into account that the concrete pad underneath should be placed below the freezing level of the soil.
When calculating the number of pillars, as well as the distance between them, the load exerted by the building plays a decisive role. Monolithic supports are approximately installed at intervals of 1.5-2 m. First of all, the pillars are located along the main nodes (corners and other places where the load is more significant). After this, the remaining supports are included in the project.
Stages of work
The entire process of constructing a columnar foundation consists of several mandatory sequential stages.
- Preparation The area is cleared and leveled. Marking is carried out and the turf layer is removed. It is necessary to maintain horizontality and accuracy of angles using measuring construction tools.
- Excavation work According to the markings, pits are dug for pillars (pedestals). A cushion of a mixture of crushed stone and sand 20 cm high is poured into the bottom of the pit. It is compacted as much as possible. For waterproofing, you can use roofing felt. A piece corresponding to the dimensions of the pit is laid on top of the backfill.

- Laying The cabinets are laid out in the standard way with the seams bandaged. You can use ordinary cement mortar as a binder, but it is better to use ready-made adhesive mixtures. They have the best indicators of strength, frost resistance, ductility and durability. The middle of the structure is filled with a solution into which reinforcement with a cross-section of 10 - 12 mm is inserted. This will increase the strength of the pillars in case of deformation. The cabinet rises 30–40 cm above the ground. It is very important that all the pillars are at the same level.
- Finishing After hardening, the pillars are waterproofed using roofing felt or similar material. All cavities and voids are carefully filled with soil.
- Grillage To increase strength and durability, the entire structure is held together with a grillage. It can be wooden or reinforced concrete. Wooden beams are mounted together with a groove fastening and supported on poles. For the reinforced concrete version, formwork is carried out, a reinforcing stiffening belt is welded, installed inside the formwork, and filled with concrete mortar.
Reviews about wood concrete blocks - we make and use them.
Advantages of expanded clay concrete blocks. Selecting material for construction.
Buying an electric boiler for a private house: https://zg-dom.ru/kommunikatsii/otoplenie/pokupka-elektrokotla-v-chastnyj-dom.html
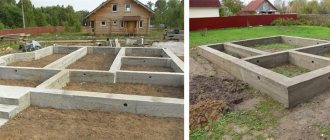
Advantages and disadvantages of a columnar recessed foundation
Shallow columnar foundation
Let's describe the advantages:
- Reducing costs when performing excavation work. There is no need to additionally involve construction equipment.
- Pouring concrete is carried out with minimal labor costs.
- The consumption of metal rods for frame reinforcement is relatively small.
- Making a pillar foundation on heaving soils takes little time.
- When mail freezes, such a base has excellent stability.
A shallow columnar foundation also has disadvantages:
- When constructing any structure that is based on a shallow columnar foundation, the type of soil should be taken into account. It is not recommended to build a home on too loose soils or wetlands.
- Minor destruction of the foundation, the appearance of chips, cracks indicates the need for immediate repair work.
These are the main weak points of the columnar base. If the entire technological process of producing such a foundation is carried out professionally, then the service life of the structure will be more than fifty years.
The shallow columnar foundation has a modification. This is a columnar-ribbon analogue, often used in the construction of stone houses. The advantages of such a foundation include high levels of stability and durability along with great stability.
Construction of houses
32 votes
+
Vote for!
—
Vote against!
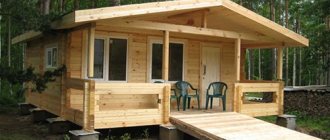
The foundation is the support of the entire house; the durability of the entire building depends on its design and strength. When choosing the type of foundation for country houses, our compatriots play it safe and lay a strip foundation. You can easily verify this by taking a tour of the gardens. But such measures are completely unnecessary. For light buildings, such as wooden, frame, frame-panel houses, a column-type foundation is more suitable. In addition, indications for its use are soils supersaturated with moisture, sandy soils, peat, swampy soils and those where frost heaving forces can push out or damage the strip foundation. You can build a columnar foundation with your own hands in an extremely short time, without involving heavy equipment and a team of workers.
- Construction of a columnar foundation
- Columnar foundation: drawing, calculation and diagram
- DIY columnar strip foundation
- Excavation
- Arrangement of pillars
- Arrangement of a lightweight strip foundation
- DIY columnar foundation
- Excavation
- Construction of a columnar foundation
- Do-it-yourself columnar foundation: video instructions
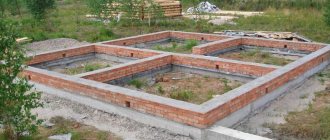
Construction of a columnar foundation
A columnar foundation consists of pillars - supports buried in the ground and protruding outward. The top level of the pillars must be the same. A grillage is installed on top of the pillars to connect the supports and distribute the load evenly. The pillars must be placed at each corner of the building, as well as at the intersection of walls and in places where the maximum load is applied.
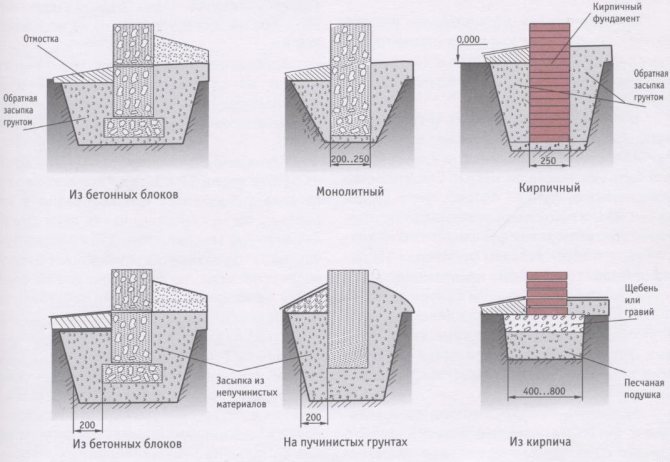
The material for the pillars can be wood, brick, concrete, concrete blocks, asbestos-cement or metal pipes, as well as rubble stone.
Wooden poles are used extremely rarely today, as they are short-lived. But under light wooden buildings or terraces it is quite acceptable to install a columnar foundation made of wooden posts. The diameter of such pillars should be 0.15 - 0.2 m. Before deepening, they must be treated with special preparations and impregnations that prevent rotting and prevent combustion. Bitumen mastics can be used as a waterproofing material.
Iron ore brick , fired in a kiln, is used for shallow or non-buried columnar foundations. The width of the pillar must be at least 0.38 m.
Concrete reinforced pillars are the most common and reliable option for a columnar foundation. They can be either monolithic or constructed from ready-made concrete blocks. The width of the pillars should be 0.4 m.
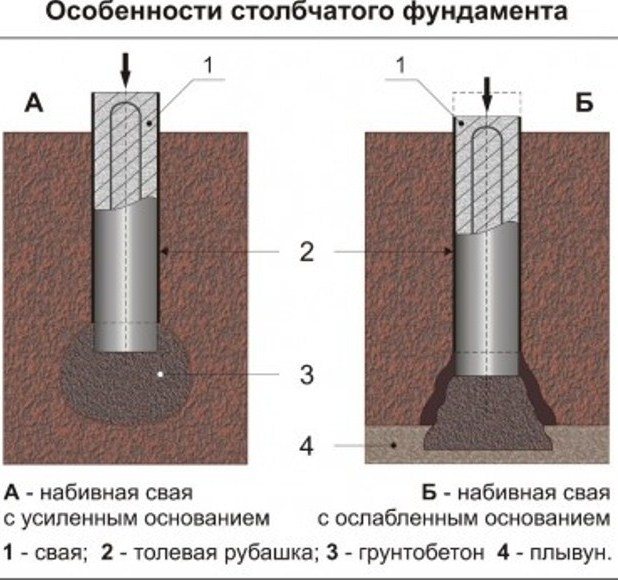
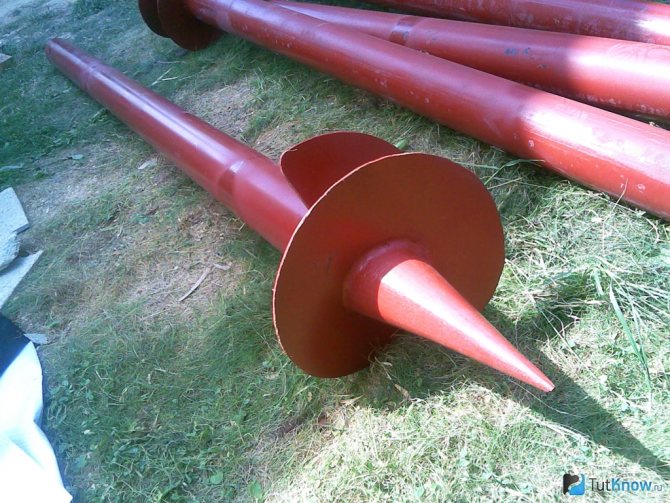
Asbestos-cement or metal pipes are used to construct pillars as permanent formwork, since reinforcement is inserted inside them and concrete is poured.
The depth of the columnar foundation is calculated depending on the structure of the soil, the level of groundwater and the level of soil freezing. A foundation buried 0.4 m into the soil is considered shallow. Recessed - immersed 0.15 - 0.5 m below the freezing level.
Very often, a columnar foundation is installed in areas where the soil freezes 1.5 - 2 meters deep, since the construction of a strip foundation in this case is simply unprofitable. The lower level of the column is buried 15–25 cm below the soil freezing level.
The distance between the pillars can be from 1 to 2.5 m, but spacing more than 3 m is not recommended.
as a grillage . If the structure is wooden, then it will act as a mortgage crown. But monolithic concrete grillage poured into wooden formwork is gaining more and more popularity.
The grillage of a columnar foundation can be high (above 35 - 75 cm above ground level) and low (lying on the ground).
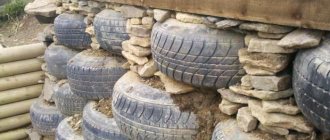
A very important design feature of columnar foundations is that it is impossible to install a basement in the house. Sometimes, to enclose the space between the pillars, a fence is formed, which is smoothed out of brick or stone, but is not connected to the foundation pillars, so as not to disrupt its integrity in case of movement. It is very important to arrange ventilation in the enclosure to ventilate the underground space. But collection is not always done. In frequently flooded areas, columnar foundations are erected to a high height above ground level, which can range from 1 to 2 m. In this case, the house remains completely “hanging” in the air on pillars.
Columnar foundation: drawing, calculation and diagram
Before starting any work related to the construction of the foundation, it is imperative to stock up on design documentation. It is better to entrust the creation of this documentation for the house to special architectural companies.
The columnar foundation diagram looks something like this:
The first step is to calculate the columnar foundation to determine the number of pillars, their material, laying depth, arrangement locations, width, and more. Calculations will require soil characteristics, groundwater level, frost heaving forces, soil freezing level, building material, its height and number of storeys, type of floors, roofing material, loads at each key point of the building, and more. For independent calculations, there are corresponding online calculators on the Internet for calculating columnar foundations.
All dimensions obtained for a columnar foundation are entered into the design documentation, where all characteristics, material and much more are indicated.
DIY columnar strip foundation
Recently, the so-called lightweight foundation for modern one- and two-story cottages has become popular, which consists of pillars buried below the freezing level of the soil, and a non-buried strip foundation connecting these pillars. It won’t be easy to make such a foundation yourself; it’s better to call friends for help and order a ready-mixed concrete mixer to make the structure durable.
Excavation
Before making a columnar foundation, it is necessary to prepare the site for construction. To do this, remove excess soil and eliminate unevenness. If the top soil is clayey, you will have to remove most of it and fill it with sand.

Next, you need to mark the area. Using construction thread, we mark the site according to the attached drawing. We stretch the thread in two lines parallel to each other, with a distance equal to the thickness of the future strip foundation. We control the angle of intersection of the threads and the angles of the future structure; they should be equal to 90 °. We mark the places of intersection and junction of walls, as well as the corners of the building, places with the greatest load.
Throughout the marked area, we remove 30–40 cm of soil where the strip foundation will be. We make the width 7–10 cm larger so that there is room for the formwork.
According to the drawing of the columnar foundation, using a hand drill we make holes where the pillars will be. The diameter of the hand drill is 150 mm, 200, 250, 400 mm. If the depth of the pillars does not exceed 1 m, then additional fixation of the walls from crumbling is not necessary. If the depth is greater, then you will have to form supports from boards so that the soil does not crumble.
We fill the bottom of the wells with sand, a layer of 10 cm.
For the last time, we check the location of the wells along the axes and the evenness of the future foundation.
Arrangement of pillars
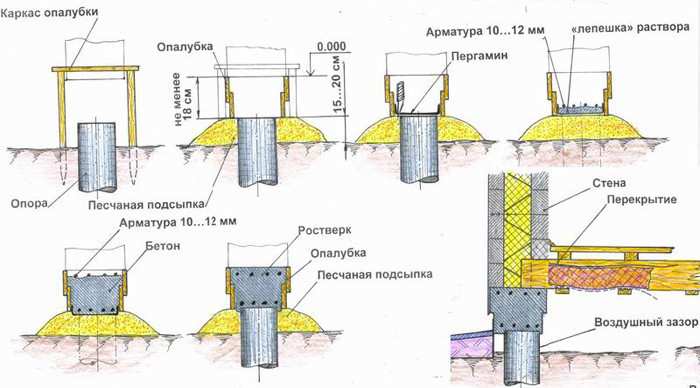
We will use concrete to construct the pillars, but to waterproof it, we will use a little trick.
From roofing felt, twisted in two layers, we form a pipe of the required diameter. We glue the connections with tape, and also tape the pipe around the circumference. We insert the structure into the well until it touches the ground.
We knit and weld a reinforcing frame from a reinforcing rod 10–14 mm in diameter and 6 mm wire. We insert it into the well. The top of the rods should protrude from the well by at least 15 - 25 cm.
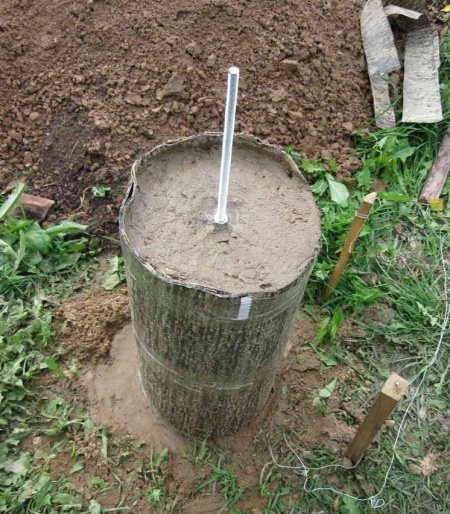
We begin to fill the pillars with concrete. To do this, first pour 20 - 25 cm inside the well and lift the roofing felt pipe so that the concrete below spreads and forms a base. Then we fill the hole completely with concrete, forming a pillar. Using an electric deep vibrator, we shake the concrete so that there are no air bubbles or voids left in it.
While the concrete in the pillars dries, let's work on the strip foundation.
Arrangement of a lightweight strip foundation
We weld and knit a frame from reinforcing rod and wire to reinforce the strip foundation. Be sure to weld it and screw it to the rods sticking out of the pillars.
The rods will be located along the foundation strip, and the wire will be reinforced in the transverse direction, forming horizontal jumpers.

We install the formwork for the strip foundation. To do this, we use boards 10–15 cm wide and 4 cm thick. Instead of boards, you can take chipboard, plywood or iron sheets. When the formwork is knocked down, we lay waterproofing material inside. It is best to use modern membranes or polyethylene film, which will also be needed to ensure that concrete does not spill out of the formwork through the cracks.
We fill the strip foundation with concrete. For simplicity, it is better to order a mixer machine to fill such a large space. We also shake the concrete with a vibrator. When the concrete gains its strength, after 20 - 28 days, the formwork can be removed and all the necessary work on waterproofing the foundation can be carried out. Then we fill the remaining trenches with soil.
For more information about how such a strip-column foundation is made, video:
Important! Many experts are extremely negative towards columnar-strip foundations, insisting that the foundation should be either columnar or strip. Only in this case will it fully perform its functions and not interfere with movements in the ground. Despite this, many construction companies continue to equip a combined foundation. So it's up to you to choose.
DIY columnar foundation

For comparison, let’s consider the option of arranging a purely columnar foundation with a high grillage. Its arrangement is advisable for light buildings on sandy soils.
Excavation
We mark the site, as in the first option. Then we remove fertile soil from the site by 15 - 25 cm. In the corners and places where walls intersect, we drill wells 0.6 m deep. Better yet, we dig square-shaped pits in the place of future pillars by hand.
We pour a 10-15 cm layer of concrete at the bottom of each pit under the pillars. It will serve as a cushion for us. When the concrete has dried, you can begin to form the support pillars.
Construction of a columnar foundation
For the pillars we will use iron ore brick, carefully baked in a kiln. We lay out a support pillar with brickwork, 38 cm wide and 35–45 cm high above ground level. The bricks can be placed in a closed loop, leaving free space inside. Inside the empty space we form a reinforcement frame, tie at least 1-3 rods and insert them. Then fill it with concrete.
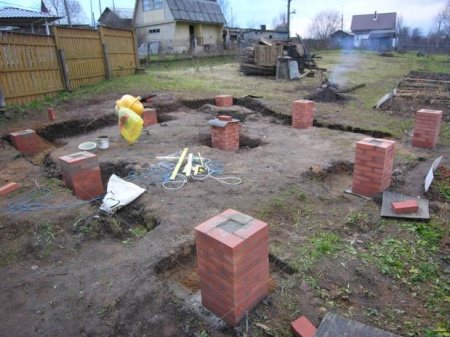
We check that the pillars are at the same level. Once the concrete has dried, the pillars can be waterproofed.
We fill the trenches with soil. We arrange a grillage on top of the pillars. It can be done using wooden rand beams. The edges of the beams must necessarily rest on the pillars and be connected to each other with a tongue-and-groove joint.
The grillage can be made of concrete. Then it is necessary to install formwork from wooden boards, weld a frame made of reinforcement inside and fill everything with concrete.
The columnar foundation technology allows the pillars to be made from asbestos-cement pipes. They are lowered into the well, then concrete is poured inside. Raise the pipe so that the concrete spreads, and then add concrete further, not reaching 10 - 15 cm from the top of the pipe. When the mortgage crowns of the house are connected to the foundation, they will need to be secured to the pipes using anchors and corner joints.
The construction of a columnar foundation allows you to significantly save on materials and a team of workers, since all work can be completed independently in a matter of days. Such a foundation can be safely built for wooden houses, bathhouses, technical buildings, terraces, verandas, gazebos, garages and other buildings whose weight is not enough to load the strip foundation. By the way, if you built a columnar foundation in the fall, it is not advisable to leave it unloaded for the winter. Therefore, concrete slabs are installed on top or they try to build the entire building before the onset of frost. Otherwise, during the winter, the forces of frost heaving may push the pillars out of the ground, and their location will no longer be even. It will be easier to dig them up and make a new foundation than to correct the consequences.
Do-it-yourself columnar foundation: video instructions
Columnar shallow base
A non-buried columnar type foundation is used quite often
A non-buried columnar type foundation is used quite often. It can be installed on slightly heaving and heaving soils, provided that the structure being erected has small overall dimensions and weight. As for rocks, coarse rocks and soils that are not characterized by movement, such foundations can be used under a large house made of timber or logs.
A non-buried foundation on supports can also be used in case of reducing the impact of heaving on the building. To achieve this, the soil under the supports must be replaced with a sand layer.
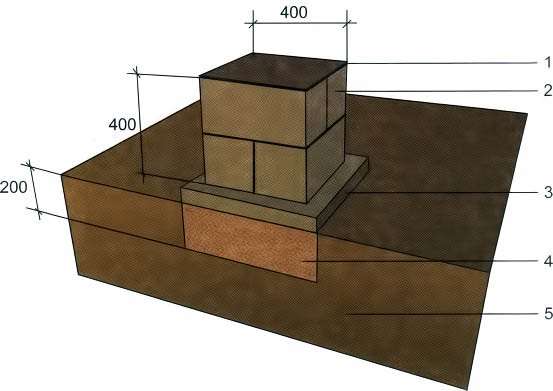
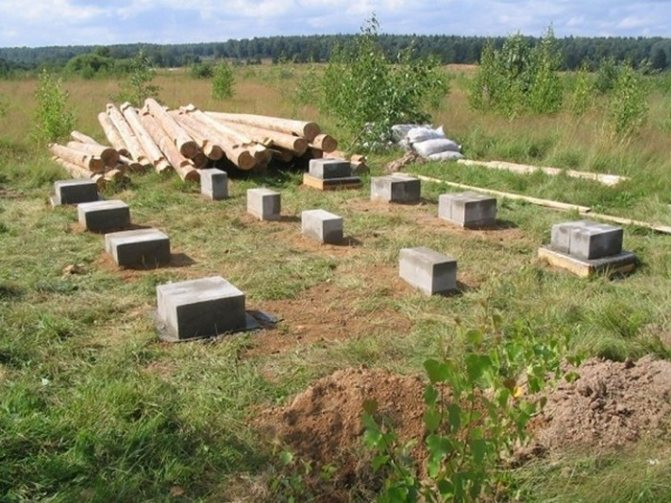
Pillars can be made from reinforced concrete, rubble concrete, stone, sand concrete and concrete foundation blocks. Typically, blocks of size 0.2x0.2x0.4 m are used. If you decide to use brick, then silicate products and ceramic material with low frost resistance are not suitable for these purposes.
The work is carried out in several stages:
Step-by-step instructions for creating a strip foundation with your own hands
- First, the construction site is cleared of debris, the fertile layer is removed, and the breakdown is carried out.
- Then a hole of the required size and depth is dug under each support.
- A sand cushion is placed at the bottom of each pit.
- After this, you can lay out the supports from the blocks. Usually two rows of 4 blocks each are made. Thick cement mortar is used to hold the blocks together. The open part of the supports is plastered.
- Parts of the supports that will be connected to the house must be waterproofed. For this, bitumen mastic, roofing felt, roofing material or glass insulation are used.
Important: sometimes a shallow foundation is made using wooden supports. Usually this is a beam made of pine or oak with a diameter of 200-300 mm. The element is impregnated with tar or processed by mining. To make the structure as strong as possible, the log is immersed 100-150 mm into a concrete solution poured into a dug hole.
Using Anchors
To connect the constructed walls and foundation, special anchors made of metal are attached to the lowest wall beams. They are immersed in the pipe cavity (11-16 centimeters). It is known that after this process it will be firmly concreted.
I would like to note that this is a rather interesting process. You need to understand that for absolutely every individual task, materials are used in a certain density. Each element that is present in the design complements each other. You can build a columnar foundation for a bathhouse in exactly the same way.
And if one element changes, then the second one, including the entire structure as a whole, will be disrupted. Therefore, choose the material with which your structure will serve you for a very long time.
You can also see my example of calculating a pile foundation. And the video will show how a columnar foundation can be easily erected independently.