April 6, 2020 Stroyexpert Home page » Foundation » Types and types
Column and strip foundation
In modern private housing construction, the construction of monolithic strip foundations predominates. This type of foundation ensures the achievement of optimal technical and operational characteristics for buildings of various types. In most situations, this option provides the necessary strength and performance characteristics of the structure. The load-bearing capacity is very high. But sometimes its use is limited or unacceptable, then you have to resort to alternative options, among which the columnar strip foundation stands out.
General information
The design of a strip-column foundation is carried out together with the creation of a project for the house itself. In this case, it is necessary to correctly calculate the load from house construction, taking into account all the building materials used, furniture, objects, people who will be in the house, and the maximum layer of snow that can be on the roof in winter.
In climatic zones with deep levels of soil freezing, installing a strip foundation is expensive and takes a lot of time and effort. The foundation must be laid 20 cm below the freezing point of the soil. At this level there are dense layers of soil, which guarantee protection against the foundation being pushed out during frost heaving.
The required number of pillars is buried in the ground at the design level, and a concrete strip is mounted on top of them, which takes over and distributes the load from house construction onto the pillars.
When the construction site has significant differences in height or is located on a slope, this type of foundation is indispensable.
In areas with close groundwater, strip foundations with pillars should not be erected.
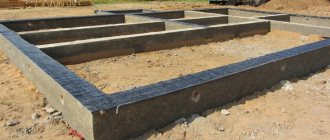
There should be a gap of 15-20 cm between the lower surface of the grillage and the soil. This will protect the structure from destruction even with severe frost heaving of the soil.
Requirements for concrete mortar
When arranging a columnar strip foundation, heavy concrete mortar should be used. Therefore, it is necessary to include gravel or crushed stone in its composition. When the concrete mixture hardens, it is recommended to periodically water it with water in large quantities during the first week. If this type of base is intended for a frame house made of wood, when creating the top layer of fill, anchors or threaded studs are assumed.
A do-it-yourself columnar strip foundation, a video on the Internet proves it, it can be done.
Advantages of a column-strip foundation
Compared to installing a strip foundation, a combined foundation with a strip-column base has the following advantages:
- reduction of labor costs, no need to carry out a large amount of land work;
- the possibility of erecting reliable buildings on peat, heaving soils;
- installation of a drainage system is not required;
- a bored pile can withstand significant loads;
- it is possible to install the pile to a considerable depth so that the support reaches dense soils with high bearing capacities;
- the consumption of building materials is reduced, the time for constructing the foundation is reduced.
Thanks to the technology of installing a column-strip foundation with a monolithic screed and bored supports, it is possible to carry out work in densely built-up areas where it is impossible to drive construction equipment to dig a pit under a strip foundation.
Books on the topic:
Modern work on laying the foundation. Types of work, materials, technologies - Valentina Nazarova - 29 rubles - link to book review Handbook of construction technologist - Gennady Badin - 239 rubles - link to book review
Calculation of foundations on subsidence soils - Vladimir Krutov - 250 rubles - link to book review
Design and installation of foundations and foundations of buildings and structures SP 50-101-2004 — — 372 RUR - link to review of the book Foundations and Foundations - Mikhail Berlinov - 2,121 RUR - link to review of the book
Flaws
Like any technology, strip foundations with bored piles have disadvantages:
- it is difficult to calculate what average load one pile will withstand; supports of the same type under the same conditions can withstand different load-bearing loads;
- the bulk of the work is performed using manual labor;
- A lot of concrete mortar is consumed to compact the soil around the support being installed.
- It is difficult to control all stages of the pile production process directly in the ground.
Due to the listed disadvantages, strip foundations with pillars are not used everywhere, but are used when justifiably necessary.
What types of piles are there?
Piles are distinguished by the material of manufacture:
- concrete;
- reinforced concrete;
- metal;
- wooden (also called chairs);
- brick;
- from concrete blocks;
- from rubble stone.
Types of piles
According to the manufacturing method, piles are divided into driven and driven. Drivers are manufactured in a factory or on a construction site and only after that they are driven into the ground. Stuffed - poured directly into the ground.
According to their type, piles come in different sections:
- square;
- polygonal;
- round;
- hollow and others.
How to choose material for pillars
It must be remembered that the durability, reliability and safety of the building will depend on the strength of the material used to make a strip foundation with a monolithic screed.
The materials used for the columnar base and their characteristics are presented in the table:
| № | Support material | Characteristics |
| 1 | Wood | Rarely used due to short service life. Such material can be used as a support in the construction of lightweight small structures in the case of a limited construction budget. The diameter of the wood must be at least 150 mm. It is mandatory to treat it before burying it in the ground with compounds that protect against fire, damage by pests and rotting. Waterproofing is carried out with bitumen mastics. |
| 2 | Concrete | Reinforced concrete supports are strong and reliable. They can be manufactured as a monolithic structure or consist of several blocks. The cross-section of the pillars must be at least 400 mm. |
| 3 | Iron ore brick | Used for constructing a shallow foundation. The width of the brick support should be 400-500 mm. |
| 4 | Metal or asbestos-cement pipes | A well is prepared into which a hollow pipe is installed, which is subsequently filled with concrete. |
The construction of bored piles is optimal for foundations installed in small areas located near water bodies, on cliffs, rocky, soft soils prone to flooding.
Sometimes it is the only possible option for foundation in densely built-up areas due to the small dynamic impact on housing construction located near the site of construction work.
Support material
The quality of the material used for the construction of supports directly affects the reliability and load-bearing characteristics of the foundation.
The pillars are erected from the following building materials:
- Rubble stone – is particularly durable and has a long service life. However, masonry requires special skills, so it is better to turn to professionals.
- Pipe – you can use metal, concrete or asbestos-cement pipe. This is a fairly inexpensive method that does not require much experience. Pipes are installed in wells, filled with reinforcement and concreted.
- Wood is not a particularly popular material due to its fragility and susceptibility to rotting processes. Wooden supports are acceptable mainly for non-permanent buildings for utility purposes, terraces, etc.
- Concrete is a high-quality and reliable option; piles are purchased from factories that specialize in their production, or they are made independently.
- Clinker brick - this option is only suitable for shallow foundations. Clinker supports should be 0.4-0.5 m wide.
According to the recommendations of experts, the cross-section of supports made of any material should be at least 0.4 m.
How to determine soil type
When constructing state and public facilities, a mandatory requirement is to conduct geological and laboratory soil studies. Such activities are quite expensive and are carried out in special certified laboratories.
When conducting individual construction, you can independently determine the composition of the soil. To do this, in several places on the site, they dig holes using a drill, the depth of which will be 50 cm greater than the expected length of the pile. Determine which layers of soil are on the drill blades.
The depth of underground sources can be found out from people living nearby or determined by the filling of water-bearing wells at the construction site.
If a flooded area of a small area is found, you need to position the piles so that they do not affect it.
In areas with differences in height, piles of various lengths are used.
Step-by-step instruction:
① Preparing the area. Level it by removing a thin layer of soil. If the soil is clay, remove more soil and add a layer of sand.
② Marking. To do this you will need stakes and visible rope and fishing line. The strings are stretched in proportion to the width of the future tape. Observe the angles. At intersections, the ropes must be perpendicular to each other. For clarity, find a photo of the described process. Understanding will come faster with pictures.
③ Dig trenches with a span of 8-12 cm wider than the markings. This stock is necessary for future formwork. The average trench depth is 400 mm.
④ Drill holes. How far to go deep will depend on the expected loads, as well as the diameter of the supports, respectively.
Tip: if the pipes will sink more than 1 meter, install wooden supports. This will prevent soil from dumping.
⑤ Cover all ditches with 10 cm of sand.
⑥ Wrap the piles with insulation. Double winding with roofing felt is suitable for this. Now the piles can be loaded into the wells.
If we take hollow pipes as supports, then it is necessary to make reinforcing structures from reinforcement rods, which are then lowered into the cavity. As a result of deepening, the ends of the fittings should protrude from the pipes by 15-25 centimeters.
⑦ Bay First, some space around the supports is filled, and then the cavities. Let it harden.
Important! Also, do not forget to lay sewerage, water supply, electricity communications or lay pipes for them before pouring concrete, so as not to dig into the foundation for them in the future.
Determination of pile length
For areas with stable, dense soil, a support length of 2500 mm will be sufficient. If construction is carried out on a slope, height differences must be taken into account. On uneven areas, supports of varying lengths are used, depending on the height of the terrain.
When building on unstable soil, the length of the support should reach the layer of dense soil. Its location is determined by test drilling. Insert the drill into the soil, take it out after a short distance and look at the type of soil on the blades.
If there is peat, quicksand or wet soil on the drill blades, then you need to drill a well until a sandy or clay layer appears. After reaching a dense layer, measure the depth of the well using a stone or other heavy object lowered on a rope.
Construction technology
To build combined strip foundation yourself, you need to dig trenches, drill wells, lay concrete in them, after lowering the reinforcement cage. Then all that remains is to concrete the MZLF using classical technology, tying the reinforcement of the two structures together (the heads go inside 5 - 10 cm).
Excavation of the soil is possible by hand; usually a little more of the fertile layer is removed in order to fill in the inert material, compacting it layer by layer with a vibrating plate. Reinforcing the tape with piles is important for heavy buildings (brick, block masonry); “frameworks” can be supported on a grillage, reducing the amount of excavation work.
Laying out the construction site, preparation
Full-scale placement of axes is carried out in stages after object snapping. Factors taken into account:
- center of passage/road – 3 – 5 m, respectively
- site boundary – 3 m
- septic tank, wells of centralized systems - 4 m minimum
- main façade – usually parallel to the street
After that, you can put castoffs for the first axis. The ends of the building are laid perpendicular to it using the triangle method (5 m hypotenuse, 3 m, 4 m legs), the last wall is ready by default. It is necessary to confirm the correctness of the constructions by checking the diagonals; an error of 1 cm is allowed.
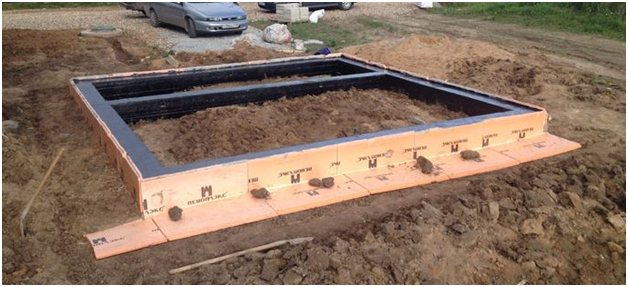
The arable layer under a strip-pile foundation is usually not completely removed, only in trenches. However, their width must be increased for the necessary access for workers (formwork, concreting, tape waterproofing). The fertile layer is replaced by a 40–80 cm layer of sand (low groundwater level), crushed stone (groundwater is close). The materials are compacted using vibrating plates (the sand can be moistened). Then the drainage system is installed:
- wells - in the corners of the building, from pieces of pipes installed vertically with a plugged bottom
- drains - between wells, from perforated corrugated pipe in a textile filter
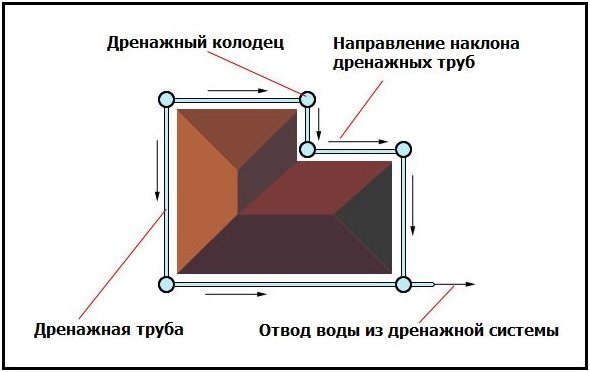
A slope of 4 - 7 degrees is necessary for gravity collection of liquid into a buried tank. It is prohibited to carry out drainage under monolithic structures. When concreting, the drainage layer of crushed stone and sand will inevitably absorb cement laitance, drying out the mixture. Therefore, a footing is used (screed of skinny B7.5 concrete 5 - 10 cm thick), onto which 2 layers of rolled waterproofing are fused.
Footing and waterproofing are usually carried out after drilling wells for pouring piles. Otherwise, you will have to drill through the freshly poured concrete base and damage the integrity of the film coating.
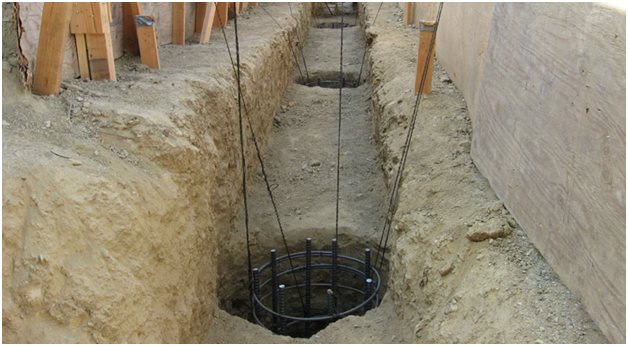
Pile field
The pits are made according to the design (corners, pitch 0.8 - 1.5 m straight sections) with a motor drill and hand tools. The maximum size of the equipment is 40 cm, which limits the drilling diameter. A strip- combined foundation is made as follows:
- drilling – it is necessary to reach the bearing layer (usually 2 – 4 m)
- formwork – soft (rolled cylinder of roofing felt), insulating (polyethylene pipe), hard (asbestos cement pipe)
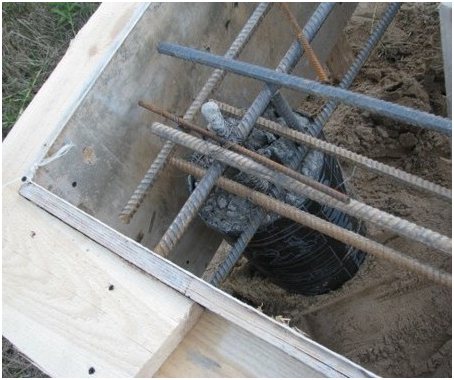
- reinforcement frame - vertical 10 - 16 mm rods, fastened with horizontal ring, square, triangular clamps (step 30 - 60 cm)
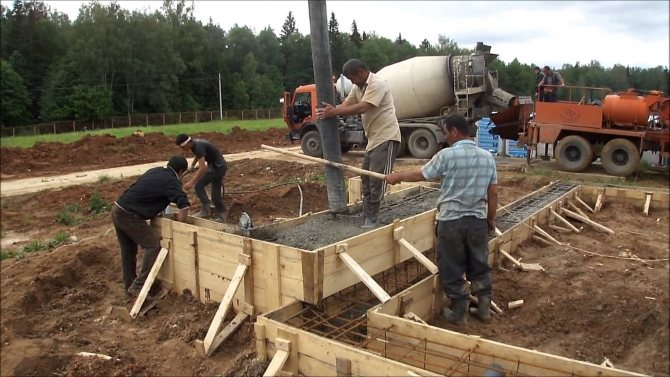
- laying concrete - the mixture is fed through a funnel and compacted with an internal vibrator
The choice of formwork is made as follows:
- asbestos cement – high strength, rigidity, low buoyant loads
- polyethylene – complete absence of tangential heaving forces, concrete waterproofing
- roofing felt - exclusively preventing rock from falling onto the face (budget option)
It is easy to calculate the percentage of pile reinforcement yourself in order to select the diameter and number of rods. To do this, you need to calculate the area (1256 cm2 for 40 cm diameter), multiply the number by the minimum percentage (0.4), take the reinforcement cross-section from the GOST tables. In practice, 3–5 rods are used, connected by a triangular, ring clamp, respectively.
The protective layer is provided by plastic rings; without them it is impossible to control the contact of the formwork/reinforcement throughout the entire depth. The upper ends of the rods are bent (90 degrees), and later connected to the reinforcement of the tape (half to the upper chord, the other to the lower). It is prohibited to shift the center of the reinforced frame relative to the hole hole (especially important for corners and T-shaped joints).
Tape part
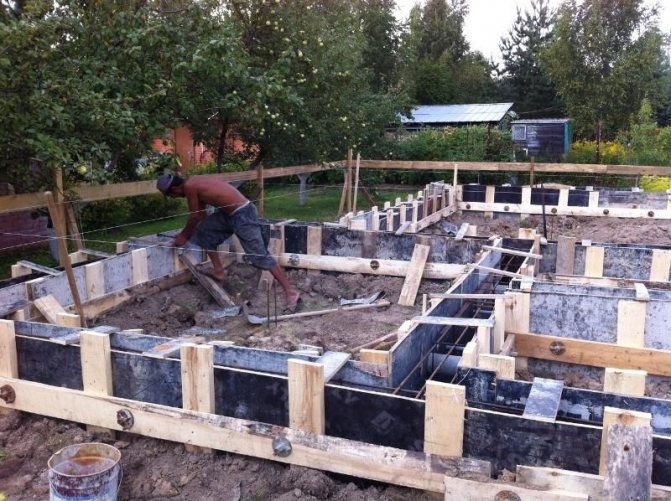
A distinctive feature of a grillage is tensile loads; this is an exception for tape, so reinforcement here is simpler. The strip- reinforced foundation does not have powerful vertical lintels; it is reinforced near the piles. MZLF standard technology:
- formwork – panel formwork slightly higher than the design level
- reinforcement frames - longitudinal bars 8 - 14 mm, anchoring of L-shaped and T-shaped joints with special elements, clamps (6 - 8 mm smooth reinforcement)
- concreting - layer-by-layer (40 - 60 cm) laying of the mixture, compaction with an in-depth vibrator, reinforcing bar
The panels are mounted on a screed covered with waterproofing, supported by jibs (steps of 0.5 - 0.8 m), tightened with jumpers, and, if necessary, fixed with spacers. Embedded elements are necessary for entering communications and ventilation ducts (basement part). Covering the inner surface with a film prevents dehydration of the mixture, leakage through cracks, and improves the quality of the surface.
Straight sections of the frames are knitted on a flat surface and mounted inside the formwork. Corners are reinforced locally with anchors (L-shaped, U-shaped parts). Bending 90 degrees of rods without reinforcement is considered a violation of technology, while straight rods overlapping each other is considered an interruption of the contour, even when connected by welding. Diagonally laid pieces of reinforcement are a pointless waste of rolled metal; such a scheme was created solely to strengthen the openings in the slabs.
Manufacturing Features
The owner of a suburban area who has chosen this option for founding a home should take into account that protection against swelling must be comprehensive. Otherwise, the strip-pile foundation will lose its integrity and collapse after a maximum of 3 to 5 years of operation. Protection includes construction operations:
- drainage – pit stage
- foundation cushion - before reinforcement
- waterproofing – after stripping
- thermal insulation – on top of the waterproofing carpet + under the blind area
To ensure a guaranteed strength reserve, identical reinforcement belts are manufactured. Wire twists are preferable to welding, and polyethylene clamps. Composite reinforcement is more expensive and has a delay in the occurrence of tensile forces, which leads to the opening of cracks in the monolith. Corrugated steel rods are preferred.
The combined foundation technology is more complex than other analogues. For example, it is enough to skip any anti-swelling method for the tape to be torn by frozen clay soil in the first winter. Secrets have been revealed especially for individual developers that allow them to reduce the budget while maintaining the high resource of the cottage.
Determination of the number of piles
The number of supports used depends on the weight, size, and design of the building.
What to consider when calculating:
- The spacing between supports in frame and wooden buildings should not exceed 3 m.
- In buildings made of light building materials: foam and gas blocks, the pitch should not be more than 2 m.
- For brick houses with several floors, the distance between supports is reduced to 1-1.5 m.
The calculation is carried out according to the formula: the result obtained by adding all the loads is multiplied by the reliability coefficient. The final indicator is divided by the load-bearing capacity of one support.
Calculation of a columnar foundation with a grillage
If you need to build a columnar foundation with a grillage with your own hands, first of all you should calculate how many supports you will need to make in order for it to be used for a long time.
As in the previous case, work begins with geological surveys in order to determine the bearing capacity of the soil. This indicator can help calculate the area of support, information about which can be easily found on the Internet or specialized literature.
Then you need to calculate the weight of the entire building . It depends on the weight of the materials used plus wind and snow loads. The resulting number must be divided by the weight that 1 cm2 of soil can support. This will be an indicator of the area of the foundation. For the final result, it is necessary to add 30% to the resulting figure as a safety margin .
In order to calculate the required number of pillars for a columnar base with a grillage, the supporting area is divided by the area of the base of the support.
This type of foundation is extremely popular precisely because of its simplicity, strength and the ability to do all the work with your own hands in the shortest possible time, even without much construction experience. And by comparing the prices of the material, you can calculate that it will cost 1.5-2 times cheaper than any other type.
But it also has a drawback that must be taken into account at the design stage. It is highly not recommended to build it on moving soil, as well as in areas where groundwater flows or large differences in height are observed.
Installation of a column-strip foundation
The construction of such a foundation consists of two stages: installation of supports and installation of a concrete strip.
Before starting construction work, it is necessary to calculate all the loads and determine the depth of the foundation and the characteristics of the supports.
When calculating, the following parameters are taken into account:
- depth of groundwater;
- level of soil freezing and its characteristics.
- load from the building.
The reliability and safety of your home will depend on proper adherence to installation technology.
The foundation can be shallow up to 400 mm or laid to a greater depth. The pillars are installed, depending on the load-bearing load of the building, at a distance of 1000-2000 mm from each other.
The larger the step between the supports, the lower the load they can withstand. The supports should be located in the corners of the house, at the intersection of load-bearing walls, under columns, fireplaces and other heavy elements.
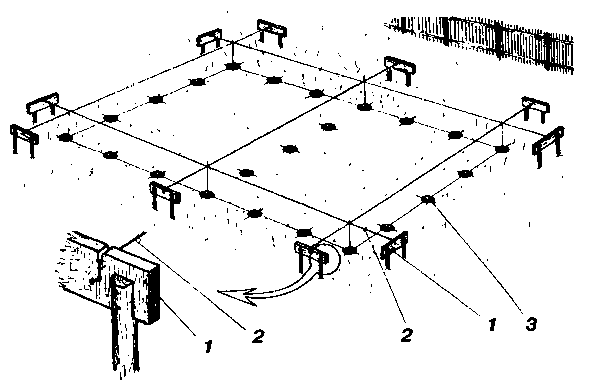
Site marking
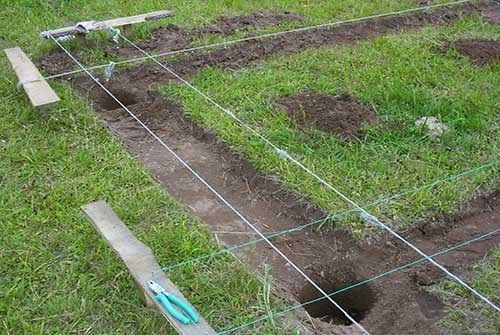
From the very beginning, the site is marked out according to the design documentation. First, a drawing is drawn on paper on which the locations of the piles are marked. Only after this construction work begins.
According to the drawing, the construction site is marked. The installation locations for the supports are marked with wooden pegs or metal rods. A cord is pulled between the posts along the perimeter and diagonally, strictly ensuring that the level is maintained. Check to make sure they are even rectangles. The cord marks the outer and inner contour of the location of the concrete tape.
Preparation for installation of the pile-tape foundation.
Do-it-yourself foundation construction
A column-and-strip foundation united by a monolithic concrete screed is quite easy to make. It is important to correctly perform all calculations and follow the technology.
Foundation Installation Guide:
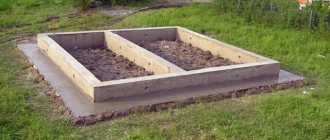
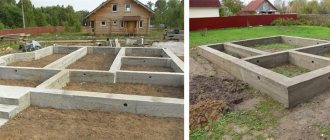
- According to the markings, they dig a trench under the strip base, 40 cm deep. The width of the trench should be 7-10 cm greater than the width of the foundation, so that there is space left for installing the formwork.
- In the places where the pillars are installed, a recess is made using a shovel or a drill. The diameter of the support pillars depends on the bearing load on the supports. The greater the gravity force, the larger the cross-section of the pile should be.
- The pillars are installed and filled with concrete to obtain a stronger base.
- They make formwork from boards and install supports so that the form does not fall apart under the gravity of the concrete.
- A concrete strip is poured around the entire perimeter of the house.
There should be no gaps in the formwork so that the concrete solution does not leak out.
The installation of the base begins only after the concrete strip has completely dried.
All metal parts must be pre-treated with protective compounds to protect them from moisture damage.
Installation of a bored foundation
After marking the site, they begin to carry out the main work of laying the foundation of the house. A strip foundation on bored piles will last more than 70 years, provided that all stages of the technological process are completed.
Step-by-step instructions for installing a columnar strip foundation with your own hands:
- The well is drilled in several stages. The first 150-200 cm of soil is selected using a drill bit. Then a well is drilled using an auger.
- When a well of the required depth is ready, a sand layer 300-400 mm thick is poured onto the bottom; it helps to increase the load-bearing characteristics of the soil.
- Using a crane, metal reinforcement made of vertical rods with a cross-section of 10-16 mm is inserted into the well. The metal frame is made with horizontal strapping, which increases its strength.
- The well is filled with concrete mortar, and as the cavity is filled, the column pipe is raised. The solution is poured continuously until the hole is completely filled.
- The casing pipe is removed and the pile head is formed.
Most often, bored supports are poured with cement mortar through one adjacent pile and installed after the previous one has hardened by 25%.
You can see how to make a pile-strip foundation with your own hands in the video:
In some cases, a pile-strip foundation is the best option for arranging the foundation for a house. The technology of its construction allows you to save significant money and time on construction work.
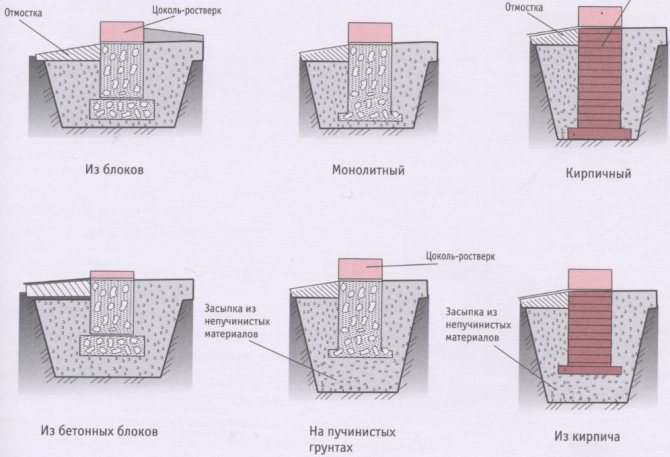
Brief description of the design
The structure of the strip-column base consists of concrete supports on which a grillage is installed, dug in to a shallow depth. The latter neutralizes the loads of the building. Reinforced concrete piles poured on site are used as supports.
The foundation of the house includes the following elements:
- concrete supports, the number and location of which are determined at the design stage;
- frame made of reinforcement immersed in concrete;
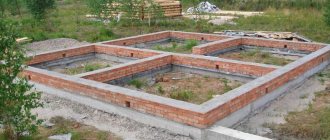
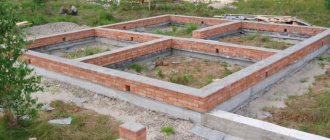
- the ground part of the belt type, constructed from blocks or bricks;
- internal pillars take part of the loads of load-bearing walls and partitions.
The technology for constructing a columnar strip foundation with your own hands is similar to arranging the foundations of urban apartment buildings. At the first stage, the required number of piles is driven in, at the second, a slightly recessed grillage is formed.
Construction process
So, where to start building the foundation. The main stages of work include the following:
- Planning and marking of the site.
- Pulling threads along the perimeter of the building, marking corners and intersections of the building.
- Removing the top layer of soil at a construction site.
- The process of building a pit.
- Installation of wells for foundation piles. Wells can be dug either manually or using special equipment. It is worth noting that this is a rather lengthy process. Therefore, to save time, it is advisable to use an electric drill.
- Expansion of wells in the lower part.
- It is recommended to construct wells at a distance of 1-2 m from each other. The average diameter of the holes should be 20-35 cm, and the diameter of the expansion at the base should be 45-60 cm.
- Calculation of the depth of pillars in the soil. It is produced taking into account climatic conditions, the depth of groundwater, and depends on the nature of the soil.
- Waterproofing process. A sheet of roofing material is placed at the bottom of each post hole. It should not come into contact with the expansion at the bottom of the well.
- Backfilling each well with a mixture consisting of coarse river sand and fine gravel. Layer thickness – 15-20 cm.
- Installation of two layers of reinforcing mesh. The diameter of the rods is 13 cm, the size of the cells is 15 by 15 cm.
- Installation of a layer of fine sand on which the formwork will be erected.
- Construction of formwork panels. Material – wood. To strengthen the formwork, it is recommended to support it from the outside with supports made of wood or metal.
- Installation of supports. The piles are mounted in the holes prepared for them. To enhance stability, they must be lightly covered with a layer of sand and crushed stone.
- Filling the lower parts of the piles with concrete solution. Before starting work, it is recommended to slightly raise the pole. This is necessary to penetrate the concrete solution into the base of the well and increase the stability of the piles.
- Use a bayonet to compact the pile.
- Strengthening pillars with vertical reinforcement.
- Installation of grillage. To increase strength, it should be subjected to a reinforcement procedure. To do this, the reinforcing bars are laid horizontally and tied with wire using a special hook.
- Layer-by-layer pouring of concrete. The thickness of each layer is 20-30 cm. Using a special vibrating tool, residual air should be removed from the concrete mixture.
- After the concrete has completely hardened, install the grillage. Concrete usually hardens within 7 days. In hot weather it may freeze several days earlier.
- The main construction of the building should begin no earlier than six months after installation of the foundation.