How to make a monolithic ceiling with your own hands
The construction process of any houses or any other buildings will involve the installation of ceilings that are located in the attic or between floors. Quite often, wooden products are used to implement such a task. Elements made from natural wood are not difficult to make and install, but they have low thermal insulation and sound insulation properties, and therefore they are much inferior to floors made of concrete.
For this reason, it is better to opt for the concrete option. In addition, making monolithic floors with your own hands is very simple. Let's talk in more detail about monolithic flooring in a private house.
The feasibility of installing a monolithic floor
Both ready-made floor slabs and slabs poured in place as a single monolith have their own advantages and disadvantages. You need to choose one option or another by comparing their features and projecting them onto your circumstances: construction conditions, technical and financial capabilities.
Monolithic floors really have many advantages.
- Possibility of producing non-standard slabs.
In private homes, the use of prefabricated reinforced concrete products is limited to their standard shapes and dimensions. They cannot be used to cover bay windows, external figured balconies, and other rooms whose dimensions do not allow the finished slabs to be laid out and supported on load-bearing walls. But you can fill the ceiling of any configuration with your own hands.

External balcony supported by columns Source plazma-m.ru
- No joints or seams.
A one-piece design means it is impossible for the plates to move relative to each other with the formation of cracks along the joints and the risk of leaks, damage to heat and sound insulation.
- Uniform distribution of loads.
The monolithic slab is part of the building frame. All loads placed on it are evenly distributed along the entire perimeter of the walls and are also evenly transferred to the foundation.
- High strength and durability.
There are no voids or joint zones in a monolithic slab, so it can withstand heavy loads with equal thickness to prefabricated structures.
The monolith is poured entirely over the entire floor area Source alacristroi.by
As for economic benefits, this point requires individual calculations, otherwise the result may be unexpected. Most private developers believe that the production of a concrete slab will cost less than the installation of prefabricated floors based on the cost of the slabs themselves, their transportation, loading work and the use of special equipment for lifting to the floor and laying.
But the delivery of a huge amount of reinforcement and ready-made concrete mixture also involves transportation costs, and a concrete pump is needed to supply the solution to a height. We add here the costs of manufacturing formwork and supporting structures. And only after this can you compare the costs of the two options and see how significant the difference is.
The most budget option is to do everything yourself, including preparing the concrete. But for this you need to know how to fill the ceiling between floors with your own hands correctly, how to achieve the strength of a homemade mortar, how to save on formwork. And be prepared for the fact that the work will take a lot of time and require remarkable physical effort.

It is impossible to fill a large area of flooring alone; you need help Source pobetony.expert
High time and labor costs are not the only disadvantage of monolithic floors. Another serious drawback is related to the fact that after they are poured, it will be possible to continue work on the site no earlier than a month later, when the concrete slab reaches its design strength. During this time, it will require attention and measures to prevent the appearance of shrinkage cracks.
Note! A large technological break can also negatively affect the cost of construction due to crew downtime, increased prices for building materials and services, the end of the warm season and other reasons.
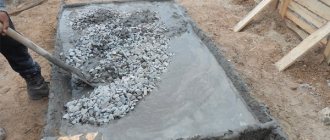
Concreting
Preparing concrete yourself is justified if the amount of work is small. Even with the required amount of concrete mixture of more than 1 cubic meter. m, it is more profitable to buy it at the factory, because the retail prices for its components are very different from the prices at which the factory buys them. And some factories have their own quarries with sand and crushed stone, and often produce cement themselves.
Already with an amount of 10-12 cubic meters. m or more, factory-made concrete, even with delivery and the use of a rental concrete pump, will be cheaper than the cost of self-prepared concrete. If the ceiling is high, then the choice in favor of a concrete pump and ready-mixed concrete is obvious.
When laying concrete, it is necessary to constantly compact the mixture in order to remove air from it. When present in the mixture, it will reduce the strength of concrete. When installing the ceiling of a private house, a manual vibrator with a drive 1 m long is quite suitable.
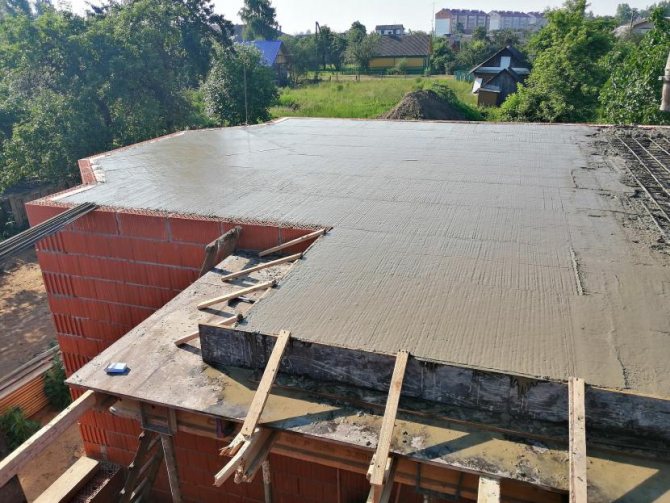
After laying and leveling the surface of the concrete mixture, it is necessary to provide care for it during the first week. During this period, overdrying of the structure due to high temperatures and wind is not allowed. It is recommended to cover the entire surface with a vapor-proof polyethylene film, and on hot days to thoroughly water the ceiling.
Concreting a 22 cubic meter floor. m was produced within an hour and a half using a concrete pump and two workers (my eldest son helped me).
Correct calculation and adherence to technology will allow you to make a strong, reliable floor with your own hands, capable of bearing a very heavy load. Tests of the first floor floor, made using the method described above for the second floor floor, confirmed this. The weight of 27 standing pallets with aerated concrete blocks is about 25 tons!
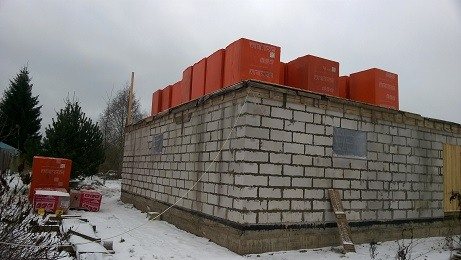
Monolithic reinforced concrete flooring can withstand very heavy weight
If you found the article useful, please tell your friends and acquaintances about it using the social networking buttons. Share your knowledge and experience, and people will be grateful to you. Subscribe to the blog to receive notifications about news and new publications. It will be interesting!
Why do you need a load calculation and why should it be done by specialists?
If the house design includes prefabricated floors, and the owner decides to pour a monolith, he will have to determine the parameters of the slab - the thickness of the pour, the diameter of the reinforcement, the number of rows and cell sizes of the reinforcing frame, the need to build additional supports, etc. Of course, this must also be done when constructing buildings without a design, for example, a garage with a basement.

You don’t need to talk about the consequences of the collapse of ceilings, just look at the photo Source dcdn.lt
The main parameters for such a calculation are the load on the floor, the length and width of the spans, and the grade of concrete. Loads are calculated by adding all the forces acting on a unit area. This:
- the weight of the plate itself;
- the weight of the screed and all layers of floor and ceiling coverings;
- loads from partitions resting on the slab, elements of the roofing system, interfloor stairs;
- weight of stoves, fireplaces and other massive structures;
- weight of utilities;
- weight of furniture, equipment and people.
Even if you can independently determine the total load, this will not help you understand how to pour a floor slab with your own hands, what thickness to make it and how to reinforce it. Because it is necessary to take into account the resistance of materials to bending, impact loads and their other characteristics. And also know what safety margin the slab should have. These are complex calculations that not every engineer can handle.

An example of calculating a monolithic floor Source chertezhi.ru
It is no secret that in private low-rise housing construction they often do without calculations, filling the floors with a margin of thickness. A thickness of 12-18 cm is considered quite sufficient with a concrete strength grade of at least B20. Anything larger requires justification by calculations, since with an increase in the mass of the slab, the load on it and on the walls with the foundation increases.
See also: Catalog of companies that specialize in calculation, installation and repair of foundations
The procedure for manufacturing monolithic floors
The technology for manufacturing a monolithic floor is intuitive. To give the slab the required shape and thickness, and to keep the concrete in a stable position until it gains strength, formwork is made. To increase its strength and resistance to deflection, a reinforcing frame is created from metal rods laid along and across the span. To ensure that there are no delaminations or cold seams in the structure of the slab, concrete is poured in one step.
But each of these stages has its own nuances and requirements for implementation.
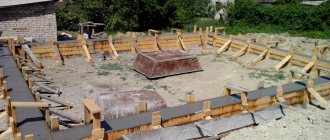
Formwork installation
Since the monolith is poured with a rather thick layer having a large mass, the formwork design must be reliable, designed for serious loads. The ideal option is steel telescopic posts and beams with thick laminated plywood decking.
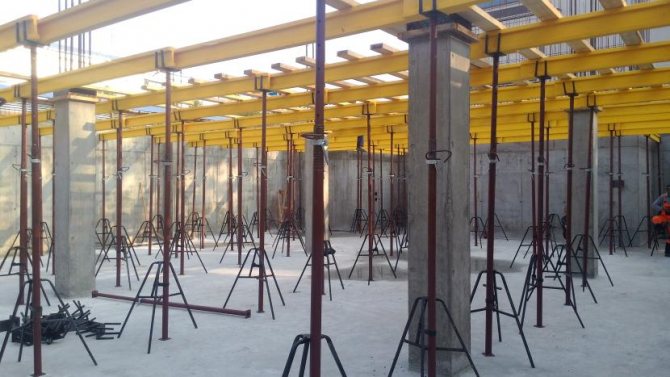
Kit for formwork frame Source opalubka-moskva.ru
Their advantages are obvious: the length of the racks can be easily varied, allowing you to create a horizontal plane without any problems, steel beams can withstand enormous loads, and plywood does not bend under the weight of concrete and is easily separated from it during dismantling.
For reference! The weight of 1 square meter of a 20 cm thick reinforced concrete slab is about half a ton. Plus the additional load from the falling solution during installation and the weight of people leveling the surface. The formwork must cope with such a load.
The disadvantage of a ready-made formwork kit is its high cost. Posts and beams can be rented, but the decking has to be cut to fit the spans, so plywood can only be bought and then sold for a lower price.
Therefore, formwork in most cases is made from existing lumber, which can later be used for other purposes. This is timber with a minimum cross-section of 100x100 mm or 150x50 mm and edged boards with a thickness of at least 25-30 mm. The rack beam can be replaced with logs with a diameter of 100 mm.
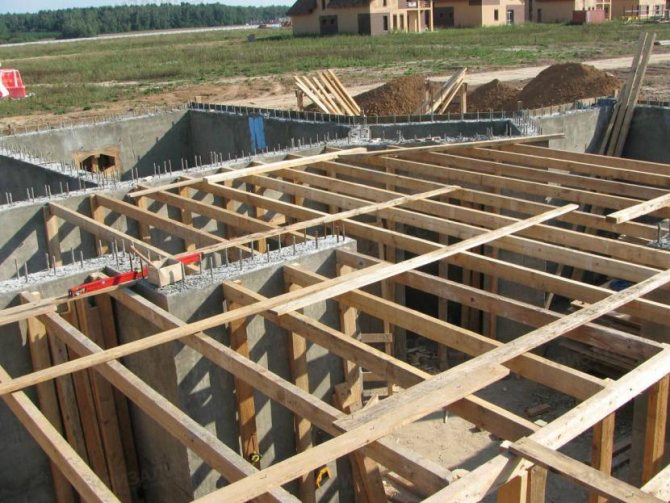
Supporting part of wooden formwork Source pogreb-podval.ru
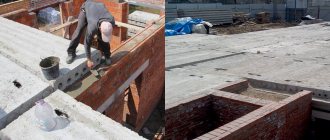
Installing formwork is a responsible process, since you need to make a concrete floor with your own hands as smooth as possible, so as not to go broke on leveling and finishing later.
- Marking.
Along the perimeter of the load-bearing walls, in increments of at least 100 cm (preferably 60-80 cm), marks are placed along which the height of the support posts from the floor is measured. The distance from the top of the wall to the mark should be equal to the thickness of the cross bars plus the thickness of the flooring boards.
- Frame installation.
The racks installed along the perimeter are connected in pairs along the top with crossbars - transverse bars located parallel to the short wall. Additional supports are placed under the bars with the same spacing so that the upper edges of all bars are in the same horizontal plane.
- Flooring installation.
Boards or sheets of plywood are laid on the crossbars. The plane of the flooring must exactly coincide with the top edge of the wall, and there should be no gaps between it and the perimeter of the flooring. The flooring elements are not attached to the crossbars, but are simply laid close to each other, otherwise it will be difficult to dismantle the formwork. Alternatively, it can be attached to the crossbars at the bottom at the corners.
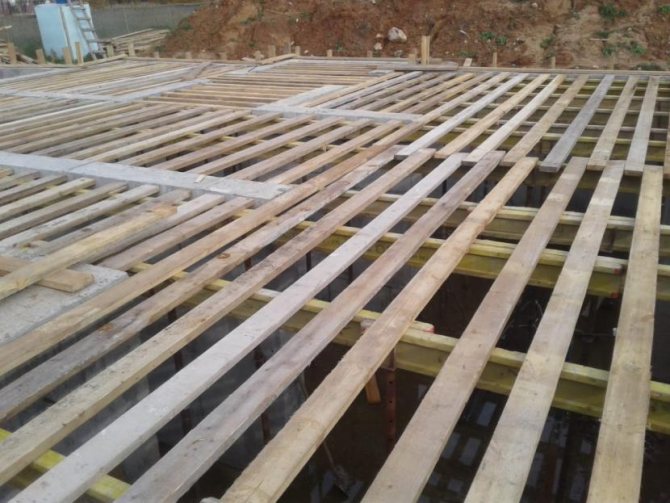
You can lay the boards staggered and cover them with 8-10 mm plywood to get a smooth slab on the ceiling side Source fundament77.ru
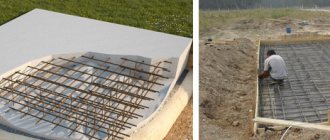
Reinforcement
Reinforcement is carried out with reinforcement bars, with a step whose value is not greater than that obtained by calculation. I installed additional rods in the places where the partitions were installed.
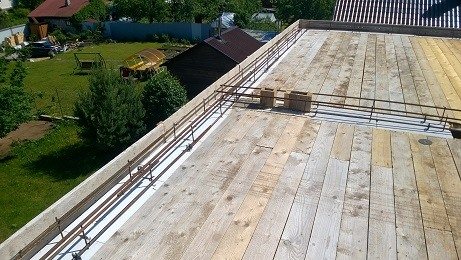
The first stage of reinforcement is to create an armored belt along all load-bearing walls, as well as along the perimeter of the ceiling. It is made from rods with a diameter of 14 mm.
It is not allowed to connect the reinforcement to each other by welding, because when heated it loses its strength. The rods must be overlapped, tightened with knitting wire. The amount of overlap must be at least 40 times the diameter of the reinforcement.
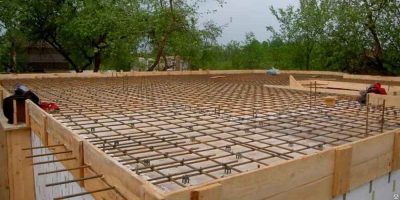
Monolithic floor formwork
To simplify the process, I drilled blind holes in the horizontal surface of the wall into which I inserted pieces of reinforcement with a diameter of 8 mm. They are also transverse (structural) reinforcement for the reinforced belt. I attached supporting rods to them.
The working fittings are laid on the flooring after it is covered with polyethylene. If there is a need to lengthen the rods, then they should be joined staggered, avoiding two joints side by side.
When installing a reinforced frame, it is necessary to ensure a gap between the reinforcement and the plane of the future floor of at least 25 mm to subsequently create a protective layer of concrete. It will prevent contact of the fittings with air and its subsequent corrosion.
To create a gap, special plastic brackets for reinforcement are used, which remain in the concrete after it hardens. They can be installed after the longitudinal load-bearing rods are connected to the transverse structural reinforcement.
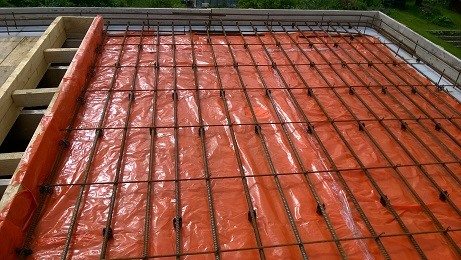
Monolithic floor reinforcement
Along the edges of future openings, it is necessary to provide reinforcement not only for the lower, but also for the upper layer of concrete.
At the final stage of reinforcement, it is necessary to rigidly fasten the vertical elements of the formwork with knitting wire to the finished reinforcement frame, cover the ventilation ducts with film so that the concrete mixture does not get into them, and also install plastic pipe sleeves on the formwork in places where heating and water pipes will pass through the ceiling and sewerage. This can all be seen in the next photo.
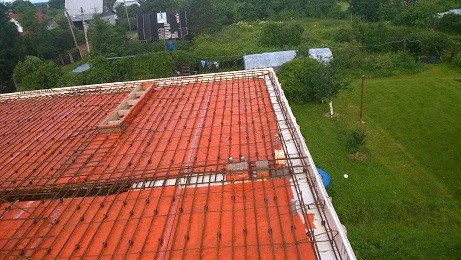
Monolithic floor reinforcement
The reinforcement work took me about two weeks. Not much, considering that I did all this in my free time from my main job.
Video description
This video provides recommendations for making formwork on a metal frame:
As you can see, when using telescopic racks and steel crossbars that can withstand loads of up to 2 tons per square meter, the step between them can be greater.
Manufacturing of reinforcing frame

Plastic stand for grill Source ustanovkasvai.ru
- The rods are cut with a grinder into pieces of the required length.
When cutting, keep in mind that the overlap of the reinforcing bars during elongation should be 30-40 times greater than their diameter. Those. When assembling a lattice from rods with a cross-section of 10 mm, the overlap should be at least 30 cm.
- The segments are laid out in the form of a lattice and tied at the joints with knitting wire.
In order not to cut off the required piece of wire from the coil each time, fasten it with tape at 4 points and cut it into 4 equal parts with a grinder. Use these pieces, folded in half, to tie the rods and tighten the twists with pliers.
- The finished grille of the bottom row is installed on plastic stands, 4 pieces for each square meter.
- The second grid is assembled in the same way.
- Both gratings are connected to each other by means of pieces of reinforcement curved in the letter P - the so-called “frogs”.
How to complete the final fill using “beacons”?
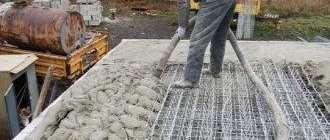
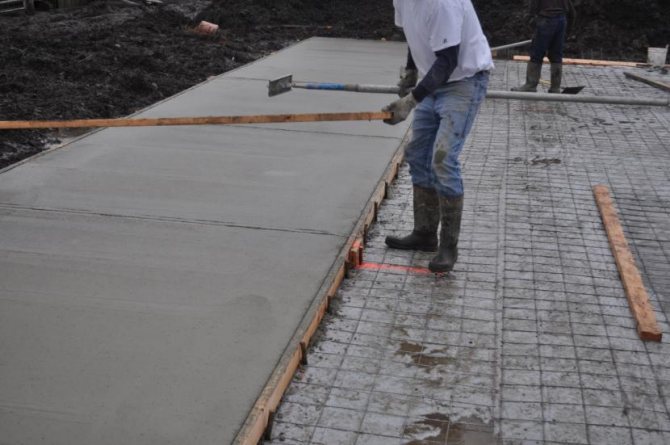
To complete the final stage, a solution prepared in a ratio of 3 buckets of sand to 1 bucket of cement will be used; crushed stone will not be used. By adding water to the concrete mixer, you need to make a solution of medium thickness. “Beacons” are installed along the entire length every 150 cm under the width of the existing rule. The “beacons” need to be set at the required level.
After a thorough check, you can complete the filling with sand-cement mortar. When pouring, you must immediately pull out and level the slab to a smooth surface. The rule should move slowly and smoothly from side to side along the entire concreted floor plane. The slab pouring process is complete.
Video description
How to correctly place stands and “frogs”, see this video:
It is important to remember that metal fittings should not have contact with air to avoid corrosion. In order for it to remain completely in the body of the concrete, the longitudinal rods and the ends of the transverse ones should not rest against the sides or vertical fences of the formwork; there should be about 3 cm of free space between them. The top of the frame should also be filled with concrete to a height of 3-5 cm.
Concrete selection
Since it is advisable to pour the ceiling between floors in one step, and mixing large volumes by hand takes a lot of time, it is best to order ready-made concrete from a factory. This is beneficial in terms of time and physical costs, adherence to technology and confidence in the quality of the solution. For monolithic flooring, high-strength concrete is chosen - B20 or B30 (M300-M400).
If there is a need to save money or it is impossible to drive large vehicles onto the site, the solution is prepared in a concrete mixer. Such equipment allows you to fill an area of 30-40 sq.m. in one shift. In cases where the overlap area is larger, steel mesh sections with a cell size of no more than 10 cm are installed inside the formwork, and concrete is poured between them.
It is not recommended to make cuts from boards or other solid materials Source ktovdome.ru
Preparation of the solution
Regardless of which brand of concrete is chosen for the floor, the solution is prepared in a similar way.
How to prepare concrete:
- Turn on the concrete mixer, pour water into it, pour in the required amount of cement
- Next, the mixture is stirred until a mash is obtained
- Gradually add sand to the mixer and mix everything well.
- When the solution has reached a homogeneous consistency, pour crushed stone and the rest of the water into the container and mix
The volume of water is calculated in accordance with the proportions of other materials, since with an excess or insufficient amount of moisture, the properties of the finished concrete significantly deteriorate. Builders advise roughly calculating this: water should be half the volume of cement.
Video description
This video shows how to make concrete in a concrete mixer:
Pouring the slab
Before starting concrete work, communications need to be stretched through the frame - heating pipes, water supply, sewerage, electrical cables in a steel or corrugated pipe. And bring them out at design points.
There are several requirements for how to fill a monolith so that it turns out strong and does not crack. They relate to both the process of laying concrete in formwork and its care during the hardening process.
Shrinkage will be less if there are no voids or air cavities left in the solution. To compact it, fresh concrete is subjected to vibration. If you do not have a deep vibrator, you can create a “shake” using a hammer drill. A large-diameter drill, possibly a broken one, is inserted into it, and it is turned on in the hammer mode, resting the drill against the formwork flooring from below. moving over the entire area, thus compacting all the concrete.
It is immediately leveled, trying not to leave obvious depressions and growths on the surface, in order to subsequently facilitate the work of constructing the screed.
Floor screed
The versatility of concrete is expressed in its use in the construction of a house for walls, ceilings, and floors.
To make a concrete floor, the surface is first leveled. The required amount of soil is removed and the cleaned surface is compacted with crushed stone and gravel. Insulating material is laid on top of the compacted crushed stone and the mixture is poured. The thickness of the floor screed must be at least 5 cm. In rooms with additional loads, the floor must be reinforced with mesh.
Filling begins from the far corner so that the floor level is slightly higher than the level of the slats, which first divide the room into strips. Even filling ensures high-quality coverage. The surface is leveled using the rule, the slats are removed as they are filled with concrete, the holes are filled with mortar. Having finished pouring the screed, cover it with film and periodically moisten it.
Video description
The full range of work on the production of a monolithic floor is shown in the video:
But the work doesn't end there. The slab will reach its design strength only in a month, and during the first two weeks it needs to be looked after, especially in dry and hot weather.
Immediately after the concrete has set enough to support the weight of a person, the surface is irrigated with water and covered with plastic film. The film will protect it from excessively rapid evaporation of moisture from the upper layers and uneven setting. Periodically it needs to be removed, the surface wetted and put back in place. These measures significantly reduce the likelihood of shrinkage cracks forming.
After about 5-10 days, depending on the air temperature, the film can be removed completely, and the concrete can continue to be wetted once every 1-2 days.

It is better to water concrete from a watering can or using a sprayer Source dako-group.com.ua
The rate at which concrete matures and gains grade strength also depends on environmental conditions. It will be possible to remove the formwork no earlier than four weeks after pouring - this is exactly the period the slab will need for final hardening at an average air temperature of about 20 degrees.
In two weeks it will gain 70-80% strength. In principle, provided that the formwork structure is preserved, it will be possible to move along it and continue construction work.
You can pour the screed after the slab has completely dried. To determine whether unbound water remains in the concrete, a dense impermeable material (thick film, roofing felt, linoleum) is placed on the surface, and after 8-10 hours, check whether a dark wet spot has formed underneath it.
Calculation of concrete mixture proportions
Calculating the proportions of the concrete mixture is a very responsible matter. In order for the quality of the composition to be at its best, it is necessary to fully comply with the technology and adhere to the adopted requirements. You can use concrete for floors only of certain grades that can withstand the expected loads. The best option is brand 350; the use of four hundred or five hundred is extremely rare, since they are too expensive.
The mixture is made not only on the basis of cement, but also with the use of sand, crushed stone, and other additives can be used, anti-frost ones are especially popular.
Correctly calculating the proportions of the mixture for pouring can only be done taking into account numerous factors. These include the fraction of added crushed stone and sand, density, requirements for the future mixture, for example, its resistance to loads, its mobility, water resistance and much more. In order to properly prepare the solution for pouring, it is necessary to take into account the relationships between its individual components. Cement, as a rule, is taken as a unit, and all other components are taken in relation to the weight of cement.
To prepare a concrete solution you will need cement, sand, and crushed stone. The proportions of the components depend on the brand of cement.
For example, if 25 kg of cement, 75 kg of sand, 125 kg of crushed stone are required, then their ratio is usually expressed as follows: 25 * 75 * 125 or 1 * 3 * 5. This means that 1 part of cement is taken, 3 parts of sand, 5 parts of crushed stone.
All proportions are calculated based on the grade of concrete and the required parameters:
- for M-300 the mass composition is taken in the following ratio: 1 * 1.9 * 3.7. In this case, the amount of concrete produced from ten liters of cement is 41 liters;
- for M-400 the ratio is 1*1.2*2.7. The resulting amount of concrete will be equal to 31 liters for every 10 liters of cement taken.
The amount of water should be just enough so that the kneaded mixture is sufficiently plastic, but not too hard.
Return to contents
Briefly about the main thing
If you know how to pour a monolithic floor slab, you can not only save on building a house, but also make it more reliable and durable. But for this it is necessary to accurately calculate the loads and decide on the design of the slab, its thickness and reinforcement. The production of a monolithic floor begins with the installation of formwork, into which a steel reinforcing frame is installed. It is poured with high-quality, high-strength concrete, which is compacted and leveled during the laying process, and then protected from drying out for several days.
Ratings 0
How to pour a floor slab on a strip foundation
- Slab foundation
- Advantages of a slab foundation:
- Strip foundation
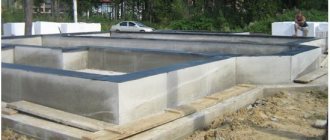
- Construction of a monolithic slab on a strip foundation
Which foundation is better: a monolithic slab or a strip foundation? When is a monolithic slab installed on a strip foundation?
Scheme of a Norwegian foundation with a floating floor.
A monolithic slab foundation or monolithic slab is a solid reinforced concrete slab that is installed under the entire area of the building.
Of all the types, it is the monolithic slab that has the largest supporting area and therefore ensures the stability of a fairly heavy structure on any soil, even with low bearing capacity.