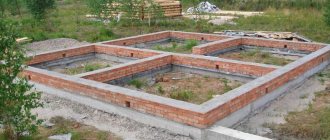
There are many types of foundations for the construction of wooden structures, small houses or massive buildings. The most popular in construction in the private sector is a strip foundation. Because this is the most affordable way to build the foundation of a house, which you can do yourself. In addition, this option allows you to include a basement or ground floor in the project.
Due to its versatility, such a foundation can be used: for a home, for a bathhouse, under a garage or under a porch. In the article we will talk about the advantages and disadvantages of a strip foundation, consider what types there are, and tell you with the help of short instructions how to build it yourself.
Strip foundation - pros and cons
Builders include the following in the list of advantages of strip foundations:
- Low construction cost. A do-it-yourself strip foundation rarely takes up a large area. You don't need a lot of materials to create it. Of these, you will need the simplest ones, which can be found in any store and even garage.
- Simplified design compared to other types of bases. The principle of arrangement is clear even to a beginner and does not involve working with equipment, a crane, etc.
You can dig a trench around the perimeter using a shovel. The formwork is equipped with a saw and hammer. The reinforcement is knitted with strong steel wire. The concrete mixture is mixed at the construction site.
If making concrete by hand seems like a labor-intensive process, you can always ask your friends for an economy-class concrete mixer, designed for half a cube.
- The strip foundation can withstand high loads. In fact, this base is represented by a monolith of concrete. Therefore, you can safely build a house of 2 or 3 floors on it.
- High speed of work. If the house for which a strip-type foundation is being made has an area of 100 square meters, it is possible to build a foundation from scratch within a month. Using industrial mixers designed for mixing concrete, you can reduce the operating time to a record 1 day. The main stage is digging a trench and constructing formwork reinforced with reinforcement.
The disadvantages of pouring a strip foundation are the following:
- In order for the foundation to be strong and reliable, it is important to provide for the preparatory stage. Specialists analyze the soil and calculate the required depth. If you take this step carelessly, there is a real risk that the winter house will lead to the side or it will sag. Soil heaving and mobility are the main parameters that are determined before construction.
- Large specific gravity of the base. The ground, in addition to the foundation, bears the weight of the building itself. Over time, the soil may sag or the house may tilt to one side.
Comparative table of foundation types
| Monolithic slab | Strip foundation | Screw piles |
| Construction period 1 week. | Construction period 1 week. | The construction period is several days. |
| Construction is allowed a month after pouring. | Construction is allowed after 20 days from pouring. | Due to its loosening when screwing the pile, the foundation requires soil shrinkage. |
| The permissible load on the foundation is 3 tons per sq.m. | The permissible load on the foundation is 17 tons per sq.m. | The permissible load on one pile is no more than 3 tons. |
| Service life more than a century. | Service life more than a century. | Service life is about 35 years. |
| When building on a slope, a combination with screw piles is needed. | When building on a slope, a combination with screw piles is needed. | The soil and soil must meet the requirements for installation. |
| It is impossible to include an underground room in the project. | You can make a basement or ground floor. But waterproofing work is required. | — |
| Construction of the foundation will cost 250-350 rubles. with an area of 9x9 m. | Construction of the foundation will cost 200 rubles. with an area of 9x9 m. | Construction of the foundation will cost 150-180 tr. with an area of 9x9 m. |
Species and subspecies
Based on the depth of the foundation, strip foundations can be shallow or recessed. There is no constant indicator of burial depth. It depends on the depth of soil freezing in a particular area.

A shallow foundation is a foundation with a construction depth less than the depth of soil freezing. When the ground freezes, it expands, which can push the concrete mixture and the building upward. The owner of the house may encounter uneven distortion and even rupture of the foundation. Suitable reinforcement will help avoid this. It is calculated using construction calculators.
A shallow strip foundation for a house is suitable in the following cases:
- There is non-heaving soil under the building.
- Low level of groundwater depth.
- It is planned to construct a drainage near the building to drain water.
- A blind area with insulation is planned near the house.
- The building weighs a little. For example, this is a wooden bathhouse, a greenhouse or a frame house.
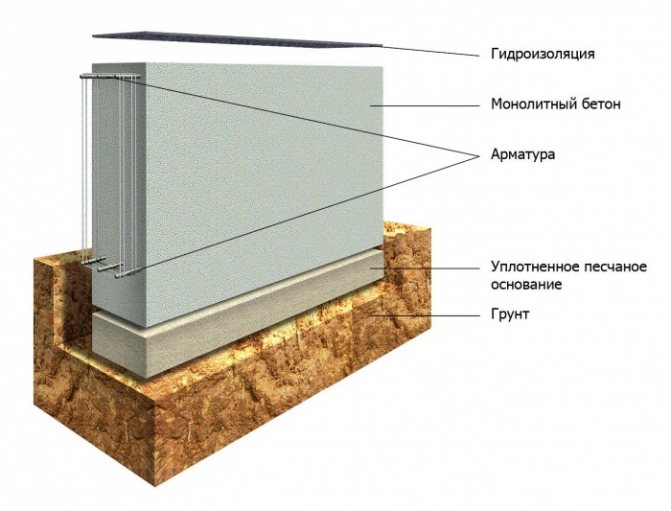
The advantages of a buried foundation are that construction is inexpensive and the level of strength is high. Although more often a buried foundation is used for the fortress of a structure. Its implementation involves the construction of a monolithic reinforced concrete strip. You can make blocks from FBS. They are placed on a reinforced concrete pad. A reinforced belt is built on top; it will connect the individual parts into a single whole.
Basement and groundwater level
Properly performed basement waterproofing is of key importance for the quality of the work in question. A decision on the possibility of deepening the basement should be preceded by a study of the issue of the depth of groundwater. The easiest way to do this is to dig a hole in the immediate vicinity of the building to the level of the intended location of the basement floor, and then observe whether water appears at the bottom or not. Another option is to get information from neighbors who have basements in their houses.
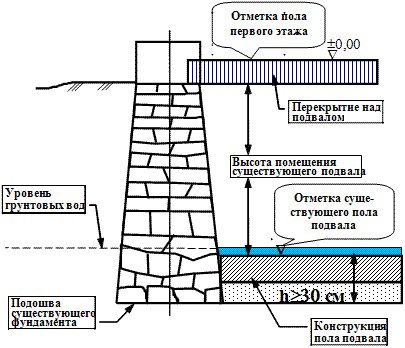
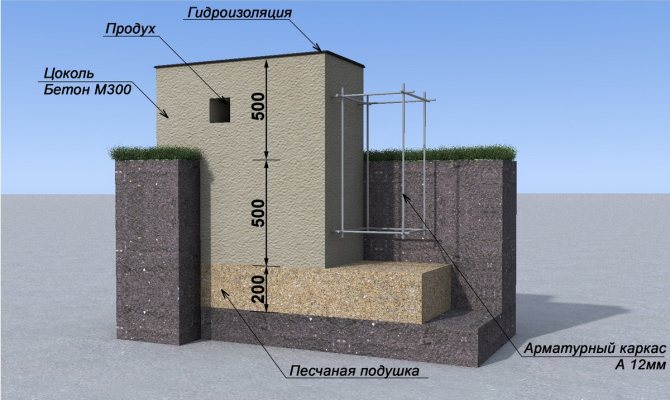
Scheme of strengthening the base and arrangement of the basement floor when it is deepened to 30 cm
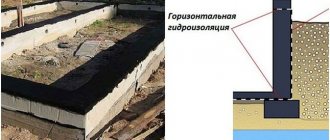
To create protection against groundwater, various waterproofing technologies are used. The most effective and therefore often used today is gluing the walls and floor of the basement with two layers of roofing felt or roll material with similar performance characteristics. This prevents moisture from getting from the soil into the basement, which would lead to unpleasant consequences such as the appearance of fungus, condensation, rot and the gradual destruction of building structures.
High-quality basement waterproofing, which you can order from our company, is a prerequisite for performing deepening work. Moreover, it is carried out regardless of the identified groundwater level and is necessarily included as an important part of the design documentation for the planned work.
Materials used for the construction of strip foundations
To build a monolithic foundation for a house, you may need the following materials:
- Portland cement;
- clean river sand;
- crushed stone;
- fragmentary rock;
- fittings made of strong steel;
- broken brick;
- water.
Of course, not all of these components are used when mixing one portion of the solution. Much determines the result that needs to be achieved. If you need to equip a strip foundation for a building with a complex configuration, mix cement, crushed stone and river sand.
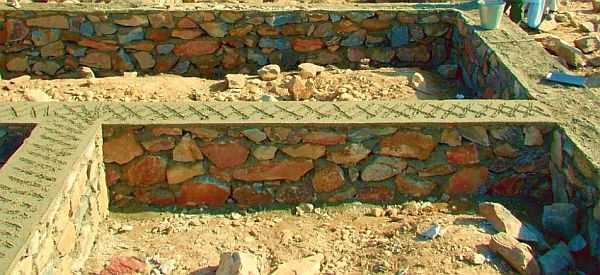
Rubble concrete base is suitable for sandy soils. It consists of large stones, cement and sand. For clay soil the option is a losing one.
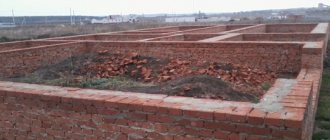
Adding brick to the mass is required to fill foundations located under or above the ground. Also, a brick foundation is suitable for the construction of a basement. Brick cannot be used in areas with a harsh climate; it will quickly deteriorate and the house may settle. The brick mortar is protected with waterproofing material. It is recommended for use in the construction of a frame house with thin wall structures made of brick.
High-rise buildings are built exclusively on slab or block concrete foundations. They are manufactured at the factory and transported to the construction site in finished form.

When buying concrete, it is important to choose the required brand of substance. The choice of brand depends on the following parameters:
- the mass of the building that falls on the base;
- weight of the building plus the foundation;
- type of reinforcement used;
- type of soil;
- climate of a particular area.
For poured strip foundations, the following grades of concrete are purchased:
- M100 - suitable for arranging a concrete cushion;
- M200 - will withstand light buildings (baths, sheds, panel houses);
- M300 - indispensable when pouring the foundation for a wooden house or a building made of light blocks;
- M350 is a good and reliable choice for the construction of 1-2-story buildings.
It makes sense to buy the remaining grades of concrete if the project involves the construction of geometrically complex structures and work on a construction site in a region with a harsh climate.
general characteristics
Based on GOST standards, the strip foundation is a reinforced concrete slab with a length of 78-298 cm, a width of 60-320, and a height of up to 5 cm.
Peculiarities:
- long service life;
- construction of structures in a short period of time;
- can be installed manually without using heavy equipment.
To determine the pressure of structures on the foundation, it is necessary to determine the mass with the index. Strip foundations are superior to pile and slab foundations.
On a note!
To calculate the estimate, it is necessary to calculate the cost of installation work and investments in materials for construction.
The usual price per linear meter of a concrete base does not exceed 10,000 rubles. This figure includes:
- soil features;
- basement floor area;
- quantity of materials for construction;
- depth;
- main dimensions of the foundation strip.
The service life is affected by the choice of site for construction, taking into account all the necessary requirements and construction standards. If all rules are followed, the terms can be increased by several decades.
When purchasing materials you need to consider:
- brick can be used for up to 50 years;
- prefabricated structure can last up to 75 years;
- monolithic blocks increase service life up to 150 years.
DIY strip foundation step by step instructions
The first step is for the owner of the future home to contact a design and construction company. Specialists will conduct a geodetic analysis of the site. The study will show the type of soil and the depth of its freezing in winter, at what depth the groundwater flows.
How to calculate the foundation
It’s good if the company’s specialists can calculate the foundation. It is not recommended to do this yourself, except perhaps for the foundation of a small outbuilding, garage or bathhouse. When calculating a strip foundation for a house, they are guided by the data of SNiP 11-B.1-62. You can use construction calculators on the Internet. Next, the site is marked.
Important. Preparatory work includes clearing the soil of debris. The top layer of soil (15 cm) is removed. This will help prevent biological decomposition processes. After all, they can cause an unpleasant odor in the basement and its partial destruction.
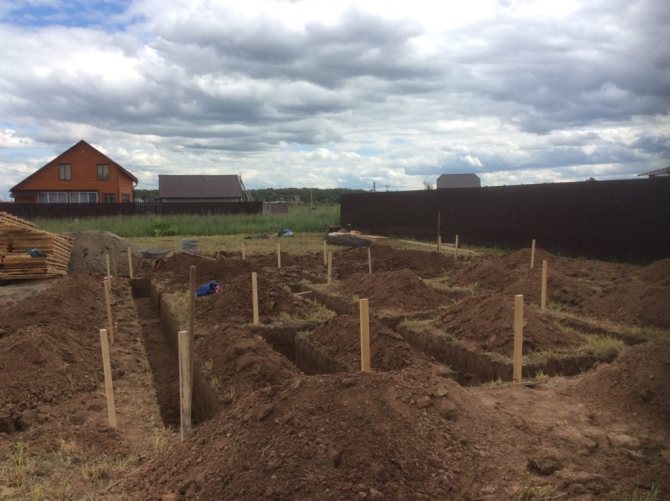
How to mark a site
Correctly apply the markings with your own hands, following this technology:
- The builder fixes the axis of the building and where the first corner will be located. Using a plumb line, he places a peg in this place. The peg can be a piece of reinforcement.
- Next, you need to pull the string, leading it from the first peg, so that you get a perpendicular. Gradually fix the second and next corners, sequentially installing new pegs.
- From the second and third corners, pull the rope towards the fourth. The angles are set following the square.
- As a result, the master should end up with a rectangle. It defines the external boundaries of the future home. It is easy to verify the correctness of the shape by carefully measuring the lengths of the diagonals - they should be the same.
- Similarly, markings of the internal contours of the base are applied, and then the contours for individual components - load-bearing wall ceilings, porch, terrace, supports intended for columns.
- To finally align the markings, following the horizontal direction, wooden planks are mounted at the required height. A string is pulled through them.
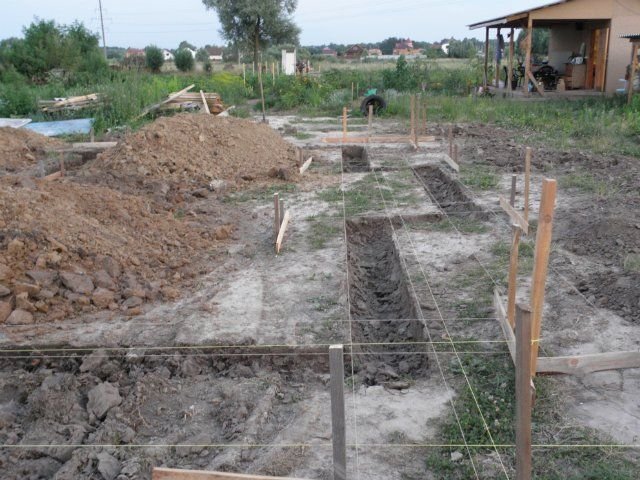
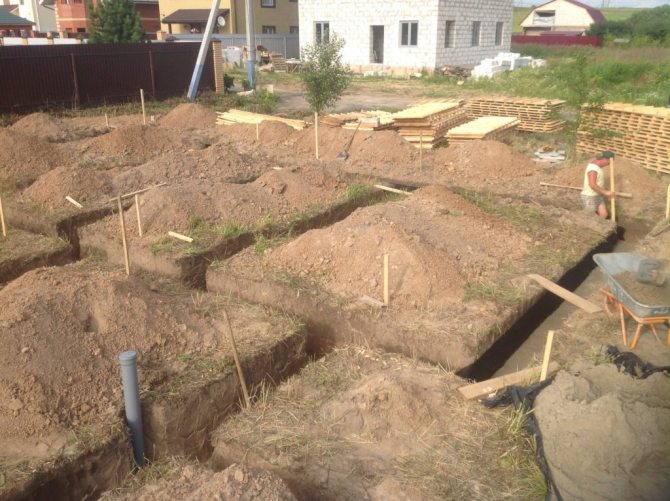
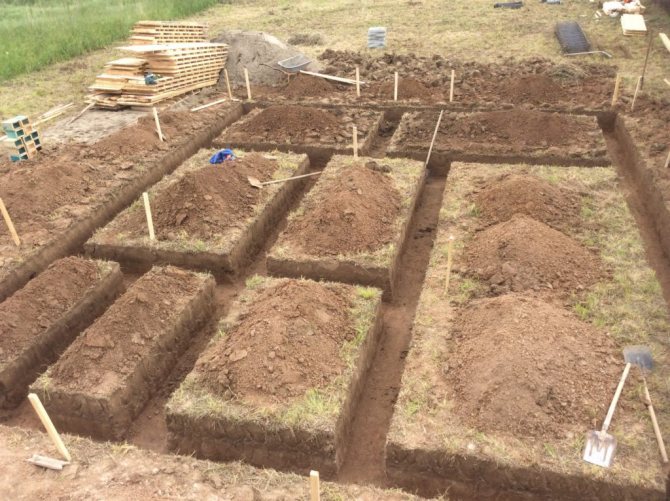
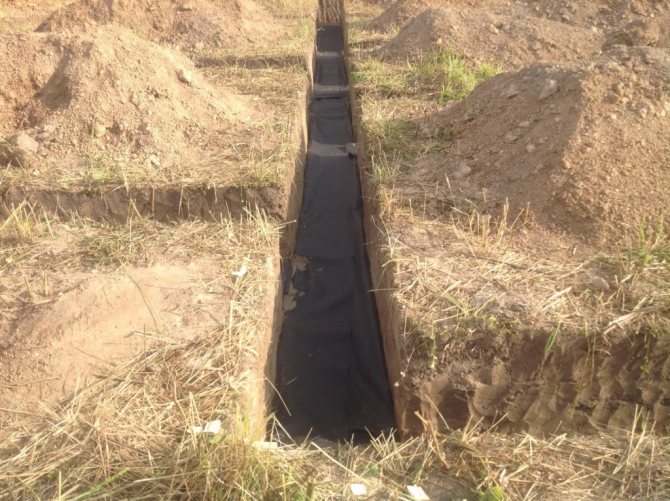
Digging a trench and preparatory work for the bottom of the pit
After the markings have been applied, they begin digging a trench. It is dug taking into account the depth calculated during the development of design documentation. When digging a trench, you need to advance from a low angle. This approach will allow you to avoid a situation where the depth of the pit turns out to be less than calculated.
The trench walls are designed to be vertical. When the soil collapses, partitions are installed; they are temporary. The bottom of the trench is done carefully; to do this, it is leveled several times. Be sure to check the bottom with a building level to ensure there is no slope.
When filling a trench, it is important to consider the following rules:
- River sand is poured until a layer 15 cm thick is formed. Saving sand can lead to uneven distribution of the load on the base. This is often observed in heaving soil.
- The sand is distributed in layers. Before pouring the next one, the previous layer is watered and compacted.
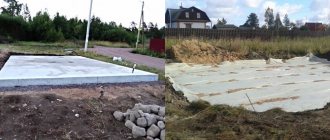
A strong waterproofing film is laid at the bottom of the pit. You can use special geotextiles. The material has good reinforcing characteristics and increases the reliability of the base. As an alternative, experts recommend pouring the concrete mixture in a rough form. Before starting to install the formwork, wait a week. During this time, the concrete will just set.
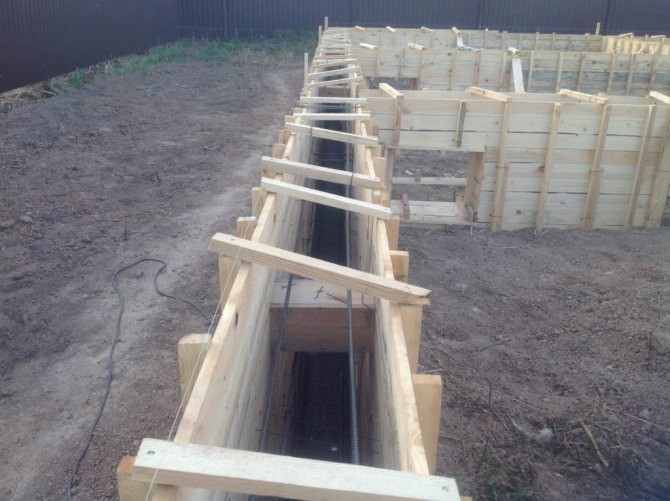
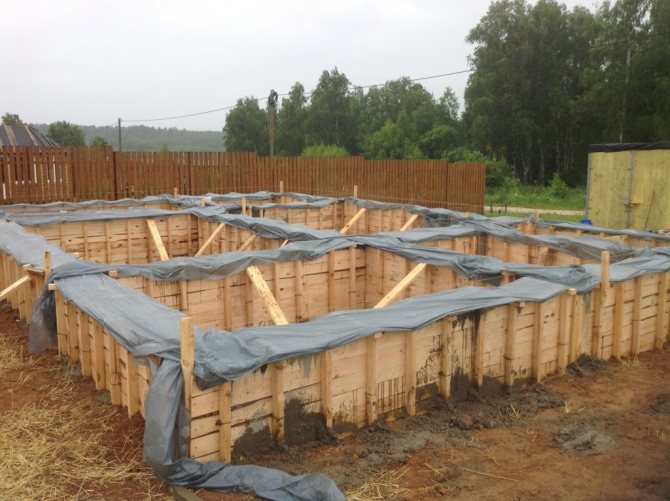
Arrangement of formwork
Next, do-it-yourself strip foundation step-by-step instructions provide for the arrangement of formwork. It is carried out focusing on a contour made of twine:
- Corner supports must be installed. Bars 50 mm thick are suitable for this. Before moving on to the next step, check the length of the diagonals.
- The edged board is assembled into formwork. The boards are fastened together using metal bars or angles and self-tapping screws. The caps of the fasteners appear to be on the inner surface of the formwork. The bars and corners are left outside.
- The outer sides are reinforced with supports. Then you don’t have to worry about deformation of the formwork during the process of pouring the concrete mixture.
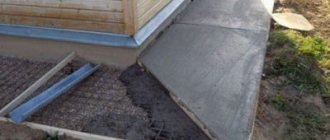
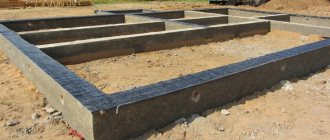
- The height above the ground is constructed at a distance of 30 cm.
- Inside the base, a level is fixed to which they are guided when pouring concrete.
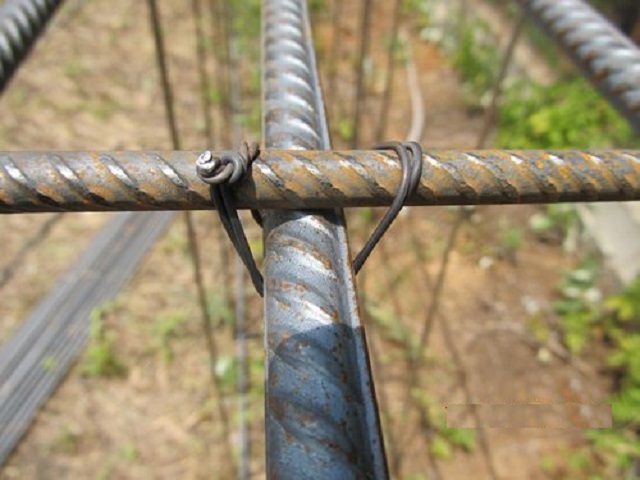
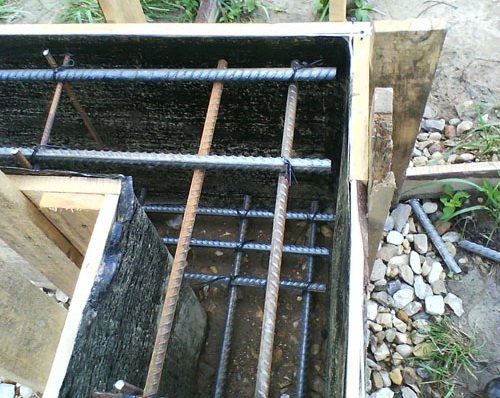
Installing fittings
To install the reinforcement, use metal rods with a cross-section from 8 to 12 mm. The rods are cut into pieces of the required length. The reinforcement is laid following the following technology:
- The segments are laid along and across the axis of the base.
- If the base is buried 0.4 m or more, vertical placement of metal rods is also required.
- The reinforcement is fixed using steel wire. It is better to avoid welding. It reduces corrosion resistance in welding areas and bending strength.
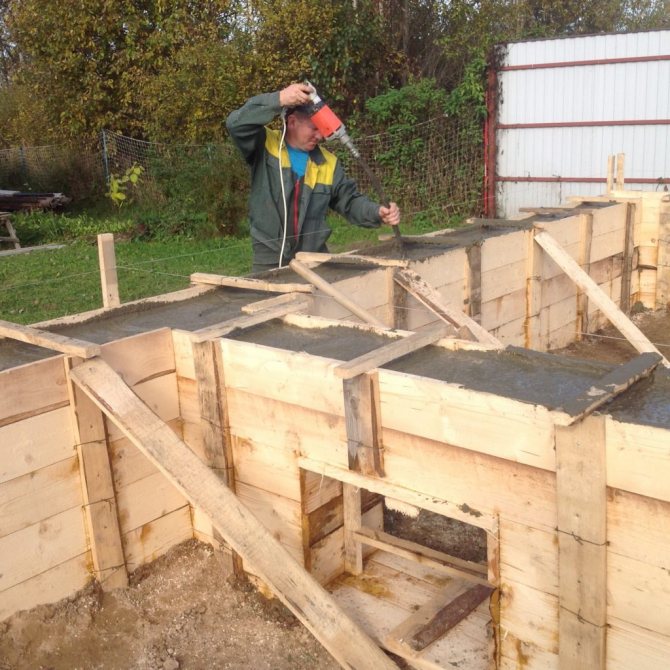
Pouring concrete and maintaining it
Next, a do-it-yourself strip foundation requires pouring a concrete mixture. The concrete mixture is prepared by mixing concrete with sifted and washed sand. You can choose one of the proportions:
- 1 part concrete to 2 parts sand;
- 1 part concrete to 2.5 parts sand.
The consistency you should end up with is liquid sour cream. The mixture is added to crushed stone. The volume of crushed stone should be equal to the volume of sand.
After thoroughly mixing the components, the mixture is laid out in the formwork. It is necessary to pour the concrete mixture to the level fixed on the formwork. The top layer is leveled using a rule or a trowel. Sifted sand is poured on top of the mirror surface of the concrete.
Important. It is easier to do this using a sieve. Experts recommend a procedure for rapid hardening of the concrete mass and to avoid erosion or cracking of the base.
You definitely need to give the concrete time. It is left covered with burlap or other material for a month. If it is too hot and dry outside, it is recommended to wet the surface of the base so that it does not dry out.
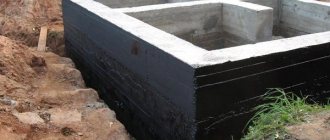
The strip foundation with your own hands must mature properly. Only then can you proceed to arranging wall structures. The formwork is dismantled and waterproofing is laid on top. The waterproofing material will ensure the durability and reliability of the base and improve the thermal insulation properties.
How to make a strong strip foundation yourself is clearly shown in the video:
Calculation and design rules
Before drawing up a project and determining the type of foundation, you should familiarize yourself with the construction documentation. It describes the rules for calculation and contains tables with the necessary coefficients.
Main documents:
- GOST 25100-82 “Classification of soils”.
- GOST 27751-88 “Exterior of building structures and foundations.”
- SP 13113330.2012 “Building climatology”.
Calculation plan for construction:
- make the necessary calculation of the total weight of the structure (including the roof, floors and household installations);
- The weight of the house is indicated by the materials used in construction.
To determine the load on the base, you should summarize the following indicators:
- snow load;
- payload;
- load created by structural elements.
To determine the snow load, you must use the following formula: Snow load = S roof X mass of snow cover X by the coefficient that makes up the angle of inclination of the roof.
Next, you need to calculate the permissible load. This includes:
- people living in the building;
- Appliances;
- furniture;
- ovens.
Calculation formula = S structure +180 m2.
On a note!
To calculate the parameters, it is necessary to use mathematical and marketing calculation methods in the construction materials markets.
The mathematical method consists of:
- Determine the length, width and height of the elements.
- Multiply the obtained data by the volume data.
- Find out the specific gravity of building materials.
- Find out the mass of each element of the building using the formula: Mass of 1 part of the building = V part x specific gravity of the materials made.
- Find out the mass for the foundation. To do this, add up the results of all parts of the structure.
Useful tips for pouring strip foundations
At the stage of planning a strip foundation for a building, it is important to assess the risks associated with soil sliding. It is better to refuse a strip base if:
- the soil is cracked or sinking;
- The site is located in the seasonal flood zone of a lake or river.
At the stage of laying out the concrete mixture into the prepared formwork, it would not hurt to take into account the following recommendations from experienced builders:
- In order for the concrete to settle better, the formwork is carefully tapped on the outside. You can pierce the mixture in several areas with a rod and further compact it with a block of wood. This will remove any remaining air from the voids. The procedure is easier to carry out using a hammer drill with an attachment or a construction mixer.
- Concrete is supplied from a low height. Otherwise the mass will separate.
- If the strip base is poured in winter, special substances are added to the cement.
Preparation of tools and materials
The first thing you need to do is take care of an arsenal of tools and raw materials for working with the foundation. What does this list consist of? If we talk about materials, it is as follows:
- river sand of medium fraction;
- crushed stone or gravel;
- boards or plywood for formwork;
- reinforcement rods Ø10–12 mm and binding wire;
- pegs and rope for marking;
- a concrete solution consisting of sand, water and cement.

Now let's look at the list of tools:
- crowbar and shovel;
- tape measure, level, plumb line, level;
- hammer and nails or screwdriver with self-tapping screws;
- concrete mixer;
- buckets, wheelbarrow, shovel;
- vibration installation for concrete compaction;
- Master OK.

As you can see, the list is large, but all materials for strip foundations are easily available.
Note! If you do not want to prepare concrete for the foundation yourself on site, you can order it in advance from a specialized company. They will deliver you the right amount of high-quality mortar for pouring the foundation.
Foundation cushion installation
When the pit is ready, you can proceed to the next stage. The process is as follows:
- Sand is poured to the bottom.
- Water is added to thicken it.
- The surface is tamped with a special tamping tool to compact the sand.
- It is important to ensure that the sand level reaches 10 cm. You can make approximate marks on the walls.
- A layer of crushed stone or gravel is poured on top.
- They can also be tamped. The required layer is 10 cm.
Thanks to such a substrate, the foundation will not shift and will become more reliable and durable.
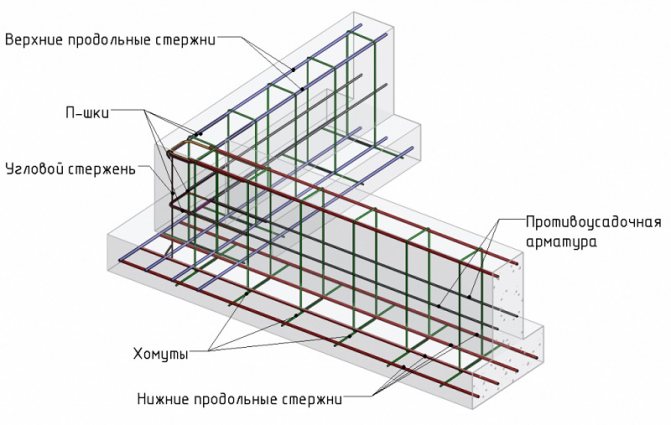
Reinforcement as a guarantee of strength
To give the strip foundation rigidity, it needs to be reinforced with reinforcement. Everyone knows that reinforced concrete is many times stronger than simple concrete for foundations. Therefore, a frame in the form of a mesh is made from reinforcement rods. It is better to connect the elements not by welding, but by binding wire. The completed frame is installed in the formwork. There are several nuances here.
Do not install the frame on the ground. It should be at least 5 cm from the soil. The same applies to the side walls. Use stands to support the frame. This is what ideal strip foundation reinforcement looks like.
Preparatory work
If you have already stocked up on everything you need, then you can start practicing. You must have drawn up a foundation plan in advance, which indicates its layout, width, depth of the tape and other features. All this depends on the type of soil, the depth of soil freezing and the occurrence of groundwater. It is better to entrust such work to an experienced specialist who can draw up a high-quality plan.

Now you can work on the area where the foundation will be built. Rate it. Are there trees, bushes or other structures that will get in your way? They need to be removed. The work area should be free of debris, remains of old buildings, etc. It is desirable that the surface be relatively flat.
Advice! At the site you need to make lighting, take care of sockets and water supply.
After this, you can begin marking the future foundation. High-quality markings are essential. This way, you will make the future foundation perfectly even and of the correct shape. The ropes will serve as guides. You can read more about how to mark a strip foundation on our website. In general, the scheme looks like this.

And then “fascinating” land work awaits you.
Installation of foundation formwork
It's time to go upstairs and build the formwork. This is the ground part of the structure that will form the base of the building. Its height depends on the desired base. For cold regions this figure can reach 50 cm, for warm regions 20–30 cm. The structure itself can be made of different materials, such as boards, plywood, asbestos-cement pipes, etc.
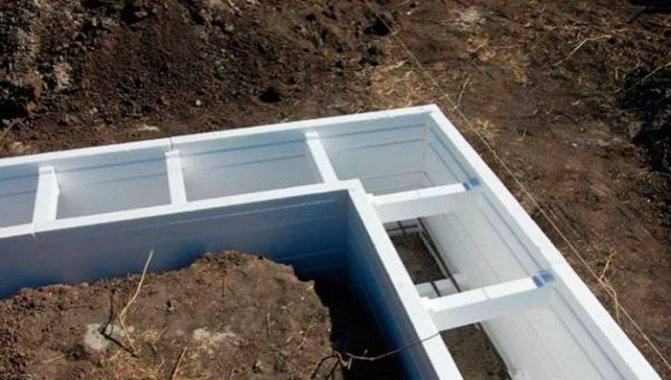
The types of formwork are also different. There are two options:
- Removable formwork, which is simply removed after pouring concrete.
- Fixed, which becomes part of the base.
As you understand, the first option will be cheaper. But it will take more time to set it up. The non-removable structure will serve as additional protection and act as insulation.
You can see the formwork diagram in the figure below. The main task is to make it perfectly smooth and reliable. Supports are installed on the sides, and a screed is packed on top. So, the concrete will not fall out of it.

Advice! To make the process of removing the formwork easier after pouring, and to prevent the concrete itself from seeping through the holes, you can cover it from the inside with a film.