Selection of design solution
The blind area is made of a leveling bedding layer and a top covering.
Sometimes it is made only from a 5-10 cm layer of clay mixed with sand or crushed stone. Factors such as heaving soil or a climate zone with severe frosts justify additional installation of thermal and waterproofing. As thermal insulation between layers, you can choose
extruded polystyrene foam
, but the use of bulk coating materials in this case is not recommended.
The durability of the blind area depends on the chosen design and type of coating. To solve this problem competently, you need to analyze:
- soil characteristics: bearing capacity, heaving and freezing depth;
- experience in operating neighboring houses built about 5 years ago;
- operational requirements for the track.
Building codes prescribe requirements for various designs and sizes of blind areas.
The width of the protective barrier should be 20-30 cm greater than the width of the protruding roof eaves and varies:
- for stable soils – from 0.8 m;
- for medium heaving – over 1.5 m;
- for clayey ones – up to 2 m.
Repair technology for minor damage
Purpose of the blind area
Let us say right away that there are no regulatory documents in our country that would regulate the correct creation of a blind area. Separate standards tell about its purpose, required dimensions, angle of inclination and other information. The sequence of actions is not written. However, there is a lot of world experience in this matter, which it would be foolish not to take into account.
A well-made blind area will protect the foundation from the harmful effects of moisture.
These documents say that the blind area is installed near the building in order to protect the soil from getting wet along the perimeter of the building. That is, it is part of water protection measures. Why protect the soil, you ask? Yes, because when it is saturated with water, moisture begins to penetrate into the foundation if it is poorly waterproofed. During periods of frost, this causes increased heaving of the soil and destruction of concrete.
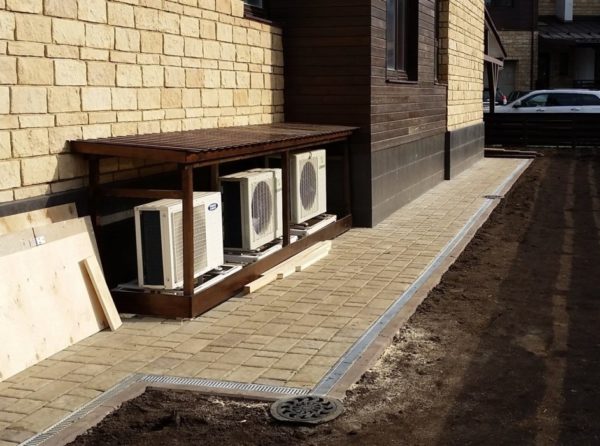
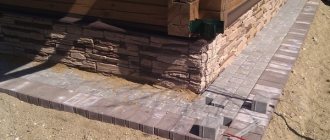
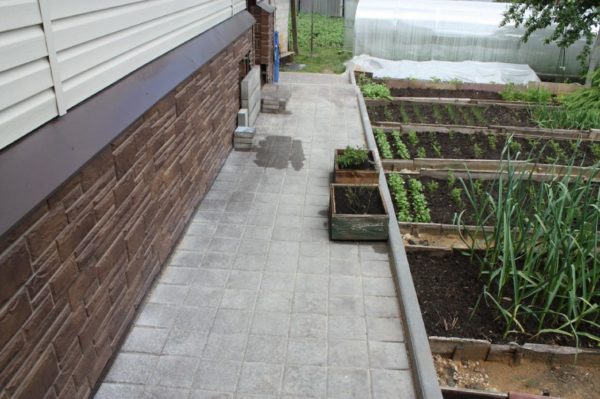
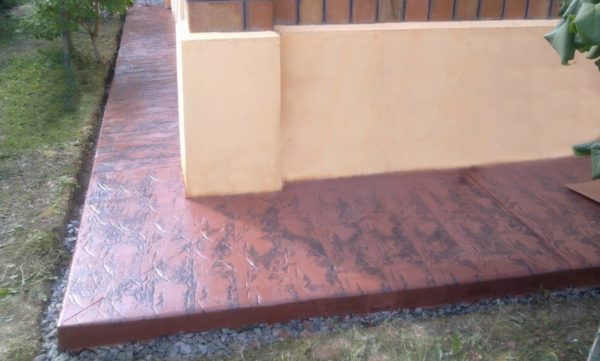
The blind area around the building is lined with concrete tiles
Also, the abundance of water in the soil can affect its load-bearing properties. This is typical for clay and loamy soils. As a result, they cannot cope with the load from the structure, and it begins to sag, causing serious deformations, which can lead to cracks in the walls and foundation. Therefore, it is so important from the very beginning to ensure that the soil around the house does not get wet. In addition, this reduces the load on the foundation waterproofing.
The blind area is also part of the architectural appearance of the entire house - without it, the building will not look attractive, even if expensive and beautiful materials are used to decorate the facade. Everything should be harmonious. And again, the blind area can be used as a path - it can be disguised and made one piece with the decoration of the local area.
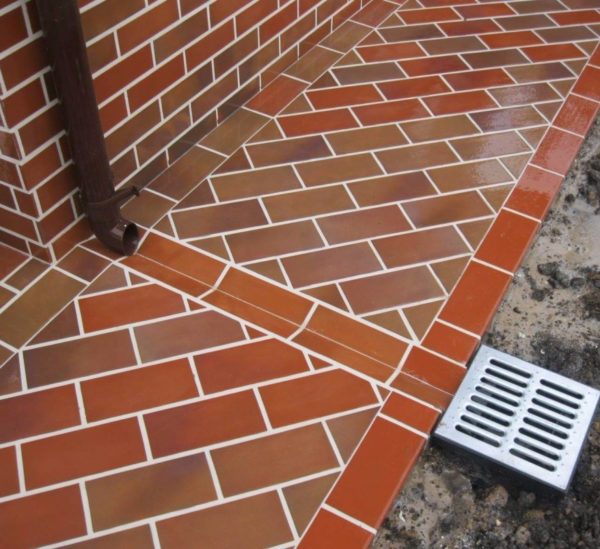
The blind area and basement of the house are lined with clinker bricks
How to seal the gap
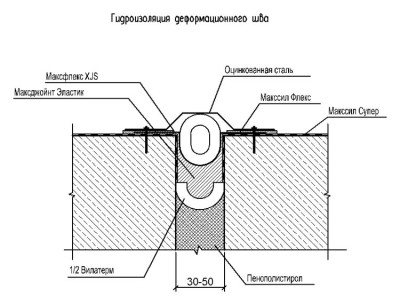
Initially, the blind area and the foundation are not rigidly attached to each other due to the uneven shrinkage of both structures. Be sure to leave an expansion joint in the form of a small hole, running along the perimeter around the base of the house. It is sealed with different materials, covering it from the outside to seal it from external influences.
Eliminating the gap between the base and the blind area can be done using the following materials:
- polyurethane sealant;
- construction foam;
- damper tape;
- expanded polystyrene (extruded only);
- bitumen mastics;
- transverse reinforcement with additional finishing with mortar.
The main materials used to seal the gap between the basement floor and the blind area are polyurethane sealant, polystyrene foam or medium-thick foam. Quite often foams, damper tapes or bitumen mastics are used.
Technology and construction stages
The arrangement technology requires the creation of:
- A slight slope of 3-10 degrees in the direction opposite to the house. The concrete layer needs to be inclined 3-5 degrees, and the cobblestone or crushed stone requires an angle of 5-10 degrees.
- Laying a concrete gutter or a pipe sawn along the outer edge of the blind area for water drainage.
- Along the edge adjacent to the wall of the house - an expansion (temperature) joint 1-2 cm thick made of damper tape, roofing felt folded in half, sealant, sand, bitumen, foamed cellophane or polyurethane foam.
- When waterproofing the basement of a house at the level of the blind area, a blind connection is unacceptable, otherwise it will be impossible to avoid shedding of the finishing material during subsequent shrinkage.
Stages of construction of a blind area resistant to temperature deformations:
- Dig a ditch 30-50 cm deep around the house and treat its surface with a herbicide that destroys weed roots.
- Install a curb or removable formwork along the outer edge of the ditch.
- Pour leveling drainage into the trench 15-20 cm deep: crushed stone, gravel stone, clay, sand or sandstone, tamp tightly with a tamping machine.
- Lay decorative moisture-proof and waterproof material: clay, concrete, small cobblestones, paving slabs or asphalt.
Seam insulation
In order to prevent moisture from getting into the ground floor, basement, and foundation, expansion joints must be insulated from it. If water leaks under the blind area, then all the work to create it will be useless, and the concrete around the house will only play a decorative role. Waterproofing options are calculated based on the nature of the cuts, water pressure, and maximum deformation load:
- Use polymer or rubber seals.
- Place a gernite strand into the cut.
- Close the cut with a waterstop.
- Install profile structures made specifically for this purpose.
What are the requirements for the blind area?
Not a single regulatory document requires connecting the amount of roof overhang with the required width of the blind area, although the connection, at first glance, is logical. Very often you can come across information that you need to retreat 20-30 cm from the projection of the edge of the roof overhang. In fact, this is not required, since all water from the roof must be drained through the ebb system.
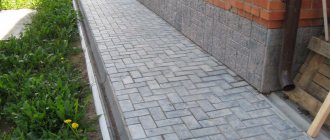
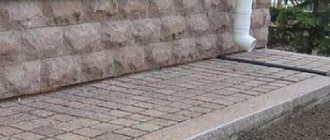
The blind area is lined with porcelain tiles
Unorganized drainage from the roofs of two-story houses (no more) must have an overhang of at least 60 cm in width. In this case, the difference with the width of the blind area will be only 10 cm. It follows that the recommendation for a protrusion of 20-30 cm is purely advisory in nature - many people do this, but there is not much point in this, since even if the overhang is wider than the blind area of the correct size and water will get into the ground, it simply will not travel this distance underground. The main thing is to protect the necessary centimeters.

There are also looser soils, which are called subsidence. There are two types, and the requirements for the width of the blind area will differ significantly. Type 1 – 1.5 m or more, type 2 – 2 m or more.
As for the angle of inclination of the blind area, it should fall in the range from 1 to 10%. For subsidence soils of both types, the minimum is 3%.

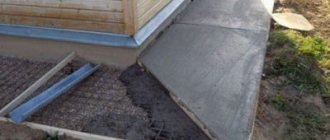
Conventional concrete blind area around the house
The nuances of proper creation
In order for the protective screed around the house to last more than 1 season and not require rework every year, the builder needs to take into account:
- features of the land plot in terms of geology and relief;
- water drainage system;
- the need and location of expansion joints of various types;
- required dimensions and material of the blind area.
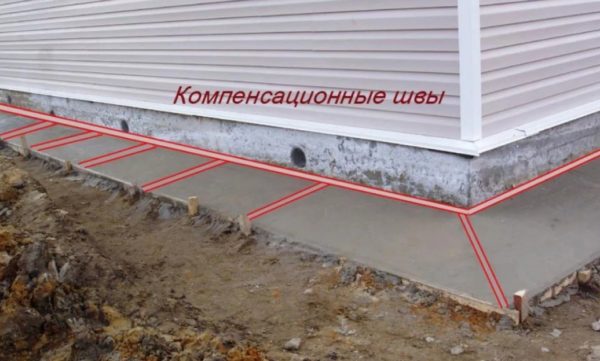
If the surface will enter a pedestrian area, possible additional loads should be calculated. The outer coating can play not only a decorative role, but also improve overall strength and wear resistance. The distance between the seams in the blind area is on average 2-2.5 m. More accurate calculations can be made by a specialist who will take into account the material of the walls and the nature of the foundation. For wooden houses with a lightweight concrete base, the distance, type of joint, and its width will differ.
How to repair blind areas made of various materials
The technology of repair work directly depends on the material used for the finishing coating of the multilayer structure.
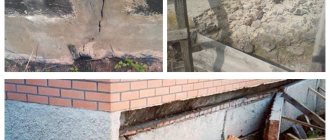
It is recommended to begin repairing a concrete blind area as soon as possible after detecting cracks and crevices in the structure. Delaying repair work aggravates the situation and can lead to destruction of the blind area.
Surface preparation. It is important not only to remove dirt and dust from the repaired area, but also to wash it with water.
Assessing the condition of the surface - repairing small cracks consists of filling with mortar. If there is a medium-sized crack in concrete, then it must not only be cleaned, but also covered with soil, which will ensure the necessary adhesion between the base and the concrete being poured. If the crack is deep, then it can be filled with a mixture of slag, bitumen and asbestos, the optimal ratio of these ingredients is 7:1:1.5. After the mixture becomes hard, close the crack completely with concrete.
Serious faults will require a lot of effort. If the bedding has not sagged, then you can get by with repair work, that is, fill the crack with a bitumen mixture and concrete. If the soil has subsided, then you will have to dismantle part of the blind area and duplicate the layers of the lining - compact clay and sand, fill in crushed stone. After this, you will have to install the formwork and fill the area with concrete.
Dismantling the blind area
We repair the gap between the blind area and the wall in the same way - widen the gap with a hammer drill, prime the walls and fill them with concrete mortar.
When repairing the blind area of a house made of paving slabs, there are cases when one or more tiles are damaged. In this case, the cause is improper operation of this part of the foundation - when there is a strong mechanical impact on the structure, the strength of the coating is simply not enough.
If the substrate also subsides, it is necessary to dismantle the sand cushion and lay the layers according to all the rules. Next, we lay the dismantled elements of the finishing layer, following the technology.
Asphalt
If there is damage on the asphalt blind area, we perform the following steps: first, you must completely rid the damaged area of the asphalt covering. Next, we fill the restored surface with liquefied bitumen, after which we lay a new layer of asphalt, compacting it with a roller.
We suggest you read: How to seal a chimney on a roof
Cobblestones
If the top layer is made of cobblestones, then during the repair you will have to remove them along with the binder. If the substrate has not sagged, then it is enough to fill the freed area with crushed stone and compact it. Next, we fill the area to be restored with cement mortar, on top of which the stones are laid. The final stage of work is filling the volume between the cobblestones with mortar.
If the top layer of the blind area is made of cobblestones, then you will have to remove them along with the binder
Soft blind area
When repairing a soft blind area, there are 2 types of complexity:
- Repair work in the upper waterproof part - in this case, you can supplement the backfill or add sand, which fills the gaps between the crushed stone. This option is relevant if the sand is washed away by melt or precipitation waters.
- Complex repairs involve replacing the waterproofing coating, which is located at a distance of 20-30 cm from the top level of the system. Such types of damage are possible due to mechanical impact on the waterproofing material, for example, when pierced by a sharp object, roots, and so on. In this case, it is necessary to remove all the dressing on the restored area and expose the waterproofing layer. We close the hole in the material with a patch and restore water resistance using glue or sealant. Alternatively, you can use double-sided tape, bitumen or polymer-bitumen mastic. The choice of material is determined by the recommendations of the manufacturer of the waterproofing layer. The next stage is the restoration of the bedding - we lay layers of sand, crushed stone and other layers that are necessary for the technical process. How to determine a waterproofing rupture? This can be judged only when the humidity in the basement increases or mold appears, but it is quite difficult to find out the location of the breakthrough.
The waterproof blind area is quick and simple in construction. It consists of an underlying layer covered with geotextiles, which is covered with crushed stone, pebbles or expanded clay of heterogeneous sizes to a height of 10 cm. Such material is difficult to compact, so the disadvantage is that it is inconvenient to use as a path.
The top 10-15 cm clay layer is applied to a well-compacted mixture of sand and cobblestones 10 cm thick.
The cobblestone covering is laid on a bed of fine crushed stone or sand. The layer height is 4-10 cm. The cracks are filled with sand. During repairs, wet gravel or crushed stone is compacted at the bottom of the cut-out damaged areas, filled with cement laitance and clean cobblestones are installed in it. Cover the cracks along the base with mortar or bitumen.
The hidden blind area looks exotic - in the form of a lawn or flower bed. To install it, soil is poured into a trench on top of crushed stone and waterproofing, into which plant seeds are planted.
Asphalt concrete is laid on a 15 cm compacted layer of crushed stone. Asphalt is more often used for multi-storey buildings, as it has 2 significant drawbacks: technically complex installation and the release of substances harmful to health in hot weather. To repair, damaged areas must be cut down and cleaned of dirt.
Pour liquid bitumen over the inside of the pothole, fill it with fresh asphalt concrete and compact it with a hand roller from the edges to the center of the area. Moreover, for a high-quality connection, the new layer must rise above the previously laid one.
Decorating surfaces made from piece materials are common due to their aesthetic appeal, long service life and ease of replacing damaged elements. Concrete paving stones, varied in shape, are very durable and resistant to temperature changes.
Rounded corners prevent edges from chipping. Beautiful, but uneven in color, paving stones made from natural stone are more expensive than concrete ones. Its granite and marble varieties, sawn or chipped, are common. Paving slabs are mainly used with a thickness of 6 cm.
During installation, it is better to make multi-layer underlay drainage: successively clay, waterproofing, sand and crushed stone or cobblestone, placing a pressure strip adjacent to the foundation. The gaps between the elements are filled with sand.
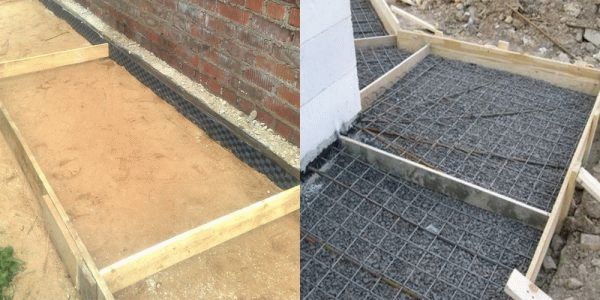
Concrete is an inexpensive, durable coating, which is why it is the most popular. On soil prone to heaving, the underlying clay layer of 10-15 cm must be reinforced with a shock-absorbing layer of sand up to 10 cm thick. It is also necessary to reinforce it with a metal mesh with 10x10 cm cells.
To prevent cracking of concrete during frost, the underlying layer and reinforcement are made with expansion joints. To do this, across the strip with a distance of 2-3 m, wooden slats with a thickness of at least 5 cm, lubricated with bitumen, are installed on the edge. Then, taking into account the slope from the house, concrete is poured evenly to the level of the top of the slats.
For better moisture resistance, concrete can be reinforced by sprinkling cement on its moistened surface and smoothing it with a trowel. Then cover with a damp cloth and water periodically for a week. Or you can decorate it with pebbles or paving slabs.
Peeling of concrete is removed using mastic and sealing pastes, after first cleaning the surface.
Small cracks need to be sealed with polymer compounds, a mixture of cement and construction or PVA glue. They have proven themselves to be excellent, completely filling voids. Then sprinkle with sand.
When peeling off from the base, clear it, cover it with bitumen and fill it with concrete mortar.
In the locations of detected potholes:
- Break the concrete with a hammer or chisel to a width of at least 5 cm, and completely dismantle the sagging areas and clean them of dust.
- To save mortar consumption, lay and drive in large parts of the broken blind area.
- Coat the walls of the wedge-shaped cavities with primer or bitumen.
- Pour in a mixture of concrete and small crushed stone and quickly level using a level.
- To strengthen, pour a cement-sand mortar with the consistency of sour cream slightly above the main surface of the coating, stretch it with a level.
- Tamp well to remove air bubbles, cover with polyethylene while it hardens.
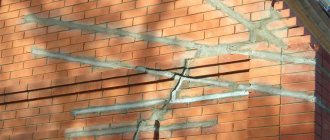
Major reconstruction of a concrete blind area:
- Using a hammer drill or sledgehammer, large damaged areas are cut down and combined into one fenced space.
- Fill with crushed stone or screenings and compact.
- Lay the reinforcing mesh.
- Fill with concrete solution above the previous level. For a monolithic structure, it is better to concrete it immediately in one day.
Advice from builders. It is more advisable to carry out restoration work in cool weather, which prevents greater opening of the seams.
A timely and high-quality repaired blind area will reliably protect the house from dampness and mold, and its foundation and base from destruction.
Base waterproofing device
Includes:
- organization of the drainage system and blind area;
- insulation of the base itself and the joints between the base and the foundation and the base and the walls of the building.
Construction of a drainage system and blind area
Along the perimeter of the base, a trench is made to the required depth, into which a perforated pipe is installed; the type of pipe depends on the type of soil, but usually this is an option with a geotextile covering. The device is built according to the scheme: compacted sand, covered with geotextile (special fabric), crushed stone is added, this pipe is laid, again with crushed stone, covered again with geotextile, and finally filled with soil into the existing level. In the corners of the trench there are (inspection) wells, which are subsequently used for drainage cleaning. According to the marks in the lowest well, a special pump is placed to lower the water level, pumping it into a roadside storm drain or using the slopes of the natural terrain.
The next stage is the blind area. By default, its width is a meter, but the value varies. It is most often made of concrete, with some kind of covering, such as paving stones. You can take care of sealing the joint between the base and the blind area. Polyurethane or thiokol mastics often act as a sealant.
Waterproofing the base, the part of the foundation protruding from the ground, involves the use of decorative finishing materials, which act as a water barrier. If this part is structurally made of concrete, then it will not hurt to protect it by treating it with Penetron material. In case of existing defects, peeling, spalling, shedding, due to its non-compliance with the design strength, it is necessary to carry out repair work. Damaged areas are removed and restored with the repair mixture Skrepa M500, then it is mandatory to treat them with Penetron material in order to prevent its further destruction.
Cut-off waterproofing of the plinth is carried out at the construction stage, in at least two layers of roofing felt - in the places of transition from the plinth to the plinth wall, in order to prevent capillary rise of water up the wall.
If skilled builders, for some reason, did not do this, then in these cases, treating the base made of concrete with Penetron material will be a mandatory recommendation. And in some cases, in order to achieve the most effective effect, it is necessary to perform injections with Penetron material. By making holes 20-25 mm in diameter with a certain pitch at an angle of 45 degrees downwards, in order to then directly fill with liquid Penetron through a funnel into the indicated holes. If you have no confidence in your own abilities and assessments, it is better to seek help from professionals. The durability and reliability of the entire building depends on the quality of the base and foundation. Saving on consultation or direct assistance is completely inappropriate.
Types of blind areas
There are three options for constructing a blind area, so first decide which one suits you best.
Rigid blind area
This option is a solid tape around the perimeter of the entire building. It is made from ordinary concrete or asphalt concrete.
Rigid blind area around the house
Such a blind area is constructed according to exactly the same principle as sidewalk paths. The only thing you need to strictly observe is the slope for good water drainage.
Both types of material are able to resist water penetration, of course, not 100%, but this indicator is quite high, due to which the soil around the building is effectively protected. From here you can immediately deduce a certain rule - there should be no cracks or breaks in such a blind area, since they will serve as direct paths for water to penetrate into the soil.
Freshly poured blind area
Another rule for such a blind area is the need for a small deformation gap between it and the structure in case of thermal expansion of the material. To avoid any open gaps, they are then filled with elastic materials and then finished.
The next type is called semi-rigid. It is made from clinker bricks and paving slabs. Laying the material is carried out in the same way as on paths, but a layer of waterproofing must be laid at the base. Membrane and film materials are used for this. Such a covering can be installed on dry sand or on a concrete base.
Soft blind area
The simplest and most inexpensive option is a soft blind area. It involves organizing a ribbon of water-repellent clay around the house - the material is compacted, after which it can be decorated with crushed stone or marble chips on top. Such a blind area was made in the old days, although even now it can be used for small buildings and country houses. To increase its effectiveness between layers of clay and crushed stone, you can additionally lay a waterproof film.
Soft blind area
Nowadays, a blind area based on a profiled membrane has become very popular - it belongs to the soft category. This is how it is done. First, a trench is dug around the entire house with a depth of 25-30 cm, the bottom of which is compacted so as to create a slope. Then the membrane is laid - it can be laid overlapping on the foundation.

Profiled membrane
Foundation protection
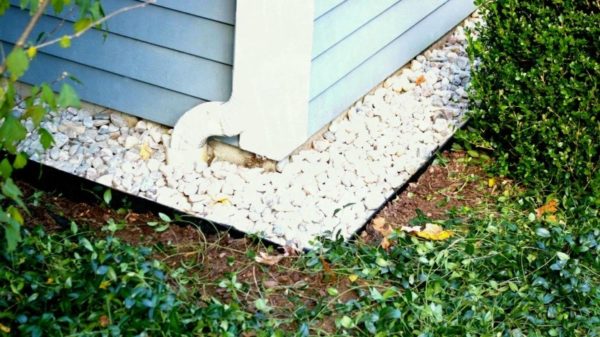
The most economical and simplest option for foundation protection is using clay, which simultaneously serves as an underlying and waterproofing layer. The clay is compacted thoroughly. You can lay a lawn on top of the clay or pour sand or crushed stone, which can protect the surface from erosion.
Asphalting is often done. For the base of such foundation protection, gravel is used, on which 3 cm thick asphalt is laid. A relatively simple option, more expensive than clay, but well resistant to moisture.
The most thorough solution is concrete protection. In this case, gravel is also used. The blind area can be reinforced monolithic or made of separate slabs. But here it is important to correctly carry out all concrete work, taking into account expansion joints between certain areas and between the blind area and the foundation of the house itself. If such important points are not provided for, under the influence of frost heaving, deformation may occur, and the blind area will move away.
Regardless of the method of execution, an expansion joint of about 10-20 mm wide is made between the foundation and the blind area.
Such a seam can be made from a layer of extruded polystyrene foam or sand. If you perform a continuous pour with the foundation, then when the soil heaves, the blind area may move away, develop cracks and even damage the lining of the base.
Typical mistakes during construction, their consequences and how to avoid them
Errors occur due to savings in the selection of materials and simplification of the construction process:
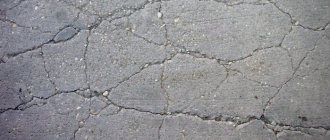
- The blind area, built from asphalt concrete rolled onto the ground, is simple and cheap, but not applicable in the average climate zone. Temperature changes in the first year will create a gap between it and the base, in which water will accumulate. At low temperatures, the resulting ice will further expand the crack. There will be a need for annual repairs. Otherwise, water will get into the leached concrete, the soil will subside, and cracks will appear on the walls, threatening the house with an emergency condition.
- Neglect of the quality of work: the shallow depth of the first leveling layer and poor-quality compaction also lead to subsidence and the formation of cracks.
- The absence of an expansion joint affects the instability to deforming soil pressure.
- Reducing the height of the outer edge of the concrete strip will lead to rapid wear.
- Water flows due to unintended roof drainage systems are harmful to the condition of the concrete and moisture-proof coating.
- A serious mistake - building a blind area several years after the completion of the house - deprives the building of protection from destruction. It is right not to delay its arrangement and complete it on time, immediately after cladding the walls and base.
We suggest you familiarize yourself with: Cracks in a wooden house: how they appear, why they are dangerous, how to fight them Reviews of construction companies.
Why the blind area can become unusable
The desire of our people to constantly save is not some kind of greed, but a necessary measure. Well, we don’t have the income to afford everything that technology dictates. However, there are things on which it is simply a crime to save, since as a result everything results in even greater expenses. The list of such phenomena undoubtedly includes the blind area.
People tend to underestimate the power of natural phenomena due to ignorance or careless attitude towards the matter. By the way, simple freezing of wet soil can squeeze out and split an entire concrete slab if it is not strong enough - we remind you that concrete does not belong to the category of elastic materials. The integrity of the blind area is also affected by other factors that should be taken into account:
- The most common mistake builders make is insufficient compaction of the soil poured back into the pit. This leads to unplanned shrinkage, which can damage the waterproofing and even crack the hard blind area. And it’s okay if it’s just a crack that can be repaired and made airtight. In some situations, the material is completely destroyed.
The blind area was simply torn away from the building - When the bottom of the trench is compacted, you must not forget to constantly monitor its slope, since this is one of the most important conditions for proper blind area. It is also worth taking care of the evenness of the bottom, otherwise when filling the pillow you will end up with uneven layers of crushed stone and sand. This leads to the fact that the base of the blind area has a different density and load-bearing capacity, and this already leads to the appearance of cracks in the concrete. In general, everything is interconnected and requires strict control during execution.
- If the builders do not give the required slope, or worse, make it in the wrong direction, then all the high water will flow towards the house. The effect of such a blind area will be exactly the opposite.
- We have already mentioned expansion joints. Very often builders forget to do them, and this also risks compromising the integrity of the concrete. When heated, the material begins to expand in all directions, and it simply has nowhere to go - the internal stress in its structure increases, which causes its destruction. Expansion joints should be made not only between the blind area and the house, but also with a certain step transverse to the direction of the tape.
The builders provided only radial expansion joints - Another quality requirement that should not be forgotten is the use of only sand without clay impurities for preparing concrete. It is also not allowed to use dirty water. All this leads to a decrease in the strength of concrete.
How thick should a concrete blind area be so that it can cope with the amount of water that falls on it from above? We are not talking about other options, since everything is determined by the thickness of the material used, while monolithic concrete needs to be accurately calculated. The essence of such calculations is not to determine the minimum thickness - it must be taken at least 7 cm, but, on the contrary, to calculate the maximum thickness at home.
The blind area will be poured over the insulation
This is not difficult to do. You know the angle of inclination that you will give for the blind area. Next, check how much you want the blind area to protrude above the rest of the area, for example, 7 cm. Take into account the width of the tape, draw the resulting right triangle and find the height of the back side. To do this, you can use the Pythagorean theorem or the rules for finding lengths from angles. If the calculations are difficult for you, then find the right online calculator and get the result in a few seconds.
Features of basement waterproofing
The basement is the foot of the house, the connecting link between the foundation and the main part of the building. It serves as protection for the floor elements of the building structure. However, the base itself is very vulnerable - groundwater and precipitation destroy it over time. Seeping into porous concrete, the liquid leads to corrosion of the metal, and with temperature changes, to direct destruction of the concrete. The integrity and load-bearing capacity decreases and this is fraught with cracking and subsidence of the entire building.
Waterproofing the base is a necessary condition for the safety of the first ground element and, as a consequence, the entire building. There are external and internal, as well as horizontal and vertical waterproofing.
Repairing the blind area around the house with your own hands
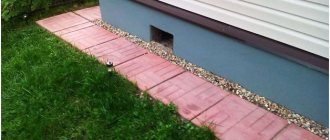
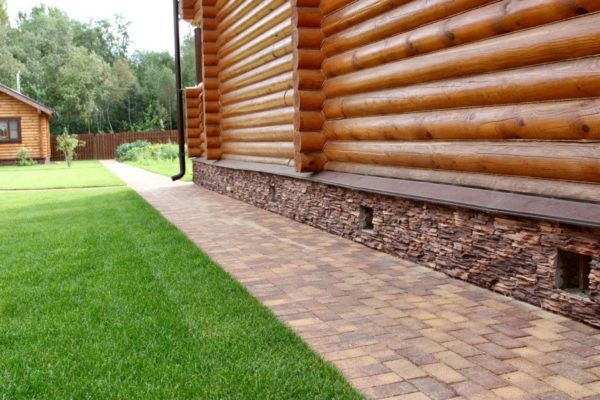
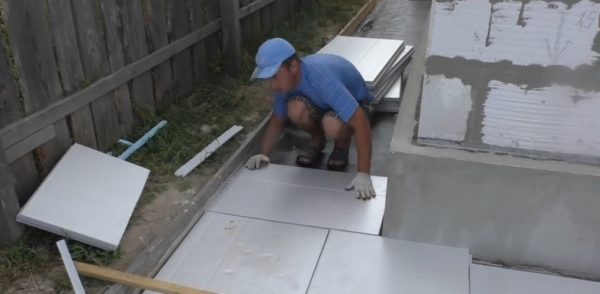
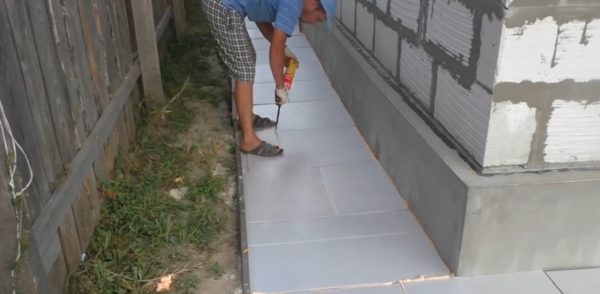
One of the most common materials for arranging the blind area of a private house is paving stones or ordinary paving slabs.
Dismantling the blind area
The frequency of repair of a blind area in a high-rise is once every 3-5 years - these are the official statistics.
In fact, if the repairs are carried out efficiently, which means sufficiently serious funding, then there is no need for such frequent repairs. As practice shows, utility services do not have the necessary resources, and therefore, when arranging and then repairing the blind area, special geotextile material is not used - only bedding is used to make the underlying layer.
Owners of private houses, who actually fulfill all the requirements of the technical process when arranging and repairing the blind area, do not have to make repairs so often. Ideally, a well-executed foundation hydraulic protection design will not require repairs for decades.
In order for the results of repair work to meet expectations, it is necessary to carry it out in early autumn or late spring.
If repairs need to be carried out in the summer, then the work is carried out in the evening or morning, when the influence of high temperatures is virtually absent. In general, when hardening, the concrete mixture should not be exposed to sunlight, since rapid evaporation of water from the mixture negatively affects the strength of the monolith.
Repair of the blind area should be done in early autumn or late spring
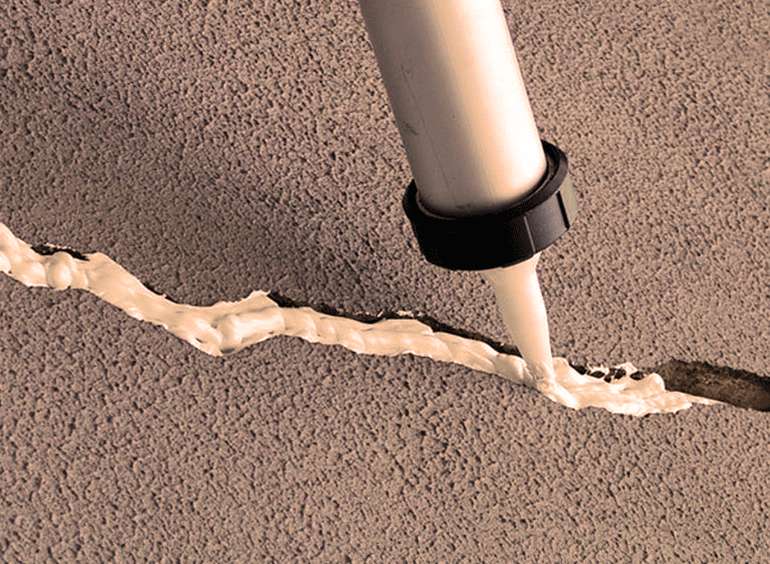
To reliably repair cracks, deep cracks and potholes in concrete, it is necessary to ensure that the defect is repaired. To do this you will need a hammer and a chisel; if you have a hammer drill, you can use this technique. It is necessary to completely get rid of flaws, be it a sink, a crack or a chip.
We clean the repair area from concrete chips and splinters, coat the walls with primer - it is better to do this in several layers.
If you don’t want to make mixtures, use special mastic based on bitumen - the ready-made composition allows the concrete to expand without deforming damage
We cover the repaired crack with a layer of concrete - the solution must be dry enough so that you can make a slope. This will make the patch almost invisible against the background of the entire blind area.
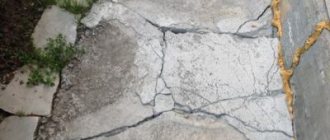
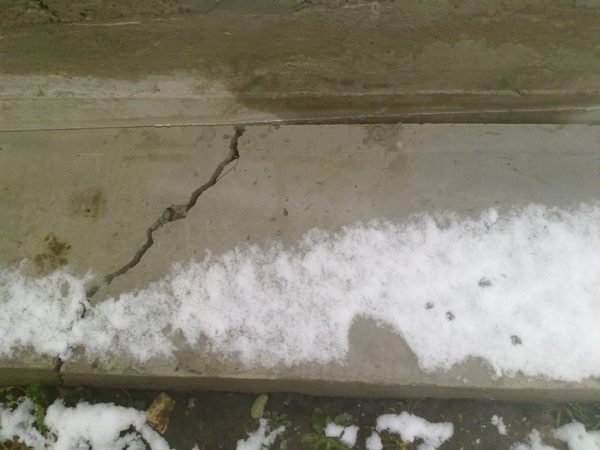
Unfortunately, time is inexorable and coating defects occur. Violations in construction technology, shrinkage of the house, unfavorable weather conditions and roots of nearby trees cause the destruction of the blind area. Defects are discovered mainly after the snow melts.
If peeling, small cracks, potholes appear, peeling from the foundation, partial subsidence or crumbling occurs, urgent routine repairs of the blind area are required. Repair work consists of eliminating identified minor damage, and those located nearby can be combined into one patch.
We invite you to read: Do-it-yourself soft blind area step-by-step instructions
Major repairs are necessary in case of seriously damaged coating - in the presence of large and numerous failures. It includes almost complete dismantling and construction of a new blind area.
After a careful inspection of the damage, an estimate of the upcoming work is drawn up. In the case of DIY repairs, the cost will only include the cost of the building materials used.
During major repairs, to calculate the required amount of loose layer, the number of meters around the perimeter of the building must be multiplied by the width of the blind area, then multiplied by the thickness of the required layer, and by the price per 1 cubic meter. Then add shipping costs.
The cost of creating a new foundation protection to order is calculated based on the price per 1 sq.m. multiplied by the footage of the perimeter of the house.
The costs of restoring the integrity of the blind area will not be superfluous when selling the house, since they are paid off by its high selling price.
Building materials and tools required for repair work:
- bulk materials: sand, clay, crushed stone, cement;
- piece elements: tiles or paving stones;
- polyurethane sealant for creating expansion joints;
- polymer glue, polyurethane foam for sealing cracks in concrete;
- Xypex or Mastersil for waterproofing repairs;
- boards with a width equal to the thickness of the blind area;
- shovel, hammer, spatula;
- level-rule;
- container for mixing the solution
Vertical waterproofing of the base
External waterproofing works
Preparation consists of restoring (if necessary) the concrete, sealing joints and cracks, and cleaning the surface. Repairs are carried out using Skrepa M500. If waterproofing of a brick base is necessary, it is recommended to plaster it, again, with the specified repair compound. The M500 fastener not only increases the strength of the structure, but also has a waterproofing effect. That is, already at this stage we receive good protection from moisture.
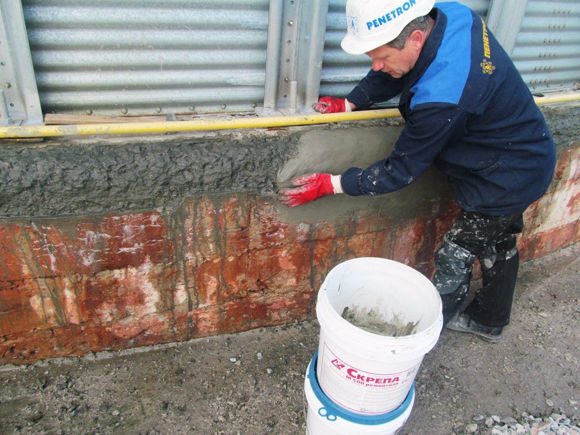
The base is cleaned of debris and dust. Existing cracks and joints between slabs or slabs and bricks are opened to a depth of 2-3 centimeters, after which they are very thoroughly moistened. Then, having prepared Penetron according to the instructions, prime the embroidered joints and cracks with the mixture.
After waiting for Penetron to dry, the joints are stamped with Penecrit, which is also characterized by good strength properties and a waterproofing component. When the solution sets, Penetron is used again. This time the entire base is treated with it.
Advantages of Penetron material:
- only penetrating waterproofing of the base becomes one with the concrete;
- the strength properties of concrete increase up to 15%;
- the waterproofing effect lasts up to 50 years;
- the mixture is capable of “self-healing” - the appearance of microcracks leads to the movement of water in the concrete, which is blocked by the formation of new crystalline hydrates.
There are many variations and combinations of water protection devices, it’s impossible to tell about them all. These are the most popular. Note that often the base is tiled according to the design. In this case, after treatment with Penetron, the base is leveled with a layer of plaster over the mesh, after which finishing work is carried out.
Internal waterproofing works
The essence is similar, except for the much rarer use of roll insulation. A similar method was often used previously, only in combination with a brick retaining wall. The most popular combination is penetrating and repair materials. Inside, special attention is paid to the junction of the base and the floor, because These places have the highest hydrostatic water pressure. If materials from the Penetron complex are used, the joints are fined and sealed with Penecrete. The method is already familiar to you.
Repairing the blind area around the house with your own hands
Now that we are aware of the basic requirements, let's see in what order the work needs to be done. For this we will need the following materials and tools.
Table 1. Required materials.
| Materials, photos | Description |
| Cement | We will use Portland cement grade 400 or 500. We do not recommend taking less, since now there is already a high probability of running into low-quality material. |
| Sand | The sand must be clean, so we take either river sand or washed sand. We also recommend sifting it first to avoid various debris and organic inclusions getting into the concrete. |
| Crushed stone | Crushed stone or gravel will serve as a coarse filler for concrete. The material fraction should not be more than 40 mm - check this parameter before purchasing. |
| Insulation | Ideally, the base of the blind area should be insulated, which will create additional protection against soil freezing. Rigid extruded polystyrene, for example, penoplex, is used for these purposes. |
| Boards | For the blind area, you need to form an even formwork. For this we use an edged board 25 mm thick and no less wide than the thickness of the blind area. |
| Steel mesh | Our reinforcing layer will be made of steel mesh. You can also use fittings, but this is an obvious excess and unnecessary expenses. |
As for the tools, everything is as usual for working with concrete:
- Concrete mixer if you don't want to do everything by hand.
- Vibrating plate for high-quality compaction of the base - can be replaced with a manual tamper.
- Shovels – bayonet and shovel.
- A tub into which ready-made concrete will be poured from a concrete mixer.
- Buckets or stretchers - in the second case, the tool will replace the bucket.
- Construction level for checking the slope of the trench bottom.
- Rule and trowel for leveling the concrete mass.
- A simple carpentry kit for putting together formwork - a hammer, a hacksaw and nails.
Concrete mixers
Other devices may also be required, which we will mention below if necessary.
So, let's get started.
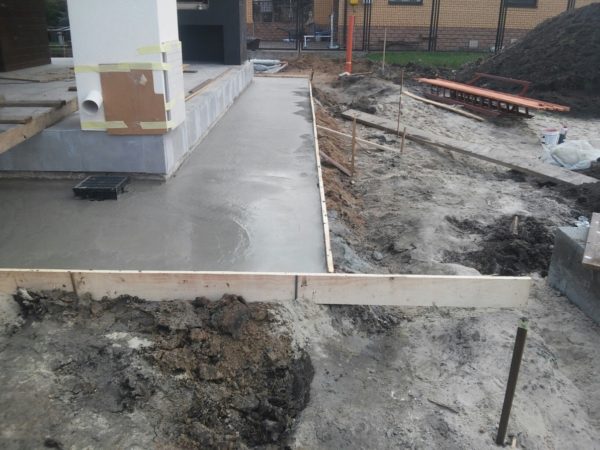
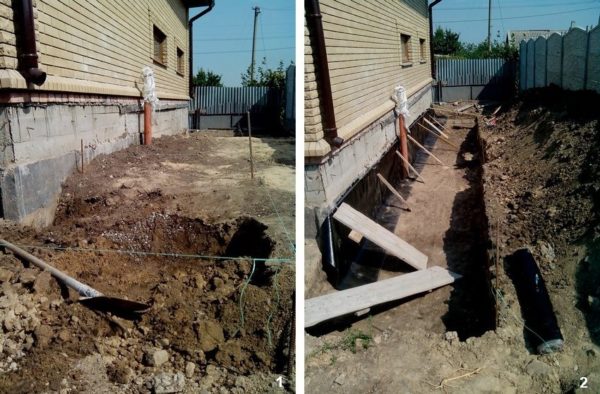
Step 1 – marking and excavation.
First of all, we need to accurately mark the boundaries of our blind area. We use twine and wedges for this. We have already written about these parameters above. Next, the soil is excavated - for a high-quality blind area, 20-25 cm will be enough. The waste soil should be immediately removed outside the site, as it will interfere with work.
Marking and excavation
In this case, it is worth removing any remaining roots, any sharp objects and large stones from the trench. The bottom of the trench is leveled as much as possible and compacted. There will be no need to compact too much, since the integrity of the soil below was not damaged by us. The exception is cases when the foundation pit was previously filled back in - here you need to make special efforts. The bottom of the trench should be sloped away from the house.
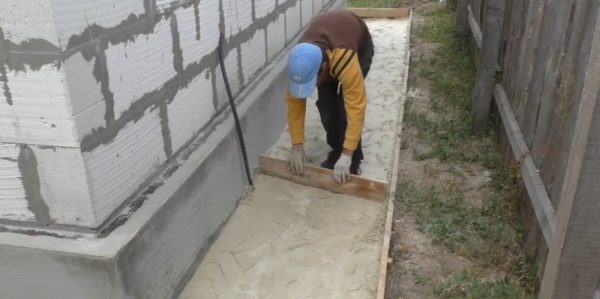
Step 2 – adding sand.
The next step is sand filling. We pour the material evenly, after which we level it well using a piece of board or rule. Please note that in the photo the craftsman has already installed the formwork. He made it even before digging the pit. You can do the same, or organize it after installing all the layers of the base - the essence will not change much.
Sand backfill
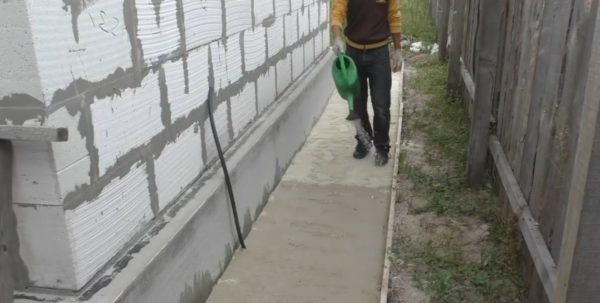
Step 3 – you need to wet the sand.
To make sand easier to compact, it is recommended to moisten it. Moreover, using a watering can, like the master in the photo, will not be enough here. It is much more effective if you apply water through a hose and sprayer so that the sand does not wash out. You need to wet the entire layer of the sand cushion, so don’t skimp on water. As water passes through the sand, it will begin to compact.
Need to wet the sand
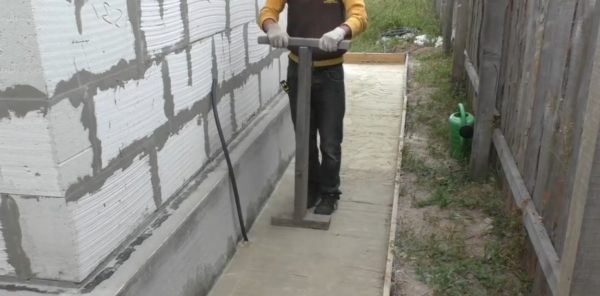
Step 4 – compacting the sand.
Next, the sand is compacted. We go through each section of the tape without missing anything. After compacting, be sure to check whether the slope that you gave to the bottom of the pit is preserved; if not, then you need to add sand and repeat the procedure until you achieve the desired result.
Sand compaction
Rammer-vibroleg
Step 5 – installation of a waterproofing layer.
In principle, there is no need to lay a film under a concrete slab, since the concrete itself will not let water into the ground. However, such a measure will not be superfluous. She will play her role if it happens that the blind area cracks. As a result, due to the slope that we gave earlier, water will be drained away from the house. The waterproofing material is laid with an overlap, and it is advisable to coat the joints with bitumen mastic.
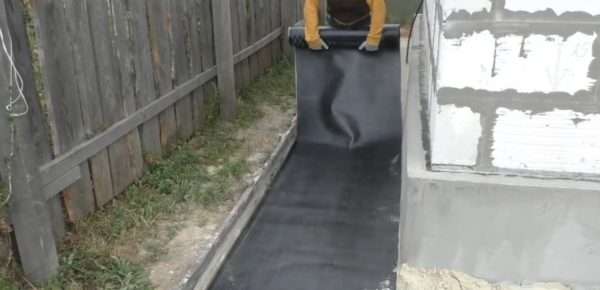
Installation of a waterproofing layer
Step 6 – insulation of the base.
Using insulation is also an optional step, however, if you want to do everything as efficiently as possible, lay this layer, and your home will be guaranteed to be protected.
Base insulation
Step 7 - foaming the seams.
Since we have decided to insulate ourselves, we do it right. There are gaps between the polystyrene boards that will serve as cold bridges, so it is recommended to fill them with polyurethane foam.
Foaming seams
We remind you that it is advisable to make an expansion joint around the perimeter of the building. How is this implemented? Some people put up boards, but then it’s difficult to pull them out, and such work is of little use. For this reason, we advise you to organize permanent formwork from the same penoplex, but of a smaller thickness - 2 cm is enough.

Penoplex slabs
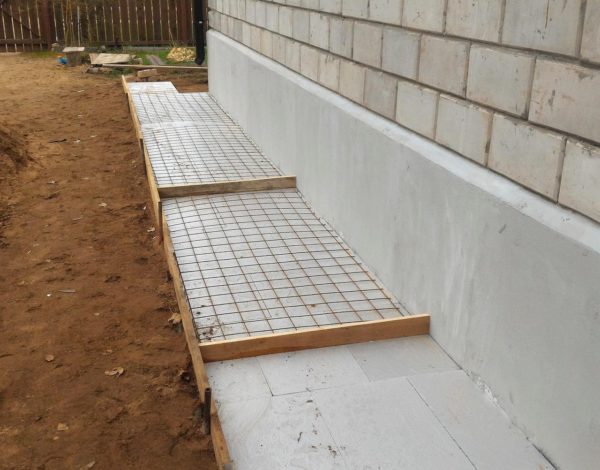
Step 8 – laying the reinforcing mesh.
We install the formwork if this has not been done before. It is nailed down and strengthened with wedges driven into the ground. It is advisable to coat the inside with bitumen so that the wood does not attract moisture. You can also wrap the material with plastic wrap.

Laying reinforcing mesh
Now we are laying a mesh that will strengthen our concrete. Be sure to overlap, otherwise the tape will not be reinforced equally over the entire area, and cracks may also appear. Ideally, the reinforcement should be raised above the base a couple of centimeters, using special stands, but few people do this, due to the inconvenience of subsequent movement - the mesh is simply laid on top of the insulation, and then, after pouring, it is slightly pulled up.
Step 9 – installation of partitions under expansion joints.
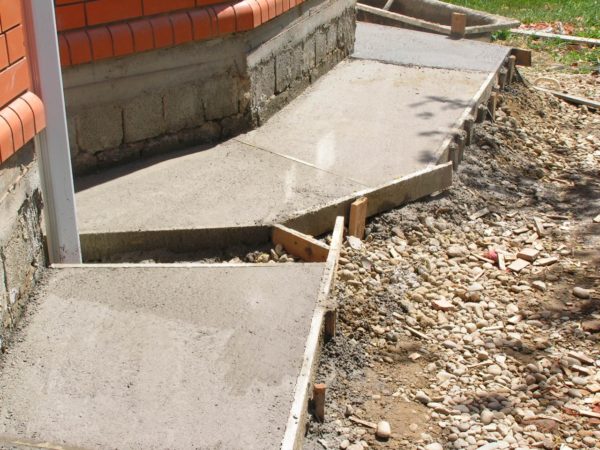
We divide our tape into sections with wooden partitions. At the same time, they should not reach the base so that concrete flows freely under them. You can also organize the seams by cutting through the concrete in the right places, immediately after pouring it. Here everyone chooses for themselves.

Installation of partitions under expansion joints
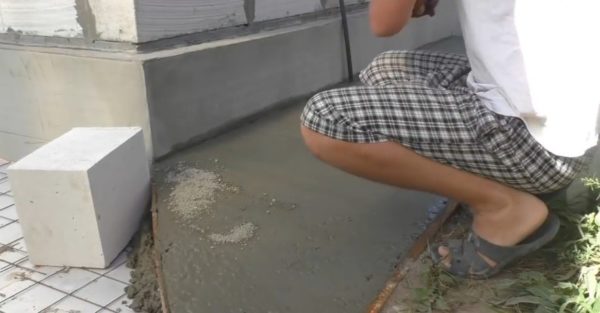
Step 10 – pouring concrete.
Concrete is prepared from the following ratio: 1 part cement, 3 parts sand and 4 parts crushed stone. In this case, you need to add enough water so that the solution does not become very fluid.
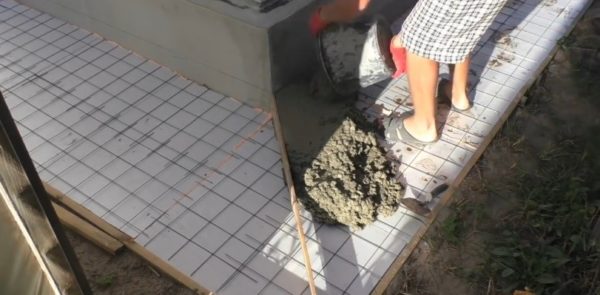
Pouring concrete
We fill our formwork, distributing the mixture with a trowel and leveling it with a rule. In this case, the surface is smoothed as much as possible. It wouldn’t hurt to use a deep vibrator to make our tape more dense and durable.
Step 11 – reinforcement of concrete.
After pouring concrete, to increase strength, its surface must be ironed. To do this, dry cement in its pure form is poured on top and smoothed evenly with a trowel.
Ironing of concrete
Ready-mixed concrete requires maintenance for at least one week. To prevent it from cracking when it dries, it must be regularly shed with water. When it is hot outside, you should cover it with additional dark film. If you follow all the prescribed points, you will get incredibly strong formwork that will last for decades.
Tags: close up, blind area
« Previous entry