Arrangement of the blind area is considered the final stage in the construction of a house.
This very important structure is designed to protect the foundation from natural moisture, is an auxiliary heat-protective barrier, plays a decorative role and serves as a house path.
The technology for making a concrete blind area is absolutely simple. With some preparation and the necessary equipment, a home master will be able to complete it on his own.
We will look at how to make a blind area around a private house with your own hands in this publication.
Markup first
Before making a blind area from concrete, which is the most common building material for these structures, you should mark the area around the house. The minimum width of the blind area is 60 cm. But it is worth remembering that the width of the strip should be greater than the roof overhang . The difference should be 20 cm so that falling drops of water do not fall on the open ground, but are dampened by a concrete blind area and move further away from the foundation.
Next, you need to set aside the resulting size along the entire perimeter. To do this you will need to prepare:
- Roulette;
- Stakes;
- Lace.
The width is taken from the corner parts of the foundation and pins are driven in at these places, the role of which can be played by metal reinforcement or wooden cuttings. As soon as the entire perimeter has been passed, a string is pulled, marking the location of the excavation for the installation of a concrete blind area. And a new stage of work begins.
Possible errors in the process
Errors can occur at any stage of blind area production; it is not enough to know the technology, you need to strictly adhere to it. For example, a poorly compacted base or the presence of construction debris will lead to emergency landing of layers and destruction of the integrity of the waterproofing layer and concrete coating.
Typical mistakes when making a concrete blind area near a house:
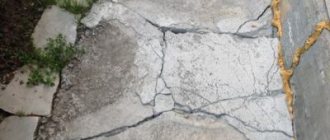
- A crack in a structure appears when the base is uneven; as a result, a layer of crushed stone is filled in with different thicknesses, and different load-bearing characteristics are formed by zone. Incorrectly tilting the profile of the excavation, made in rainy weather or melting snow cover, leads to the accumulation of water at the base of the house from the soil saturated with moisture.
- The absence of expansion joints between the blind area and the foundation will cause the formation of cracks. At high temperature conditions, internal stress zones are created in the blind area near the walls of the facility, which contribute to the occurrence of cracks and fractures in concrete.
- It is not permissible to use sand containing clay and dirty water in the process of preparing the concrete composition. This will lead to a deterioration in the consumer properties of concrete and a reduction in the service life of the blind area.
- The completed structure does not have a drainage system.
- A wider structure with incorrectly positioned slopes in relation to the roof overhang was installed.
- A separate drainage gutter was not installed under the water tap installed in the basement of an individual house for irrigation work. A leaking shut-off valve or a leaky drain hose installation allows water to collect at the base of the house.
- The base has not been compacted. Small thickness or uneven laying of the sand and gravel cushion will cause shrinkage, and tears will appear on the surface of the concrete.
It is not allowed to use fragile facing material on a concrete surface. If the expansion joint passes under a fragile element, it will crack.
Excavation
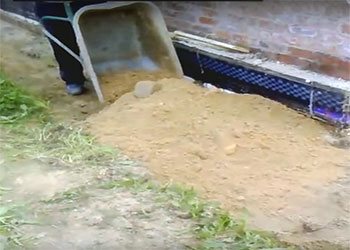
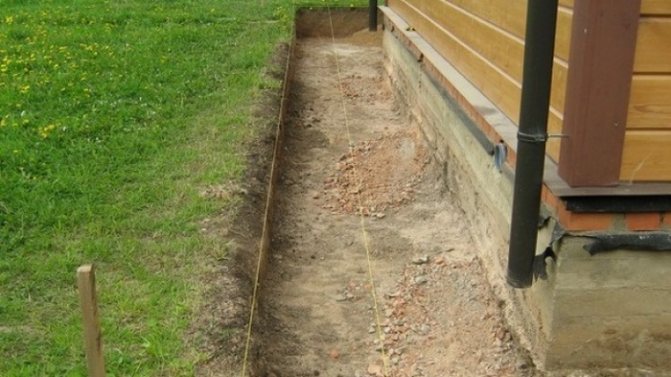
Excavation of soil for a concrete blind area is carried out only manually. You need to dig to the depth of fertile soil. If this layer is small, then at least 40 cm is removed in order to be able to place layers of sand and crushed stone cushions and a concrete strip. The soil should be taken away and distributed around the site, as it will no longer be needed.
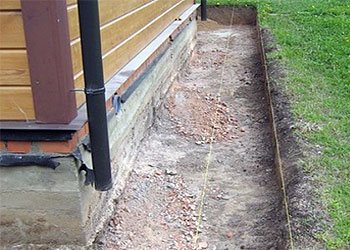
The base of the future concrete blind area must be level. A layer of geotextile should be laid on it so that the plant roots remaining in the ground cannot germinate and damage the hydraulic structure over time. The material is distributed over the entire area of the trench with an overlap onto the foundation and the opposite side.
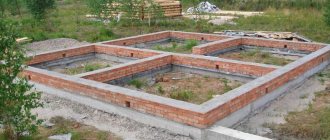
Blind area of strip and monolithic foundations
Do you need a blind area for a strip foundation? Yes, it is necessary, and first of all because the reinforced concrete strip is completely in the ground. You can read how to arrange a strip base here.
It is made from the outer perimeter of the building to a width that is 400 - 800 mm greater than the overhang of the roof of the building.
The roof overhang is the vertical projection of the outer edge of the roof onto the ground. That is, water dripping from the roof should not fall on the ground, but on the concrete.
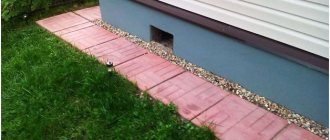
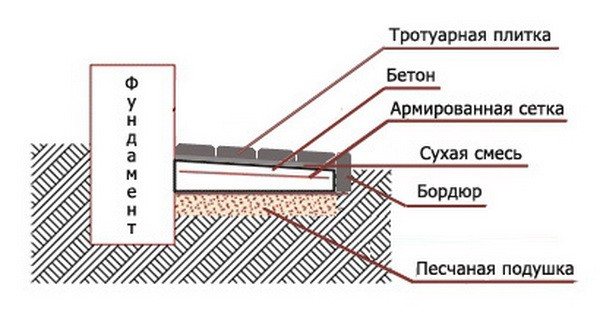
The top of the concrete can be decorated with stones, such as pebbles. It is pressed into fresh concrete mortar so that only the rounded side of the stone protrudes.
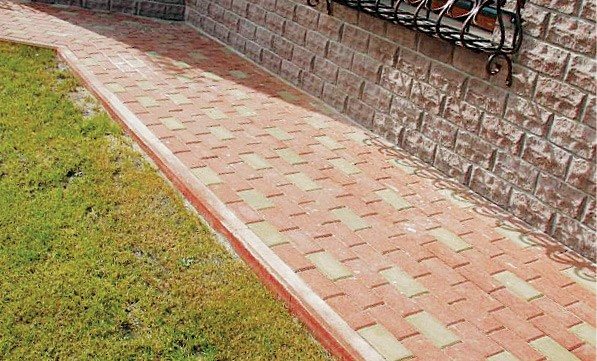
You can also decorate with paving slabs, which are laid on top of a layer of concrete of lesser thickness on a thin sand or cement-sand layer.
</>
Instead of paving slabs, you can use granite, gabbro-basalt or artificial stone paving stones.
Adding sand and crushed stone
As soon as the trench is completely prepared, you need to backfill and compact construction sand and granite or limestone crushed stone. It is important to remember that the pillows should not contain any impurities, which can significantly reduce the quality of the work done. The sand is sifted before use, freeing it from any inclusions. But crushed stone is cleaned with normal visual inspection.
The thickness of the bedding ranges from 15 to 20 cm. Materials should be laid in small portions. In this case, each layer must be compacted . To do this, use an electric professional tool or a simple wooden “block”, that is, a piece of log or timber with a handle.
An alternative to compacting sandy substrates is to use water. By evenly distributing the flow, you need to thoroughly moisten the pillow. Water will begin to seep into the sand, causing these small particles to adhere more tightly to each other.
Tools and consumables for work

Tools and materials should be selected based on the production flow chart:
- excavation,
- production of formwork,
- waterproofing works,
- reinforcement,
- installation of a drainage system,
- preparation and pouring of concrete.
To excavate soil from a trench you will need:
- pick,
- shovels,
- rammer,
- roulette,
- pegs and twine.
For moisture protection, geotextiles are required to create a water seal.
Materials for creating concrete mortar:
- gravel fractions 5 - 10 mm,
- cement M500,
- sand and water.
To prepare the solution you will need a mixer, a cart and a measuring bucket.

To perform formwork you need:
- boards,
- electric saw,
- building level,
- nails and hammer.
For reinforcement, they buy mesh or steel wire, welding and tools for cutting reinforcement parts. To level the concrete solution you will need a long rule, trowels and spatulas. To seal the seams, you need to purchase polyurethane sealant.
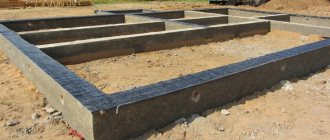
Reinforcement and formwork
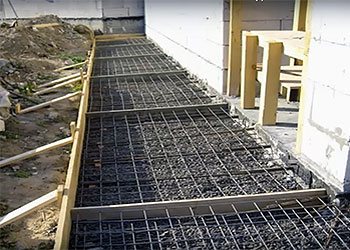
After the stage where the sand and crushed stone cushions were backfilled, it is necessary to perform reinforcement so that the concrete blind area around the house with your own hands does not become covered with a huge number of cracks after a couple of years. But fastening with reinforcing rods will avoid troubles. In addition, the metal will add rigidity to the blind area, which will have a positive effect on the durability of the structure.
To work, you will need a metal rod (flat or notched), with a diameter of 8 to 16 mm. A reinforcing mesh is also used, laid in a trench and then filled. If a rod is used, it is distributed perpendicular to each other, forming cells ranging in size from 10 to 20 cm. The reinforcement is fastened using tying wire, previously cut into equal sections of 30 cm.
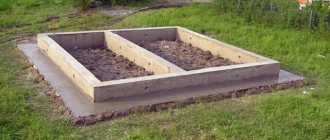
Once this work has been completed around the entire perimeter of the house, you can proceed to installing the formwork. In order to make a concrete blind area much easier, it is better to use an edged board. The width of the material will depend on the height of the pour, since in some cases it is possible to raise the level when it is planned to further work with the landscape of the site. The optimal thickness of a concrete blind area is 10-15 centimeters .
The boards are installed using wooden stakes to which they can be nailed. When positioning the formwork, a building level should be used. It will be required to maintain the horizontal position of the blind area or to install slopes for better water drainage. It is equally important to install special inserts to divide the continuous concrete strip of the blind area. This is required to eliminate future kinks from temperature changes.
Technology for constructing a blind area made of concrete with insulation
Step-by-step instruction:
Preparing the base for the blind area
. To do this, the top layer of soil is removed, all roots, stones, etc. are removed. Using a blanket herbicide will eliminate activity under the substrate. For example, the drugs Agrokiller or Tornado.
Advice. Considering that the blind area must exceed the edge of the roof slope by 200 mm, it is recommended to use a plumb line to accurately mark the boundary of the blind area.
Marking
. To do this, we pull the rope onto the stakes hammered in the corners. To avoid sagging of the rope, you need to install intermediate stakes (at a distance of 5-6 m from each other).
Advice. How to determine the required angle of inclination of the blind area? Craftsmen install additional beacons (stretch a rope) on the base of the house. Fastening is done every 1-1.5 meters.
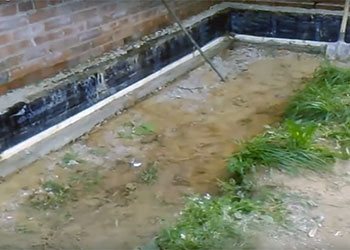
Hydraulic lock device
. To do this, lay fatty clay in a layer of 100-150 mm or cover the bottom with geotextiles (roofing felt, PVC film, advertising banner, etc.). Please note that to prevent the film from tearing, it is better to pour a layer of sand of 50-100 mm at the bottom of the trench. A layer of sand of the same thickness is also poured on top of the film. The sand is leveled, moistened and compacted. In the case of a clay hydraulic lock, there is only one sand layer. When laying the film, you should avoid tension. It must be able to move freely with the ground.
Note. Experts advise making high-quality drainage near the hydraulic lock. To do this, you need to dig a trench 100 mm deep and 200 mm wide and fill it with crushed stone or lay a drainage pipe in it, wrap it with geotextile and fill it with crushed stone. This will increase the rate of water drainage.
It is worth noting that many people ignore this stage of work. In practice, this attitude results in the fact that the water passing through the expansion joint goes directly under the foundation, and when it freezes, it leads to an increase in pressure on it.
Backfilling of crushed stone
. The layer thickness varies from 50 to 100 mm. The gravel is leveled and compacted. Since crushed stone is difficult to compact, some recommend using a special grid for laying it, which is used in landscape design for making gravel paths. We note right away that this will increase the cost of the blind area without much need.
Backfilling with sand
.
Laying communication pipes
. To do this, a depression is made in the sand for pipes and storm drains.
Insulation of the blind area
. Expanded polystyrene or penoplex is laid on the compacted sand with which crushed stone and communications are covered. Only hard insulation is suitable for the blind area, but it is afraid of point loads, so it must be laid on a sand cushion.
Advice. Cold bridges can be eliminated by laying insulation in two offset layers.
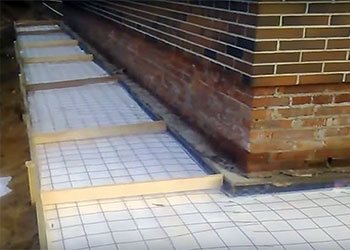
Reinforcement of concrete blind area
. This is done by laying reinforcement mesh with cells of 50x50 or 100x100 mm or by knitting a reinforcement cage.
Advice. Chain-link mesh is not suitable for reinforcement - it is too flexible.
If insulation is not intended, the reinforcing mesh is laid directly on the crushed stone to a height of 20-30 mm. Which will contribute to better distribution of concrete.
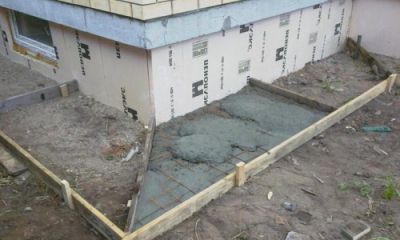
Formwork installation
. Boards or plywood are installed strictly according to level. To level out the pushing force of concrete, the formwork is reinforced with stakes that are installed on its outer side. During installation, do not forget that the formwork is removable, which means that all seams will be visible after its dismantling. In this case, the blind area will have an ugly appearance. Therefore, when installing boards, you need to ensure that the internal seams are invisible.
Construction of expansion joints
. To do this, we install wooden slats and boards (on edge), which are pre-treated with an antiseptic or tarred. The recommended distance between the expansion joints of the blind area is 2-2.5 meters. Expansion joints must be made diagonally in the place where the formwork turns (at the corners). The purpose of the expansion joint is to compensate for the thermal expansion of concrete during operation. They are installed level, taking into account the angle of inclination of the formwork, because When pouring concrete, they are guided by them. An alternative to wood can be Guerlain butyl rubber tapes (10 RUR/m) or a hydro-swelling elastic cord, for example, Penebar Rapid SW45 A/B.
How to seal the seams in the blind area?
According to reviews, those who ignored the formation of expansion joints had cracks after the first winter. Many people believe that wood swells and allows moisture to pass through. You can seal the resulting cracks with special sealants, such as TEKTOR 103 mastic (225 rubles/piece), ISOSEAL P-40 (280 rubles/piece).
Pouring a concrete blind area. When pouring concrete, you need to ensure that no air pockets are formed and that the cement mixture evenly fills the entire space. It is important that no bumps or depressions appear when pouring. Their presence will lead to stagnation of water in these places. If it is not possible to do the entire blind area at one time, part of it is poured, and then work is resumed.
Advice. When pouring a blind area, you can use a technique for uniform distribution of concrete - bayoneting. To do this, the concrete is “pierced” with a rod, and the solution fills the entire space.
How to properly pour a concrete blind area around a house - video
Preparation of concrete mixture
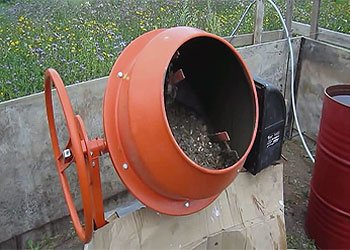
After all the preparatory work has been completed, you can begin preparing the concrete mixture. To do this, you should use a mortar mixer with an electric motor so that the process goes faster and the resulting solution is of high quality. The durability and strength that the concrete blind area around the house will have depends on this.
To prepare the concrete mixture, sifted construction sand and fine crushed stone are taken. This is exactly what allows you to get a smooth surface on which you can move freely, like on a path. Portland cement grade 400 or 500 is required as a binder. Particular attention should be paid to the date of manufacture of this building material. The fact is that cement has the ability to reduce its own qualities and characteristics over time. Therefore, for work you should choose material from the date of manufacture, which has not passed more than a month .
The mixture for the blind area around a concrete house is mixed with clean water. The temperature of the liquid should be at room temperature, that is, not too warm or cold. First, water is poured into the mixer, then crushed stone is added, and only then cement can be poured. This allows for uniform mixing of the binder, which helps produce better quality concrete. When the cement is completely distributed throughout the mixture, sand can be added.
The composition of the mixture is determined by different specialists from the following calculation:
- cement one part.
- Sand three parts.
- Crushed stone five parts.
Water is added until the desired consistency is obtained, which should resemble sour cream. This is the only way to obtain a high-quality mixture that is convenient for leveling and laying. The resulting grade of concrete depends entirely on the cement used. So, to get M250 concrete, you need to use M400 cement. But a binder with the M500 grade allows you to obtain M350 concrete. The proportions of the material should not change.
What it is?
This is a special prefabricated structure that acts as a form to hold the concrete mixture . It can be performed on the production site and be reusable or manually.
For private housing construction, it is made of panels and wooden blocks connected to each other. All elements are fixed clearly according to the diagram, in a position that guarantees maximum tightness of the structure in order to prevent concrete leakage.
The structure is assembled in the form of a continuous road strip around the perimeter of the house , adjoining the base or walls of the house. For heaving soil, a technological gap is left between the base and the blind area.
The formwork consists of form-building, supporting, installation, technological and other elements to implement the design characteristics of a concrete blind area for a certain type of soil.
The components of the formwork include panels, struts, beams and racks. Its production begins after the completion of the main work on the construction of the house, when the blind area has been marked and all building materials have been purchased.
Installation of the form is carried out element by element manually or using devices and mechanisms. Installation/dismantling of formwork elements is carried out in accordance with the requirements of work safety rules.
The formwork is dismantled at a strictly established time, depending on the type of structure, its dimensions and the depth of the pie.
When and why is it needed?
For the construction of a concrete blind area, fine-panel formwork is used, which is made up of small-sized panel structures: supporting, connecting and fastening weighing up to 50 kg. Therefore, their installation is allowed manually.
The manufactured formwork must provide:
- strength and geometric constancy of shape and dimensions under the constant action of prefabricated and technological stresses;
- lowest adhesion to hardened concrete mortar;
- the smallest number of standard elements with the possibility of enlarging and reconfiguring them during construction on the construction site;
- the ability to fix embedded components with intended accuracy;
- quick detachability of mounting parts with the ability to eliminate gaps;
- impermeability of form-forming surfaces;
- maintaining temperature conditions and humidity sufficient for concrete to obtain design strength;
- chemical neutrality of surfaces to concrete.
Laying concrete mixture
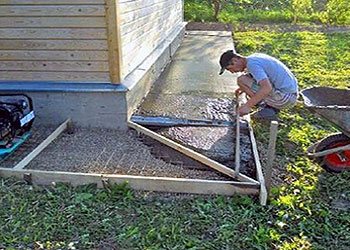
The prepared concrete is evenly placed in the prepared blind area. This is done using buckets or directly from the mixer, when it is possible to install it directly near the formwork. Each portion of concrete after unloading is subjected to leveling and vibration. This allows all air bubbles to be expelled from the concrete, which will make it much stronger.
An ordinary wooden block can serve as a vibrator, which produces translational movements. Once this is done, you should move on to the process of leveling the concrete. To do this you will need a metal rule. This tool allows you to get a flat surface that is smooth and uniform. Thanks to it, the same thickness of the concrete blind area is obtained, which is also important.
If the formwork was done correctly, then there will be no problems with the slope of the structure. But you should still check it. The slope of the blind area should not be more than 15 mm per meter of width. This is the only way to get an additional path around the house, along which water will flow freely onto the site. If you want to drain the liquid to one place, a gutter is placed along the perimeter of the blind area. When it rains, water will flow into it and go into a storm drain or into a special ditch.
Formwork technology
First of all, it is necessary to mark the future covering around the house
After you have decided on the material for making the blind area, calculated its width and the required slope, you can start working:
- First of all, it is necessary to mark the future covering around the house. To do this, set the calculated distance away from the walls, hammer pegs in the corners and pull on a fishing line or cord.
- After this, within the markings along the perimeter of the building, a fertile layer of soil 20 cm thick is removed. The soil at the bottom of the resulting depression is carefully leveled and compacted.
- Now we begin to assemble the formwork. First, a frame is made from timber. To do this, bars are fixed at the corners of the depression in the soil with a height slightly higher than the thickness of the coating being made. Next, along the stretched fishing line, the same bars are installed in increments of 50-100 cm. For greater rigidity, the bars are fastened together with longitudinal bars. Wooden elements are connected using nails or self-tapping screws.
- After this, we attach an unedged or edged board to the frame made of timber so that the timber is on the outside of the structure, that is, on the side of pouring concrete there is a continuous, flat surface of the boards. We fasten the boards to the frame with nails.
Attention: to prevent concrete from leaking between the boards, the gaps between adjacent elements should not be more than 0.3 cm.
- To prevent the formwork structure from bursting and deforming after pouring the concrete, oblique struts are attached to the frame from the outside. The installation step of such spacers is 50 cm. We attach the spacers to the frame bars using self-tapping screws or nails.
- To make it easier to remove the formwork after pouring and hardening of concrete, its inner surface can be covered with thick plastic film or one layer of roofing material. This material will also perform other additional functions:
- will not allow moisture from the concrete to be absorbed into the formwork boards, thereby reducing the strength of the concrete coating;
- if there are significant gaps between the formwork boards (especially if unedged boards are used), the coating will prevent concrete from flowing into the gaps.
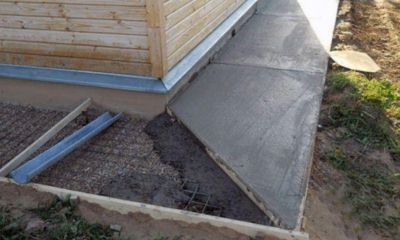
- Along the walls of the house it is necessary to install an edged board with a thickness of 2 cm and a height slightly higher than the height of the covering in this place. There is no need to firmly fix the board, since after the concrete hardens it will be removed. Using this board we will create the necessary temperature gap between the coating and the walls of the house.
Making expansion joints
The laid slats at the formwork stage, which are responsible for the formation of expansion joints, should be pulled out after pouring the concrete. This measure allows you to avoid subsequent rotting of the wood and filling of these technological cavities with various debris. But there is no need to leave them empty either. Therefore, the most effective solution would be to fill the seams with a special sealant. It will not interfere with the expansion of the concrete surface, and will also make the technological cavities more attractive in appearance.
The distance between expansion joints is important. It should not be too large, but it is also not recommended to chop it. The optimal distance is 2 meters, which eliminates the formation of cracks with subsequent destruction during the expansion and contraction of the concrete blind area.
Pros and cons of building on your own
Concreting a blind area is a process that requires a significant investment of labor, money and time. Therefore, implementing such a design on your own will provide significant savings to the family budget. When carrying out a step-by-step process of filling the formwork with concrete mortar, it proceeds without difficulties and does not require special construction experience.
Advantages of pouring a concrete blind area yourself:

low operating costs, while creating the same consumer properties, making concrete blind areas durable and simplifying their maintenance;- many design options - today there are many color and texture effects that create an expensive look for the cement base;
- Properly processed and hermetically installed concrete is practically resistant to water;
- creating an anti-slip surface;
- creation of a heat-resistant structure.
The disadvantages of installing a blind area yourself appear with large dimensions of buildings, marshy soils and sloping terrain of the location of the house. In this case, special engineering solutions, calculations and development of an individual flow chart for the work will be required.
Protective measures after concrete placement
When the concrete mixture is finally laid, the blind area should be covered with plywood or chipboard panels. It is allowed to use slate sheets that are leaned against the wall of the house. This measure allows you to protect fresh concrete from the effects of precipitation, such as rain. Also, such protection will not allow moisture to quickly leave the solution, which can lead to the formation of cracks.
You can maintain moisture by carefully wetting the concrete blind area. This way it will dry evenly and the surface will remain smooth and without damage.
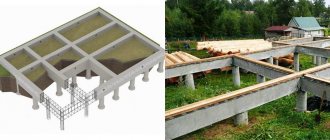
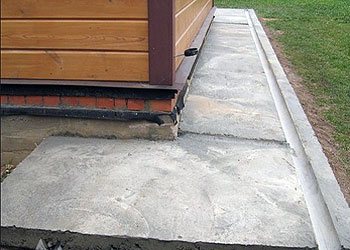
Blind area of a pile-screw foundation
You have built a wooden house on a high pile-screw foundation. (How to do this is here). A natural question arises: is a blind area needed for a pile-screw foundation? After all, the pile is protected quite well by zinc and paint coating. The answer is the same as before - it is necessary.
How it is done can be seen from the figure.
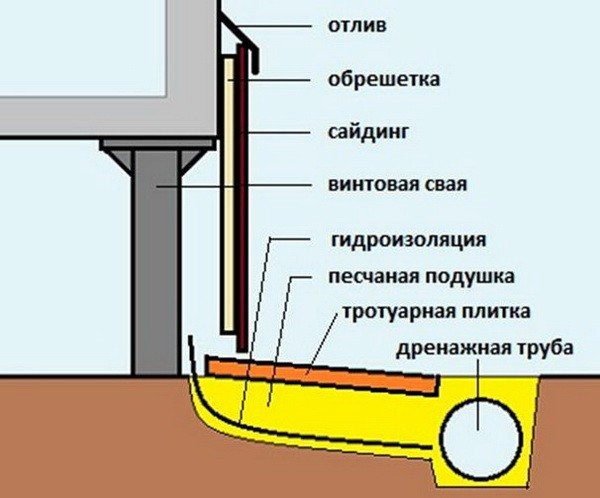
They also start with a drainage ditch, into which a drainage pipe or open drainage blocks are laid. Then the fertile soil is removed right up to the pipes of the screw piles, a sand cushion is filled and compacted in the thickness of which a strip of rolled waterproofing must be laid, the inner edge of which is raised and fixed to the pipes. A concrete or tile layer is laid on the sand cushion.
Strengthening the surface of the blind area
What is the difference between a proper concrete blind area? The strength and durability of the top layer on which the water collected on the roof of the house falls. To ensure these qualities apply:
- cement laitance;
- liquid glass;
- primers and enamels;
- ceramic tiles and natural stone.
The most common method of protection is reinforced concrete. For this purpose, dry cement or milk prepared on its basis is used. After the processing process, a thin layer is formed on the surface that can withstand any impact of precipitation and temperature. This makes the blind area hardy and durable.
Coating concrete with a primer or enamel is also aimed at achieving protective properties and increasing the performance of the resulting structure. To do this, water repellents are used that penetrate deep into the frozen blind area, providing it with water-repellent properties. Compared to ironing, this method is somewhat more expensive, so it is less common among owners of country houses, although it is quite effective.
An alternative to priming concrete is to coat it with a mixture of liquid glass and cement. This composition is somewhat reminiscent of conventional iron surface, but provides the blind area with higher resistance to water and other precipitation. Liquid glass is responsible for this in the mixture, increasing the water-repellent properties of the surface and making it more airtight.
Using ceramic tiles and natural stone to cover the surface of the blind area allows you to perform two tasks at once:
- Improving protective properties.
- Decorative design of the area around the house.
When planning the future landscape design of a site, this method can perfectly fit the house located on it. Many designers use this solution to create a smooth transition from the structure to the ground. The qualities of ceramics or natural stone make it possible to ensure long-term operation of the blind area, even in cases where there is frequent movement of people living in the house.
The laying of all elements is carried out directly after laying and leveling the concrete. A building level will help check the evenness and horizontality of the resulting cladding layer. The only unpleasant moment is that due to the dense coating, the concrete base will take longer to dry, which will delay the start of its operation. Otherwise, this solution can be considered the best option for designing a blind area around any building.
Blind area of a pile reinforced foundation
If the pile foundation has a grillage buried in the ground or lying on the surface, then the blind area of the pile foundation is done in the same way as on a strip foundation.
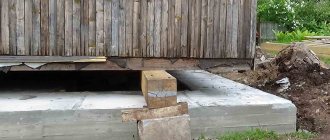
If the grillage is raised, that is, when its lower part is located above ground level and the gap is not closed by a fence, then the question is whether a blind area is needed for a pile foundation? the answer is not so simple. First of all, it should be “placed” under the grillage and the inner edge should be raised with a roller having a height of at least 30–50 mm. But it is better and easier to lower a fence from the outer plane of the grillage, for example, from a sheet of flat slate. On the plane of a rectangular pile, the joint of the layer is made in the same way as with the wall.
Possible installation and dismantling errors
Regardless of the building materials used and the fairly simple technology, errors are often made when installing/dismantling the form, which lead to a violation of the integrity of the blind area.
The main mistakes made when assembling formwork:
- Unsatisfactory quality of fastening of mold components.
- The proximity of the support stakes to the structure.
- There is no waterproofing.
- There is no height reserve.
- Vertical displacement of the form.
- Installation of a wood form on unstable ground without additional fixation.
- Installing the form on an uneven area.
- Incorrect distance between supports, excavation collapse when pouring concrete mixture.
- The use of low-quality wedges that break under intense load.
- The use of building materials that do not meet regulatory requirements and do not have the necessary wear resistance.
In order to avoid any of the problems mentioned, it is necessary to select boards for installing formwork in accordance with GOST requirements; they must be of the same thickness with dimensions no less than those indicated in the technological map for the construction of the blind area or the project.
Serious deficiencies in the integrity of the walls of a wooden structure—knot holes or large cracks—are covered with plywood or steel patches. Narrow cracks up to 15 mm can be clogged with small crushed stone, then the concrete solution will not be able to seep through.
After installation is completed, it is recommended to water the wooden formwork elements with water ; the wood will become wet, swell, and possible gaps between the elements will become significantly smaller.
How to calculate?
The design must guarantee reliability, hardness and constancy of the shape and design dimensions of the blind area. When calculating it, vertical/horizontal stresses from the mass of the formwork, concrete and reinforcement are taken into account. It is also necessary to take into account wind and dynamic loads on the side elements of the formwork when unloading concrete.
The calculation of wooden formwork consists of several sections, so it is necessary to determine separately how many boards, beams and fastening elements will be needed.
An example of a calculation for a house in a 10x10 m plan on heaving soils for different types of wood products:

Determine the perimeter of the frame along the plan axis: 10*2+10*2 = 40 m.- Tape width - 1 m.
- The height of the blind area is 0.72 m.
- The height of the formwork with reinforcing mesh is 0.25.
- The area of one wall is 40 * 0.25 = 10.0 m2.
- The entire area of the frame walls is 20 m2
- Volume of 3rd grade board with dimensions 25*100*6000 mm, price 5300 per 1 m3: (20:6*0.1)*0.025 = 0.83 m3.
- Transverse boards for expansion joints, the area of one board for formwork is 1 m: 1 * 0.25 = 0.25 m2, when installed after 2 meters and in the corners, the quantity required is 40: 2+4 = 24 pieces, the area of the transverse elements is 24 * 0.25 = 6 m2, volume - 6 * 0.025 = 0.15 m3.
- Cost of the board: (0.83+0.15)* 5300 = 5194 rub.
- The number of panels of FSF birch plywood of the 4th grade, 18 mm thick with dimensions 3050x1525 mm, cost per 1 sheet - 2400 rubles: 20 m2 / 3.05 m x 1.525 m = 4.2, we accept 5 sheets.
- The number of transverse plywood panels for expansion joints every 2 meters and in the corners is: 40:2+4= 24 pieces, the area of the transverse elements is 24x0.25= 6:3.05x1.525 = 1.28, rounded up to 2 sheets.
- Cost of FSF birch materials: (5+2) x 2400 = 16800 rub.
- The cost of fastening wooden products and losses take up to 10% of an unedged board - 0.83 x 0.1 = 0.083 m3.
- Cost of wooden fasteners: 0.083x 5300 = 440 rubles.
- Wire for ties with a diameter of 0.8 mm, price 55 rub./kg: 10 kg.
- Wire cost: 10x55 = 550 rub.
- Total cost of material for the board: 5194+440+550 = 6184 rubles.
- Total cost of material for shields: 16800+440+550 = 17790 rubles.
What can it be made from?
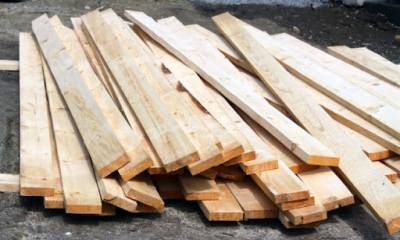
The formwork for the blind area is usually made of wood . However, currently the building materials market can offer other materials in the form of sheets of plywood, slate and chipboard/OSB.
When installing removable formwork, it is recommended to choose a board with a thickness of over 25 mm and a length of 4 to 6 m in order to have fewer joints.
There is no need to buy expensive types of wood; deciduous or coniferous species are sufficient; the main thing is that the edges of the boards are straight.
If the material is treated with antiseptic impregnation, it can be used several times. In terms of resistance and resistance to moisture changes, the best use is spruce and pine .
The main advantage of such a frame is its low cost. The disadvantages include the long installation time of the shields and the need for additional strengthening of the structure.
When using sheets of plywood or chipboard as formwork, you will additionally need timber for assembling and installing stops with struts. The permissible thickness of such shields should be over 20 mm.
Moreover, the larger it is, the less timber is required to create a rigid structure. For a single-use frame, ordinary plywood is used ; for repeated use, a laminated, water-resistant modification is used.
The main advantages of this material are lightness and high speed of construction. The disadvantage of waterproof laminated plywood is its price.
Polymer boards are a new material that has begun to be used for repeated performance of the same type of formwork work. To create appropriate structural rigidity, a frame made of wooden beams or a metal profile is required.
The advantages of this method of making a frame are simplicity and reusability, the disadvantage is the high price.