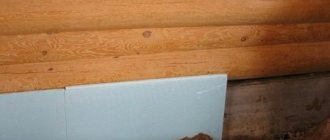
From the point of view of material investments, a shallow foundation is the optimal solution for the construction of low-rise buildings. But in this case, an insulated blind area and base will be required, especially if construction is carried out on heaving soils. This technology will help protect the soil from freezing near the building, protect the foundation from subsidence and deformation, and protect the walls from cracks and destruction.
Why insulate the foundation of MZLF
The outer layer of heat insulation on the foundation strip solves several problems:
- retains the geothermal heat of the subsoil - the soil under the building does not freeze, frost heaving forces cannot arise;
- shifts the thermal contour, the dew point outward - relevant for a technical underground, an exploited underground floor, on the outer walls of which moisture is guaranteed not to appear.
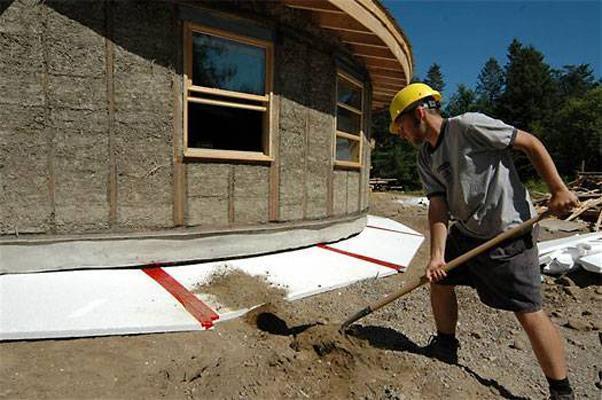
However, it is impossible to retain the heat of the subsoil solely by covering the foundation with a heat insulator. The depth of the MZLF is insignificant, so an increase in the perimeter is required. For this purpose, an insulated blind area is often used - concrete over a layer of extruded polystyrene foam with a slope from the building wall. However, computer modeling based on the real characteristics of structural materials has proven the low efficiency of this method:
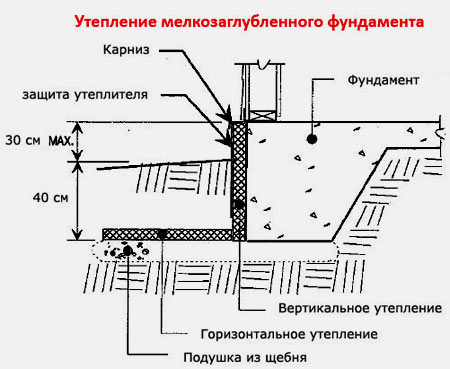
The most economical option for the construction budget is a warm blind area 60 cm wide with a sheet of polystyrene foam 5 cm thick + a vertical 5 cm layer of PSB-S to the height of the plinth (from ground level to the start of laying the wall) Fig. 1.
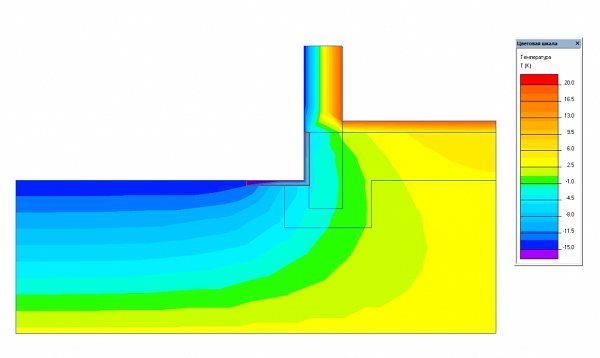
Fig.1. Heat distribution diagram when insulating the blind area and MZLF base.
This technology is only suitable for soils with low clay content, since the residual heaving exceeds 50%;
If you cover the entire height of the MZLF tape with a heat insulator (mark -30 cm), leaving an insulated blind area, this figure will drop to 40% Fig. 2.
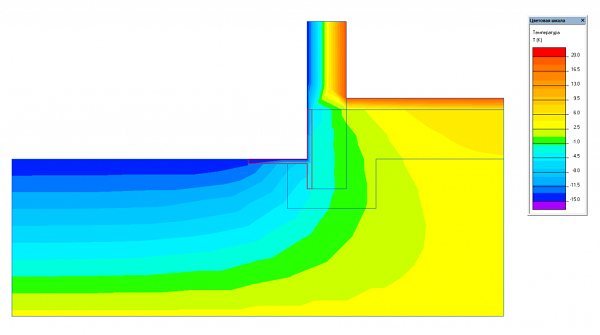
Rice. 2. Heat distribution diagram when insulating the blind area and MZLF tape to the entire depth.
With an increase in the perimeter of the thermal contour (90 cm of the blind area from the foundation), heaving decreases by another 5–7%, sharply increasing labor costs (expansion of the trench, increase in excavation work, and consumption of materials). Increasing the thickness of expanded polystyrene or PSB-S also does not eliminate the forces of heaving under the entire base of the cottage.
However, if you transfer the insulation to the level of the sole - line the bottom of the trench 60 cm around the perimeter, the heaving forces under the reinforced concrete structures disappear completely. Rice. 3.
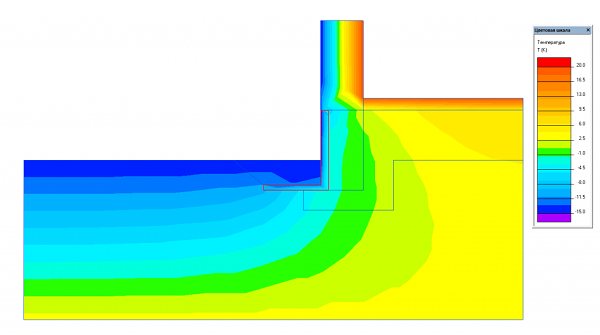
Fig.3. Heat distribution diagram when insulating the sole and MZLF tape.
Preparing the pillow - digging trenches and filling the “pie”
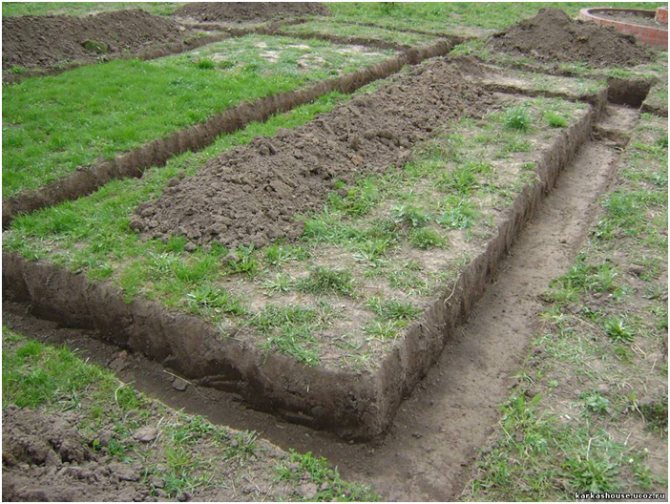
Regardless of what kind of covering you use, the installation of a blind area begins with the preparation of the cushion, and it is always performed in the same way. First of all, you need to decide on its width. According to SNiP 2.02.01-83, the blind area, and, consequently, the cushion, must extend beyond the roof overhang by at least 200 mm, while at the same time its width must be at least 700 mm.
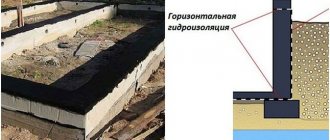
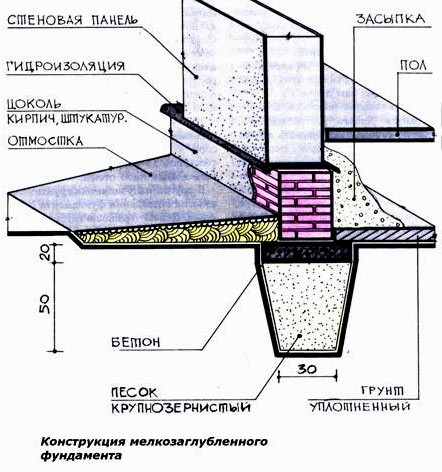
Then, having decided on the width, you need to mark the perimeter of the house. A trench is dug according to the markings, i.e. it must correspond to the width of the blind area. As we said above, the depth of the trench is half the freezing level of the soil. A layer of clay 15–20 centimeters thick is placed at the bottom of the resulting ditch - this is an additional water seal. The clay must be carefully compacted and leveled, while ensuring a slope of about 8-12 cm per meter. Then the trench is covered with waterproofing material, for example, you can use polypropylene film or even several layers of roofing material. The main thing is that the waterproofing is wrapped 10 centimeters on the foundation, as well as on the wall of the trench to the level of crushed stone.
To fix the edge, you can attach a strip or corner over it.
Then the waterproofing is covered with a layer of sand at least 3 cm thick. The sand must also be leveled. Geotextiles are laid on the sand and wrapped on the wall of the trench. Then a layer of crushed stone about 9-10 cm thick is poured in and carefully compacted. In this case, a slope of 5-7 cm per meter is formed. At this point the pillow can be said to be complete. Further actions depend on the material that will be used to cover the blind area. The only thing is, if you do not plan to carry out storm drainage along the perimeter of the blind area, you need to make drainage around it.
To arrange drainage, you need to dig a ditch 30 centimeters below the level of the cushion. The bottom of the ditch should be covered with geotextile, the edges of the canvas should be left with a margin of 35 cm. Then a layer of crushed stone is filled in and drainage pipes are laid. The top of the pipes is also covered with a layer of crushed stone and wrapped with the free ends of geotextile. The finished drainage system should be drained into a fixed well or connected to a storm sewer system, if, of course, there is one.
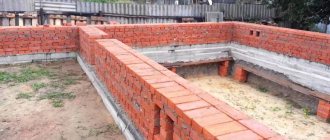
Technology for constructing a strip shallow foundation
Before you start building a shallow strip foundation with your own hands, you need to make the appropriate calculations - width, location and optimal depth. Based on the data obtained, a diagram is drawn up. It is necessary so that during work there is no need to interrupt for repeated measurements and calculations.
The scheme is drawn up in a matter of minutes, but subsequently it often saves several hours. The design of shallow foundations is simple, so even a non-specialist can handle this work. When the diagram is ready, you can begin georeferencing. Armed with pegs and a strong cord, you need to determine where exactly the foundation of the house will be located on the site.
Shallow foundation design drawing
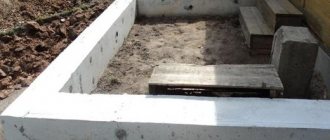
After this you will have to take up the shovel. Having marked the boundaries of the future trench, it is necessary to dig a ditch 60-80 centimeters deep and about 40 centimeters wide.
More accurately, the width can be determined by taking the thickness of the external walls of the building, adding 5 cm on each side for the stability of the structure on the foundation and another 5 cm for installing formwork (for this, plywood, boards, corrugated sheets and other thin materials can be used, durable materials).
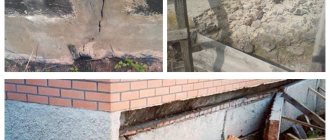
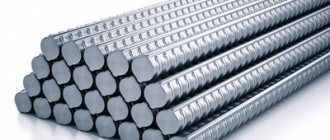
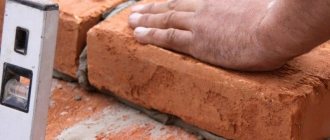
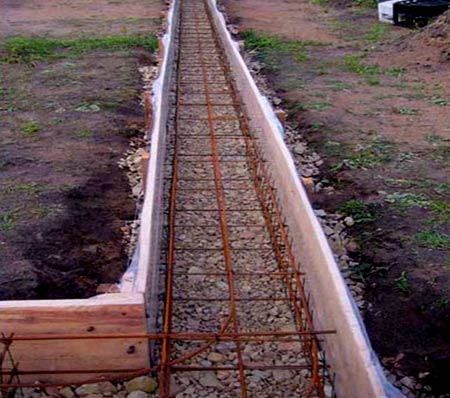
The next stage is reinforcement. From reinforcement 5-7 mm thick. the base for the foundation is knitted or welded. A reliable reinforcement base is especially important if shallow foundations are built on heaving soils. Without strong reinforcement, the foundation will simply collapse during seasonal fluctuations in soil levels. In most cases, this leads to the destruction of the house.
The resulting “skeleton” is installed in a trench and filled with concrete. When it gains sufficient strength, the formwork can be removed.
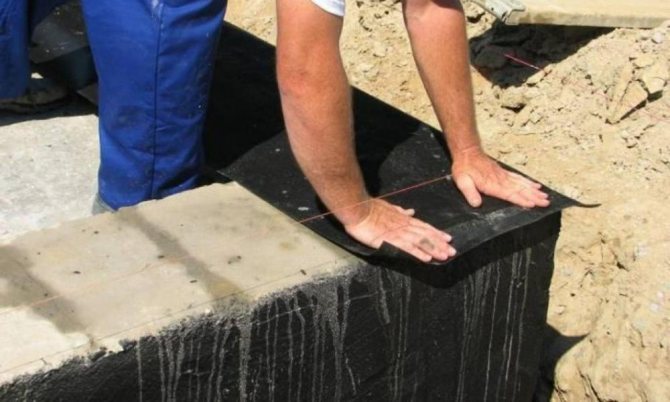
And the waterproofing efficiency of roofing felt is much greater.
Insulation of a shallow strip foundation
After this, the next stage of construction begins - insulation of shallow foundations
It is very important if you do not want heat loss through the foundation to force you to continuously heat your home during the cold season
foundation for a bathhouse
The fact is that a shallow foundation lies above the freezing level of the soil. And without high-quality insulation, it will significantly increase the heat loss of a residential building.
Extruded polystyrene foam is most often used as the main insulation. This material has a number of advantages. It is lightweight, which simplifies the process of transportation and installation. It is capable of performing its function perfectly for many years, even when working in high humidity soil, without harm to itself.
And finally, polystyrene foam, despite its small thickness, provides high-quality thermal insulation.
When the insulation of the foundation is completed, all that remains is to fill the remaining cracks with earth and compact the soil tightly.
Some experts recommend planting low but dense shrubs along the wall of a house built on a shallow foundation. In the summer, they give special freshness and beauty to the house, emphasizing its originality and grace. But there is also a purely practical calculation - additional thermal insulation.
As you can see, a shallow strip foundation, despite its apparent complexity, does not represent anything extraordinary.
The entire device can be completed in a matter of days by a couple of people who may not even have the skills to carry out construction work, but will seriously study the theoretical part.
Example of reinforcement of a shallow foundation
After the foundation has gained sufficient strength (usually after 10-20 days, depending on the humidity and ambient temperature), you can begin building a bathhouse, house, gazebo or any other building.
In what cases is insulation necessary?
Nowadays, strip foundation insulation is carried out only when two main problems arise:
- Provided that the house is built on heaving soil.
In this case, heat and waterproofing is needed to shift the freezing boundary of the soil further from the base of the concrete base. As a result, using expanded polystyrene or bulk mixtures can significantly reduce the height of soil freezing and minimize the likelihood of a sharp rise in soil during freezing;
- If necessary, create energy savings in the home.
When solving problems of maximizing heat loss reduction, insulation can be installed for any type of soil and house structure. In this case, the insulation will save energy during the cold months of the heating season.
Preservation for the winter
Even most professionals don't know that leaving a newly poured foundation in place during the winter is dangerous. A foundation without a load is not able to balance the heaving forces with its own mass. In this case, there is no heating of the perimeter due to the heating equipment not being installed.
The temporary protection of the MZLF is as follows:
- the perimeter (foundation + 1 m of soil around it) is covered with a double layer of film (polyethylene is not recommended, it is better to choose PVC);
- structures are protected by a heat insulator (expanded clay, straw, mineral wool, slag, sawdust) fig. 4;
- installation of snow retention elements - shields around the perimeter of the building area.
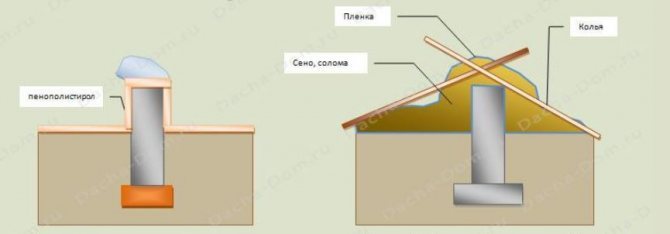
Fig.6. Preservation of MZLF for the winter.
The density of the soil can be reduced mechanically by plowing and digging up the soil on the site. A depth of 15 cm (bayonet of a shovel) is quite enough for this. Rice. 5;

Fig.5. Preservation of MZLF for the winter.
Applicability criteria for shallow foundations
A shallow foundation is simple in design, but is also inferior in strength to the buried version.
Therefore, it is important to determine the opportunities for such savings and their feasibility. Such foundations are most common when constructing light buildings made of stone or frame blocks.
Low-heaving soils are suitable for the construction of shallow foundations
The main criteria for choosing shallow foundations include the following:
- Soils should have minimal heaving, as there is a high risk of the foundation rising and the building collapsing. With low or medium heaving, it will be necessary to reinforce the concrete in the strip structure with reinforcement. On highly heaving soils, installing a shallow foundation is prohibited.
- The depth of soil freezing should not exceed 0.2-0.35 m, since the foundation laying depth is up to 1-0.7 m. That is, the freezing zone should be 30-35 cm above the tape, excluding the sand-crushed stone cushion.
- The soil must have sufficient bearing capacity and not be seasonally flooded. This is due to the fact that a shallow foundation must have support not only from below, but also from the sides of the belt to prevent it from moving under load. To determine the composition of the soil, geological exploration is carried out, and engineering surveys are carried out to assess the possibility of constructing the facility.
If the main criteria are met, then preparatory work can begin.
Scope of application (MZFL)
Shallow foundations are used in the construction of structures on slightly heaving and non-heaving soils with low moisture content. These are sandy and sandy loam soils.
The main criterion is the groundwater level. It should be 0.5 m below the foundation depth.
Important! Most clay soils are classified as medium- and high-heaving, so the construction of MZFL on these types is accompanied by problems. Since the shallow type of foundation is between non-recessed and recessed, the load-bearing capacity is assessed as average
Since the shallow type of foundation is between non-recessed and recessed, the load-bearing capacity is assessed as average.
MZFL technology is used for structures:
- country houses and frame houses;
- timber structures;
- outbuildings;
- baths;
- sheds;
- fences
Important! Structures made of foam blocks, gas blocks and brick houses with a shallow foundation are not suitable. It can be used in combination with other types of bases
For example, in combination with piles. For heavy structures, a pile-strip foundation is suitable because... The load-bearing capacity increases due to bored supports. The design must comply with SNiP 2.03.01-84 in terms of strength and resistance to deformation.
Tape base
Shallow strip slabs are in great demand in country house construction. This device can be used for:
- Wooden buildings
- If you follow all the rules, you can use it for buildings with heavy walls made of stones.
When planning to further insulate the foundation, then you can build foundations on any type of soil. The strip base consists of: a uniform strip of concrete mixture, which should also be evenly loaded with further building structures. Types of construction:
- Reinforced concrete with two belts
- Prefabricated reinforced concrete with reinforcement outlets in small quantities
- Blocks having two belts, lower and upper
- Block with one upper belt.
Advantages of a shallow strip base:
- Profitable money saving. Indeed, when constructing deep foundations, the prices for such construction are much higher than shallow foundations.
- Savings on labor costs. All construction work of this type involves a small amount of work. First of all, savings arise when working with excavation work, as well as when creating formwork.
- As an addition, you can use the saved money to build a basement.
As practice has shown, the installation depth of the strip base can correspond to the depth of freezing and the depth of the plant layer. In books on construction, the figure is fifty centimeters. At such a depth, all the forces of frost heaving are concentrated in this place, so this depth is considered the most dangerous.
Base calculation
Calculating the foundations of a small foundation is considered an important step in construction. The service life of the foundation and the house as a whole will directly depend on the correctness of the work done. With all this, it is possible to reduce the costs of the main construction of the building. When calculating shallow foundations, you must first decide on the size and type of structure. The main properties include the size of the sole, as well as the level of laying depth. The level of foundation laying depth is influenced by several factors, one of them is the type of construction of the planned building, for example:
- Type of material used to construct the roof
- What are the walls planned to be built from?
- Will there be a ground floor in the building or not?
In addition to these factors, the properties of the soil at the construction site and the groundwater level also influence. If water appears on the soil surface, it is necessary to completely dry the construction site. After drainage work, it is necessary to devote time to laying engineering communications.
Having completed the preparatory work and selected the required dimensions of the foundation, you should smoothly proceed to its calculation. The ultimate strength and deformation that the base structure can withstand is calculated. After completing the theoretical work, you should begin the practical part of construction, that is, build the foundation structure.
Base structure
Foundations that are slightly deepened are not partially subject to deformations resulting from soil heaving. For this reason, this method of installing a foundation is widely used in practice. Most often they are used in the construction of small houses, cottages and frame structures. Buildings with low weight cannot withstand soil heaving, so the foundation is deepened to a small level.
The design that shallow foundations are capable of consists of a monolithic frame. A frame with a reinforced concrete base can easily resist soil heaving, not only seasonal, but also permanent.
Foundations that can be used during shallow installation:
- Columnar base
- Strip view of the foundation
- Reinforced concrete slab
These types of foundations have a common component, such as a reinforced concrete base. The dimensions of any of the bases are determined only by strength calculations. It is based on the weight of the structure at the moment of contact with the ground. Although a large area reduces the pressure, the maximum size of the site does not justify the construction costs. For this reason, all calculations must be equal to the values in construction, that is, all buildings must be equal to the area of the foundation.
Subsequent treatment of the base
When the MZLF is ready, they begin to protect it from destructive factors: moisture, temperature changes. For this purpose, hydro- and thermal insulation of a concrete tape is used. The blind area also plays a certain role in protecting the structure.
Waterproofing shallow foundations
To protect a shallow strip foundation from moisture, it is coated with hydrophobic compounds. There are two types of waterproofing used for MZLF: vertical and horizontal. The first type consists of two layers of roofing felt, which are fixed to each other using bitumen mastic. The lower surface of the foundation is insulated before the reinforcement is installed, the upper surface is insulated after the concrete has completely hardened. Vertical waterproofing is applied to the side surfaces of the foundation. For this purpose, special impregnations, coatings or pasting materials are used.
Insulation
The use of thermal insulation allows you to avoid condensation on the surface of the concrete strip, freezing of moisture inside the foundation itself, dampness and cold on the ground floor. This work is especially relevant if you plan to make a basement in the house. For shallow strip foundations, external or internal insulation is used. The first is considered mandatory, the second - if there is a basement. Different materials are used for thermal insulation:
- Penoplex. It is characterized by an optimal price-quality ratio.
- Expanded polystyrene. Cheap material, but with reduced technical qualities.
- Polyurethane foam. Expensive sprayed insulation with a long service life.

Blind area
At the final stage, the sinuses on the outer and inner sides of the tape are covered with sand or other material with good absorbent properties. The sand is poured in layers, compacting each one. Next, they begin the blind area. In the future, it will protect the foundation from water flowing from above. The blind area is installed using standard technology, taking into account the need for its insulation.
Finishing
To make the protruding part of the base more attractive, it is advisable to cover it with finishing materials. In addition to its decorative role, cladding also serves as additional protection for concrete from adverse factors.
There are different cladding options. The easiest and cheapest way is plastering and painting. Another option for finishing is DSP panels and brick. Such coatings are reliable and durable. Natural stone stands out among the more expensive materials. To save money but achieve an aesthetic appearance, they use imitation of natural materials - artificial varieties of stone and brick.
We make a blind area from bulk materials - one or two and you're done
It’s even easier to make a blind area from crushed stone. Essentially, it follows the same pattern as a pillow. But the crushed stone layer should be thicker, i.e. its thickness should be equal to the thickness of the crushed stone layer of the pillow, plus the thickness of the sand layer, plus the thickness of the coating layer. The result is about 20 centimeters. The surface of the crushed stone is leveled in a horizontal plane. As for the slope, there is also no point in doing it for a crushed stone blind area.
As you can see, the process of arranging a soft blind area is quite quick and simple. However, it has several disadvantages - it is fragile and not very presentable in appearance. True, if the landscape design is designed in the appropriate style, then pebbles or even ordinary crushed stone around the building can look quite good.
The blind area with a top cement-filling layer is approximately the same. The difference is that the layer of crushed stone should be several centimeters smaller, since the screed will take up this thickness. To fill the solution, formwork must be installed along the edge of the blind area. As a rule, it is made of boards, plywood or OSB. The most important thing is to fix it well so that the formwork does not move during the process of pouring the solution. To do this, you can use spacers and racks.
On the foundation side, before pouring, a sealant must be laid, which is responsible for the construction of the thermal seam and its sealing. Most often, a conventional damper tape made of foamed polyethylene is used for these purposes. A cement-sand mortar of grade M200, about 3 cm thick, is poured over the crushed stone. When the mortar begins to set, it is ironed, i.e. a thin layer of cement is poured on top and rubbed in with a small brush. Thanks to this operation, the blind area will become smoother and stronger.
After rubbing in dry cement, it is advisable to cover the surface of the blind area with a dark film, since the iron ripens better without light. To prevent the blind area from cracking during the drying process, it needs to be sprinkled with water every day for the first few days.
Materials for thermal insulation of foundations
When choosing a material for thermal insulation of the base, you should pay attention to several points:
- The insulation must have low thermal conductivity.
- The material should not absorb moisture.
- Thermal insulation must be resistant to temperature changes and mechanical stress.
- Materials for foundation insulation must be resistant to aggressive environments.
- The service life of the insulation and the operational period of the building must be comparable.
Thermal insulation materials, presented on the modern market in a large assortment, meet all of the above requirements. To make the right choice, you need to know the advantages and disadvantages of the insulation material. Several types of insulation are the most popular.
Polystyrene foam can be considered a reliable heat insulator due to its composition and ability to maintain its properties in any climate. On the positive side, polystyrene foam is characterized by the following qualities:
- Good thermal insulation;
- Waterproof;
- Ability to withstand contact with asphalt and cement.
- Fire resistance.
- Resistance to harmful effects of sunlight.
https://youtube.com/watch?v=zGKyeXy24Mw
Extruded polystyrene foam is the most common material for insulating shallow strip foundations. Its main advantage is low thermal conductivity. The high compressive strength of the material can protect the waterproofing of a shallow strip foundation from damage. Low water absorption increases the material's resistance to severe frosts. Such insulation will reliably protect the base from moisture penetration, sudden changes in temperature and caustic chemicals. With proper use, polystyrene foam will last for 50 years.
Polyurethane foam is a new generation material. It combines several main functions: thermal insulation, waterproofing and sound insulation. The material is applied to the insulated surface by spraying. In such insulation there are no gaps or seams that serve as unique cold bridges. Therefore, there is no possibility of cold and moisture penetrating into the foundation of the house. The advantages of polyurethane foam insulation include:
- Reliability;
- High adhesion;
- Long service life;
- Low thermal conductivity and vapor permeability;
- Seamless;
- No need for waterproofing work.
The main disadvantages of polyurethane foam are its high cost and poor resistance to ultraviolet radiation. In addition, applying the material to the surface requires special equipment and experience, which can also cause some difficulties.
Expanded clay and earth are considered the cheapest and most accessible materials. At the same time, they are able to significantly reduce heat loss during the cold season. This method is most often used when insulating strip foundations. The use of earth and expanded clay as insulation prevents freezing of basements in private homes. Expanded clay, as an insulation material for a shallow strip foundation, can hold back cold air from the outside. It also absorbs moisture well, which helps protect the foundation of the house from waterlogging. However, the use of expanded clay alone does not give a significant result. The additional use of waterproofing materials will help reduce heat loss when heating a house.
Useful tips
- If polystyrene foam insulation technology is used, the thermal insulation layer must be treated on top with glue for finishing work. This will allow the insulation to maintain its performance characteristics for a longer period of time.
- To increase the protective functions of the foundation of the house, it is recommended to additionally insulate the blind area. In this case, work should be done along the entire perimeter of the building. Any material can be used, including polystyrene foam.
- The insulation should be laid only after arranging the blind area cushion and drainage, as well as laying the waterproofing material.
- A concrete screed must be placed on top of the insulation. As an alternative, laying paving slabs can be used.
- If the construction of the building was carried out on soil characterized by a large freezing depth, it is strongly recommended to take care of additional protection of the thermal insulation layer from various types of mechanical damage. Brickwork on top of polystyrene foam insulation is best suited for this purpose.
- Insulation must be carried out for all types of foundations, regardless of the type of soil on which the house was built.
- Without some construction experience, it is strongly not recommended to insulate the foundation on your own. In such a situation, the best solution would be to turn to experienced professionals who know their business very well and are able to complete work of any degree of complexity in the shortest possible time.
When choosing a company for base insulation, you should pay attention not only to its experience in the relevant market sector, but also to reviews from existing clients.
Shallow foundation calculator
Examples of how to calculate this type of important construction project, intended for those who are building or planning to build their own home. The use of special formulas and data will help for accurate and good quality calculations of the strip foundation and the durability of the entire structure of the room
What you need to know:
- Name of the total length of the tape. It includes information along the entire perimeter of the foundation. You must know the real numbers that are taken after probing the object.
- The area of the sole area. Determination of the reference area for the future basis. It must match the dimensions of the selected waterproofing system or material.
- The area of the lateral outer surface. It is assumed to be equal to the insulation zone for the external one.
- The name of the required concrete solution and its quantity. This is the amount of concrete required to construct a foundation for a specific purpose. It is determined only by independent production of concrete mortar.
- The amount of concrete mass of the solution. Designed for the average density of cement-concrete mortar.
- The load on the ground on which the foundation will be calculated. This shows the size of the load distribution over the total area.
A real example of calculating a strip foundation
Data used: monoblock concrete installed on granite.
To better understand our own actions, we will draw up a plan for the scheme. 1. Data for calculation:
- Shallow strip foundation, base, size: 6x3 m;
- Height: 0.2 m;
- Bottom: 0.25 m
2. Real characteristics of the room for building a strip foundation:
- Walls 400 mm thick.
- Soil containing crushed granite
- Two-storey house.
Calculation of gravity when building a shallow strip foundation
- Gravity is measured in newtons, a unit of force that is calculated by taking the weight of a structure in kilograms and multiplying it by 9.81, a number that, in effect, is the maximum pressure gravity force.
- To build a strip foundation, you need to know the heaviness of the room, and this is measured in three ways:
- Dead weight: This is the force attributed to the overall structural mass of the building, as mentioned above, roof, etc. This will be the weight of all materials multiplied by 9.81 to calculate in newtons.
- Created Load: This is the force that will be imposed on the room, including people, furniture and others. Snow loading (snow load) will also be included in this category.
- In all cases, the final decision on the width and depth of strip foundations is the general rule that the depth of the foundation should be equal to or greater than the distance from the front edge of the wall to the edge of the foundation. But the concrete thickness will be at least 150mm. In some cases, reinforcing steel may be inserted into the strip foundation to reduce the depth of the concrete. It should also be remembered that when building a foundation when working on blocks and/or brickwork, space must be found in the trench. It is considered normal practice, at the base of the required strength or better, to construct a concrete strip foundation 600mm wide and 250mm deep. This will cover almost all possible cases. Installation outside the building is much easier if the foundation expands rather than narrows and does not allow errors in operation. It's also worth noting that 600mm is the standard size of an earthmover bucket!
- The choice of filling the foundation trench with concrete is now used in most cases. And in most cases it is much cheaper to do this. The cost of labor involved in laying bricks and blocks to ground level, together with the materials involved, is usually greater than the cost of pouring concrete to the required height, which, in most cases, is two courses of masonry of a completed foundation.
- Walls built below are subject to earth pressure in both directions and are treated as retaining walls.
- Pipes passing through concrete must pass through a special tube to remove the possibility of pressure from any other surface resting on the pipeline.
Types of FMZ
Tape
It is most popular in country house construction, as well as among individual developers carrying out construction work on their own.
It is used both for the construction of wooden and heavier stone structures. Such a shallow structure is a continuous strip of concrete evenly loaded by the walls of the structure.
There are several options for its construction:
- reinforced concrete block with an upper reinforcing belt;
- reinforced concrete block with lower and upper reinforcing chords;
- monolithic with two reinforcing belts;
- prefabricated monolithic with fittings.
Columnar FMZ
Can be used in the construction of wooden, timber, brick and stone buildings.
It consists of pillars that are installed at each corner of the house, as well as at the junction of internal and external walls. The “step” between the pillars should not exceed 2 meters.
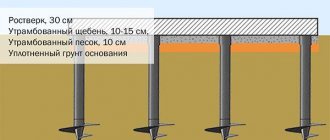
To build a shallow columnar foundation, a pit is made, the depth of which should be about 1 meter, after which rings of reinforced concrete are placed in it, subsequently compacted with sand and covered with concrete slabs.
Concrete blind area - we create it for a long time
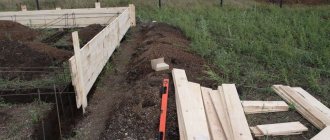
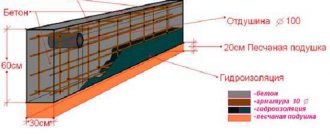
The most durable and durable is the concrete blind area. The process of its manufacture begins with the preparation of a sand cushion, as before laying paving slabs. Then formwork is installed around the perimeter in the same way as in the previous case. Before laying the reinforcement, it is advisable to install expansion joints made of wooden planks about 15 mm thick. Compensators should be located perpendicular to the blind area, i.e. between the foundation and the formwork. The distance between compensators should not exceed 2.5–3 meters.
Since the planks will remain in the thickness of the concrete, they must first be treated with a protective antiseptic agent and bitumen mastic. Thanks to this, they will last for decades. When installing compensators, try to align their ends in the same plane with a slope of 10 cm per meter. As a result, the planks will additionally serve as guides.
After installing the formwork, a damper tape is laid along the wall and reinforced with reinforcing mesh. Its optimal dimensions are 100x100x4 mm. Keep in mind that the mesh should not lie on the pillow, so you need to place special stands or small stones under it. Otherwise, the grid will not perform its functions. After this, concrete work begins. First of all, you need to prepare a solution from the following ingredients:
- cement grade not lower than M400 – 280 kg;
- crushed stone – 1400 kg;
- sand – 840 kg;
- water 180–200 l.
Let me remind you that cement and sand are first mixed, then water and filler are added. The solution will be very dry, but don’t let that bother you. This consistency is necessary so that the concrete can maintain the required slope angle. Filling is carried out section by section. During this procedure, do not forget to compact the concrete. It is best to use special equipment for these purposes, but if you don’t have it, you can use a piece of reinforcement. During the compaction process, try not to displace the reinforcement mesh, as this will reduce the strength of the concrete.
After filling the blind area, expansion joints can be coated with construction sealant to eliminate the possibility of moisture penetrating into them. After the solution has set, it is advisable to carry out ironing according to the scheme described above. Do not forget that the surface of the concrete blind area must be moistened with water for the first few days.
Device Features
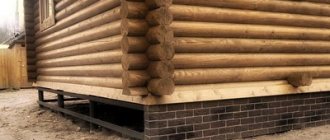
If you are selecting a foundation for a frameless house or bathhouse on clay soil or black soil, then a shallow strip foundation is best suited for you.
Types of strip foundations made from aerated concrete blocks or FBS slabs are convenient due to their design and method of transmitting forces. They directly take the loads upon themselves and transfer them to the soils that lie below. However, unlike foundations for a bathhouse with a solid slab, much less concrete and time are needed to produce FBS blocks from aerated concrete.
Let us give an example when a shallow foundation is mounted directly under the load-bearing elements of a house or bathhouse. If the house has a basement, then the loads are transferred between the block walls, floor slabs, and then the foundation.
If the house does not have a floor slab, and the floors of the house or bathhouse are filled with a regular screed over pebbles, then the structural loads are transmitted directly through the walls of the house or bathhouse. In any case, the shallow columnar foundation of the building is considered universal. Even SNiP recommends building standard low-rise buildings or bathhouses on strip foundations made of FBS aerated concrete blocks.
Laying FEM - a simple and beautiful option
First, let's look at how to make a blind area with paving slabs with your own hands, since this is one of the most common options. Work should begin by laying geotextiles on top of crushed stone with a fold over the trench wall. Next, install a border along the edge of the blind area. To do this, dig a groove along the width of the curb and fill it with cement mortar. The curb can be placed directly on the fresh mortar so that it is set in concrete a little.
To ensure that the border is level, stretch a cord along the edge of the blind area and align the sections of the border along it.
Then the geotextile is covered with a layer of sand at least 6 mm thick. The sand must be compacted, and it is advisable to spill it with water, which will allow it to be compacted more efficiently. It must be said that in the case of using paving slabs, the function of water drainage falls entirely on the waterproofing film. Therefore, there is no need to slope the top layer of sand. The process of laying FEM tiles is standard - you simply lay the tiles on the sand and align them relative to each other, as well as in the horizontal plane.
Here, in fact, are all the nuances of performing such a blind area. It must be said that according to this scheme it is made not only from paving slabs, but also from paving stones. The only thing is that the latter, unlike tiles, needs to be buried a little in the sand.