A reliable and strong foundation becomes a guarantee of the durability of each building. Its main task is to ensure uniform pressure of the most massive structure on the ground surface.
A high-quality initial level will protect the building from temperature changes and erosion during seasonal snow melting. The house does not deform and will last for many years. Depending on climatic conditions, different types of such building foundations are selected. In many cases, a sand cushion is recommended.
Why do you need to install a concrete footing?
The concrete footing performs a number of useful functions, namely:
- Creates a layer of waterproofing. Thanks to this, the liquid cement mortar will not leak during the process of pouring the foundation. In addition, the moisture in the screed will be distributed evenly and the base will not crack when drying.
- Allows you to create a flat surface for a rough concrete base. Thanks to this, the consumption of cement-sand mortar is reduced.
- Protects the foundation from groundwater.
- Redistributes the pressure exerted by the soil and ground parts of the structure.
- Allows for higher quality reinforcement.
- Eliminates shrinkage of the building.
In addition, such a shock-absorbing layer significantly improves the strength and durability of the entire structure. A foundation laid on a concrete base “survives” the winter more easily.
From all of the above, it becomes obvious why a footing is needed, so let’s move on to the varieties of these slabs.
Types of simple concrete footings
There are several types of foundation slab:
Shchebnevaya
This “preparation” is considered more economical, since crushed stone is cheaper than cement composition. The crushed stone layer must be at least 20 cm high. In the process of laying the concrete footing, careful compaction (preferably using vibratory tamping equipment) is a prerequisite.
If it speaks about the shortcomings of “preparation,” then the technology for laying crushed stone footings under the foundation is considered unreliable. The fact is that such a substrate is not rigid enough, so further work on installing the foundation on such a foundation will not be carried out at the highest level. However, if you do not plan to build a multi-storey building, then such a concrete base will be quite sufficient for a utility block or bathhouse.
To install a simple base, follow these steps:
- Prepare a work surface and lay crushed stone on it.
- Level it with shovels.
- Compact and compact the pillow over the entire surface.
- Apply a layer of bitumen to the resulting footing to obtain good waterproofing. If you want to save money, you can use roofing felt or polyethylene instead of bitumen, however, these materials have lower waterproofing properties.
Sandy
“Preparation” of sand allows for the best redistribution of loads on the foundation. It is recommended to lay such pillows in autumn and spring, when the soil undergoes changes. Due to the underlying layer of sand, the lower part of the foundation will be located above the groundwater level, so the monolith will not suffer from the harmful effects of moisture. That is why sand concrete footings are most often installed in areas with problematic soil.
To install such a layer you need:
- Remove the layer of soil.
- Fill it with river sand in a fraction of at least 1.5 cm.
- Using a building level, level the cushion around the entire perimeter.
- Compact the “preparation”.
Healthy! To determine the required thickness of the footing, as well as select the desired type of layer, it is necessary to take into account: the type of soil, the presence of surrounding buildings, seismicity and operating loads. Detailed requirements and calculations are set out in SNiP 2.02.01-83, as well as in SP 50-101-2004 and SP 63.13330.2012.
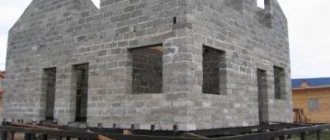
Sand and crushed stone cushions are not suitable for all buildings and are characterized by low strength. If you want to make the most reliable foundation for a residential building, then, of course, you should give preference to a concrete slab.
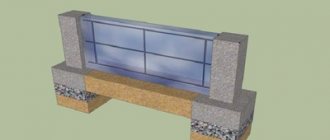
Concrete pad
The installation of this type of concrete requires large financial investments, but this type of foundation is best suited for slab and strip foundations. The fact is that when installing such fundamental foundations, a heavy reinforcing frame made of rigid steel rods is installed, which requires a more durable foundation.
Before you start installing the base, you need to consider a few tips:
- To install the concrete base, “thin concrete” of classes from B 3.5 to B 7.5 (M 50, 75, 100) is used. There is no point in using stronger cement; besides, it will cost many times more.
- To obtain a durable “preparation”, it is enough to lay a concrete pad 10 cm thick (provided that groundwater does not predominate in the area).
- Before laying the concrete mixture, it is necessary to pour a thin layer of sand or crushed stone onto the bottom of the pit or trench.
- If a reinforcing frame is not used when installing a concrete pad, then the optimal thickness of the base will be 15-20 cm.
- Thanks to the reinforcement of the concrete base, the ground part of the structure will be located on a reliable foundation. For the armored belt, metal rods with a cross section of 8 mm are used. The rods are installed vertically and should protrude above the surface by approximately 25-30 cm. In this case, the thickness of the “preparation” can be reduced by 6-10 cm.
Soil compaction
Soil compaction is used to construct soil and sand cushions, eliminate the subsidence properties of macroporous soils, and bulk soils. Compaction is carried out when a certain humidity is created. For sand and sandy loam, 100...150 liters of water will be required per cubic meter of soil, and 150...240 liters will be required to compact loam or clay. If there is excessive soil moisture, a drainage device is required. Various types of compaction are used in construction, each of which can be implemented in several ways.
Surface seal
used for constructing sand and soil cushions, eliminating subsidence of macroporous and loose sand and bulk soils;
it can be performed using various mechanized means (Table 10). Table 10. Surface soil compaction methods
| Mechanism | Compaction depth (m) |
| Pneumatic rammers | 0,1…0,2 |
| Smooth rollers | 0,1…0,25 |
| Pad rollers | 0,2…0,35 |
| Vibratory rollers | 0,4…1,2 |
| Hammer weighing 2.2 tons | 1,2…1,4 |
| Tamper weighing 2…3 t | 1,5…2,0 |
| Tamper weighing 4.5…5 t | 2,5…3,0 |
| Rammer weighing 10 t | 5,5…6,0 |
When compacting soil with heavy rammers weighing from 1 to 10 tons, they are lifted and dropped using a crane from a height of 4...8 m or more. The number of impacts with a tamper on one track is about 8...12 times.
In some cases, during compaction, crushed stone, broken bricks, or fractions obtained from processing destroyed concrete structures are fed into the compaction zone.
Deep compaction
can be performed in the following ways: – immersing the vibrator on a cable using a crane (used to compact soil at a depth of 1 to 10 m); – immersion of a rod attached to a vibrator (used to compact soils to a depth of 5...20 m); – compaction by explosion (for compaction of subsiding loess soils); – using sand or soil piles created by filling wells with sand and compacting it layer-by-layer (for compacting macroporous subsidence soils, silty and fine sands, highly compressible peat soils).
Installation of concrete footing
Let's say you plan to build a house on a site with fairly loose soil and a high groundwater level. To do this you need to follow these steps:
- Determine the highest point of groundwater - it is better to “preparation” to this level. Some install the “preparation” in such a way that it protrudes beyond the underground structure by 10 cm.
- Level and compact the soil.
- Pour coarse sand into the bottom of the pit, spread it over the surface and compact it thoroughly. For a better effect, you can also lay a layer of crushed stone.
- Lay roofing material or polyethylene on top of the sand.
- Lay the reinforced frame with cells 60 x 60 cm.
- Install guides; it will be more convenient to level the liquid mixture along them.
- Mix cement, crushed stone, sand and water until a homogeneous thick mass is obtained.
- Pour the concrete solution and level it along the beacons using the rule.
- After the base has hardened, treat the surface with bitumen.
Healthy! In order not to use expensive drilling equipment after the monolith has hardened, it is recommended to think through openings for communications at the stage of laying raw concrete.
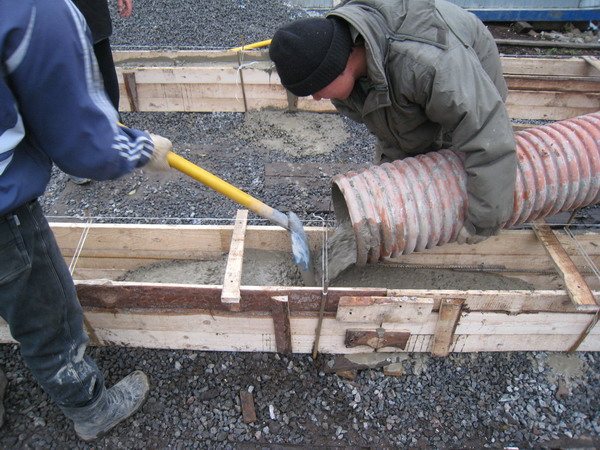
How to pour a foundation for a house with your own hands - the nuances of concreting
The final stage of work on the construction of the foundation is the pouring of a monolithic foundation slab. It is carried out using a concrete solution made from M400 cement, medium-fraction gravel and coarse sand. It is allowed to use a solution prepared under different conditions.
Possible options:
- a mixture prepared independently at the construction site. A concrete mixer is used in which pre-prepared ingredients are mixed with the addition of water;
- purchased concrete solution produced at an industrial enterprise. It is brought in mixers and supplied to the work site using a concrete pump or through a special chute.
It is important to correctly calculate the required amount of concrete mixture and avoid interruptions during the concreting process.
Pouring a monolithic foundation slab is the final stage of work on the construction of the foundation base
Let's look at how the foundation for a house is poured. Follow the given procedure:
- Draw a line inside the formwork indicating the level of concreting.
- Fill the formwork with concrete mixture, ensuring a layer thickness of 20-33 cm.
- Check that there are no cavities in the area of the load-bearing frame.
- Fill the remaining volume of concrete solution to the specified level.
- Use steel rods to remove any air pockets inside the array.
- Compact the concrete with a surface or deep vibratory compactor.
After pouring is complete, ensure the concrete surface is flat using a rule or trowel.
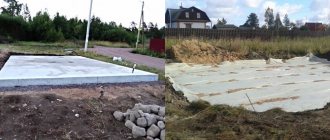
Purpose and thickness
The preparatory concrete or crushed stone foundation is made using different methods, means and building materials. But with any device, its purpose will remain the same - it consists in preparing and leveling the surface. Due to this, the main concrete pour is consumed more economically due to uniform placement, which does not require additional consumption of the mixture for unevenness and depressions in the ground. Concrete and crushed stone footing, which is required for construction work, is used in the following cases:
- Surface preparation for easy installation of structural parts. On a leveled site it is much easier to do markings, reinforcement cages, etc. Obviously, this work is more difficult to carry out on loose soil.
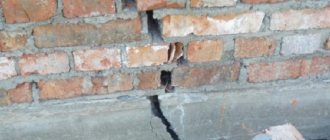
- Waterproofing. Thin concrete bases are also necessary in order to retain moisture from the poured mortar. Cracks appear on the frozen slab. They often appear due to the fact that the liquid is unevenly distributed in the cement structure.
- Protection of the foundation from groundwater. If the layer is laid under a slab base, groundwater may enter the pit. In these cases, the footing absorbs part of the liquid, thereby preserving the load-bearing layer on which the building rests.
In addition, the presence of shock absorption increases the strength of the structure due to the fact that the base is better preserved. As for the thickness of the foundation monolith, it will depend directly on the dimensions and weight of the structure. On average, this figure is in the range of 0.15-1 meter.
Preparation can be made of concrete, bulk or film materials.
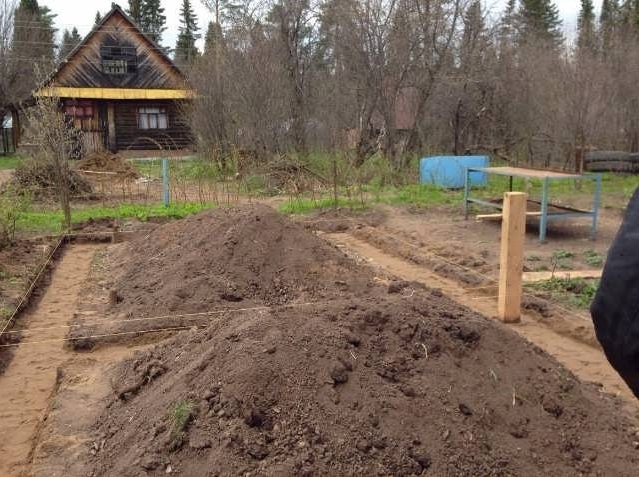
Preparing the site for the foundation: why is it needed?
Like every type of our activity, creating the foundation of a house requires a thorough and comprehensive preparatory process based on knowledge of the basic characteristics of the soil. Since the soil in different areas, and even within the same territory, can be very different, it is a good idea to understand which design is best suited for your plot of land.
Preparing the soil for the foundation is designed to ensure the stability of the cottage’s foundation, to provide more points of support with maximum strength, not subject to internal and external influences. Loose soil cannot be the basis for the construction of a structure, since under the weight of the structure it will invariably sink to the depth at which it can compact itself. And it is more expensive to build houses on moving soils, because uneven shrinkage will lead to disruption of the geometry of the structure, the structural integrity of load-bearing structures, cracks and destruction.
In addition, the constructed structure will be affected by soil pressure, the effect of heaving from the frozen soil, underground water flows - as a result, there will be flooding, waterlogging, and even a displacement of the house from the original construction site by several meters in different directions depending on the time of year.
Preparing the soil for the foundation is designed to eliminate any negative influences coming from outside, to provide a strong and stable foundation for structural elements, and to speed up the process of constructing a country residence. After all, on a prepared foundation it will be much easier to erect the main structure of the foundation, which will not need much time for final shrinkage.
The vibrating and tamping tool used, even with normal manual action, is capable of transmitting a pressure force to the soil much greater than the weight of the person carrying out the work. The more densely the surface and deep layers are compacted, the less time it will take for the house to finally fall into place and not be exposed to the forces of nature.
Types of training
Before starting the main work, it is necessary to carry out preparations. The work package includes the following three stages:
- performing calculations;
- leveling the site;
- preparing the surface before laying the foundation.
The first preparatory stage involves careful calculations and work with documentation. Then you need to clear the site. You will need to remove debris from the area, cut down and uproot trees, dig up bushes and other plants. The next step involves creating a “cushion” on the surface, which will be located under the foundation of the future building. The following building materials are used for this:
Finishing operations
After completing the concreting of the foundation, the final operations are performed:
- A polyethylene film is laid on the surface of the concrete mass to maintain constant humidity.
- The concrete surface is periodically moistened with water to ensure the normal course of the cement hydration process.
According to technology requirements, it is important to ensure the immobility of the concrete mass during hardening. After all, concrete gains operational strength within a month after pouring. Only after this the formwork structure is dismantled and work is carried out to waterproof the surface of the foundation base.
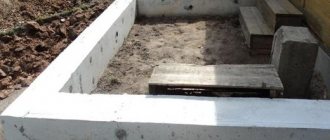
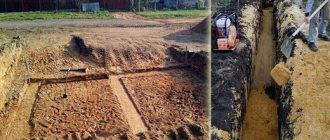
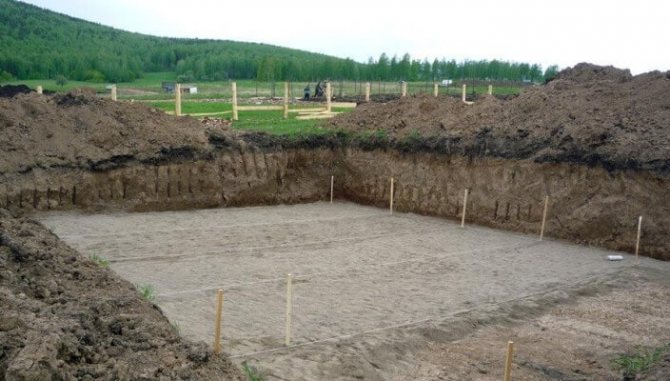
Preparation device (work stages)
First you need to clear the soil surface and make a pit. Proper preparation of the depression involves a number of works aimed at bringing the soil to the desired state. In other words, the soil must withstand the heavy loads specified in the project. It is necessary that after the foundation is laid, the soil tightly grips the foundation from below. First, you should form a pit, clean its bottom with a bulldozer, and then thoroughly compact the base. In addition, during compaction of the pit, the soil should be moistened or dried. Most often, trenches are dug by hand. In addition, builders visualize the surface of the base itself and set the corners of the walls using pegs. After the pit is dug, specialists begin the following stages of construction:
- marking the construction site for the foundation;
- leveling the area;
- preparing the required amount of crushed stone (layer - ten centimeters);
- compacting the pillow using a vibration device;
- installation of formwork (its height depends on the layer of concrete mixture layer;
- pouring mortar to the top of the formwork;
- reinforcement of the pillow (cross-section of the rods - at least eight millimeters);
- compacting the cement mixture with a vibrating plate;
- installation of a reinforcement cage that allows you to fasten the crushed stone cushion to the base (they should protrude above the poured concrete by about twenty to thirty centimeters).
You can install a reinforced frame in concrete, but you can do without this material. In practice, the two options have almost no differences. The only difference is that a pillow created without reinforcement is limited in size.
In fact, it is very simple to understand what a footing is. Here even the name speaks for itself - this is a layer of thin concrete, which is prepared for comfortable and economical pouring of the main volume of the mixture. In fact, this layer is placed under the main layer of concrete when constructing slab foundations, for example.
But why exactly this needs to be done (and whether it is necessary at all) is worth understanding in detail. In addition, it will be useful to consider what the installation instructions for such a base are.
Let's start with the most important thing.
Calculation of the required foundation depth
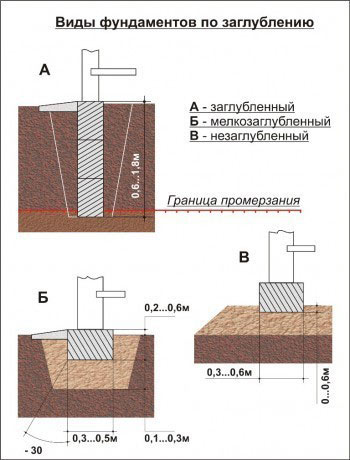
Removal of foundations by depth.
The depth of the foundation for a house largely depends on the type of soil on the construction site. If your site has clay soil, you need to make a sand and gravel cushion under the foundation. If there is sand under the turf layer, then no additional work is required.
The most expensive and difficult option is the presence of silty or peat soil on the site. This base will have to be completely replaced. In this option, you cannot do without the advice of professionals. Only specialists, based on geological expertise, will be able to correctly calculate the composition and design of the artificial foundation for your home.
Another important factor is the depth of soil freezing at the construction site. Before construction, the meaning of soil freezing should be clarified with a local design or construction organization.
Purpose of the footing
It is worth noting that the preparatory layer can be made in different ways and different materials can be used. However, the meaning and purpose of this work remains the same ().
| Goal of the work | What does this give in practice? |
| Leveling the rough base. | This allows you to reduce the amount of the main mixture when pouring, that is, save a little. This happens due to the fact that the concrete layer will be laid evenly and there will be no leakage of the solution into unknown holes. |
| Preparation of the plane for convenient installation of various structural elements. | The convenience lies in the fact that on a flat area you can make markings much faster, assemble a frame from reinforcement and install beacons, for example. Agree that this is not so easy to do on loose soil with holes and bumps. |
| Creation of a waterproofing layer. | This means that due to the presence of the concrete base, when pouring the bulk of the mixture with your own hands, moisture will not disappear from the solution. Accordingly, cracks will not appear on the finished slab or screed, which usually form due to uneven distribution of moisture within the structure of the working area. |
| Creation of protection against groundwater. | That is, if this layer is made under a slab-type foundation and groundwater often appears at the bottom of the pit, then in this case the footing is required to take the moisture “on itself” and prevent it from passing further into the main load-bearing layer of concrete. |
In addition, the presence of such a shock-absorbing layer improves the strength characteristics of the entire structure as a whole. At a minimum, due to the fact that the base layer dries and gains strength better and of better quality.
Please note that the installation of concrete footings involves the use of inexpensive concrete mixture. As a rule, “skinny” concrete B3.5-B7.5 is used. That is, it turns out that thanks to the preparation of such a layer, the overall cost of the project is reduced, since a significant amount of the total cubic capacity is filled with a composition with a lower cost.
So, why this kind of work is needed is probably clear. Now let's figure out how this is all done.
Useful video
How thick should the sand cushion be?
Compacting a sand cushion
Do-it-yourself sand bedding
Like the author! 0
Author's rating
Author of the article
Mikhail Lavrentiev
About 15 years in construction. He has accumulated extensive experience in foundation work and shares it on the pages of our online magazine.
Articles written
23
- Even more interesting:
- How to correctly mark the foundation and draw the diagonal
- We make formwork for the foundation with our own hands
Methods for constructing a footing
Before we begin, it is worth noting that concrete footing is, first of all, a very desirable measure, but not always mandatory ().
That is, simply put, if you have a small-scale project and the rough foundation consists of an old screed and there is no trace of loose soil or uneven terrain, then it is simply impractical to carry out such work.
So, objectively assess the situation - you shouldn’t waste your money where such additional work will not affect the final quality in any way.
Let's return to the options for constructing such a layer. As an illustrative example, let’s take the preparation for pouring a slab foundation.
Installation of the simplest concrete footing
For work we need this:
- Crushed stone.
- Tamping device.
It is easiest to make from wood or metal.
- Liquid bitumen.
- Good and durable shovels
.
We can begin.
- The required amount of granite crushed stone is poured onto the working area. Typically, the material is dumped from a dump truck and the end result is a large pile of rubble.
- Using shovels, the stones are evenly distributed over the entire surface.
- A tamping device is taken and the crushed stone is compacted over the entire area.
- A layer of bitumen is applied to the resulting surface.
Advice: you can save money and use not bitumen, but more or less durable roofing felt or even film. In any case, this will not provide particularly good waterproofing in the future, but at least these materials will allow the concrete to harden efficiently (without loss of moisture).
In general, the simplest version of the concrete footing has been implemented.
Now let's look at how to do this as correctly as possible.
Installation of capital footing
So, we have a working area with loose soil and the risk of groundwater.
- We determine the highest point of groundwater - the footing will have to be made just up to this level (well, in any case, it is advisable to do it this way).
- Using shovels, we try to level and level the soil.
- We pour sand into the bottom of the pit and distribute it evenly over the surface, and then tamp it.
- Lay a film or roofing material on top of the sand.
- From thin reinforcement we make a kind of “cage” with a cell size of approximately 60 by 60 cm.
- If desired, we install guide lines - beacons. It is convenient to stretch the mixture over them to get the most even surface in the end.
- Mix cement, sand, crushed stone and water - you should get a homogeneous thick mass.
- We pour the solution and, using the rule, distribute it over the entire area.
- After the solution has dried, it needs to be treated with bitumen and, in fact, the construction of the footing is completed.
Advice: in almost every similar structure, holes for communications are then made. As a rule, this involves cutting reinforced concrete with diamond wheels using a grinder or simply drilling using a standard hammer drill. But you can make the work much easier and faster if you “lay” such holes in advance - in the concrete that is still wet.
But even if you simply simply forgot about such moments, and not only the lining layer, but also the main slab has already been poured, then you should not despair, because you can always use such a service as diamond drilling of holes in concrete with powerful industrial equipment.
In principle, that's all. The technology review is complete. Let's summarize.
The principle of operation of the drainage system
The effect of drainage is fully consistent with its main purpose - removing excess moisture to a safe distance. It would be a mistake to assume that one pipe laid around the perimeter of the house can cope with this problem.
In fact, this is an entire engineering and construction complex that combats excess moisture, protecting foundations and basements, but without drying out the surrounding area.
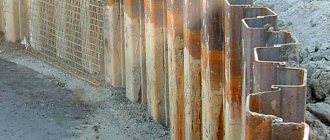
The wall type of drainage is advisable in conditions of clayey soil and loams, when melt, rain and groundwater cannot independently leave the area located around the building. A complex structure of pipes, wells and outlets removes excess water quite effectively, despite the budget cost.
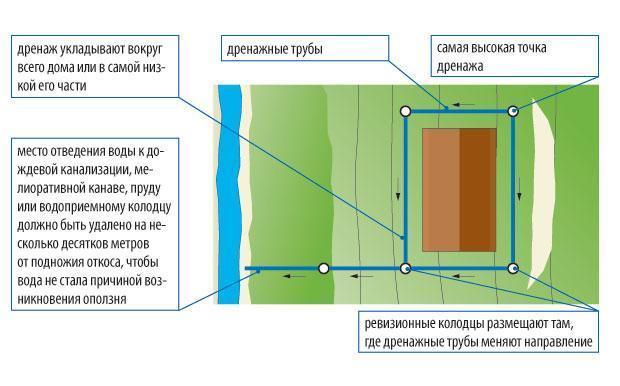
One of the simplest wall drainage designs: installation of drains around the perimeter of the building, inspection wells in the corners (sometimes two are enough), drainage outside the garden area (+)
One of the popular schemes involves connecting two systems - drainage and storm water - in the area of a storage well, which is usually located at the lowest point of the territory adjacent to the house.
In practice, the option is often used when the drainage pipeline is cut into storm sewer inspection wells. However, this is possible only under one condition - if the total volume of wastewater does not exceed the standards calculated for the installed equipment.
If the drainage zone is located above the water level in the storage tank, pumping equipment must be installed. A popular option is a submersible drainage pump, selected according to power.
There are two options for arranging drainage around the foundation: traditional and more reliable. Traditional is the installation of pipes with gravel backfill, a filter and a clay lock. Its performance has been proven for decades.
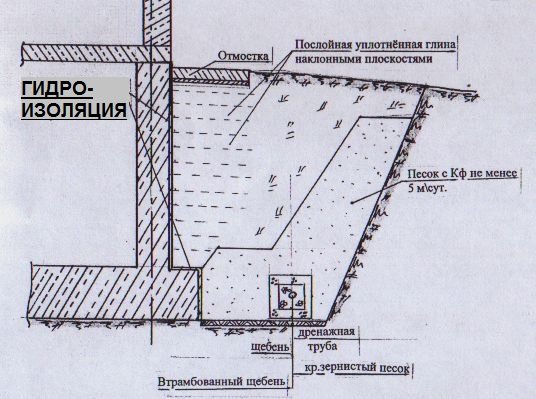
The clay castle, which is one of the important elements of the system, is compacted in layers to increase water resistance. It cuts off groundwater from the foundation, thus creating an insurmountable barrier for water (+)
More reliable modern drainage is distinguished by the design of the foundation. A geomembrane is fixed across its entire width, the characteristics of which are not inferior to a clay castle.
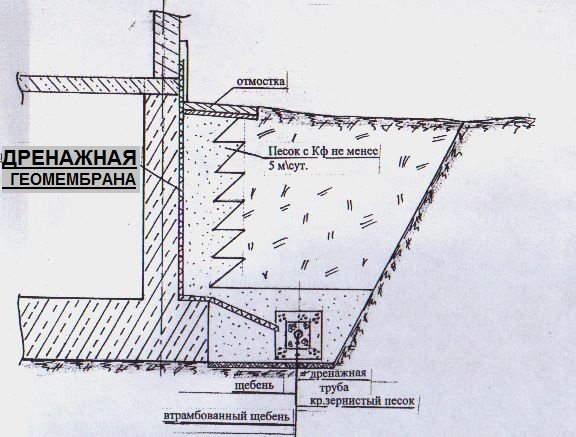
Installation of a geomembrane is more economical in terms of construction: there is no need to dig a deep ditch, look for the right type of clay, transport heavy loads to the construction site, or remove excess soil (+)
The installation process is much simpler, if only because there is no need to make calculations and calculate the angle of inclination of the clay “plug”. Now almost all wall drainage schemes include the use of a geomembrane, because it is reliable, practical, fast and effective.