Retaining walls serve to hold soil masses. Hydrostatic pressure of groundwater can lead to its destruction. Therefore, drainage is critical to the longevity of retaining walls. As a result, pressure decreases, fungus and mold do not form, and the period of operation of buildings increases. Wall foundation drainage will reliably protect the base of the house from moisture and ensure effective drainage of water.
A garden house or a private cottage can be built on a plot of land that, in many respects, does not meet optimal conditions. Wall drainage around the house is a mandatory part of the construction project. Especially in the presence of high groundwater, heavy clay soil and other terrain features of the site. An effective system consists of trenches dug along the perimeter of the walls, with their help the collected water is drained from the foundation.
What is drainage
Soil water is a complex, balanced system, any intervention in which causes changes and requires care and caution. To build a strip foundation, it is necessary to dig a trench that cuts through the water horizons and becomes a place for a constant flow of water.
The situation is complicated by rain and melt water penetrating into the backfill layers from the surface. If you do not take effective measures, you can get a lot of problems in the form of flooded basements, waterlogging of the area near the house and other undesirable consequences.
Drainage is a communication system designed to remove or drain water from soil layers in direct contact with the concrete strip. The complex includes pipelines, channels (drains), trays and other elements that help remove moisture or regulate its amount at a set level.
Excess moisture is partially absorbed into the lower layers of the soil, the rest is discharged into low areas of the relief or discharged into reservoirs.
How to arrange wall drainage

The process of installing wall foundation drainage consists of several stages. First, you need to draw up a project - this stage must be completed by a professional who will take into account all the official requirements for the arrangement of such a system. The project includes drawings, diagrams, and at this stage it is also necessary to do the following: ⊕ Select drainage equipment. ⊕ Make an action plan. ⊕ Calculate the estimate.
Do strip foundations need drainage?
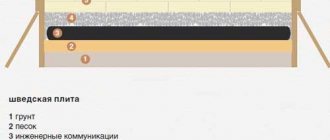
The need for drainage is almost always present. The absence or great depth of groundwater does not cancel the periodic appearance of rainwater and seasonal melting of snow. Most often, the role of the drainage system is played by a layer of sand bedding (pillow) located directly under the tape.
It allows moisture to pass through better than the surrounding soil layers, which are the walls of the trench. Moisture passes through the pillow without being retained or causing damage to the base material. Sinking to the bottom of the trench, the water is gradually absorbed into the soil.
In the absence of constant inflow from aquifers, such drainage is quite sufficient. However, if there are active aquifers on the site, it is necessary to compensate for their inflow and organize the removal of incoming moisture.
NOTE!
Experts recommend creating a drainage system in any case, since over time the bottom and walls of the trench silt up. They stop absorbing water and form a kind of reservoir, from where moisture cannot escape on its own. This creates a serious danger for the building and threatens its destruction, so the creation of a drainage system must be treated with all responsibility.
Creating a reservoir system with your own hands
As already mentioned, its main task is waterproofing, reliable protection of the foundation and walls of the building from the negative consequences under the influence of groundwater, and the basement from flooding. Reservoir drainage can be an independent means or part of a complex drainage system. In the latter case, in order to connect the reservoir drainage with the drains that are located outside, it is necessary to install pipelines.
The reservoir drainage that is installed under the foundation must have a minimum thickness of 30 cm. Moreover, according to SNiP, the dimensions must be selected in such a way that the perimeter of the drainage extends beyond the perimeter of the walls of the building by 20-30 cm.
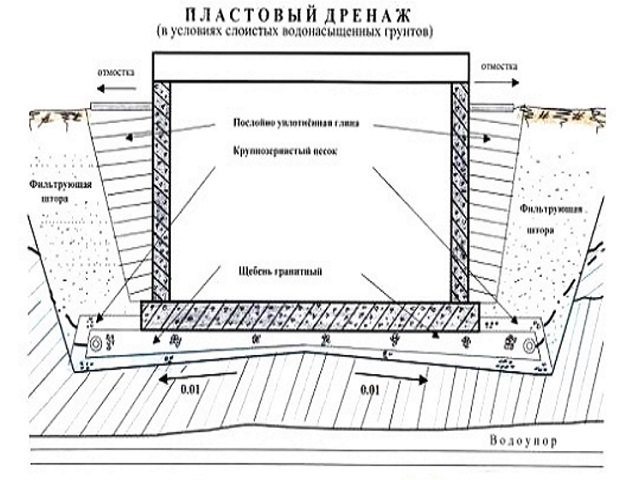
Reservoir drainage scheme
As practice shows, laying a layer system so that the waterproofing is reliably installed is necessary if the building is being erected on clay soil. In other situations, a ring system is often sufficient.
The pipes must be laid so deep that they are lower than the clay soil layer.
Reservoir system design:
- A pit is prepared specifically for supporting structures. It is important to deepen it by at least 20 cm. At this stage, a fairly wide soil layer is removed, compared to the place where the foundation lies;
- When the pit is ready, it is necessary to fill the bottom with crushed stone, a layer thickness of 20 cm, and it is important to thoroughly compact and level it while maintaining the slope towards the receiving well;
- Along the perimeter of the base, where the crushed stone is laid, it is necessary to lay perforated flexible plastic pipes containing stiffeners. Take their ends towards the receiving wells.
Next, the foundation is laid according to the SNiP standard, as in other cases.
Thanks to perforation, moisture entering under the foundation will penetrate into the pipes, through which it will enter the receiving tanks.
Regarding receiving wells, it is recommended to use a filtration type. These finished wells have the following average dimensions:
- Round – 150 cm;
- Rectangular shape 280 by 220 cm;
- Height – more than 200 cm.
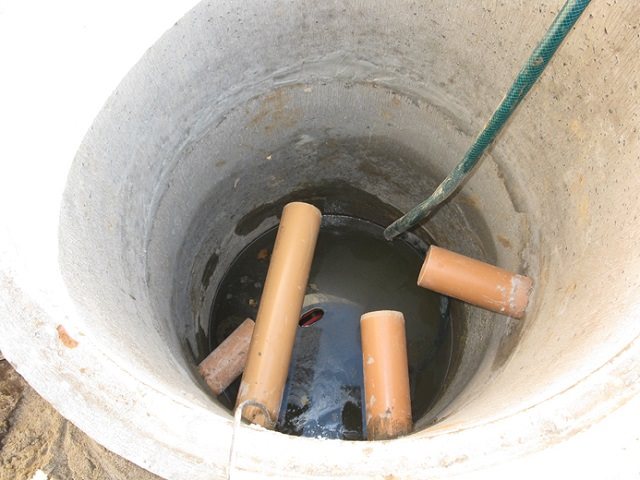
Reception well
To make a well, you need to dig a hole so deep that the bottom of the “receiver” is at least a meter lower than the entry point of the drainage pipe. The distance from the well to the future foundation and walls of the structure must be at least three meters. So, it is ideal and complies with SNiP. In practice, a gap of 1 m is often created between the bottom of the receiving tank and groundwater. Subject to the basic rules, reliable and effective waterproofing will be ensured, as well as proper operation of the entire drainage system.
The width and length of the recess are selected in such a way that after installing the well, 20-30 cm of void remains from each of its walls. Next, the well must be installed in the pit. It is necessary to fill the bottom with crushed stone in a layer of 30 cm and compact it well.
The space that remains between the walls of the pit and the container must also be filled with crushed stone, a layer height of at least 1 meter. Drainage pipes are introduced into the tank. To create good waterproofing, everything needs to be covered on top with geotextiles, then covered with sand, soil and compacted thoroughly.
Well design diagram
Water entering the well can be drained into the soil layers (in depth).
In order to be able to carry out inspections in the future, the well should not be completely filled in, so that it would be impossible to get to it. It should be backfilled to the very top of the well walls to ensure good waterproofing. Next, important elements such as the neck, seal and hatch are installed.
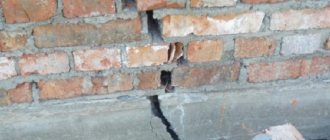
What forces destroy the foundation?
Moisture in contact with a concrete strip causes a number of destructive processes:
- Erosion of the sand cushion, which results in subsidence and damage to the integrity of the foundation.
- Water soaks into concrete and destroys it from the inside in winter.
- When the temperature drops, the moisture in the soil layers surrounding the tape freezes, expands and begins to put pressure on the base or foundation walls (frost heaving of the soil).
Most often, these factors act simultaneously, which increases the danger to the foundation and the entire house. The waterproofing gradually fails , the insulation peels off, exacerbating the destruction process and changing the microclimate in the house for the worse.
The situation is dangerous, since all processes proceed slowly and secretly, the results become noticeable only when destruction, cracks and other signs of failure of the foundation appear.
Types of drainage
There are different types of drainage system designs.
According to the installation method, they distinguish:
- Open (surface) type. Moisture is removed by organizing a system of drainage grooves located on the daytime surface of the soil. This option is convenient because it is constantly possible to maintain, clean and change the system design. The disadvantage is the high level of placement, which allows only surface water flows to be drained, bypassing underground horizons.
- Closed (deep) drainage. A closed system is a set of pipelines transporting wastewater to the discharge point. Closed drainage allows you to remove excess moisture from underground sources, but for maintenance or cleaning you have to dig up the pipes, which is only possible in the warm season, takes time and requires significant labor.
In addition, according to the method of water penetration into pipelines, there are systems:
- Perfect. The system is located below the inlet level, water enters from above or from the side. Drainage trenches are filled from above.
- Imperfect. The pipelines are installed above the inflow level, moisture enters from all sides - from below, above and from the sides through holes in the pipe. Backfilling is also done from all sides, i.e. the pipe is located at a certain height above the bottom of the drainage groove.
There are also systems with different functional features:
- Ring. Covers the building with a ring of pipelines, cutting it off from moisture coming from outside. If the influx comes from one side. the formation of an open ring with water collection at the point of its appearance is possible. It can be created after the construction of the house, or in parallel with it.
- Wall-mounted. The system is installed during construction, since the pipelines are installed before the sinuses are filled. Provide protection against flooding in basements and basements.
- Plastovaya. The most complex system used in areas with an active influx of water or with the presence of clay layers that impede natural filtration. A sand and gravel cushion under a concrete strip is one of the simplified options for creating a reservoir drainage system.
The use of a suitable design option allows you to remove excess moisture, compensate for inflows or cut off the building from aquifers. For this purpose, special techniques are used, for example, backfilling with clay, which does not allow moisture to pass through to the foundation walls and directs water to the drainage pipes.
IMPORTANT!
It is recommended to entrust the choice of one or another type of drainage to specialists. This is a complex task that requires professional training and experience; attempts to solve the problem on your own do not always bring the expected result.
The optimal option for arranging drainage
There is more than one type of drainage. But if the structure has a foundation, it is more advisable to use exactly two of the main types.
The first is a ring one - to protect the basement from flooding with groundwater. It is based on tubular drain options laid along the contour of the supporting structures.
The second is reservoir drainage. Its only disadvantage is that it can only be erected at the construction stage, since it must be installed under the foundation slab at the same level as the sand backfill. Excess liquid and moisture penetrates through perforated pipes to the well, and from it to the place chosen by the developer. This could be a sewerage system, a reservoir, a relief depression on the territory, or pumping out and used for economic purposes.
Slope Definitions
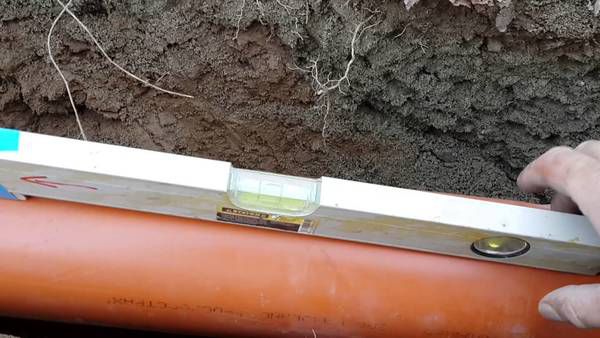
The slope of drainage pipes is regulated by SNiP and is determined by the minimum speed of movement of wastewater.
Pipes of different diameters allow you to get your own angle of inclination:
- With a pipe diameter of 150 mm, a slope of 8 mm per 1 m of length is allowed.
- With a diameter of 200 mm - 7 mm.
- In some areas, an understatement of up to 5 mm per 1 m of length is allowed.
At the same time, there is an upper limit to the slope. For pipes with a diameter of 150 mm it is 150 mm. For unrated sections with a pipe diameter of 40-50 mm, a slope of up to 30 mm/m can be made, and for pipes from 85 to 100 mm, a slope of no more than 20 mm/m can be made.
For trays, it is necessary to provide a slope that promotes self-purification of water (settling of dirt, sand, small particles). This will reduce the degree of contamination of pipelines, avoid the occurrence of traffic jams and congestions in the outlets of drainage wells.
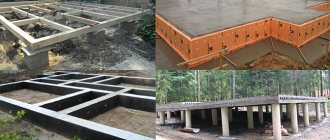
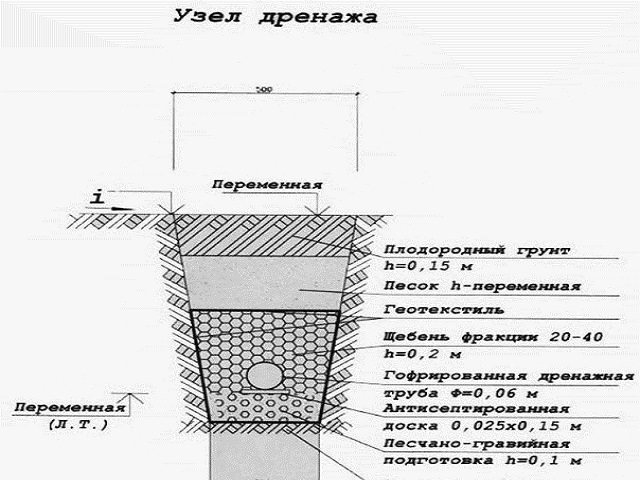
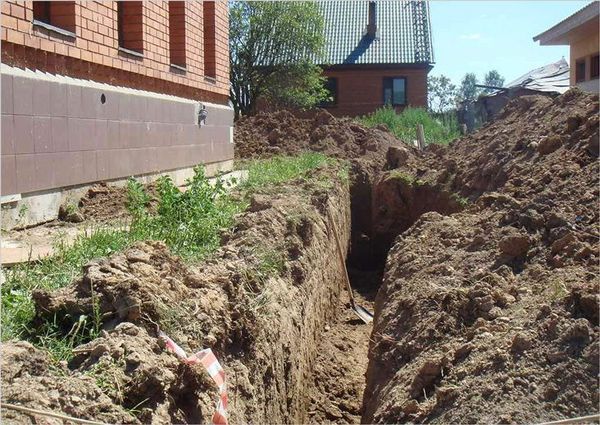
Preparing the trench
The trenches for the drainage system have a depth corresponding to the level of the pipes. In order to be able to organize the desired slope, the depth is made with a small margin.
The direction and configuration of the trenches is determined by the type of drainage system chosen, and the width is usually made such that pipes with a layer of filler and insulator can be freely placed.
Usually they dig to a width of 30-40 cm, so that it is more convenient and the walls do not crumble.
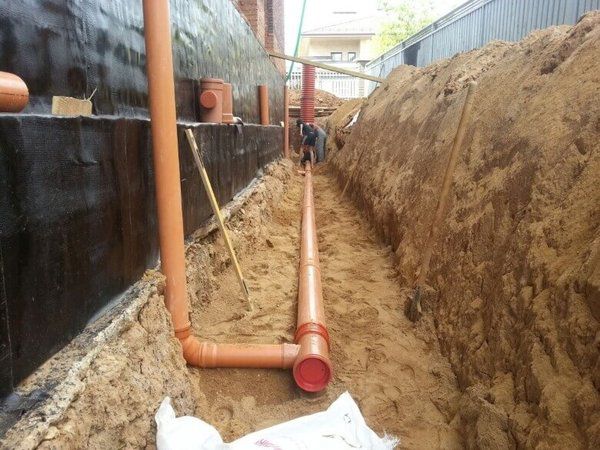
Creating a filtration layer
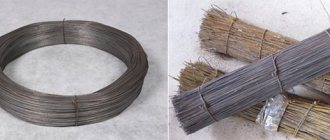
Drainage pipes are corrugated with longitudinal rows of holes to collect water. In order to prevent clogging of pipes with sand and small particles, it is necessary to surround the pipes with a layer of filtration.
The most common option is a layer of fine crushed stone surrounding the pipe by 10 cm in circumference, wrapped in a layer of geotextile . It turns out to be a double filter - the geotextile itself retains sand and organic matter, and the crushed stone layer serves as an additional filter that performs secondary purification.
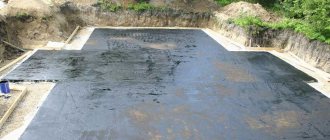
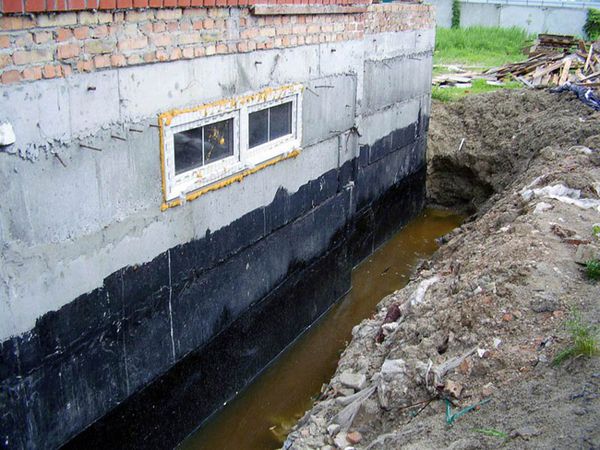
Foundation waterproofing device
This is a necessary measure not only when there is a risk of flooding or when arranging a used basement floor. Protecting the foundation of the building will extend its service life, maintain its original characteristics and eliminate dampness on the ground floor. Traditionally, there are two ways to insulate the foundation from moisture:
- Treatment with bitumen mastic. The thickness of the layer depends on the depth of the foundation: up to 2 meters - 2 mm, more - up to 4 mm.
- Laying membrane film. It is a more modern, but at the same time expensive method. After treatment with mastic, a roll of membrane (polymer profiled film with corrugation) is rolled out over the entire surface of the base. Its two- or three-layer varieties are equipped with an additional layer of geotextile. The principle of operation comes down to the drainage of moisture that has seeped through the fabric to the drainage pipes.
Additionally, it is worth insulating the foundation.
How is installation done?
Procedure:
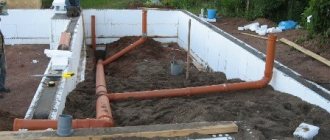
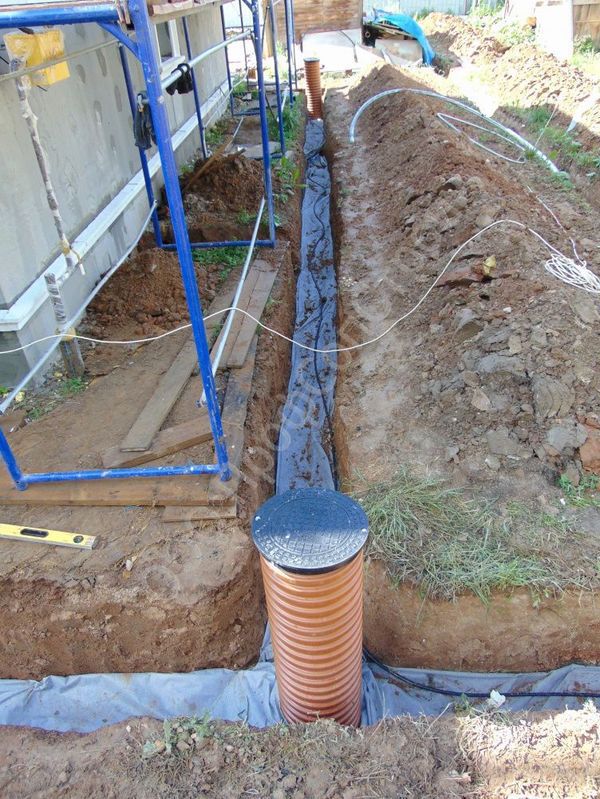
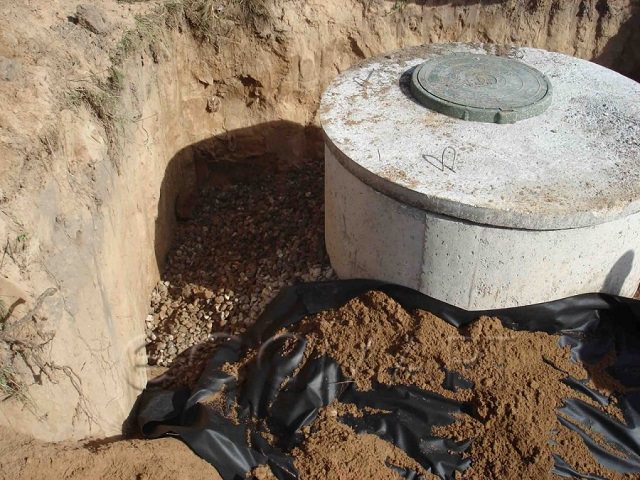
- A recess is dug in which a container for collecting water is placed. This could be a plastic tank with holes in the bottom or concrete rings. The distance from the house is at least 3-5 m. The depth of immersion should significantly exceed the depth of the foundation, but it should not be brought to the groundwater level. If the house is large, you can use two collectors or more. It is most convenient to install them in the corners. The sides of the container must have holes for connecting drainage pipelines .
- Drainage pipes are laid next to the tape. If the system is created during construction, the drainage is installed in the same trench as the tape itself. If the system is built later, you will have to dig up the foundation and lay pipelines nearby. The ends of the pipes are inserted into the manifold or connected in series to each other, encircling the foundation on the outside.
- In some places where problems may arise - connections or transitions - special wells (inspection wells) should be installed. They will allow you to carry out repairs, clean pipes, etc.
- A layer of sand (about 10 cm) is poured onto the bottom of the trench, then a layer of geotextile. Pipelines are laid on it and given the required slope, for which you can add gravel or simply place a stone under the upper edge.
- A layer of crushed stone and sand is poured over the pipes. The ends of the geotextile fabric are lifted and wrapped, forming a layer of backfill around the pipe, wrapped in geotextile fabric like a shell.
- The trench is finally filled with soil.
NOTE!
In some cases, collectors are not used, if the terrain allows, water is discharged into lowlands or reservoirs. Wells are often used for this purpose, which allows drainage water to be used for the operation of heat pumps.
Arrangement of drainages in hydraulic structures
Drainage structures are installed in the lowlands of the structures being erected.
If the dams are earthen, the following types of waterproofing can be used:
- Drying prism located in the low-lying compartment;
- Drainage mattress in the inner part of the dam;
- Band/tube drainage at the base of dams.
If the dams are made of concrete and built on a base similar to rocks, waterproofing as drainage is performed by a system of vertical drains flowing into longitudinal galleries, from which water is discharged and falls downstream.
If dams made of concrete are built on a completely different foundation, non-rocky, drainage is arranged using reverse filters.