There are only two ways to attach reinforcement to a frame: electric welding and knitting. We will not open a debate about which one is preferable. Let’s just say that knitting does not reduce the strength of the working rods.
Any welding weakens the metal because it creates local stresses in it. This negatively affects the reliability of the entire structure.
Compared to welding, knitting work is more labor-intensive.
Despite this, in private construction with its small volumes it is better to choose them. Especially when it comes to such critical structures as foundations and floor slabs.
In this article we will tell novice builders how to knit reinforcement correctly. Let's look at the tools, materials and technologies used for this work. We hope that the information received will help you confidently handle metal, assembling strong and reliable frames.
Using special knitting wire
To quickly and reliably make the strapping, a special baked steel wire of round section with a diameter of 0.8 to 1.2 mm is used to fasten the reinforcing elements. It bends easily, fits tightly to the joint, and stretches well (that is, it does not tear when knitting). When working with such material, the knitter does not require any special skills. This method is successfully used both for tying the reinforcement of a reinforced concrete monolithic slab and for the reinforcing frame of any foundation. How to quickly knit reinforcement, what materials, tools and equipment will be required for this.
Do-it-yourself calculation of strip foundation reinforcement
Any construction work is regulated by GOSTs or SNiPs. Reinforcement is no exception. It is regulated by SNiP 52-01-2003 “Concrete and reinforced concrete structures”. This document specifies the minimum amount of reinforcement required: it must be at least 0.1% of the cross-sectional area of the foundation.
Determination of reinforcement thickness
Since the strip foundation in section has the shape of a rectangle, the cross-sectional area is found by multiplying the lengths of its sides. If the tape has a depth of 80 cm and a width of 30 cm, then the area will be 80 cm * 30 cm = 2400 cm2.
Now you need to find the total area of the reinforcement. According to SNiP it should be at least 0.1%. For this example it is 2.8 cm2. Now, using the selection method, we will determine the diameter of the rods and their number.
Quotes from SNiP that relate to reinforcement (to enlarge the picture, right-click on it)
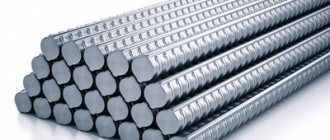
For example, we plan to use reinforcement with a diameter of 12 mm. Its cross-sectional area is 1.13 cm2 (calculated using the formula for the area of a circle). It turns out that in order to provide the recommendations (2.8 cm2), we will need three rods (or they also say “threads”), since two are clearly not enough: 1.13 * 3 = 3.39 cm2, and this is more than 2.8 cm2, which SNiP recommends. But it will not be possible to divide three threads into two belts, and the load on both sides will be significant. Therefore, they stack four, laying a solid margin of safety.
In order not to bury extra money in the ground, you can try to reduce the diameter of the reinforcement: calculate it at 10 mm. The area of this rod is 0.79 cm2. If we multiply by 4 (the minimum number of working reinforcement bars for a strip frame), we get 3.16 cm2, which is also enough with a margin. So for this version of the strip foundation, you can use class II ribbed reinforcement with a diameter of 10 mm.
Reinforcement of a strip foundation for a cottage is carried out using rods with different types of profiles
We have figured out how to calculate the thickness of longitudinal reinforcement for a strip foundation; we need to determine with what step to install vertical and horizontal lintels.
Installation step
There are also methods and formulas for all these parameters. But for small buildings it’s simpler. According to the recommendations of the standard, the distance between horizontal branches should not be more than 40 cm. This parameter is used as a guide.
How to determine at what distance to lay reinforcement? To prevent steel from corroding, it must be embedded in concrete. The minimum distance from the edge is 5 cm. Based on this, the distance between the rods is calculated: both vertically and horizontally it is 10 cm less than the dimensions of the tape. If the width of the foundation is 45 cm, it turns out that between the two threads there will be a distance of 35 cm (45 cm - 10 cm = 35 cm), which corresponds to the standard (less than 40 cm).
The reinforcement step of a strip foundation is the distance between two longitudinal bars
If our tape is 80*30 cm, then the longitudinal reinforcement is located one from the other at a distance of 20 cm (30 cm - 10 cm). Since medium-level foundations (up to 80 cm in height) require two reinforcement belts, one belt from the other is located at a height of 70 cm (80 cm - 10 cm).
Now about how often to install jumpers. This standard is also in SNiP: the installation step of vertical and horizontal dressings should be no more than 300 mm.
All. We calculated the reinforcement of the strip foundation with our own hands. But keep in mind that neither the mass of the house nor the geological conditions were taken into account. We relied on these parameters to determine the size of the tape.
Application of hooks
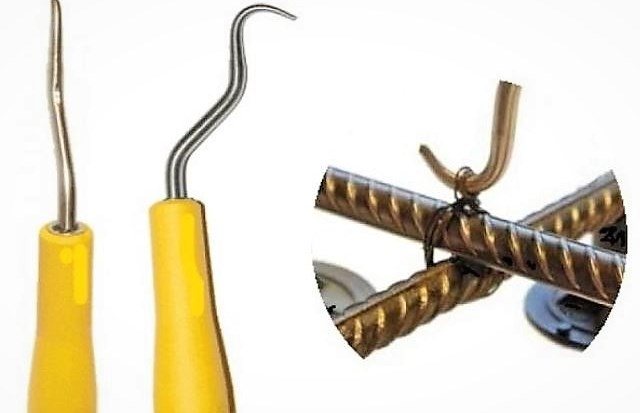
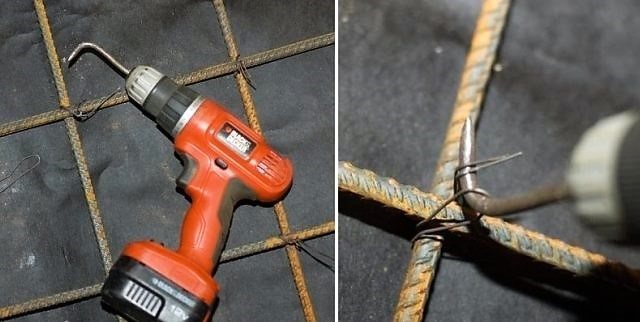
To work with wire, you can use: a manual crochet hook (it can be easily purchased at any hardware store), a homemade hook for tying reinforcement, a semi-automatic mechanical hook (more expensive than a regular manual one) or a crochet hook made using a screwdriver.
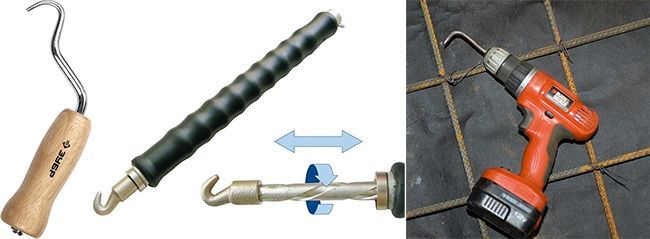
How to make a hook for tying reinforcement:
Option #1:
We take a thick electrode or a metal rod of a suitable diameter, sharpen one end of it and bend it at the desired angle. We bend the handle from the second end of the rod (if desired, you can wrap it with electrical tape). The hook for tying reinforcement with your own hands is ready.
Option #2:
The material for production is a metal rod, both ends of which are sharpened. On one end of the rod we place a round wooden blank for the handle (with a drilled hole in diameter slightly smaller than the diameter of the rod); We bend the second end of the rod to the required (convenient) angle.
Option #3:
An old screwdriver (or a construction awl) is suitable as a starting material, the metal end of which is sharpened. Then we bend it to the required angle and get a hook for knitting reinforcement with a comfortable handle.
On a note! The photo will help you easily make hooks for tying reinforcement.
Tying reinforcement with a screwdriver significantly speeds up and facilitates the work. We clamp a hook for wire tying reinforcement, made from a thick nail, into the chuck. By adjusting the rotational force of the screwdriver, you can easily achieve the required joint density. How to knit the reinforcement cage: with homemade tools or purchased ones (or both) - decide for yourself.
How to lay the reinforcing mesh for the slab
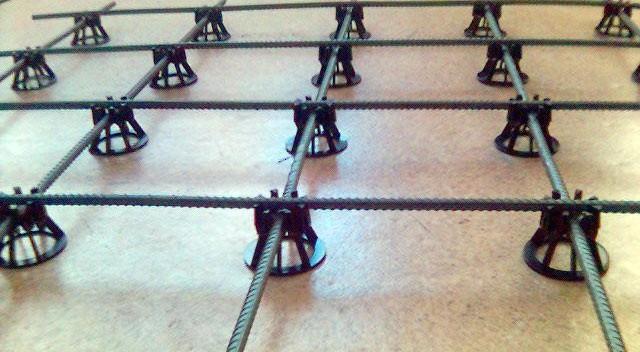
When laying reinforcement, it is important to ensure a constant distance from the reinforcement grid to the concrete surface, equal to 3-5 cm. This will prevent corrosive destruction of the reinforcement frame due to capillary moisture ingress
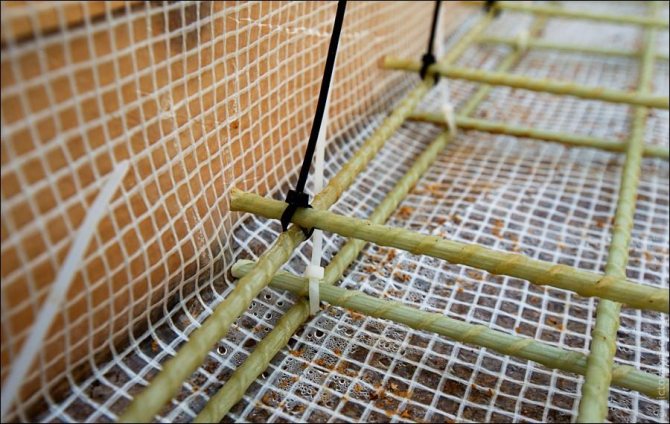
To ensure a guaranteed thickness of the protective layer, special fixing elements made of plastic or metal stands are used.
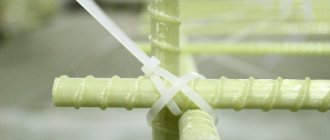
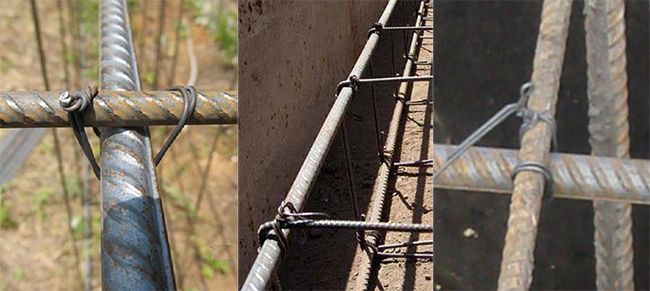
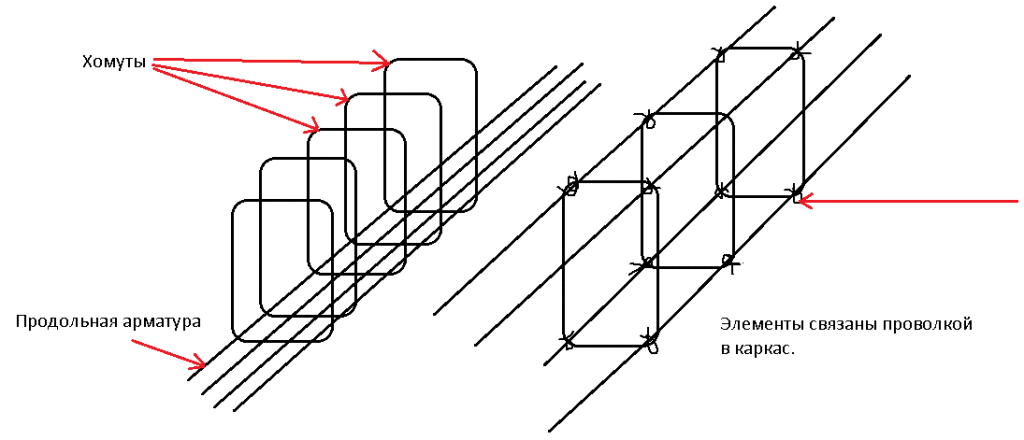
At the intersection of the rods, the strapping is carried out
Procedure for laying reinforcement:
- Check the dimensions of the formwork.
- Place the lower grille elements on the clamps.
- Lay transverse reinforcement.
- Tie the lower level mesh lattice together.
- Attach vertical rods to the bottom mesh.
- Knit the top mesh in the same way as the bottom mesh.
If the length of the reinforcing bars is insufficient, join the bars with an overlap of 40 times the diameter of their cross-section. So for reinforcing bars with a diameter of 10 mm, the amount of overlap will be 40x10 mm = 400 mm.
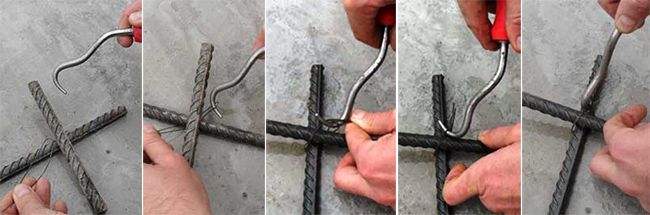
How to crochet
The methods of tying reinforcement are quite simple and understandable. Scheme of step-by-step knitting of reinforcement:
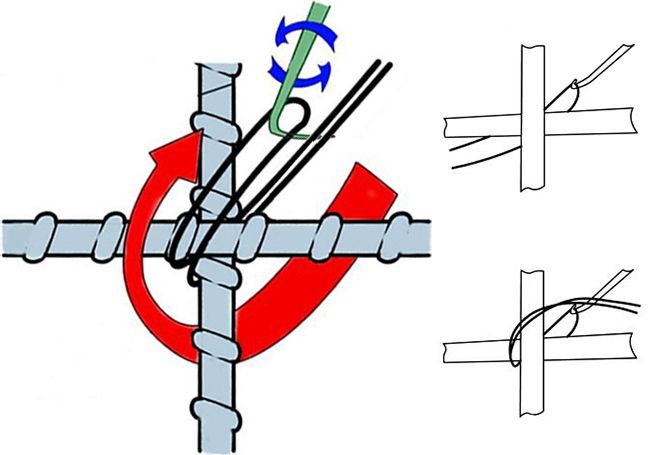
- We cut the wire into pieces (we select the size experimentally depending on the diameter of the rods).
- Fold the prepared piece in half.
- We bend the double workpiece around the intersection of the reinforcing bars.
- Insert the hook into the loop and place the loose ends on it.
- Rotate the hook (usually 3-4 rotational movements are enough) until a tight twist is obtained.
Attention! You can tie the reinforcement using the above technology using any type of hook.
There is another way to crochet reinforcement - overlapping.
- We cut a piece of wire twice as long as in the first case.
- Fold the piece in half and in half again.
- We place the double bend on the top bar.
- We place two double pieces under the lower bar and lift it up.
- We insert the hook into the loop and press the two free ends to it.
- Rotate the hook and crimp the joint. If we use a mechanical hook, then with force we pull the handle towards ourselves. We obtain a tight twist due to the fact that the translational motion is converted into a rotational motion by means of a worm gear.
Methods of knitting reinforcement
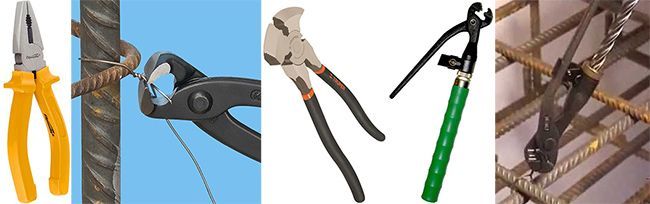
There are two ways to fix reinforcing bars: manual and automated.
The manual method uses four types of tools:
- Pliers;
- Hook (simple and reversible);
- Screwdriver with attachment.
Using pliers is not very convenient. Therefore, they are rarely used and only for assembling small frames. Crochet is used more often. This simple device, with some skill, helps to quickly connect steel rods.
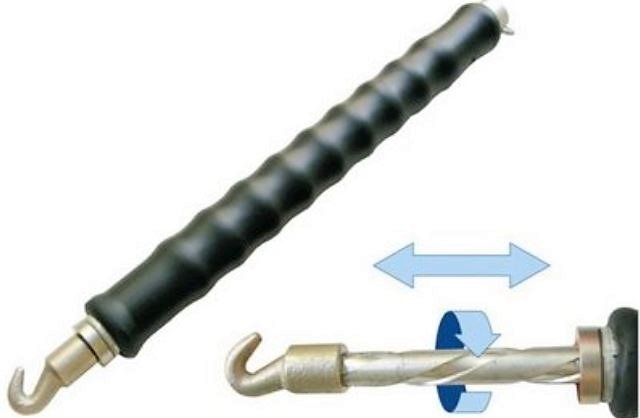
There is an improved modification of the simple hook (reversible). Its basis is a screw that rotates when the handle is pulled back.
By combining a hook with a screwdriver, home craftsmen have created another convenient device for fixing steel rods in a frame.
Automated knitting is performed with a so-called pistol. This is a rather complex and expensive device used at large facilities. Its performance is such that tying one knot occurs in 1 second.
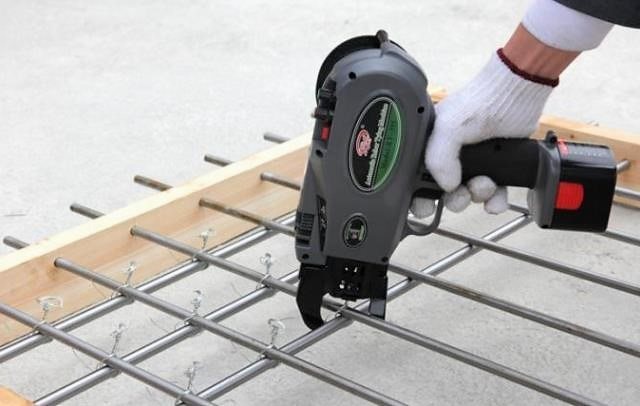
The device is equipped with a compartment in which a spool of wire is installed. The working body of the gun delivers it to the fittings and ties it into a knot.
Using a knitting gun
A gun for tying reinforcement greatly simplifies the work of creating any reinforcing frame.
Convenience and advantages of use:
- a cassette with knitting wire is inserted inside the device;
- it is supplied automatically;
- the knitting gun is powered by a built-in battery;
- correct knitting of reinforcement with minimal use of manual labor;
- An automatic gun for tying reinforcement allows you to make all twists with the same tension.
But such a convenient and useful device has disadvantages:
- impossibility of carrying out work in hard-to-reach places;
- a gun for tying reinforcement is expensive, so its use is economically justified only when carrying out large volumes of work.
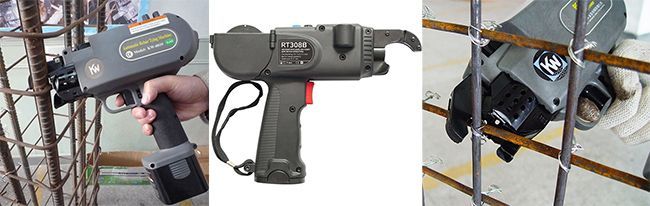
Table with approximate prices for the main models available for sale on the construction market:
| Model | Ø fittings (mm) | Assembly manufacturing time (sec) | Number of nodes from one battery charge | Approximate price (RUB) |
| GS308-6512 | 6,5÷12 | 0,8 | 1000 | 19000÷21000 |
| GS308-1016 | 10÷16 | 0,8 | 1000 | 22000÷24000 |
| GS24T | 6÷24 | 0,8 | 1000 | 26000÷28000 |
| GS34T | 8÷34 | 0,8 | 1000 | 28000÷30000 |
| RT308V | 4÷19 | 0,8 | 1100 | 31000÷35000 |
| BM400 | 10÷29 | 1,0 | 2000 | 44000÷46000 |
| BM200 | 9÷21 | 0,85 | 2000 | 28000÷30000 |
| KW-0039 | 10÷22 | 0,8 | 1200 | 47000÷54000 |
| RDL40 | 12÷32 | 0,9 | 3000 | 43000÷45000 |
| RDL20 | 9÷21 | 0,9 | 3000 | 41000÷43000 |
| PVA-32 | 6÷18 | 1,6 | 450 | 44000÷45000 |
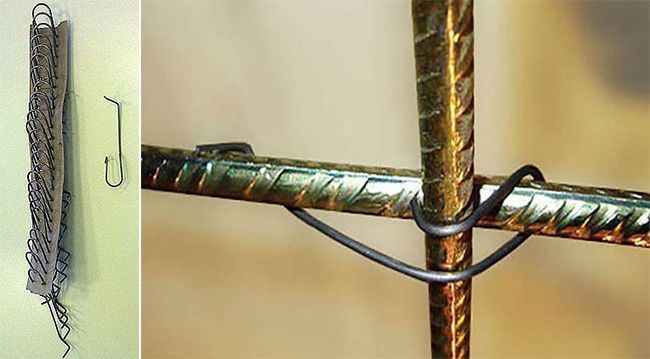
Wire, clamp, clamp: features of existing fasteners
Fastening reinforcing bars into a single frame can be done using wire, clamps and special clamps. About them in the table.
Table. Materials for fastening reinforcement
| Bonding material | Description |
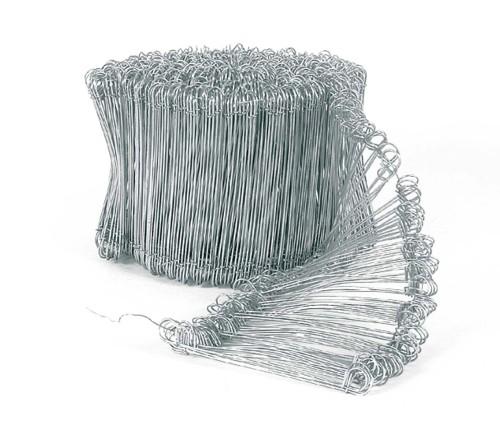
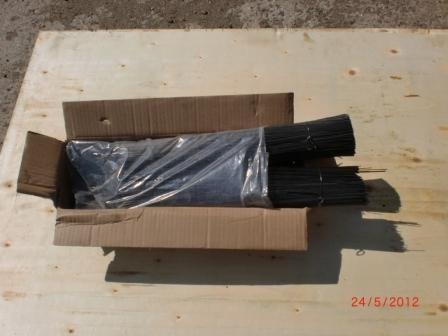
Knitting wire | The most traditional, budget-friendly and familiar (especially for “old school” builders) material for tying reinforcement. Made from annealed steel. Sold mainly “in bulk”, i.e. in packages (more convenient, since the material is already cut into pieces of suitable length) or in special spools. Package weight and wire length may vary depending on the manufacturer. The most convenient are 5-kilogram packs filled with 40-centimeter pieces of wire. One such package usually contains from 1000 to 1500 pieces of wire. |
| Plastic clamp | The principle of use is not much different from knitting wire - the same methods, similar tools. Characterized by greater ease of use (easier to bend and twist). Costs a little more than wire. It has an increased diameter (on average 4 mm versus 1.2 mm for the wire). To ensure a reliable connection of reinforcing bars, it is enough to use a 20-centimeter clamp at one intersection point. |
Special clamp | The most modern option for connecting reinforcing bars. The clamps are made of plastic. They perform best in combination with fiberglass reinforcement. The advantages over steel reinforcement and tying wire are obvious. To fully understand them, you need to pay attention to just one drawback of steel reinforcement - it is susceptible to corrosion. Rust can increase the diameter of a metal rod by an order of magnitude. Its strength, however, does not change for the better. Corrosion causes pores to appear in concrete. Water penetrates into the pores. In winter, water expands and increases the size of cracks. The clamps do not rust, and using them to connect fittings is much easier, more convenient, and faster than using wire. There are several types of fasteners available for sale that allow you to connect reinforcing bars in various spatial directions, set up “stands” (as in the image) and solve other problems related to reinforcement. |

Due to the fact that the manual in question is dedicated specifically to tying reinforcement, the procedure for connecting rods with special clamps will not be considered - this process is not tying in the traditional sense and is generally intuitive.
More attention should be paid to the wire and clamps.
First, the wire.
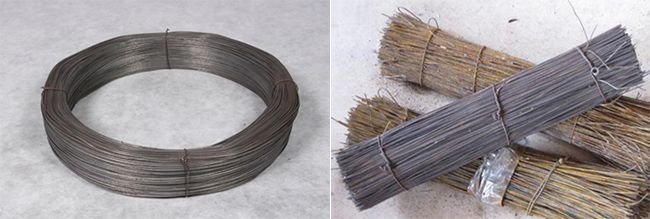
Wire for tying reinforcement
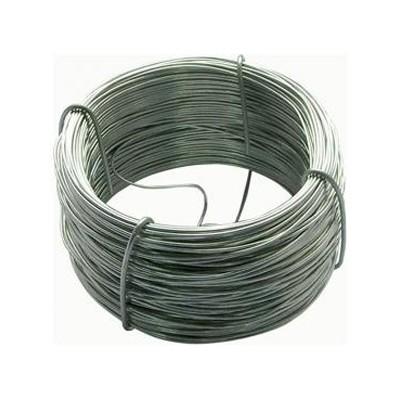
Galvanized wire for tying reinforcement in a coil
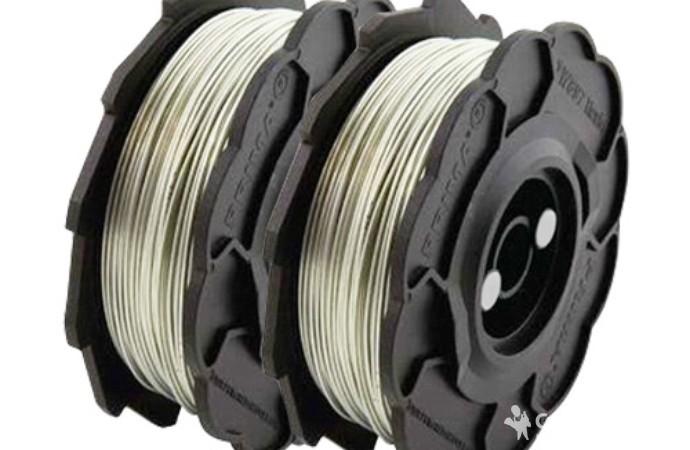
Tying wire for guns for tying reinforcement
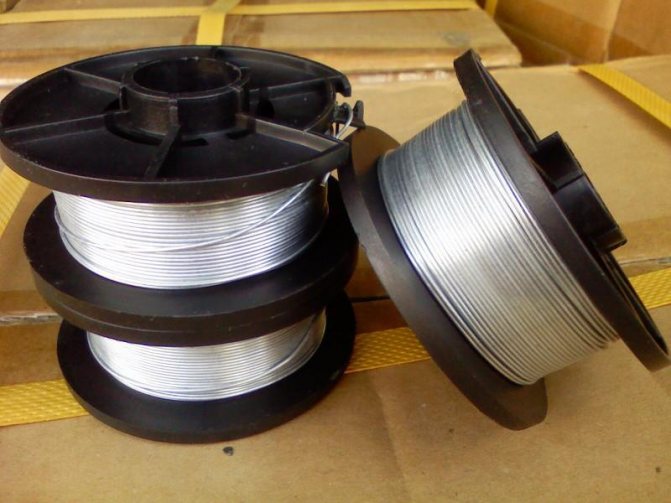
Spool of wire for a rebar tying gun
For its manufacture, as noted, low-carbon steel grades are used. The annealed material bends relatively easily and copes well with the tasks assigned to it. Non-galvanized binding wire (black) and its galvanized counterpart (white) are available for sale.
Many craftsmen consider the purchase of galvanized binding wire for arranging a foundation to be an excess and an inappropriate waste of money, arguing that the reinforcing frame after pouring the concrete becomes inaccessible to air, therefore, nothing will rust. At the same time, the occurrence of corrosion, as noted earlier, cannot be ruled out.
Wire for binding, galvanized
Knitting wire for reinforcement, black
The recommendations are:
- if you decide to use steel reinforcement, you can knit with both galvanized and non-galvanized wire - if corrosion reaches the reinforcing frame, it will not care what “is”, be it reinforcement or wire, and it will not be possible to avoid deterioration in the quality characteristics of the foundation under such circumstances ;
- if you decide to use fiberglass reinforcement, it is better to tie it with galvanized wire - this will minimize the risk of corrosion and ensure a longer service life of the supporting structure.
As for the diameter, the most optimal in terms of ease of use and reliability is the 1.2-1.4 mm option. “One” is weak for the foundation; working with “two” will require extra effort.
Secondly, clamps.
Clamped reinforcement
This, as noted, is a modernized and improved version of the knitting wire. They are made of plastic, not steel, so when using such fasteners, the likelihood of corrosion inside the supporting structure is eliminated. Along with this, it is precisely because of the material used to make plastic clamps that many developers have a number of well-founded questions regarding the fasteners of this group.
- Will the clamps be able to withstand the loads created inside the foundation? They can.
- Will the fasteners break over time, disrupting the uniform distribution of loads and generally deteriorating the quality of the foundation? It won't break.
- Is a plastic clamp really reliable? Indeed, but you need to approach the issue of choosing it correctly.
Helpful advice! For tying reinforcement, plastic clamps using steel wire as a core are best. Such clamps are more expensive than steel wire, but they are easy to use.
Important note! Plastic clamps cannot be used for tying reinforcement when carrying out foundation work in the winter - in the cold, the material used to make the clamps almost instantly becomes brittle. The exception is special polyamide fasteners.
Scheme of tying reinforcement using clamps
Prices for knitting wire
knitting wire
Pliers and pliers
For tying, ordinary pliers, pliers (with slightly blunt cutting edges) and special pliers for tying reinforcement (manual or automatic) are often used.
Knitting reinforcement with pliers and pliers according to production technology is no different from fastening reinforcing bars using hooks. The only difference is that there is no need to form a wire loop.
Tools that are right for the job
Nowadays, guns, hooks and screwdrivers are more convenient for tying reinforcement. The simplest device is a hook with a comfortable handle and a slightly curved steel hook.
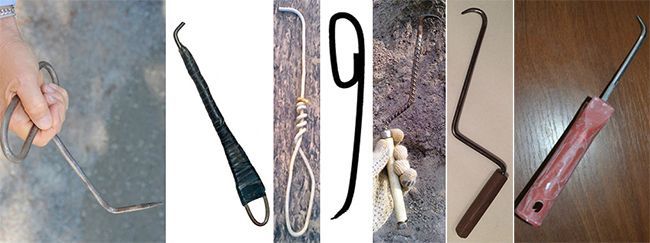
There are several types of hook for tying reinforcement:
- Manual. It is considered the simplest tool with a simple device - a curved rod is attached to the handle, as well as a bearing, the purpose of which is to ensure rapid rotation of the device. The curved rod grips the reinforcing loop during manual rotation of the hook. The undoubted advantage of such a tool is ease of use, long service life, and low cost. True, the work of tying reinforcement for the foundation takes a huge amount of time.
- Screw or reversible. Such a tool can be called a mechanized device, the operation of which is based on the principle of a spinning top, so the wire is pulled into a very tight knot. In order to put the device into working condition, you should take it by the handle and pull it towards you. After this, the hook begins to rotate and, using certain manipulations, ties knots. The tool is very easy to use, provides incredible speed in operation, and also lasts a long time. But as for the price, it is quite high, so not everyone can afford such a device.
- Auto. Such a device provides automatic binding of reinforcement, as well as rotation at high speed. You don't need to put in a lot of effort or time when working. The wire is inserted into the machine, and knitting begins automatically. The price of tying reinforcement using this method will cost you higher than the previous ones.
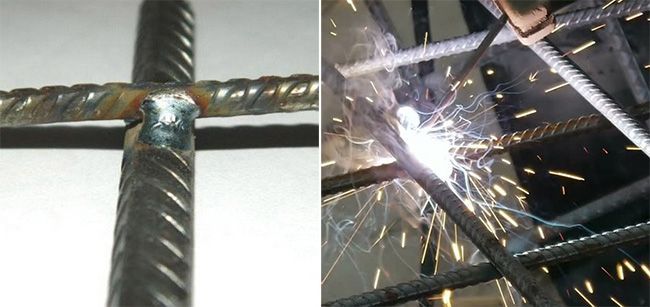
Strapping using electric welding
Advantages:
- A fairly reliable way to tie reinforcing bars.
- High speed of work completion.
- Less labor-intensive process than hand knitting.
Flaws:
- Under the influence of high temperature during welding, the physicochemical properties of steel change (the crystalline structure of iron is disrupted). At the joints, the bending and tensile strength of the reinforcing bar is significantly reduced. Ultimately, this leads to a decrease in the reliability of the entire reinforcing frame.
- The use of welding significantly increases the rigidity of the frame made of reinforcing bars. When compacting the solution with vibrators, there is a risk of deformation or destruction of rigid welded joints.
- The frame metal in the area of welding seams is more susceptible to corrosion, which reduces the durability of the entire reinforced concrete structure.
- To carry out welding work, special equipment is required.
- The site where such work is carried out must be connected to the power supply, which is not always possible (especially during suburban construction).
- Work can only be carried out by a qualified specialist (welder). How firmly and reliably the frame made from steel reinforcement is knitted depends on his experience and qualifications.
The feasibility of strengthening the base
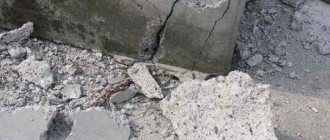
A properly constructed foundation of a building, which is a concrete monolith, has high strength characteristics. Without steel reinforcement, it will not have the required operational strength. Concrete has increased resistance to compressive loads, but can crack under tension.
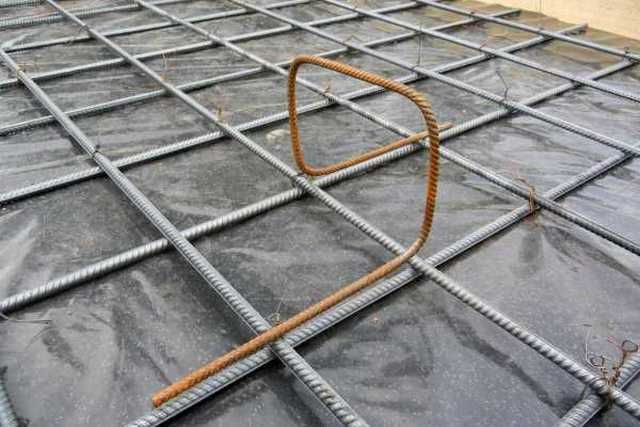
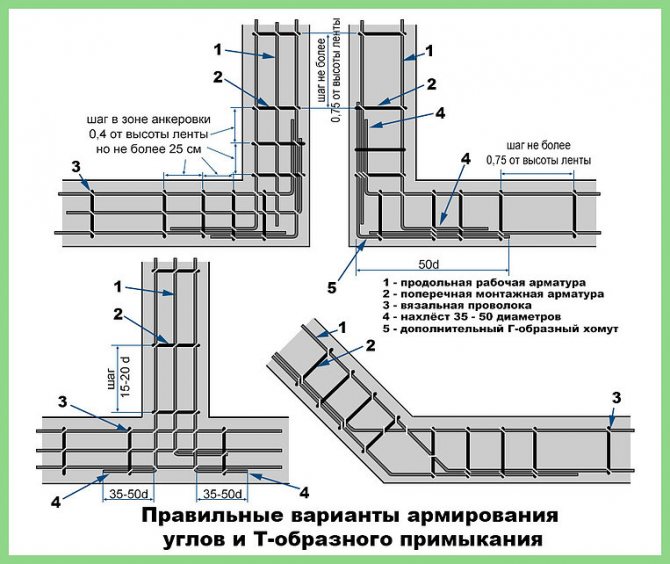
This is fully compensated by the reinforcement cage installed before pouring the strip foundation at the lower and upper levels of the strip contour. Significant forces are concentrated in the corners of the foundation. That is why proper reinforcement of the corners of a strip-type base is a guarantee of a long service life of the structure and its strength.
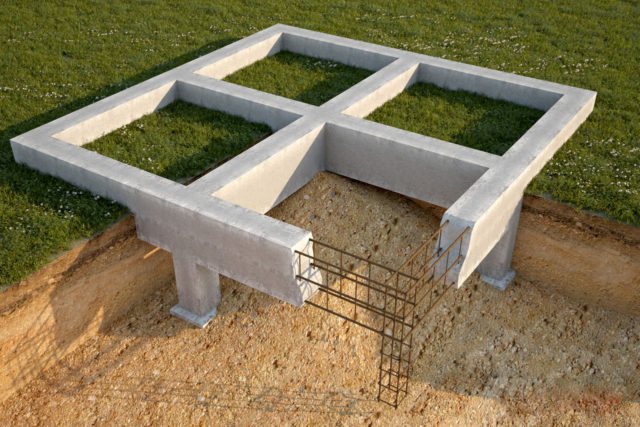
Additionally, vertical metal rods need to be installed in the corner parts
Reinforcement installed in the corner parts of the foundation significantly increases the strength characteristics of the structure and compensates for bending and breaking loads. Vertically positioned steel rods support reinforcing chords located at the top and bottom of the frame.
Tying with metal staples
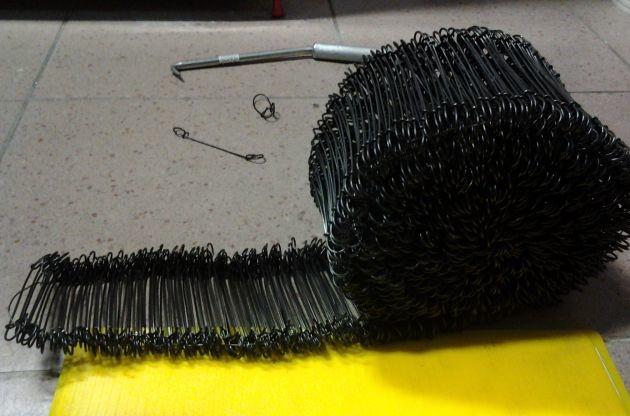
The reinforcement can be tied using special metal staples.
Advantages:
- high speed of connection execution;
- no tool is required for tying reinforcement (everything is done by hand);
- the work can be done even by an untrained person;
- equal density of connected compounds.
Flaws:
- the need to purchase a set of special staples for the production of tying reinforcement of a certain diameter;
- limited area of application: only for fastening simple cross connections;
- insufficient fastening strength (mainly suitable for light horizontal structures, for example for reinforcing screeds).
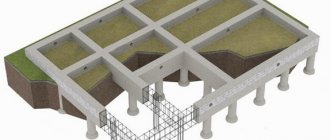
Stages of construction of a reinforced foundation slab
The construction of a foundation slab is a rather complex process, since the entire structure is responsible for the strength of the entire structure in the future. Let's look at how to make quality reinforcement for a foundation slab, point by point.
So, the whole process can be divided into the following stages:
- Construction of a pit (with a buried slab structure);
- Laying and compacting sand bedding;
- Laying and compacting gravel backfill;
- Pouring a thin layer of concrete;
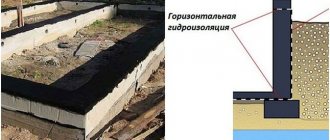
- Installation of a waterproofing layer;
- Installation of reinforcing mesh;
- Installation of formwork;
- Pouring the main slab;
- Top waterproofing of the slab.
- The construction of a pit is required only if the foundation is deepened, or the creation of a basement floor is planned. A slight recess of the slab also adds strength to the structure. However, the need for this method directly depends on external factors and individual wishes.
- Laying and compacting sand and gravel bedding is necessary to prepare the foundation base. This approach avoids the adverse effects of groundwater and structural deformation. Both layers should not just be filled in, but compacted well. This will give the structure additional strength.
- Pouring a thin layer of concrete is necessary for high-quality construction of the waterproofing layer. This layer of concrete can be about 10 cm thick.
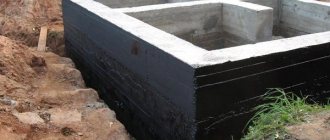
- The design of the waterproofing layer, as mentioned above, directly depends on the availability of groundwater. However, no matter what method is chosen, you should approach this stage very seriously, since the presence of moisture in the foundation can lead to irreversible damage, even to the highest quality structure.
- Installation of reinforcing mesh is the most important stage in the entire foundation construction. The strength of the structure depends on the quality of this work.
Here it is worth correctly calculating the cell size in the reinforcing mesh, since the larger the scale of construction, the smaller the cells should be. Having decided on the frequency of laying the rod, you can begin to create the gratings themselves.
The rods can be welded or tied together with wire, but here it is necessary to take into account the class of the reinforcement. If the reinforcement has a class marked C, then it can be welded; if not, then it is better to tie it together, since the properties of metal of other classes are lost during thermal intervention
It is also worth paying attention to the quality of the reinforcement; it must be clean - without traces of dirt and dust, since the presence of contamination significantly impairs the adhesion of the metal to the concrete mass
The option discussed above describes the reinforcement of a monolithic foundation slab, however, there is another way to construct a foundation using slab reinforcement. This method involves creating a foundation in parts and is called strip.
Reinforcement of the strip foundation slab is carried out using separate sections of reinforcing mesh. However, it is better to pour them all at once to obtain monolithic concrete.
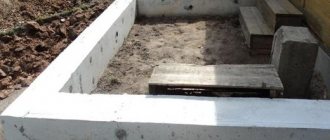
Installation of formwork can be done both before installing the reinforcing material and after
The main requirement for this stage is a good fit of the formwork elements to each other, since concrete milk can flow out through existing cracks, which is important for the concrete bond. The formwork must be installed very efficiently to avoid displacement of its parts and deformation of the foundation slab. The foundation slab should be poured only after all parts of the reinforcing mesh and formwork are properly secured
This process is very important because the quality of the monolith depends on it. The entire pouring, even if the area is large enough, should be done continuously, otherwise there is a risk of getting a layered slab, which will greatly affect the quality. A break in pouring for more than one hour can negatively affect the condition of the slab. Top waterproofing of the slab is the final stage in the construction of reinforced foundation slabs. This stage guarantees insulation from moisture not of the foundation, but of the building itself.
Tying with plastic clamps
Knitting reinforcement using plastic clamps is a simple and convenient method for creating a reinforcement frame.
Pros:
- plastic is not subject to corrosion;
- ease of installation;
- high knitting speed;
- low cost;
- there is no need to use special tools.
Minuses:
- work cannot be carried out at subzero temperatures (plastic becomes brittle);
- the strength of the connections is questioned by many professionals;
- a fairly large elongation coefficient of plastic can lead to a decrease in the rigidity of the reinforcing frame (or a violation of the geometry).
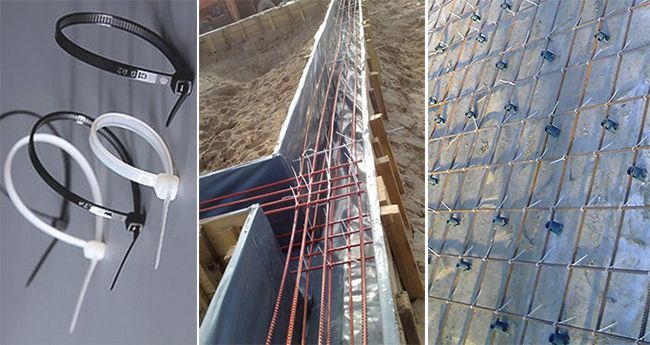
Diagram for assembling the frame
It is impossible to connect a frame from individual metal rods of a strip foundation without a working drawing or as-built diagram. To compile it, you need to make a special calculation of the collection of loads on the foundation and, based on the results, select the required diameter of the longitudinal rods of the working reinforcement. When drawing up a working diagram, the conditions and construction features during the construction of a strip foundation are taken into account. For such calculations, it is best to contact qualified specialists - designers.
Some recommendations for knitting the reinforcement cage of the foundation
The rules on how to knit reinforcement for a strip foundation and for a monolithic slab are the same. The length of a standard reinforcing bar is 6 meters. Very often they have to be joined. The overlap of the reinforcement during tying should be 40÷50 cm, the rods should be tied together evenly in 3-4 places.
The same requirements apply when strengthening corners and junctions with L-shaped and U-shaped additional reinforcing elements.
Knitting a metal frame from reinforcement for a strip foundation can be done not only in the formwork, but also in separate fragments (made in a place convenient for you), which are then lowered into a box.
Important! It is necessary to tie the reinforcement of individual fragments together.
The combination of reinforcement for the foundation and the correct choice of its diameter are the main factors influencing the strength of the foundation of the future structure. When tying reinforcement for the foundation, special attention must be paid to the tightness of all connections.
This video will help you understand how to properly knit foundation reinforcement:
How is the grillage and pillars reinforced?
- The columnar foundation is reinforced using rods. They are tied or welded using wire into frames.
- A layer of sand must be poured onto the bottom. Crushed stone mixed with sand in the same quantity is placed on top. Next, to ensure that the metal is reliably protected from moisture, approximately 100 mm of concrete is laid.
- Pre-prepared frames are lowered into the holes under the pillars.
- The cross-sectional dimensions of the frames must be no less than the diameter of the well itself. Experts call this layer of concrete protective because, thanks to the alkaline reaction, it protects the metal from corrosion damage.
- During the manufacture of the frame, the outlets of the reinforcement must be bent horizontally, to a length of about 30-40 cm. If the work is performed by an experienced and competent specialist who knows how to weld correctly (without overheating the reinforcement), then bends will not be required.
Regarding the layout of the reinforcement bars, in such cases it is necessary to pay attention directly to the parts of the foundation:
- If a pile column made of reinforced concrete or bored piles is used, then the load coming from the displacement of soil masses in a horizontal position is taken into account.
- If the grillage is monolithic and horizontal, the load is bending, since the beam is located on supports at the ends, while there is practically no support under the middle part.
How should the reinforcement be located in the corners of the grillage?
The reinforcement of columnar foundations must be carried out according to a clearly indicated scheme. As for the corners, the bending of the rods should be at least 0.4 mm.
It is not always possible to carry out welding - there are grades of steel that cannot be welded with conventional electrodes, since there is a risk of overheating of the rods, weakening of the seams, etc.
How is the base of a columnar foundation reinforced?
When choosing a reinforcing material, in any case, it is necessary to take into account the purpose for which the concrete will be used. For example, in order to strengthen the base of a pillar, special meshes are used.
Calculations were made, thanks to which it was possible to establish that if the planned load is small, then a reinforcing mesh with a diameter of about 5-6 mm will be sufficient. However, according to building regulations, it is unacceptable to use a frame that will have a diameter of less than 12 mm. Therefore, if you need to carry out all the work in accordance with the standards, in this case, experts recommend reinforcement mesh with a diameter of 12 mm and a cell of 200 x 200 mm for a building with low weight.
How is the grillage reinforced?
Before carrying out foundation work, the drawings must be carefully studied - regardless of who will be doing the construction: a specialist or a novice.
In order for the frame to be spatial, the horizontal grids need to be connected to each other - using vertical segments. Select the shortest length - otherwise there is a possibility that the frame will lose stability, and its strength may significantly decrease.
The most common mistakes that should not be made when performing work:
- installation of the frame on the ground;
- lack of centering of the frame when installed in a well;
- creating connections at the corners of walls when welding rods;
- heating the bends of the rods during welding.
If you are not sure that you can carry out all the work correctly yourself, it is better to use the help of specialists, since reinforcing a columnar foundation is an important task that must be completed perfectly
Working with obtuse angles
Finally, we’ll figure out how to install reinforcing parts on bends with a turn of more than 90 degrees. This will require knowledge of several basic manipulation methods.
First
The external and internal elements of the longitudinal rods are bent at the desired angle, and then they are tied together. Connections to vertical rods also need to be made more frequently than on a straight section.
Second
In this case, a section of reinforcement that has already been prepared in advance, bent to the required degree, is placed in the trench. This part is fixed to the main route with an overlap. It is important to ensure a significant overlap equal to approximately 40-55 times the diameter of the rolled stock used.
Types of angles
Not all connections are equally easy when making amplification. The first step is to decide what degree of contact the joint will have. In accordance with this, the selection of optimal materials and procedure techniques is carried out. The following types are distinguished:
- Direct. These are the most popular options available. Working with them does not cause any particular difficulties.
- Blunt, deployed. Tying them is quite easy. The rods are installed in the direction of the inner part with an increase in the frequency of transverse inserts in relation to the remaining areas.
- Spicy. It is quite rare to see this type in the construction of low-rise private houses. They are not easy to work with and require certain skills and experience.
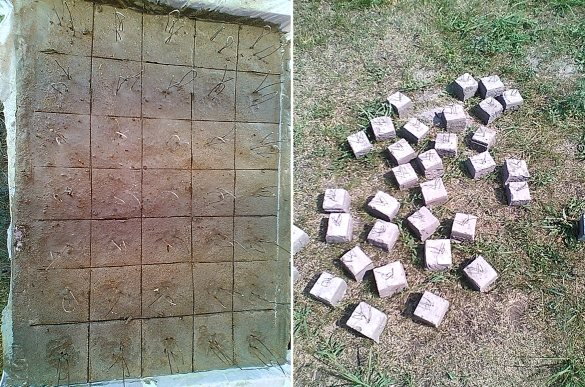
Concrete clamps: how to make it yourself
Like plastic, concrete clamps are industrially produced, but they are used mainly for large objects, and they are difficult to find on sale. However, anyone can make such supports themselves if they have time to tinker with molds, pouring and drying. Some people don’t bother with molding and make “patches” from the solution or lay them out in a cone directly in place, but it’s still better to take the time.
Concrete stands are most often of two types:
- Rectangles - pouring into a mold or cutting uncured solution into cubes;
- Rounds - pouring into scraps of plastic pipes, you get an even relief or pouring into the bottoms of plastic bottles, you also get grooves for rods.
If you insert wire into concrete, you will get not just supports, but real reinforcement clamps.
navashinoFORUMHOUSE Member
Watch Anton Weber's video, there is a process of making concrete clamps for the GS. Assemble the formwork into a rectangle, fill it with hard concrete or sand concrete until the solution sets, insert loops of knitting wire, cut the mass into squares (5-7 cm). After the concrete has hardened, shake it out of the mold and break it along the slots.
The efficiency of the method has been confirmed.
AndrShurupovertFORUMHOUSE Member
Yesterday I tried to make a pilot batch, today I was pleased with the result, poured the first cubes into water for a day, and made the next batch.
Winder
Another good way: cut off the bottom of a simple plastic bottle (with a lumpy relief), fill it with a hard solution (little water) and, like Easter cakes made of sand in childhood, lay it out on a flat base covered with film, after a few days the coasters are ready.
Which is what they do.
maratovichFORUMHOUSE Member
We do not sell stands and have never sold them. I brought 25-35 mm stands from St. Petersburg, but they are too small for moving into the garage; I came across a mention on the forum that you can sculpt just like in childhood. Blinded.
How to knit foundation corners: where to find a detailed description of the process
As we already wrote above, the corner zones of the foundation bear the main pressure throughout the entire life of the building. Therefore, the stability resource of a private house directly depends on how effectively the reinforcement work is carried out. All detailed information on the installation procedure, potential loads and arrangement of parts can be found in technical regulations and building codes. You should also take into account the characteristics of the materials used, which are also freely available.
Basic conditions and standards
- It is important to determine at an early stage what type of soil is at the construction site. The less stable and less dense the soil, the more serious the amplification.
- For longitudinal elements, choose rods with the largest cross-section (up to 2 cm).
- The surface of the rolled metal is not smooth, but embossed, so that it holds well after pouring the solution.
- The frequency and concentration of reinforcing parts in the corners should be higher than in other areas.
Parameters for calculation
- The frequency of placement of vertical rods ranges from 0.5 to 0.8 m.
- The distance between the edge of the concrete strip and the load-bearing frame is maintained at around 50 mm.
- The depth of the rods is not below the plane of the ground surface by more than 50 mm.
- The cross-section of the main rolled metal is 1-2 cm, structural - up to 1 cm.
To eliminate the possibility of making a mistake, at the initial stage it is important to make a detailed diagram and display in detail the arrangement of all structural elements.
Procedure for installing rods
- The main rods are buried into the ground every half meter.
- At the top and bottom, load-bearing parts are added to them by welding.
- Next, additional rods are welded at a distance of up to 0.1 m.
A few secrets of quality connections
- Cross joints are not used where walls intersect.
- Fastening only by welding is unacceptable both in the corners and in other places along the perimeter of the foundation strip. Mating is required.
- When using welds, the parts are processed slightly at an angle, after making a bend.
- Any of the longitudinal parts is fixed with a curved metal hook.
- The result should be a solid monolith, where all the parts are interconnected.
A couple more recommendations for the proper construction of your home
The main thing is to use at all stages only proven and high-quality building materials, the parameters of which meet the requirements for a particular structure. In addition to the walls, for which Ytong aerated concrete is the best choice, it is important to provide a solid foundation for the house - the foundation. To implement a project with your own hands, we first advise you to learn the basic rules for making joints during reinforcement. At every step towards completion of construction, plan your actions carefully and in advance. Just measure seven times, prepare the frame and quickly (necessarily in one go) fill it with the mixture.
Corner reinforcement: what materials are used
To increase the strength and stability of a strip foundation located at a shallow depth, high-quality rods should be used, the thickness of which is at least 1 cm. The maximum diameter is 2 cm. Knitting is carried out using a special wire with a cross-section of about 1 mm. The rods must be free of damage (including no corrosion). Have a corrugated surface. The maximum possible length is selected to minimize the need to organize docking. The following standards are regulated when choosing suitable raw materials:
- The fittings are taken suitable for welding (if suitable, then the name will contain the letter C);
- high level of rust resistance (letter K in the name);
- the strength index is determined based on the main material of manufacture (A2 or A3 steel is the best option); such rods do not change when tied with wire.
Concrete requires high-quality cement (M-200 - M-400). As well as a fraction of gravel, sand and water. All this is combined in shares determined on the basis of a specific construction project.