Foundation
Date of publication: 12/17/2015
2
12577
- Why is tape better?
- First stage of construction
- Second stage of construction: formwork
- Correcting the deformation
- Forming the floor
If you have a need to build an inexpensive but high-quality garage, pay attention to frame buildings. Since a car weighs a little more than furniture, special attention should be paid to the foundation. It is better not to make the foundation for a frame garage columnar, but to use a strip foundation.
The strip foundation was corrected in all respects
Foundation for a frame garage - my experience
After I built a house outside the city, naturally, my whole family began to travel by car.
I have a car, my wife has a car. As soon as my daughter turned 18 and got her driver's license, they bought her a used subcompact car. And this whole squadron of cars stands in the yard near the house. The winter of last year was quite severe, the frosts were far beyond -30 degrees Celsius, and lasted for almost a week. This year's winter has surpassed the previous one both in low temperatures and in the duration of frosts. We had to start the cars at temperatures of -45C, because there is no public transport in our village, but we still have to go to work.
My daughter’s subcompact Nissan Micra refused to start in such cold weather after the night. And my Suzuki Grand Vitara started with great difficulty. And only my wife’s Toyota continued to start over and over again, and took the whole family to the city in the most severe frosts.
After all these exercises, it was decided to build a garage for three cars. The garage must be insulated and heated to eliminate the need for a cold start of the engine at extremely low temperatures.
The parameters of the garage are described in my other article on this site, where I describe why I began to build just such a garage, and how the planning of this process was carried out.
Now I’ll tell you how I made the foundation for the garage and why I chose this one.
Why I decided to build a frame garage
Before starting to build a garage, I scoured several forums on construction topics and read several topics in detail.
As an option for building a garage, I thought I could make it from the following materials:
- Aerated concrete blocks.
- Expanded clay concrete blocks.
- Beam.
- Frame construction on a steel frame.
- Frame construction on a wooden frame.
During planning, block materials were no longer needed; they require a decent foundation, which is expensive and requires a large amount of concrete work.
I decided not to build a log garage because I have a house made of blocks and bricks, and with such a house, a log garage or a garage made of timber looks like a barn. It may be a utilitarian building, but you also need to think a little about building design in general.
I didn’t make a steel frame, because after the calculations I looked at the final estimate and spent several minutes wondering why my garage cost was almost the same as a residential building.
So in the end I decided to build a frame garage on a wooden frame. I will impregnate the wood of the frame with fire retardant impregnation and cover the garage with corrugated sheeting.
Why did I choose this particular foundation for a frame garage?
Next came the planning of the foundation for the garage. The foundation had to be cheap and built quickly. The idea was to use the following foundations for the construction of a frame garage:
- Shallow strip foundation - MZFL.
- Pile foundation.
- Slab foundation.
These three types of foundations are most often used for frame buildings, residential buildings and outbuildings.
The pile foundation was no longer needed due to its poor suitability for the garage. It is good to build a bathhouse or barn on a pile foundation, but a garage requires a fairly thick floor, if possible concrete, on which cars will stand. At the same time, the floor will have to be insulated, but how can this be done with a pile foundation in order to ensure, on the one hand, budget, and on the other hand, the possibility of a solid foundation?
The slab foundation suited everyone; it is the best foundation for a garage. The slab is the basis for load-bearing walls, which are laid out along the lines of the slab stiffeners. And at the same time, the slab is the floor for the garage on which cars are parked. If you make an insulated Swedish USHP stove for a garage, then this, in my opinion, is the best option.
But I didn’t like this option due to my budget. Just like with the steel frame, I spent half a day looking at the final figures in the estimate. And, in the end, I gave up on the idea of building a garage on the USP.
That left MZFL, which is one of the most budget-friendly options for building a frame structure.
Preparing the site for a garage foundation
On my site there is a very high groundwater level - groundwater level. It’s May now, there’s water in the ground, it’s worth digging 1 bayonet deep with a shovel.
Therefore, in order to plan a site for building a garage, the site had to be prepared in advance. A layer of fertile soil down to the bedrock clay was selected. The layer is quite small, because the site is located on the site of a former forest. So the layer is only 10-15 cm.
Next, a layer of 200 density geotextile was laid, which covered all the clay. After this, the place under the MZFL was filled to ground level with sand, which I spilled with water and compacted. Quarry yellow sand is best suited for this purpose. River gray sand, which is washed from the river, the sand grains of which have weak adhesion to each other, is not suitable for being the basis for concrete structures.
Next came a layer of geotextile again. After which I poured a layer of crushed stone of fraction 40-80, which raised the level of the garage above the soil level by another 10 cm.
Now the area for the foundation for the garage was ready.
Foundation planning work
It remained to decide whether to fill in the MZFL or use ready-made foundation blocks. Since it was planned to build a frame garage, the foundation for it could be assembled from separate blocks.
At that moment, I came up with the idea of using as a foundation the remains of 30 by 30 cm piles, which could be bought during the construction of a multi-story building. The piles are driven into the ground to different depths and then cut to the zero level of the future house.
You can negotiate with the foreman and buy piles directly at the construction site. Which is what I did. And he became the owner of a dozen piles with a length of 2.5 to 4.5 meters and an end area of 0.09 sq.m.
Thus, I saved on concrete, on reinforcement, on formwork. The piles are laid with their ends facing each other, and the protruding ends of the reinforcement are welded. After this, the spaces between the piles are concreted in place.
And look at what kind of reinforcement is used in piles for a multi-story building. It would never have occurred to me to use 22 reinforcement in the foundation for a garage. So there is a decent margin of safety.
Now my neighbor jokes that I don’t understand something - either MZFL, or an incorrect pile foundation, the piles in which are not driven into the ground, but lie on their sides.
Types of screw piles
When purchasing supports, it is extremely important to pay attention to their design and operational characteristics. The pile can differ in several parameters:
- Areas of use;
- pipe diameter and blade width;
- types of tip;
- number of blades;
- thickness of steel and its grade;
- types of protective coating (if any).
Types of piles by area of application
When choosing a pile for constructing the base of a house, you first need to take into account the weight of the building itself and the type of soil at the construction site. According to the area of application, screw posts are divided into 4 categories:
- Broad-bladed. Such products are equipped with only 1 wide blade, which is located on the lower edge of the base. This option is often called universal, as it is suitable for construction work on various soils. On such a base it is best to build one-story frame or wooden houses.
- With increased wear resistance. The design has 2 blades (at the very bottom of the support and in the middle). It is suitable for the construction of two-story houses. The peculiarity of the support is that to bury it in the ground it is necessary to use special equipment (it cannot be installed manually).
- Narrow-bladed. This product has a pronounced cone and a narrow blade. It is intended for construction on rocky ground.
- For permafrost. The support is equipped with a blunt end, which improves the effectiveness of the foundation in permafrost conditions.
Standard sizes of screw piles for foundations
In addition to structural features, a screw pile can have different diameters and blade widths. The higher this number, the greater the load the support post can withstand:
| Pipe diameter/blade width (mm) | Load-bearing capacity indicator | Application area |
| Diameter 57/150 | The permissible load on the support does not exceed 800 kg | Limited use. Can be used in the construction of lightweight fences made of chain-link mesh. |
| 76/200 (СВС 76) | The indicator reaches 3 tons | Suitable for the construction of polycarbonate fences and corrugated sheets. |
| 89/250 (СВС 89) | Load can reach 4-5 tons | Suitable for constructing plinths for gazebos, outbuildings, verandas for houses, frame garages. |
| 108/300 (СВС 108) | Pillars can withstand up to 9 tons | Can be used for frame and timber one-story buildings. |
| 133/350 (СВС 133) | These products have the highest characteristics. They can withstand loads of up to 14 tons | On such a plinth you can install a small house made of brick or gas silicate blocks. |
Number of blades
Foundation piles also differ in the number of blades. There are only 2 categories for this parameter:
- Single-cavity. Such products are more suitable for working on soil characterized by high strength. Experienced builders advise being extremely careful when choosing such structures. Welded blades can be torn off under high loads. In this case, the strength indicator will decrease several times.
- Multi-lobed. This option is suitable even when working on soft soils. Multi-bladed support pillars have increased resistance to any type of load (horizontal, pressing and pulling).
If multi-blade supports are used when installing a pile-screw foundation, then the pipe diameter can be taken smaller than would be required with single-blade structures. In this case, the width, pitch and degree of inclination of the blades must be selected depending on the type of soil.
Tip Types
According to this characteristic, the pile can be welded or cast:
- Cast. During its manufacture, the pipe tip with blades is made in the form of 1 part by casting. Thanks to this, such a pile is less susceptible to deformation when working on dense soils with solid inclusions and on soil with permafrost.
- Welded. According to production technology, the tip is connected to the blade by welding. Such products are cheaper, but their strength is somewhat less. Such bases should be chosen for working on weaker soils; in addition, it is important to take into account the grade of steel and the thickness of the metal. This allows you to increase productivity and reduce costs.
Thickness and grade of metal
When installing a screw foundation, you should take into account such a characteristic as the thickness of the metal. This data shows what wall thickness the pipe has. The load-bearing capacity of the product and its resistance to deformation depend on this. According to this characteristic, the pile can be classified as one of 3 types:
- Thin-walled. Parts of this design have a wall thickness of no more than 3.5 mm. Of the entire range, these are the lightest and cheapest products, but their load-bearing capacity is also low.
- Medium thickness. In the manufacture of these products, steel with a thickness of 3.5-6 mm is used.
- Thick-walled. Such a pile can have a wall thickness of 6 mm or more. Such designs should be chosen in cases where increased foundation strength is required.
A suitable steel grade is selected based on the results of soil studies and when calculating the mass of the structure.
Steel grade ST3 is suitable if the soil is characterized by weak chemical aggressiveness.
Steel ST20. This metal can withstand the average chemical aggressiveness of the soil.
Steel grades 30ХМА and 09Г2С are designed for use in highly aggressive soil conditions.
Type of anti-corrosion coating
In addition to design features and wall thickness, an important indicator is what the finished product is coated with. This composition acts as a protection for the metal from corrosion and other external influences. Manufacturers offer several coating options:
- polyurethane;
- zinc (cold or hot galvanizing);
- polymer;
- epoxy.
Each of the above options has advantages and disadvantages, so the choice must be made taking into account the operating features. Studies have proven that the least protection for metal products is provided by polymer coating and hot-dip galvanizing.
In some cases, the pile may lack a protective coating, in which case it must be applied independently. Experienced builders emphasize that the protective composition for the underground and above-ground parts of the pipe may be different.
What to consider when planning your garage
In order for the building to serve as long as possible and at the same time not require additional investments for reconstruction or restoration, it is necessary to think through the main points of laying the foundation even before the start of construction.
First, a study of the soil type is required. So, on sandy soil you can use almost any type of foundation, but on unstable soils you need to fill a foundation that will actively resist heaving forces.
Due to the relatively light weight of a frame building for a garage, experts do not recommend the use of a columnar foundation on any type of soil.
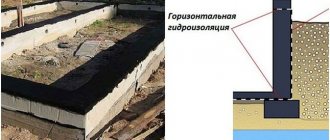
Secondly, an important part of the design is the analysis of the location of the groundwater level. The method of making the waterproofing layer depends on this parameter.
Thirdly, in most of Russia, the soil is subject to freezing in winter and therefore it is necessary to accurately know the depth of soil freezing in order to install a foundation below this level. This will increase the strength of the building. The following are considered common options for a garage foundation:
Construction of a frame garage without a foundation is possible if only large elements are used for the construction. To do this, you also need to make sure that the soil is reliable by compacting it. The lack of a foundation does not eliminate the need to waterproof the bottom of the garage.
Principles of calculation and design of a pile-screw foundation
To select piles and calculate their number, you need to take into account several indicators, including the design features of the building. The formula used for this is quite complex, so it is better to order the calculation from specialists. Otherwise, there is a risk of structural damage shortly after commissioning. Such changes may entail additional costs for repair or reconstruction of the basement.
Assessment of the load-bearing capacity of the pile
It is customary to indicate the load-bearing capacity of each pile in a wide range. This is because the same support will exhibit different characteristics on different types of soil. To make calculations for the construction of a building, you need to study in detail the indicators of the soil located directly at the construction site. You can do this in 3 ways:
- Geological survey work. This service includes specialists visiting the construction site, diamond drilling of a well and a detailed study of each soil layer. Thanks to such research, it is possible to obtain the most accurate indicators for calculation. The correction factor is only 1.2. The only drawback is the high cost.
- Installation of a reference pile. This procedure also requires the presence of a specialist, but it consists of screwing in 1 pile in the area. The main task is to detect torque. Based on these data, the bearing capacity of soils can be determined. When using this approach, a correction factor of 1.25 must be taken into account.
- Independent drilling of a well or hole. This is the cheapest way to study soil. To do this, a hole is drilled at the site to the depth into which the support pillars will be sunk. Soil is removed from the bottom and classified according to external characteristics with existing options. With this approach, the accuracy is achieved to a minimum, so the correction factor increases (up to 1.6-1.7).
The length of the pipes depends on the type of soil. This indicator can be determined experimentally. Drilling is carried out at the site to the desired soil layer, the drill is removed, and a rope with a weight at the end is lowered to the bottom of the hole. Once the load reaches the bottom, a mark is made on the rope at ground level. The distance from the load to the mark is the depth of the hole.
To calculate the length of the pipe, you need to add the depth, the length of the above-ground part and a margin of 300-400 mm.
Assessment of loads falling on a pile-screw foundation
To find the level of load that falls on the grillage foundation, it is necessary to take into account a number of indicators:
- Mass of walls. To do this, you will need the sum of the area of all the walls and the material from which they will be made. You can consider 2 types of material (for example, internal partition and external wall).
- Mass of overlap. As with walls, you will need floor area and material.
- Roof weight. To do this, take into account the type of roofing, roof area, sheathing system and rafters.
- Possible snow load in winter. For the calculation, important characteristics are the precipitation rate (it can be determined by region) and the angle of the roof slope.
- Grillage material for strapping. If wood is used, it can be ignored.
Number of screw piles
Before installing a screw foundation, it is extremely important to determine the required number of pillars. This requires 2 values:
- the total load that will be created on the base (this is the weight of all elements of the building);
- an indicator of the load-bearing capacity that each pile has (it is important to take into account the operational reserve).
The number of pillars required for construction is found using the following formula: total load/bearing capacity.
To make this easier to understand, it is worth considering the calculation using an example. The total load on the grillage foundation is about 63.5 tons, and the permissible load on 1 pile is 4.3 tons (SBC-108 is being considered). Using the formula you can get: 63.5/4.3=14.77.
If the number is a fraction, it must be rounded up. The resulting figure (15 pcs.) is the minimum that must be used during construction, but this value cannot yet be called accurate. It is also important to consider the requirements for the placement of pillars.
Depending on the construction material, the pitch between the supports may be different:
- no more than 2000 mm - for buildings made of gas and foam concrete, brick, slag concrete;
- no more than 2500-3000 mm - when erecting fences made of wood or corrugated board;
- no more than 3000 mm - for houses made of timber, logs, frames;
- no more than 3000-3500 mm - for light fences.
It is also important to comply with location standards:
- For a columnar-grillage foundation, supports must be installed at the corners of the building’s perimeter and at the intersections of load-bearing walls.
- Under the main external and internal walls, the pillars are installed at an equal distance from each other (the maximum allowable pitch must be taken into account).
- If a summer kitchen, terrace or outbuilding is adjacent to the house, then the base for the auxiliary building should be arranged separately from the base of the house. In this case, the pipes may be of a smaller diameter (to save money).
- If there is a boiler, stove or fireplace in the house layout, it is necessary to install additional supports (there must be at least 2 of them). For them, the foundation with grillage is assembled separately.
Preparatory work
The first thing a person planning to build a garage needs to do is draw a plan for the future building. To do this, you need to decide on the purpose of the structure. Will it be used only for car storage? Or the plan should include an inspection hole to carry out feasible repair work.
This room may also include a basement for storing vegetables and preparations, or a place for car parts and work tools. All this affects the size.
If the garage is intended for one vehicle, then its dimensions must be planned so that there is no less than 1.5 m from the car to the wall of the structure in all directions.
Once you have decided on the size and internal contents of the garage, all that remains is to clear the space for construction. It is necessary to remove branches, leaves, grass and debris that will interfere with work. The fertile layer of soil is also removed. The main thing is that the construction site is dry, level and clean.
The final stage of the preparatory work will be marking the perimeter of the future building. To do this, you can use a rope, stakes, and to simplify the task, a laser ruler and other devices. Much attention must be paid to the angles, which must be strictly 90 degrees, otherwise the walls of the building will be crooked, which will affect the strength and appearance of the structure.
Preliminary work on site
Next stage. Leveling and clearing debris from your garage area. A layer of soil with fertile soil should be discarded.
At the third stage, markings are made. It is important to accurately place the stakes that serve as boundaries; do this according to the designed plan. A good foundation is obtained with a thickness of more than 30 centimeters. If there are devices like a laser ruler, this will significantly speed up the work process.
Do not allow deviations in the geometry of the structure. Each corner must be straight, otherwise you will end up with uneven walls.
Strip base for frame construction
A strip foundation for a frame garage is one of the common options for this type of building. This is facilitated by the following advantages of this solution:
- such a foundation is strong and can withstand structures of impressive size and weight;
- subject to building codes, it is resistant to deformation and shrinkage;
- the ability to make a durable floor based on concrete screed;
- You can build such a foundation with your own hands.
The disadvantages of this solution include the high cost compared to a columnar foundation, the need to use special equipment and perform additional work, such as installing and dismantling formwork. In addition, such a base can be installed at certain times of the year and only in good weather. When working with it, low temperatures and high humidity or partial precipitation are not allowed.
Before you start building the building itself, you need to wait for the concrete to harden for several weeks.
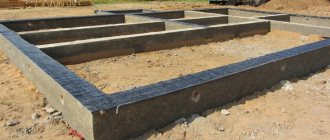
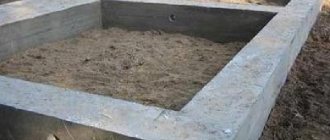
Strip foundation for a garage
After the preparatory work is completed, a trench needs to be dug along the perimeter of the construction. Its depth should be below the soil freezing level. In most cases this is about 50 cm.
The next stage of work will be the installation of formwork. For those who want to save on materials, it is possible to use simple boards made of cheap wood. For more expensive construction, formwork can be purchased or rented.
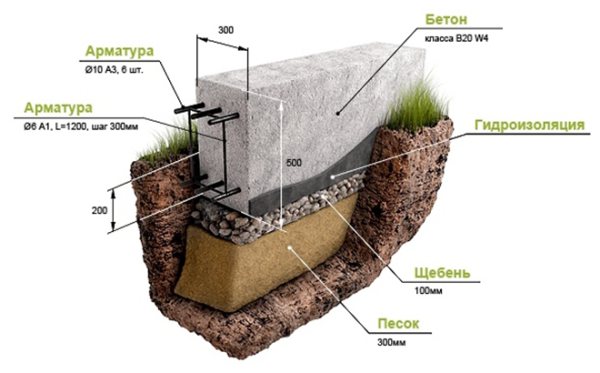
A cushion of sand and crushed stone is placed at the bottom of the trench. The next layer will be waterproofing. If necessary, the future foundation can be reinforced, and then concrete mortar will be poured into the prepared trench. During operation, the mixture must be compacted using special tools.
Afterwards, the structure is left until the concrete hardens. The foundation must first be covered with film and watered periodically to prevent the top layer of concrete from drying out.
After the structure has sufficiently hardened and the formwork has been dismantled, it is necessary to check the resulting foundation for strength. Firstly, its horizontal line must be flat everywhere. The maximum permissible difference is 1 cm. If an error is noticed somewhere, it is corrected by applying cement mortar to lower sections of the tape to level the surface. In this case, the mixture used is required to be an order of magnitude thicker than that poured into the formwork.
Secondly, all angles must be 90 degrees. All detected deviations from the norm must be urgently corrected, and only after this can we begin lining the foundation and constructing the garage.
Why is tape better?
A strip foundation is most often a monolithic structure containing a cement mixture. The monolithic structure, also reinforced with reinforcement, is strong enough to withstand heavy loads.
Advantages of a strip foundation:
- High strength.
- Ability to withstand heavy garage weight.
- Does not cause large shrinkage and deformation of walls.
- Can be installed by hand.
The strip foundation is ideal for forming a cement floor, which in turn is created from a screed on the ground.
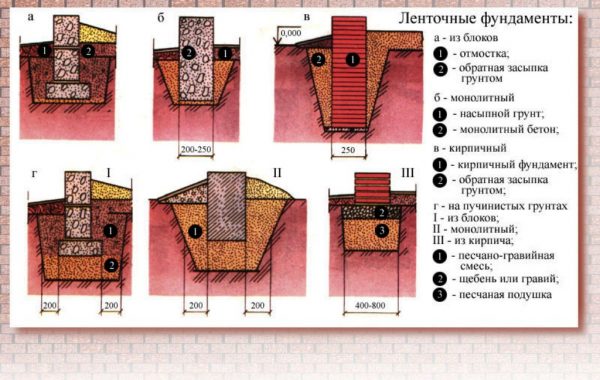
Types of strip foundations
Disadvantages of a strip foundation:
- Costs more than a columnar foundation.
- It can only be erected in the warm season; it cannot be installed in winter or during periods of frequent rain.
- Requires the rental of special equipment - concrete mixers, tractors for digging trenches.
- It is necessary to wait several weeks for the foundation to harden.
- Requires additional work - formwork installation, waterproofing.
When to remove formwork
And yet, despite a number of disadvantages, or, better said, difficulties in installing a strip foundation, it is best to choose this type of foundation. If the garage is planned to be built as an extension, then this type of foundation is also best suited. You can read more about the extension garage here. Detailed information about frame technology can be found in our article.
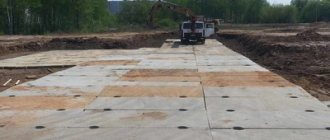
Monolithic slab for frame garage
In rare cases, a monolithic foundation can be used for a frame garage. Compared to tape, it is distinguished by greater strength on unreliable soils and resistance to deformation and loads.
The disadvantages of this solution include higher cost, the need for special equipment, a large amount of work and the time it takes to fill the base.
Monolithic base for a garage
In addition, a monolithic foundation requires more careful planning. So, if, after completing work on the garage, the owner wants to additionally build an inspection hole or cellar, this will be impossible.
When pouring a monolithic foundation, the procedure is similar to making a strip foundation, only instead of a trench around the perimeter of the garage you will need to dig a foundation pit. Then the formwork is installed, a sand-crushed stone cushion and a layer of waterproofing are laid on the bottom. Installation of fittings in this case is mandatory. An important part of the work will be pouring and compacting the concrete.
Pouring a monolithic slab requires a lot of time and effort. If the process was not completed within one day, the foundation must be covered with a waterproofing layer. Work should be continued no later than 12 hours later. If the deadline is missed, you can resume pouring the foundation only after 5 days.
Since this design requires more material, it will take longer to harden. Throughout the entire period, the process must be monitored, periodically moistening the top layer. At the end of the period when the layer hardens, all that remains is to remove the formwork, fill the resulting cracks with soil, and level the base horizontally. The convenience of this solution is that there is no need to worry about the arrangement of the floor if there is no need for additional thermal insulation.
Installation of formwork for the foundation
As soon as the marking process is completed, you should begin digging a trench. This can be done in two ways: with a shovel (in this case, take care to protect your hands from calluses) and with a tractor with a special attachment designed for such tasks. The foundation must be dug deep into
a distance of about 50 centimeters or more. The tractor will need approximately 1.5 hours for this work.
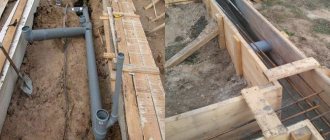
Boards are placed in the finished trench and knocked down along the wall. There is also ready-made removable and permanent formwork, which can be ordered if you do not want to do it manually. Since this is a garage, don't waste money pointlessly, use cheap lumber. Before pouring the cement mixture, you should lay a waterproofing film between the boards.
To ensure stability of the walls, small beams are attached to the formwork, this will give them reliable fixation.
Before pouring cement, we put reinforcement or mesh into the trench.
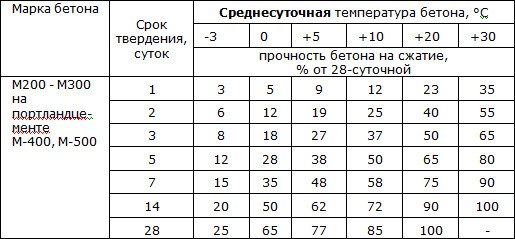
In order for the foundation to harden firmly, it must be left for approximately 14 days. In case of frequent rains, the hardening mixture is covered with film.
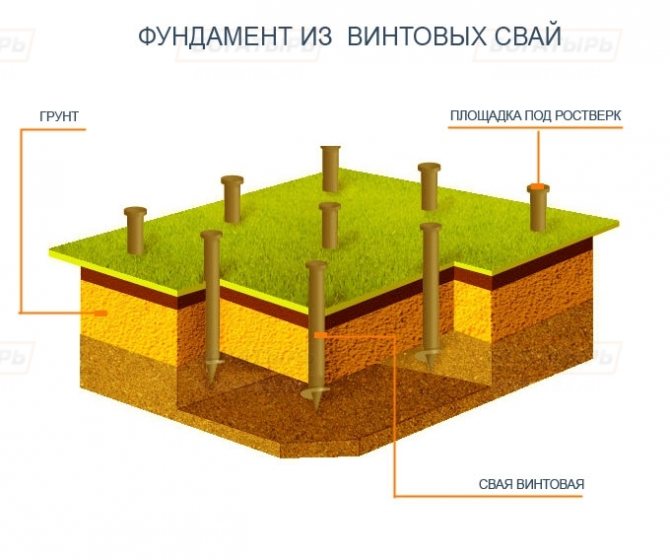
Pile foundation for garage
A pile-grillage foundation gives special strength to a structure built on unstable soils. In the case of arranging a garage, this method is rarely used. Based on the type of installation, the following types of piles are distinguished:
The first option necessarily requires special machines for installing supports. The second option can be used when making a base with your own hands. To immerse the structures in the ground, the effort of 2-3 people will be enough. Based on material, foundation elements are divided into 3 types:
The first type of piles is universal because it has the greatest strength. Steel piles can also serve for quite a long time, but subject to treatment with an anti-corrosion coating. Wooden piles are of little use in construction due to their extremely low strength.
Foundation on screw piles for a garage
After determining the dimensions of the garage and marking the perimeter, the installation of piles begins. The supports are driven or screwed into the corners of the structure, and then along the perimeter. In this case, the distance from one pile to another is no more than 1.5 m.
A prerequisite for installing piles is to immerse them vertically in the ground. This parameter is checked especially carefully after completion of work.
As soon as the last support is in the ground, it is necessary to cut the piles to the same length. The horizontal evenness of the base should also be checked. After this, the hollow screw piles are filled with concrete mortar. Heads are installed on their upper ends. Finally, the grillage is installed and the tying of the piles begins.
How to build a garage with your own hands
Construction work begins with precise marking of the territory, using pegs or metal rods and a tape measure with a level.
All angles must be equal, diagonals must coincide, and all distances must comply with the parameters specified in the project.
To make the structure more stable and easier to install, you need to first dig small holes.
Step-by-step instruction:
- Mark corner landmarks with wooden pegs.
- Using a rope stretched between the pegs, mark the installation locations around the perimeter of the foundation for the remaining supports.
- Dig holes at the marked points no more than 15-20 cm deep.
- Place the metal rod in the hole and begin to screw it into the ground. The work is easier to do with three people: two will screw in the product using a crowbar and tubular levers, and the observer should monitor the vertical direction of the support using a bubble level.
- When the pile passes the freezing boundary of the soil, it can immediately be considered installed.
- Having established all the required quantities, you need to align them in the horizon plane at one level, which is fixed with a special tool.
- All pipes are cut to the same height according to the fixed markings.
- The piles must be filled with concrete from the inside to ensure spatial rigidity of the structure and waterproofing of the metal surface of the support.
- Then a cap is welded to each product, which is a square metal plate with a thickness of at least 8 mm, protruding 2-3 centimeters from each side of the pile.
After preparing the supports, it is necessary to make a grillage - the upper part of the foundation, which has the form of a horizontal frame that carries and distributes the weight of the entire garage over the installed piles. The beams of a wooden or metal grillage are attached to the plates with bolts or welding, and for a grillage made of concrete or reinforced concrete, formwork is assembled, lined with waterproofing from the inside, a metal mesh or reinforcement frame is mounted, and the formwork is poured with concrete.
How to equip the floor
When using strip or pile foundations, an important stage of work is the installation of the floor. Most often, the cement screed method is used to ensure strength. With this choice, you first need to equip an inspection hole by digging a recess of the required size and securing the walls of the structure.
First, the floor is covered with gravel, which acts as drainage. This layer needs to be compacted. Sometimes this is done using a press. With enough time for construction, you can allow the gravel to come to the desired form naturally by suspending work for a while. The next layer requires sand, which also requires compaction.
Waterproofing is laid on top of the drainage layer, followed by thermal insulation. This stage is especially important if you will be working in the garage during the winter months. Before pouring cement, a welded mesh is installed as reinforcement. To complete the work, you just have to wait for the solution to dry.
The choice of foundation for a frame garage depends on the type of soil and the features of the structure. Experts often recommend using strip foundations for such structures. Pile foundations or a monolithic slab are applicable here. Regardless of the choice, the main thing is to follow the foundation technology so that the constructed garage lasts as long as possible.
Strip, shallow foundation
Strip foundation for a frame garage
The design of a strip, shallowly buried foundation is as follows:
Design advantages:
- Low, in relation to the normally buried type, the cost of materials and work; Short deadlines for completing the work; Ease of installation work; There is no need to use special equipment; Has a reserve of load-bearing capacity for further construction of light structures;
The disadvantages are:
- Not possible to install on heaving soils; Susceptibility to the negative effects of nearby groundwater.
The construction of the foundation of this structure is carried out in the following sequence:
The width of the foundation strip is determined.
This value is selected individually by the developer, depending on the size of the garage and financial capabilities. A trench is dug along the perimeter of the garage. The width of the trench is 200 mm greater than the width of the foundation strip, the depth of the trench is 500 mm from the surface of the earth. The formwork of the foundation being constructed is made from lumber. The lower edge of the formwork must be at least 100 mm below the ground surface.
The upper edge determines the size of the foundation strip and is located above the ground at a height of no more than 700 mm. The upper edge of the formwork is mounted in a horizontal plane; for this, a building level, level or theodolite is used. A sand-gravel mixture or sand of coarse or medium fraction is poured into the trench. When laying it, layer-by-layer compaction is performed.
The thickness of the compaction layer is 200 mm. ASG is not poured into the internal space of the formwork. A reinforcement cage is mounted inside the formwork. The connection of the reinforcement is carried out using tying wire, plastic clamps or bricks used to underlay the lower bars of the reinforcement. Concrete grade M250 or M300 is poured into the prepared formwork. Waterproofing is laid over the top layer of concrete, after it has hardened.
The installation of formwork and backfilling of the ASG trench can be carried out in the reverse order. It depends on the desire of the developer.
Frame house
Frame construction today is the most modern form of house construction, and the reason for this is the undeniable advantages of this technology. The first frame houses came to us from America, where people know how to count money and do not like to overpay for something that can be obtained cheaper without losing quality. Over time, this technology spread to Europe and Russia, improved and became today the most modern technology for the construction of both residential buildings and other buildings.