Engineering and geodetic work plays a dominant role in the initial stages of each construction. The construction of structures must necessarily be accompanied by consultations with a geodesy specialist. The fundamental and integral process of geodetic surveys is the alignment of axes with a tacheometer. Comprehensive implementation of alignment work is necessary:
- to fix the planned location of points that uniquely characterize the object under construction;
- to establish the planned location of points and planes of the object under construction in accordance with the design documentation.
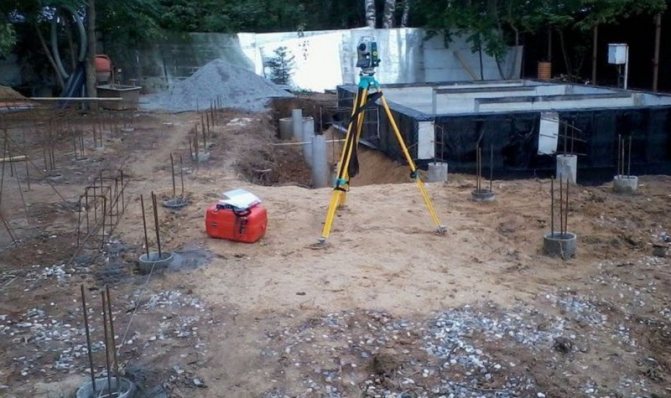
Such actions are intended to be performed by high-precision instruments - geodetic tacheometers, which are used to measure long distances, heights and angles in linear planes using visual contact.
To work with complex projects and terrain with heterogeneous terrain, surveyors may need surveying instruments of various scopes, including high-precision engineering electronic total stations.
What are the features of geodetic layout?
Surveying and marking work are considered the most popular in geodesy and, in fact, are the opposite of each other. So, when shooting, the data obtained is used to create a plan of a finished building or area. The task of alignment work, on the contrary, is to find the points and axes of the future building, in accordance with regulatory documents.
To do this, set one starting point, and then set off the design angles or distances from it. The transverse and longitudinal axes are taken as the geometric basis of the structure, and further dimensions are set relative to them. The main axes are tied to external geodetic objects. For each such basis, a corresponding act is drawn up containing its characteristics. This document is linked to an object.
The main axes of any building are the overall axes of the external walls or the axes of symmetry. In the case of linear structures, for example, when laying out for tunnels, bridges and roads, the longitudinal axes are considered the main ones. The project also contains the main axes that determine the location of the most significant parts of the object. Auxiliary axes are attached to them. To determine the height of the points, the floor of the first floor is taken as the reference level.
All this allows us to say that alignment work in geodesy is more accurate than survey work, which depends solely on the chosen scale. They allow you to achieve maximum detail, use many auxiliary fragments, and work with buildings and objects of any complexity.
Registration of the form
As for the design, everything is also left to the specialists involved in the layout work. The act can be filled out electronically or written manually. The only condition that must be met: the act made using a computer should be printed so that all responsible persons can sign. In this case, it is not necessary to put a stamp on the document.
The act is made in five absolutely identical copies, one for each specialist who signed it.
The finished document is subject to strict storage for the period specified in the legislation or prescribed in the regulations of enterprises. It is strictly prohibited to destroy it before this period, because if suddenly some problems arise during the operation of the building, it will be possible to identify the responsible persons with its help. Only after the storage period has expired can the certificate be disposed of in accordance with the procedure established by law.
Main stages of marking work
Depending on the type of object to be worked with, the breakdown may affect the boundaries of the site, axes, linear structures, contours or individual fragments of the building. At the same time, there are certain stages that are unchanged for any type of work.
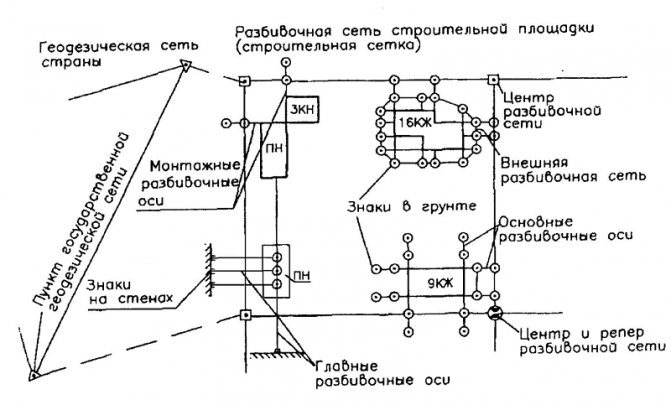
Creation of a geodetic alignment network (base)
It is created on the territory of the designated construction site. The type of network used depends on the shape and size of the object, as well as on the accuracy of the transfer of the axes of the future structure. For example, these could be the following options:
1. To lay out civil and industrial buildings, use a system consisting of squares and rectangles that are parallel to the transverse and longitudinal axes of the building. The average step between them is 100-200 m. Such a network is initially designed on the general plan and then transferred to the area.
2. To transfer the engineering network design to the area, it is superimposed on the topographic plan of the area. Then, using geodetic marks, high-altitude benchmarks and turning points of the route axis are fixed. The spacing step is determined depending on the nature of the excavation work, as well as the customer’s requirements.
3. To construct an accurate topographic map of the area, a planned geodetic network is used, which consists of linear-angular networks, and also includes data on the position of objects on the ground obtained using satellites or aerial photogrammetric survey.
Geodetic preparation of the project
The task of geodetic preparation of an object is the selection of specific options for its layout on the ground, including the choice of methods and means of taking measurements, setting the required accuracy of the work performed, etc. To carry it out, the specialist uses data from the alignment network, as well as a drawing of the structure itself. In this way, alignment drawings are obtained indicating exact coordinates. The following methods for determining coordinates are used in the process:
1. Graphic. The coordinates are determined based on the general plan data.
2. Analytical. The location of design points is determined based on the coordinates of already known points. So, for example, the beginning of the bridge crossing, the distance between the bridge supports and the direction of its axis are known. Using this data, a specialist can calculate the coordinates of the center of each support.
3. Graphic-analytical. Data on the coordinates of some points is taken from the general plan, and the location of the rest is calculated using an analytical method, based on the information received. For example, if you need to lay out a street, you can graphically determine the coordinates of the corner of one of the buildings, and find out all the others through calculations.
Marking work
They begin by laying out the main axes and linking them to the geodetic network. For a linear structure, the main axis is the route fixed to the ground; for bridge supports, the transverse and longitudinal axes; for buildings, this role is played by the axes of the outer walls. External existing objects can also serve as a basis.
After this, they move on to a more detailed breakdown, which determines the position of all elements of the future structure. This stage requires increased accuracy, for example, for excavation work - from 2 to 3 cm, for concrete - from 4 to 5 mm, for installation of standard equipment - from 1 to 2 mm.
Control during construction
As an additional guarantee, upon completion of a certain stage of construction, you can order a geodetic survey, which will allow you to establish the actual position of the design points. After this, the information received is compared with the original regulatory documents. It is especially important to do this at the initial stages in order to quickly detect possible errors and eliminate them with minimal costs.
Prices for laying out the building axes, cost of laying out the contour (4 axes)
| Difficulty category | I | II | III |
| Type of settlement | village | city | metropolis |
| Contour layout 20×20 m | from 10,133 rubles | from 13,753 rubles | from 19,326 rubles |
| Contour layout 50×50 m | from 18,056 rubles | from 24,554 rubles | from 34,486 rubles |
| Contour layout 100×100 m | from 25,880 rubles | from 35,392 rubles | from 49,998 rubles |
| Contour layout 200×200 m | from 42,568 rubles | from 58,704 rubles | from 84,024 rubles |
| Detailed breakdown of axles, per 1 axle | 3,040 rubles | 4,126 rubles | 5,798 rubles |
Main tasks of marking work
Layout work in geodesy can be used in almost all areas of construction, but there are certain tasks that are most in demand among customers.
Determining the boundaries of the site, setting out in nature
If you are planning construction, it is important to obtain not only an accurate plan of the building itself, but also to determine the boundaries of the construction site. So, without the help of marking work, this is almost impossible to accomplish. By neglecting this event, you run the risk that after construction is completed, it may turn out that the building or structure is located outside your site, etc.
This type of geodetic work is called the removal of site boundaries on the ground. To carry it out, you must contact a specialist with a good reputation and appropriate certification. The process itself is carried out using a total station and GPS receiver, in accordance with the procedure established by law. The permissible error in determining the boundaries is from 5 to 20 cm - the figure depends on the environmental conditions (relief, soil quality, etc.).
To order alignment work, you will need information about the site from the State Cadastre. Next, a corresponding contract with a list of works and time frames is concluded with the company executing the order. After this, the on-site specialist determines the turning points of the site boundaries and installs temporary or boundary signs. It is recommended to immediately install a more reliable fence.
Breakdown of building axes
The method consists of searching for points on the construction site that demonstrate the intersection of the main axes of the object. All these points are fastened in pairs with alignment signs outside the excavation works. This allows them to be maintained in a stable position throughout the entire construction process. If it is impossible to achieve the required distance of points (for example, due to building density), markers can be placed on neighboring buildings.
Layout of the foundation, walls and partitions
To accomplish this task, a reference geodetic network is used, which represents coordinated marks on buildings located around the site. The origin point, as well as the orientation of the network itself, is established according to the location of all parts of the building. This is done so that one of the intersections of the axes is expressed in whole meter coordinates and all other coordinates are also positive.
Working with the device.
You can briefly describe the work with geodetic equipment, for example, with a theodolite, when marking the axes of walls, columns, and foundations. Work begins by installing the device on an already broken corner, centering it over a nail driven into a stake. Then you need to raise the device pipe until the horizon of the mesh aligns with the edge of the top of the cast-off board. Where the grid vertical will be designed on the board, a 3 cm deep incision is made. A nail is driven there so that it corresponds to the vertical. A mark is placed, a line is drawn that continues the cut, with a pencil (paint) on the board, after which the name of the axis is signed.
The next step is to point the instrument pipe at a nail driven into a peg at another intersection of axes (corner), the point is transferred to the cast-off. Consistently placing the theodolite at all points, the axes are carried out on the cast-off using two nails each, driven in on opposite sides of the board. All that remains is to pull the wire or cord and the precisely recorded contours of the walls appear in real life.
How are the axles secured?
When construction is at the very beginning, traditional methods of axes are used:
- along the boundaries of the foundation pit planned for digging;
- along the internal boundaries of an already existing pit with simultaneous fastening to cast-offs;
- floor by floor for high-rise buildings.
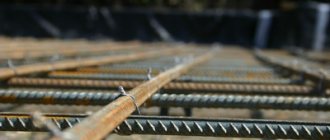
All axes that need to be removed are fixed to the ground in various ways. In this case, the intersections of the main ones are thoroughly fixed to avoid their displacement during construction. Typically, reinforcement intersections are used for this purpose in pile foundations. In other cases, fastening is performed using a special cast-off.
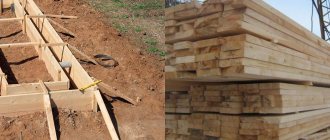
A cast-off is a wooden or metal structure on which the center lines are visualized in a suitable way: paint, nails, notches, etc. To visualize the intersection points, cables or fishing lines are pulled. In some cases (in dense urban areas), coordination is carried out using reflective marks on adjacent buildings.
The material for casting is selected based on the design duration of the construction of the object. If work on a construction site will be carried out for more than six months, then it is regulated to secure the cast-off supports not on wooden stakes, but on concrete pillars.
How to mark the foundation correctly: marking the axes, what to mark, how to mark evenly (photo, video)
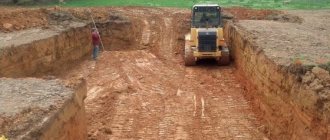
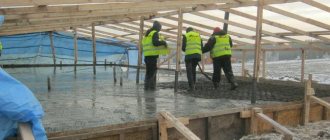
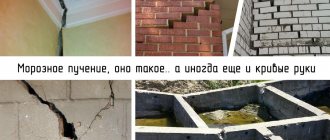
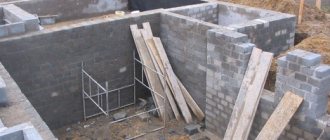
Work on building a house begins with the creation of a foundation: the foundation, whatever it may be (strip, slab, columnar or pile), must be resistant to atmospheric and climatic phenomena, physical influences, reliable with respect to freezing, as well as uniform shrinkage, and therefore the arrangement of the foundation must be approached carefully already at the stage of its preparation. In order for the house to be strong and stand for many years, it is necessary to understand how to mark the foundation and apply the acquired knowledge in practice. This is especially important if you do the construction yourself. It is necessary to mark the foundation on the ground, and by this time a design plan should already be ready.
How to make markings for the foundation?
Building a good foundation for a future country house is a labor-intensive, expensive and troublesome task, but knowing how to correctly mark the foundation with your own hands can significantly reduce the cost of time, effort and money.
In addition, proper preparation of the site for the upcoming construction will allow you to avoid annoying mistakes that can significantly fray your nerves and the planned budget. No special knowledge is required to carry out this work - with the possible exception of a school geometry course.
So, how is marking for the foundation and site preparation combined with it done?
How to make markings for the foundation yourself: preparatory stage
Before starting work, it is necessary to decide on the type of foundation and the thickness of the walls of the future structure, as well as prepare a construction project containing the main parameters and calculations. The presence of this project will simplify the organization of construction work and reduce the risk of errors to a minimum.
It would also be useful at this stage to plan the proposed design of the site, reflecting the location of existing and future outbuildings, the location and boundaries of the garden, vegetable garden and flower bed, flower beds, hedges, vertical gardening objects - for example, arches and pergolas for climbing roses or trellises for exotic actinidia .
Site clearing
If the site does not yet have auxiliary objects such as a barn or utility block, it is advisable to erect at least a small temporary structure. In the future, it will be useful for storing tools, construction and finishing materials, and in bad weather it can serve as a shelter from rain and wind.
Before making markings for the foundation , the area is thoroughly cleared, freed from debris, dilapidated buildings and unnecessary vegetation - weeds, wild shrubs and trees.
Areas with uneven terrain are leveled as much as possible by cutting off all the bumps and filling in the holes. If the dacha area is located with a noticeable slope, a ditch for drainage is installed on its elevated part.
This will avoid flooding of the pit or foundation area during rain.
Determining the type of soil
At the place where it is planned to build the foundation of the house, on a dry and clear day, remove all vegetation and remove the top layer of soil to the depth of a spade bayonet.
In parallel with this work, the type of soil is determined and, if necessary, its bearing capacity is calculated.
To do this, a small amount of wet soil, extracted from a depth of 10-15 cm from the surface, is kneaded in the hands, its plasticity, density, moisture content and uniformity are assessed.
Slightly damp clay is easily crushed in your hands, without crumbling and taking any shape. Loam has slightly less plasticity, forming a lump or cake with cracked edges when squeezed.
Moistened sandy loam can also be collected into a lump, which, unlike lumps of clay or loam, will crumble with little impact.
(The table for calculating the bearing capacity of soils can be found here.)
The removed fertile layer of soil is temporarily sent to a vacant part of the site, where it will be stored until construction is completed. To ensure that the stored soil does not lose its fertility during this time, it is sown with green manure - peas, beans, chin, beans, lupins.
Tools
Having cleared the area, prepare a set of necessary tools, namely the following:
- – a right triangle with legs of at least 30 and 60 cm (it is best to use a right triangle with legs of 1 meter each);
- – stakes about 50-60 cm long;
- – strong and long rope;
- – sledgehammer;
- – level and plumb line;
- – tape measure 10-15 meters.
Do-it-yourself foundation markings
When independently marking a site for the foundation of any object, two basic rules, known from school times, are usually used:
- The diagonals of the marked rectangle are equal.
- All angles of a rectangle are equal to 90° (to construct strictly right angles, use the rule of the “Egyptian triangle” or the formula “the square of the length of the hypotenuse is equal to the sum of the squares of the lengths of the legs”).
There are quite a lot of options for independently marking a site - in this publication we will present the most common and accessible ones. Regardless of which one you decide to use, remember that this work requires patience, accuracy and responsibility, since correcting mistakes in the future will be very expensive.
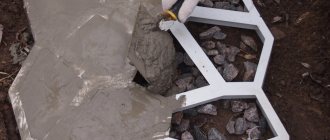
Marking for strip or slab foundation
First, they determine the location of the first corner of the future house and drive a stake into this point, onto which a triangle is placed. Then the triangle is laid on the ground so that its right angle coincides with the point where the stake is located, and the legs run along the planned boundaries of the foundation of the future house.
Next, distances equal to the length and width of the future building are measured along the outer sides of the triangle. This stage of work is carried out very carefully, strictly measuring every centimeter and checking with the construction plan.
Having measured the required dimensions of length and width, the second and third stakes are driven in at their end points. After this, a rope is pulled and fixed between all the stakes so that a right triangle is formed. The length and width of its legs should be equal to the length and width of the planned structure.
Having thus marked exactly half of the future foundation of the house, another rope is tied to the first stake and pulled in the opposite direction, dividing the right angle into two equal parts (45° each, respectively). The last fourth stake is driven at the point obtained from the calculation using the formula “the square of the length of the hypotenuse is equal to the sum of the squares of the lengths of the legs,” where:
- – hypotenuse – a diagonal line dividing a right angle in half;
- – legs – sides of the future base.
If all the work was done with utmost precision, the result should be a rectangle with equal diagonals (the maximum error in their lengths should not be more than 2 centimeters!).
The calculations can be considered using the example of marking for a foundation with sides A = 6 meters and B = 8 meters. Using the Pythagorean theorem, where A²+B²=C², and making the necessary calculations, we obtain a hypotenuse equal to 10 meters.
This marking option is applicable for slab (monolithic) and strip foundations. For the latter, additional work will be required to mark the internal contour of the future foundation.
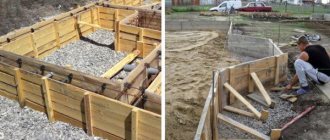
Layout of the axes of the strip foundation walls
To break the axes of the internal and external walls of the object being built, pegs are dug or driven along the entire perimeter of the future house, retreating a distance of 1 meter from its boundaries. The pegs are driven strictly in the directions of the axes, after which a rope is pulled between them.
The lengths of the diagonals of the resulting rectangle are measured with a tape measure - they must be equal (with a permissible error of no more than 2 cm!). Also, using a square, check the squareness of the corners at the intersection points of the broken axes of the walls.
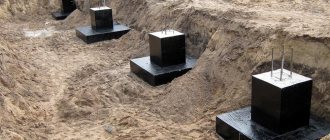
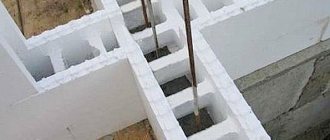
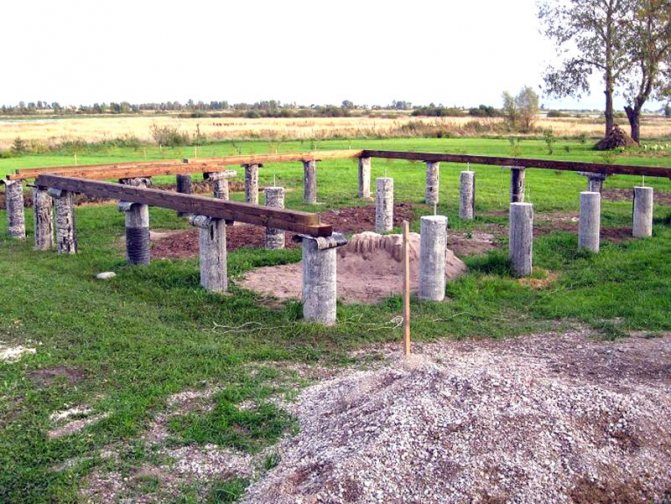
Layout of wall axes for a columnar or pile foundation
In this case, the breakdown of the axes of the walls is carried out using cast-offs, which are installed along the perimeter of the future house at a distance of 1.5 meters from the outside of its walls. The direction of the cast-off boards must be strictly parallel to the walls - this is checked using a level and a staff. The distance between pillars (piles) should not exceed 2 meters.
The axial dimensions of the foundation plan are applied to the upper edge of the cast-off (the upper edges of the boards), marking them with notches into which nails are driven.
Ropes are stretched between the nails to mark the location of the axes.
The intersection points of the ropes are fixed with tape or clothespins and, using a plumb line, the places where the pillars or piles will be installed are determined (the plumb line indicates the center of the cross section of the pillar/pile).
Useful tips
Having marked the location of the future foundation, it is recommended to make narrow grooves under the stretched ropes and fill them with crushed stone. The boundaries of the base marked in this way will significantly facilitate all subsequent work.
If you are planning to build a small compact country house on your site, then when marking its foundation it is more convenient to use such dimensions of the length and width of a right triangle so that when calculating the hypotenuse you get an integer (for example, 3x4x5 meters or 6x8x10 meters).
If the construction project for your house involves the construction of a larger object with a complex polygonal base, then in the absence of the necessary experience and knowledge, it is better not to take risks, but to seek help from specialists.
Did you like the article? Click the buttons and share with your friends!
Source: https://moja-dacha.com/dachnyj-domik/110-kak-sdelat-razmetku-pod-fundament