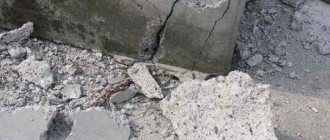
Owners of cottages and country houses often face the problem of dampness under the floor. At first you may not even notice it, but over time the moisture rises from below. The leveling layer gets wet, everything that is under the screed (expanded clay, sand, etc.), and then the screed, the walls around the perimeter of the house. As a result, water reaches the floor and wall coverings. The most common culprit is a wet foundation. Water can penetrate into it both from the inside and from the outside. Some of the most common reasons for a damp foundation include:
- Violation of construction technology. Often, wanting to save money, land owners pour the foundation themselves or hire a team of unprofessional workers. However, ignorance of all the intricacies of the process can play a cruel joke. If you do not completely dry the concrete foundation of the house and immediately fill the barely set monolith with expanded clay, sand or other insulation, they will remain damp. The moisture from them does not evaporate due to the screed; it will gradually rise, capturing the walls and floor.
What to consider before choosing the type of foundation waterproofing
If in the process of designing a house the choice fell on pouring a strip foundation, craftsmen should conduct a series of studies in order to do their job correctly:
- the foundation itself must be below the freezing level of the ground;
- it is important to take into account the groundwater level;
- waterproofing requirements may vary depending on the purpose of the future structure;
- it is worth exploring the area for a sharp rise in water after floods and heavy rainfall;
- An important factor will be the force of soil swelling, which affects changes in ground level.
All of these factors can affect the depth of the trench that will have to be dug for the foundation and the water protection measures used. Based on the type of location of the foundation waterproofing made from FBS blocks, it is divided into horizontal and vertical, which have several options.
Horizontal waterproofing
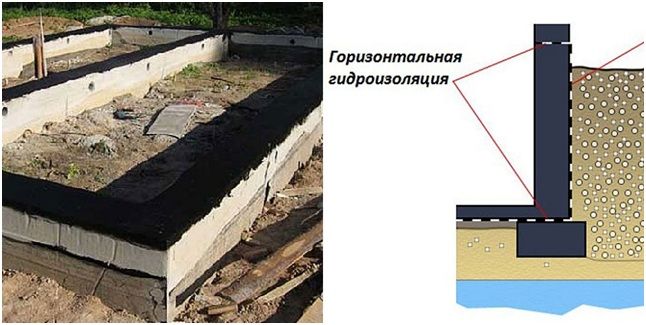
Location of the upper and lower horizontal waterproofing
This type of waterproofing is performed before the foundation is made in order to prevent capillary water from entering from below. To fully accomplish the assigned tasks, it must be a special foundation, possibly larger than the perimeter of the future house. For a small building, a screed made of cement and sand in a ratio of 1:2 will be sufficient.
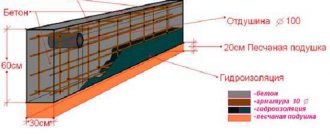
When building a residential building, more serious preparation will be required:
- a layer of sand 20-30 cm thick is laid and compacted at the bottom of the pit;
- to get started, you can use clay instead of sand;
- a cement screed 6-8 cm thick is applied on top of the first layer;
- then you need to wait until the cement dries, which takes up to 14 days;
- then the first screed is covered with bitumen mastic and roofing felt is placed;
- the top layer of roofing material is covered with another layer of mastic;
- a second tie is made.
After the material has completely dried, the manufacture of the foundation begins.
If the proposed structure is made of wood, it is worth performing the upper horizontal waterproofing of the strip foundation. Otherwise, water will flow to the wood, causing it to rot.
How you can make the top layer of horizontal waterproofing and at the same time cut a roll of roofing material easier can be seen in the following video:
Vertical water protection
Unlike horizontal waterproofing, this type of work can be performed not only during the construction process, but also while protecting the finished structure from moisture. Craftsmen have at their disposal several options for materials used for waterproofing FBS blocks:
- polyurethane mastic;
- bitumen in rolls;
- polymer membranes.
All these products differ in strength, durability, elasticity, installation methods and cost, so before choosing one of the proposed methods, the master should determine the difference between waterproofing materials, their strengths and weaknesses.
Using a clay “castle”
To protect the strip foundation from moisture, you can use clay. To do this, the foundation is dug in a circle, the trench must be at least 50 cm deep. Next, clay is poured in small quantities and compacted very well.
The layer of natural material does not allow water to pass through and is an excellent natural insulator. Such insulation can be done for small structures. For larger houses, the use of a clay castle can be used as an additional method.
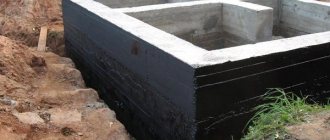
Bitumen insulation
This method is considered the most common due to the low cost of the material, its elasticity and ease of application. Liquid mastic fills all the resulting cracks and voids in the foundation, preventing moisture from penetrating inside. Such waterproofing of a strip foundation with your own hands can be done by the efforts of one person.
Bitumen mastic compositions differ in heat resistance, so when choosing, you should pay attention to the markings. Its last two digits indicate the maximum permissible temperature at which the composition retains its properties.
However, the method also has its drawbacks. The composition is applied in several layers, which increases the duration of the work. It does not guarantee 100% protection and requires re-treatment of the foundation after 10 years.
Before applying a layer of mastic, surface preparation is required. It should be solid, with rounded corners, without sharp protrusions, with the smoothest possible transitions from horizontal to vertical. If there are traces of air bubbles in the foundation, they should be wiped away with fine-grained cement mortar. The surface must also be cleaned of dust and dirt. All this will affect the evenness and integrity of the applied composition.
Be sure to check the surface for moisture. If the indicator is more than 4%, the bitumen will not form a durable layer, but will begin to delaminate a short time after application.
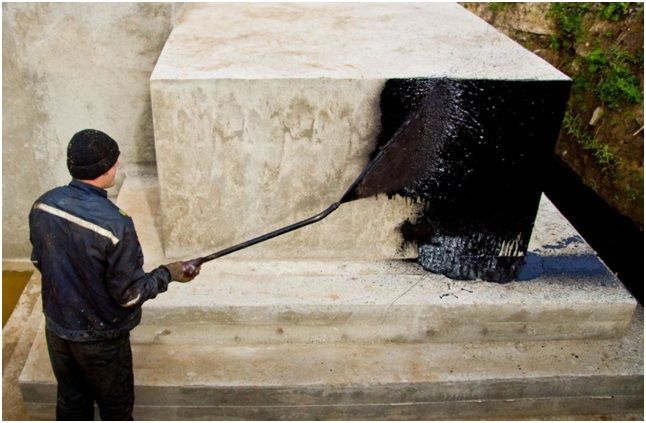
Application of bitumen mastic
The next stage of work is the primer. It is performed either with a bitumen primer or with a mixture of BN70/30 bitumen and gasoline in a ratio of 1:3.
To apply the mixture you will need a roller or brush. In places where the base has joints or irregularities, it is necessary to apply 2 layers of primer. After which you can begin to cover the foundation with mastic.
To prepare it, large pieces of bitumen are crushed and melted in a bucket. Since the composition partially loses its properties even during the first heating, it is worth using the mixture before it cools down.
To ensure more reliable insulation, it is worth applying 3-4 layers. To protect the mastic, the top is covered with geotextile or a heat-insulating layer. In problem areas, the mastic must be reinforced with fiberglass or fiberglass.
Moisture insulation of formwork
To answer the question whether waterproofing is needed for formwork or not, let’s consider its main functions. The design is designed to limit the space into which the concrete solution will be poured to form the foundation. In other words, the main function of formwork is to form a liquid solution, which, when hardened, forms the necessary geometric shape.

Waterproofing strip foundation formwork
To assemble the formwork, as a rule, wooden panels are used, which are hygroscopic. Because of this, structural elements may be deformed, which will lead to distortion of the geometric shapes of the poured concrete base. In this case, the answer to the above question becomes obvious: waterproofing for formwork is really necessary.
What types of insulators are used for finishing formwork? To protect wooden formwork elements the following can be used:
- bitumen solutions;
- hydrophobic impregnations;
- water-repellent varnishes;
- roll insulators.
When calculating the amount of waterproofing materials used, it is worth noting that for formwork processing, painting with bitumen will be the most cost-effective option.
Roll waterproofing
This type of FBS waterproofing can be used as an addition to mastic, but as an independent way to protect the foundation from moisture. The material most often used is roofing felt, which is low cost and accessible. Compared to mastic, it protects the base from moisture for much longer (up to 50 years). At the same time, it will no longer be possible to do this work alone.
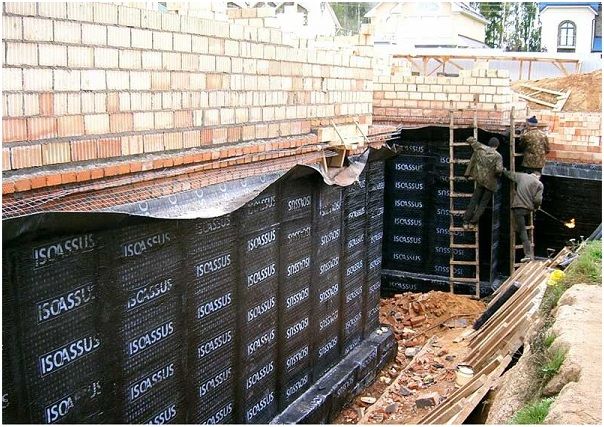
Vertical waterproofing with roofing felt
To cover the foundation or base with roofing felt, you first need to prepare the surface and cover it with bitumen mastic. In this case, you should not worry about carefully applying the layer, since it will perform the function of attaching the roofing material to the surface.
The sheets of the base coating must first be slightly heated from below using a burner, and then placed on a layer of bitumen. The roofing material is overlapped with an allowance of 10-15 cm. For additional fixation, all joints are also heated. After fastening, the foundation is simply covered with soil without additional protection.
Instead of roofing felt, more modern materials can be used, such as polymer films with bitumen-polymer coating. The operating principle will remain the same. The difference will be in the service life of the coating and in price.
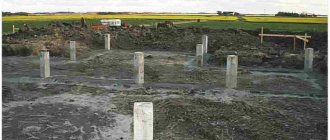
Moisture insulation of pile-tape foundation
How to properly insulate when installing a pile-strip foundation? The absence of a supply presupposes additional processing not of the basement of the structure, but of the load-bearing concrete parts themselves - the piles. They take the maximum static load created by the weight of the structure itself.
Why do you need protection for support pillars? Under the influence of moisture, the supports begin to collapse over time due to corrosion processes occurring in the reinforcement of the pillars. To prevent distortion and subsidence of the base, additional water protection of the load-bearing parts is required. How to protect a pile-strip foundation without a basement?
- Bored piles. Bored supports are concrete pillars reinforced with metal reinforcement. As a rule, they are installed in casing pipes, which do not provide the proper level of protection from moisture. During the construction of the structure, it is advisable to insert roofing material into the wells for the racks, which will play the role of formwork and waterproofing;
- Screw piles. The elements of the concrete structure are represented by steel screws that are screwed into the ground. To protect them from corrosion, the spiral legs of the piles are treated with hydrophobic anti-corrosion solutions;
- Driven piles. The supports in this case are represented by reinforced concrete or wooden pillars. To protect them, antiseptic and anti-corrosion treatment is required. Special impregnation and coating with bitumen will not be superfluous.
Other methods of water protection
In modern construction practice, along with the methods described above, there are a number of alternative methods:
- An ordinary layer of plaster can be used as waterproofing. The service life of such a coating will not be long due to the low water resistance of the material (no more than 15 years), but it is not difficult to apply again.
- To protect it from liquid, the strip foundation can be coated with a composition based on liquid rubber. The quality of waterproofing in this case will be high. The disadvantages of such a solution will be the high cost of materials, including a special primer composition, the presence of a sprayer, or low operating speed due to its absence.
- Penetrating waterproofing based on special compounds can be used for both external and internal treatment of buildings. The difficulty for the master in this case will be the low prevalence and high cost of this method.
- Craftsmen may suggest creating a clay castle. To do this, a trench is dug along the perimeter around the foundation, the bottom of which is covered with a mixture of sand and crushed stone, and the remaining space on top is covered with a layer of clay, which becomes a reliable barrier to groundwater or heavy rainfall.
Foundation waterproofing is an important part of the design and construction of any building. This is the main protection of any wall structure. Depending on the type of waterproofing, it can be carried out either before making the foundation, or after completion of construction. The complexity of manufacturing, cost and service life depend on the chosen material and the correctness of its application.
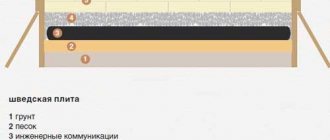
Do you need moisture protection for a sand cushion?
What are the functions of a sand-foundation cushion? An embankment of sand and gravel, which is often made during the process of laying strip foundations, performs two tasks at once:
Horizontal waterproofing of foundations and materials used
- Cuts off water from the structure;
- Helps to distribute the load evenly.
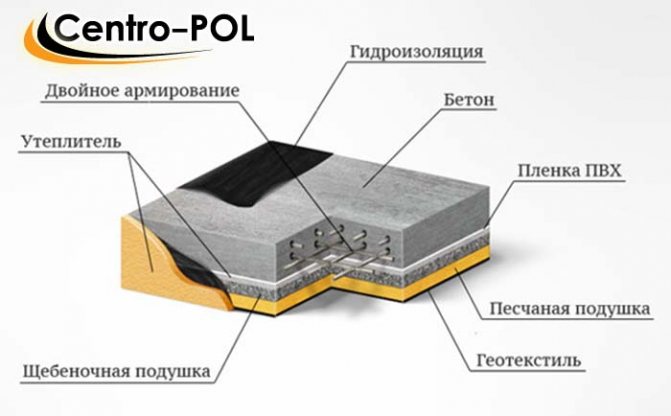
Scheme of waterproofing a foundation pie
Laying a pillow is a prerequisite when constructing a basement in a house. As a rule, it is in this room that it is quite damp, which creates all the conditions for the accumulation of condensation under the floor and the proliferation of fungus. Is waterproofing of the pillow necessary in this case?
If the building itself is installed on soil with strong heaving, during the process of laying the sand cushion it is necessary to calculate the required amount of waterproofing material. It is laid on a layer of sand and gravel, which disrupts capillarity and the flow of moisture from underground into the concrete structure.
Strengthening with concrete
Concrete is an artificial stone that is obtained from a solution prepared in special proportions. The hardening of the mixture depends on many factors, so there is no exact answer suitable for all cases to the question of how long the foundation of a house should stand after pouring. The answer varies depending on the conditions.
On average, it is believed that the development of strength takes 28 days, but this is an average value. The process depends on the following factors:
- what type of cement was used when mixing the concrete solution;
- ratio of cement and water in the mixture;
- ambient temperature during foundation hardening;
- what the weather will be like after pouring (sunny, cloudy, windy);
- how compacted the concrete solution is.
Each of these factors has an impact. The whole process can be divided into two stages:
- grasping;
- hardening.
Grasping
This is the period during which the foundation mixture remains mobile. This means that the entire process of transport, pouring and compaction must fit within this framework. When delivered by concrete mixers, the setting time is increased due to constant mixing. If the solution is in the mixer for too long, changes occur that will adversely affect the quality of the finished structure. The setting period is inversely proportional to the ambient temperature.
| Ambient temperature, ᵒС | Beginning of setting (counting from the moment of mixing the mixture), h | End of setting, h |
| 6-10 | 15-20 | |
| 20 | 2 | 3 |
| 30 | 1 | 1,5-2 |
The optimal temperature is 20ᵒC. Rapid setting at high temperatures can negatively affect the quality of the house foundation after pouring.
Hardening
The second stage of strength gain is hardening. If the time of the first stage dictates the conditions for performing the work, then how long hardening will take affects the possibility of continuing construction and moving on to the construction of the “box” of the building. The table below shows the “holding time” of the foundation after pouring depending on the temperature. The 100% gain in compressive strength is taken to be the value that will be obtained at a temperature of 20ᵒC if the foundation is allowed to stand for 28 days. The values are given for material grades M200-300 (class B 15 - B 22.5) made with Portland cement grades M400-500.
| Average daily air temperature, ᵒС | Curing time, days. | ||||||
| 1 | 2 | 3 | 5 | 7 | 14 | 28 | |
| -3 | 3% | 6% | 8% | 12% | 15% | 20% | 25% |
| 5% | 12% | 18% | 28% | 35% | 50% | 65% | |
| +5 | 9% | 19% | 27% | 38% | 48% | 62% | 77% |
| +10 | 12% | 25% | 37% | 50% | 58% | 72% | 85% |
| +20 | 23% | 40% | 50% | 65% | 75% | 90% | 98% |
| +30 | 35% | 55% | 65% | 80% | 90% | 98% | — |
The table shows that negative temperatures slow down the process especially strongly.
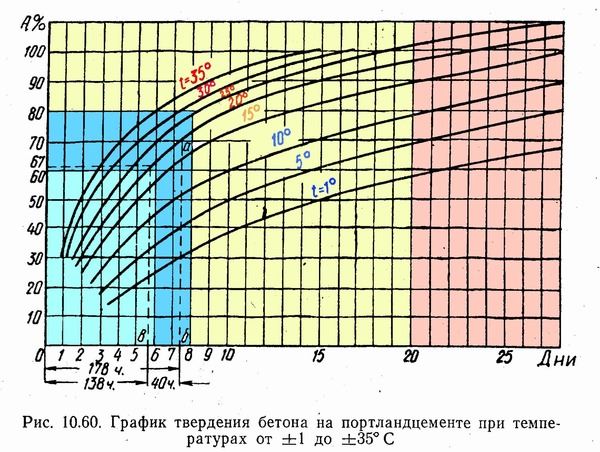
Graph of concrete strength gain depending on temperature.
The demoulding strength of concrete is determined by the joint venture “Load-bearing and enclosing structures” and is 70% of the brand strength (safe period for starting work). This means that the formwork must be removed after pouring the foundation of a house no less than 7 days for an average daily temperature of +20ᵒC or no less than 14 days for +10ᵒC. With appropriate justification, it is possible to wait until only 50% of the brand compressive strength is achieved (the standard safe period for starting work) before removing the formwork. When constructing it yourself, it is also recommended to read the “Guidelines for the production of concrete work in winter conditions in the regions of the Far East, Siberia and the Far North.”
The time it takes for the foundation to gain strength also depends on the type of Portland cement used to make the mixture. There are three types:
- fast-hardening;
- normal hardening;
- slow-hardening.
The table shows the compressive strength values for concrete with various binders depending on the air temperature. All values, as in the previous table, are expressed as a percentage of strength at a temperature of 20ᵒC, if the monolith is allowed to stand for 28 days.
| Average daily temperature, ᵒС | Strengthening time, days. | |||||
| 1 | 2 | 3 | 7 | 14 | 28 | |
| With fast-hardening Portland cement | ||||||
| 5 | 16% | 22% | 26% | 33% | 38% | 45% |
| 10 | 26% | 37% | 43% | 54% | 61% | 71% |
| 20 | 42% | 58% | 66% | 82% | 92% | 98% |
| On normal hardening Portland cement | ||||||
| 5 | 12% | 19% | 23% | 31% | 37% | 43% |
| 10 | 21% | 32% | 38% | 51% | 60% | 70% |
| 20 | 34% | 50% | 60% | 78% | 90% | 98% |
| On slow-hardening Portland cement | ||||||
| 5 | 6% | 12% | 17% | 27% | 34% | 41% |
| 10 | 11% | 21% | 28% | 44% | 56% | 67% |
| 20 | 19% | 34% | 45% | 68% | 85% | 98% |
In the same way, the formwork is removed when 70% of the brand compressive strength is reached (50% under special conditions).
Technology of laying timber on the foundation
The lower crown can be attached to the foundation in two ways: from above or from below. In the first case, fastening is performed with anchor bolts. Through holes are drilled in the timber. Holes are also prepared in the concrete foundation in appropriate places. Their depth is selected to match the length of the anchor bolts, taking into account the cross-section of the beam.
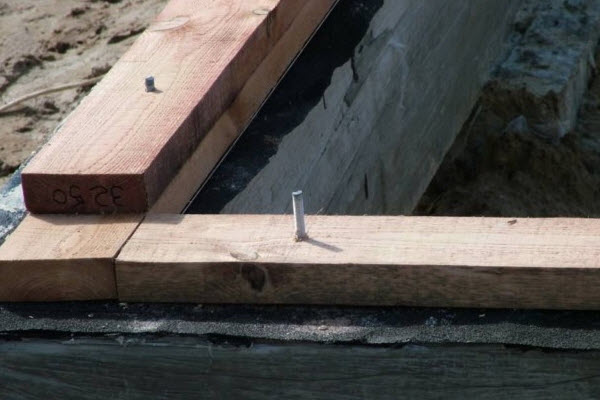
In places where drilling is done, the moisture-proofing layer will be damaged, so before laying the first row, it makes sense to apply an additional amount of mastic at the fastening points.
Fixation from below involves the use of embedded elements installed at the stage of pouring the foundation. You can use through threaded studs and pieces of reinforcement.