Preparing to mark the foundation
Before marking the foundation with your own hands, a draft of the future building is drawn up . At the same time, the area of the object, the appearance of the building and the layout of individual rooms are determined. The project is tied to the site where construction will take place. First, soil research is carried out, and then the foundation is marked.
To carry out marking you will need the following tools:
- Pegs made of metal or wood.
- Construction levels.
- Roulette and plumb line.
- Level and laser range finder.
- Cord.
- Boards and scraps of reinforcement.
Before making markings for the foundation, it is necessary to carry out preparatory work:
- Old buildings are dismantled , garbage and excess plantings on the site are removed.
- The site is leveled in a horizontal plane , all depressions and hills are eliminated.
- A passage is being prepared for vehicles that will transport construction materials and remove unnecessary waste. After cleaning the road, it is recommended to sprinkle it with gravel for easy passage during rain.
- Separately, a place is prepared for storing various materials.
- Before construction work, it is worth erecting a fence to protect the building materials.
- Consider the supply of electricity , water, installation of a bathroom, as well as temporary housing.
After this, the foundation for the house is marked. The installation technology assumes the presence of rectangular shapes. General rules and regulations for marking are suitable for all types of bases; they are not affected by the material of manufacture or the presence of a basement.
Marking begins on any side of the building . This may be the facade or side of the building. When using a tape measure, you should give preference to metal products that have a length of more than 10 m. Fabric models do not guarantee the accuracy of measurements and sag during measurements.
To carry out the casting, it is recommended to use bars (at least 10 pieces), stakes (about 19 pieces), as well as cords, boards and ropes. Sometimes pieces of reinforcement are used that are driven into the ground. They should be U-shaped.
The site is selected taking into account the following factors:
- The prospect of all communications.
- Condition of the roads.
- Geographic reference to cardinal directions.
The most important purpose of the marking is to ensure the correct orientation of the future structure relative to the terrain. This will allow the building to be built taking into account standard technological rules.
Return to content
Comments • 28
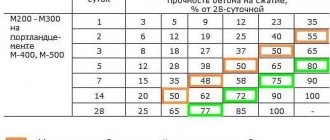
Nothing is clear. What to do with these notes? There is 1, there – 0.7... and then what to do? How to apply it?
@Victor Moshkovsky What to do with low corners? I don’t have such a long and straight board to level it with a level. Problem. I’m building it myself for the first time, it’s very difficult for me. Thank you.
After you have found the highest corner, start laying the first row from there, here is the video thexvid.com/video/4weYUJeC8xE/video.html
Equivalent to the eye
I stopped by my site in the evening. I placed a level for 2,500 thousand rubles in the middle and leveled it. and in 10 minutes he recaptured all 8 corners of his foundation. A water one is needed when laser ones are not available. Moreover, he managed to align the brick in the corners and hit it. Don’t worry, buy a simple level, it will come in handy in many places
How much does this water level cost? Fuck with him. and dancing for half a day. Buy a laser level or level, a tripod. Learn to work with a level like two fingers.
A water level costs a penny, but a good laser level costs a lot
A water level costs a penny, but a good laser level costs a lot
Where is that unit? It seems that what they say is correct, but there is no sense in it.
a century-old board without a 0 is game. The author at least measured it, but it turned out as if by eye.
It is necessary to translate from one angle from one point to all other points, otherwise there is an error. depends on the distance between points. Checked..
The level must be set before the concrete is poured and the solution is poured over them, and this is some kind of circus
this goes without saying, I think it’s clear that the formwork is set according to the level, but still it’s very difficult to fill everything perfectly to zero, there will be a run-up somewhere, even if it’s not big, but it will be
this goes without saying, I think it’s clear that the formwork is set according to the level, but still it’s very difficult to fill everything perfectly to zero, there will be a run-up somewhere, even if it’s not big, but it will be
))) I ride from such videos, it’s clear that they need views likes and so on. But damn, when did a builder become a clown? Is it fashionable? What are you running? Well, he's tall, so what? Now what? we lay one brick at a time or a block at a time and pull the cords of the first row, it’s all the same. and we all see where to cut or poke. The grout levels had to be used during the pouring process). And the fact that they smeared the solvent on top of the fill so it will crumble is better to smoothly remove this difference during the laying of a couple of rows. This is a small spot in your video, and if it is too low, then from such lubrication it can and go when you load it. But this is also lyrics. anyway, there will be finishing on top and the wave of 2-3 rows will disappear and there is no need to finish anything.
That’s all you’re saying, it’s good when laying on a mortar, you can stretch it as much as you like, but such a trick won’t work with glue, and besides, sooner or later you’ll still have to knock off the level so that your house doesn’t sit askew
That’s all you’re saying, it’s good when laying on a mortar, you can stretch it as much as you like, but such a trick won’t work with glue, and besides, sooner or later you’ll still have to knock off the level so that your house doesn’t sit askew
And they don’t do your foundation exactly?
All this is done with a water level, this is the most cost-effective and best way, but there may still be a slight error, the shield may get stuck somewhere, there are all sorts of nuances, it’s better to double-check all this before laying the first row, if it’s zero, well, what does that mean? if it’s not zero, it’s okay, you’ll just need to start laying from the highest angle, that’s all
It is not necessary to have a laser. An even foundation can be created without a laser. It is enough to have the same height of the four corners. pull the rope and create the formwork.
I agree, but not everyone has laser levels
What are you paying for then? for hackwork? This foundation is not pure work.
if the formwork is well made and set with a laser, then there will be no such differences
The author ran around and around corners. hell knows . I did not get anything . And whoever understands this doesn’t need this video.
start from any corner and go around all the corners in a circle, returning to the corner from which you started
start from any corner and go around all the corners in a circle, returning to the corner from which you started
The highest angle is just 0.5
@Viktor Moshkovsky I bought a hydraulic level yesterday and still don’t understand how to use it
I added this nuance in the comments, I got it a little confused)
@Viktor Moshkovsky I bought a hydraulic level yesterday and still don’t understand how to use it
I added this nuance in the comments, I got it a little confused)
Stages of taking measurements
Correct marking for the foundation consists of several stages. First of all, the main point is determined , which is the right corner of the building. It is installed taking into account the design specifications. The first peg is mounted at this point.
Return to content
Start of marking
A distance is set aside from the peg that is equal to the size of the foundation. The drawn segment must be parallel to the front line . A perpendicular guide is measured inside. In this case, the resulting angle should be 90 degrees. The angle is verified with a level.
The designation of external boundaries is carried out as follows:
- A cord measuring 12 meters is taken .
- From the beginning of the cord, marks are made at 4 m, and then at 3 m. The mark is fixed with a beam.
- The beginning of the cord is attached to one line, and the 4 m mark is set perpendicular to it.
- The rest of the cord is connected to the beginning. In this case, the angle between the smallest parts of the rope is straight.
Other elements are marked in the same way . If the diagonals of the resulting rectangle are the same, then the angles are right.
Return to content
Internal boundaries
When deciding how to mark the foundation on your own, you should pay attention to correct measurements of the internal contour . The thickness of the foundation should not be less than 45-50 cm. This distance is measured inward from the outer boundaries and is marked with pegs. If internal load-bearing walls are planned, then additional markings are also performed. In each element of a rectangular or square shape, the equality of the diagonal lines is checked.
When it is planned to construct a complex base shape, the entire area is divided into separate rectangles and each element is checked separately.
After marking is completed, all values are checked again and pegs are installed in the right places. This work must be carried out responsibly, and measurements must be carefully verified. Even a small error in calculations will affect the quality of the support . Proper marking of corners helps to further minimize pressure on the ground.
Return to content
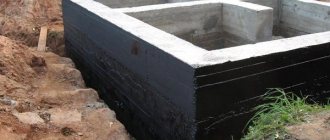
Performing cast-offs
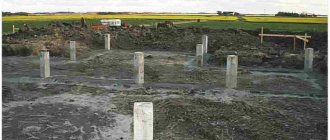
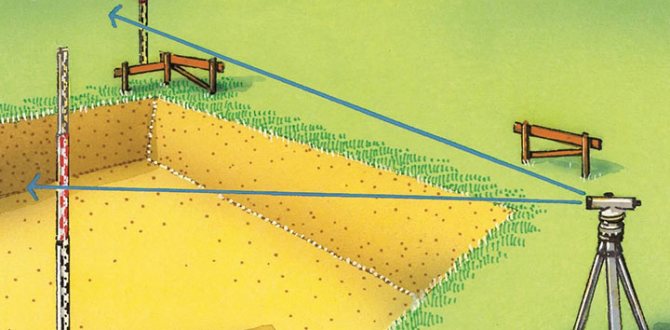
After marking work is completed, wear-out is carried out. This stage of the process is considered necessary for control measurements. All contours of the future structure are brought to the surface of the earth . The top layer is removed and a recess is made to the size of a shovel bayonet.
Casting is the installation of wooden posts, which are driven in pairs into the soil at a distance of 1.5-2 meters from the corner of the base. Casting allows you to create the correct contour of vertical planes . In this case, the planes have a pair of columns. The horizontal parts of the pillars must be located at the same level.
The height of the cast-off is equal to the height of the base of the building. Marking the depth of the trench is done from cast-offs. In this case, the perimeter, regardless of the nature of the relief, must be the same.
Return to content
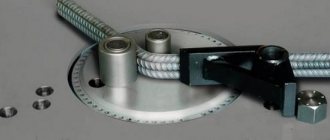
Pouring water into the device
Before starting measurement work, it is necessary to properly prepare the instrument. To do this, it is recommended to perform these steps in this order:
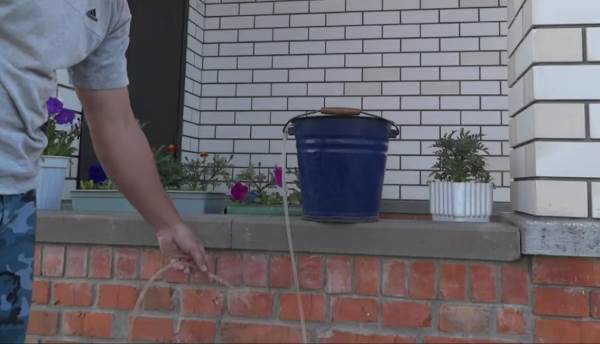
- Take a bucket of water or any other large container with an open surface. The bucket is placed at some elevation relative to the ground.
- One end of the device is placed in a container of water, and the other is lowered below the location of the bucket. Usually placed on the ground. In this case, due to the property of communicating vessels, the liquid begins to move through the tube, filling it.
- When filling, it is important to monitor the presence of air bubbles in the device. Wait until all the gas comes out of the tube. After this, one end is clamped with a finger or bent.
- The second horse is taken out of the container. Check the movement of water and again the presence of air.
- Both ends are closed or clamped and the device is transferred to the workplace.
After completing these steps, you can begin measurements.
Some tips
- To simplify the process, you can color the water poured into the device in a bright color. This will allow you to quickly determine the water mark in the tube without straining your eyes.
- The larger the diameter of the hose, the faster the liquid will level out in it. It is recommended to purchase products with a diameter of 10-12 mm.
- The leveling speed also depends on the length of the tube. Don't choose items that are too long.
Advice! If you need builders to build a foundation, there is a very convenient service for selecting specialists from PROFI.RU. Just fill out the order details, the experts will respond and you can choose who to collaborate with. Each specialist in the system has a rating, reviews and examples of work, which will help with the choice. Looks like a mini tender. Placing an application is FREE and does not oblige you to anything. Works in almost all cities of Russia.
If you are a master, follow this link, register in the system and be able to accept orders.
Using the level
The laser level is a level for making markings . The internal bubble level allows you to check whether the level is level. Modern models have automatic mechanisms that adjust the position level. When deciding how to mark the foundation on your own, you can use this device.
The following actions are performed:
- From the mark of the corner of the building, using a level, a line is calculated and drawn, which should coincide with one of the walls of the future building.
- All measurements are taken from the same starting point. This will improve the accuracy of the measurements taken.
- The zero mark is made on any visible element.
Return to content
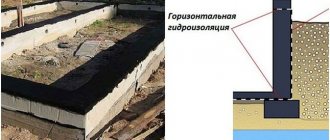
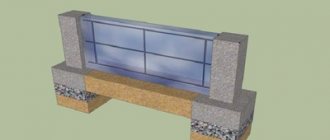
Features of strip foundation markings
Creating a strip foundation with your own hands begins with the correct markings. Such a base is made of continuous reinforced concrete strips , which are laid in a trench. The width of the support depends on the quality of the soil. The foundation should not be thinner than the walls. Its thickness should be more than 50 cm if the building will be erected from bricks or blocks.
The depth of foundation depends on the level of soil freezing . Such structures are erected on solid soils and are easy to install, and also allow you to equip the ground floor and basement.
When marking, it should be taken into account that the building from the fence and neighboring territory should be located at the following distances:
- According to fire safety rules, the distance from windows to the walls of another building must be at least 6 meters. At least 3 meters from the building to the neighboring property.
- According to sanitary standards, at least 3 meters.
Marking for a strip foundation is carried out according to the general rules for marking a site for construction. The same is true for cast-off.
On the upper part of the cast-off, nails are driven in for marks :
- In the central part there is a mark for the axis of the foundation walls.
- To the left and right of the axial line there is a mark for the width of the base;
- Next, the width of the pillow under the base is indicated.
Return to content
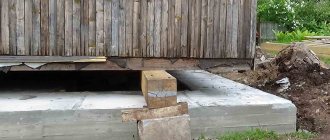
How to mark a columnar foundation?
A columnar foundation is a simpler version of a pile foundation. Under the columnar foundation, rectangular or round supports are mounted in a vertical position along the axes of the building . They must be installed in the most loaded areas of the building: in future corners of the building, as well as at the intersection of load-bearing structures.
In most cases, the pillars are placed at intervals of 1.5-2 meters. The supports are connected using beams. The space between them is filled with crushed stone and sand.
Marking such a foundation requires the construction of cast-offs. The size of the elements depends on the height of the future base . The casting is done using boards. Each pair should be located opposite each other. Each of them is limited by a cord. This produces a rectangle or square. All angles must be right.
The pillars must be placed at the same level. Control ropes are made according to marks made using a hydraulic level. At the intersections of the cord, pegs are mounted, which indicate places for drilling recesses for supports .
Then the cords are removed. Recesses are dug at the peg locations. Piles are installed in the recesses and filled with cement mortar. After this, the main part of the foundation is marked. It is carried out in accordance with the general rules for marking work.
Return to content
Method of intersection of two curves
When marking, it is important to ensure that the corners of the building for which it will serve as the basis are strictly straight. This method allows you to achieve this with maximum accuracy, without much effort. The procedure is:
- A base corner is selected and a cord extends from it along the first wall.
- Then, from the corner along this line, but in different directions, two equal segments are laid out; marks are placed at their ends.
- After this, a sufficiently long cord is taken and a peg is tied to one end.
Marking with thread and supports - A cord with a peg is used like a compass: with their help, two arcs are drawn in turn, for which the centers of the circles are the marks made earlier along the line of the first wall.
- Through the point where the drawn arcs and the vertex of the base angle intersect, a straight line is drawn, which, according to the rules of geometry, will pass at 90 degrees to the first wall. The length of the second wall is measured on it. This is how the 2nd angle is determined.
- The result of successive iterations of this kind is the appearance of a complete “closed” contour, which, in fact, is required in the task at hand.
As in the previous method, it would be a good idea to check the correctness of the markings by measuring the diagonals.
This method is good for everyone, but has the disadvantage that its implementation requires quite a lot of space to “unfold”.