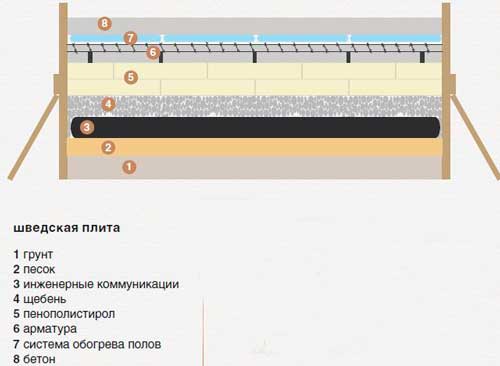
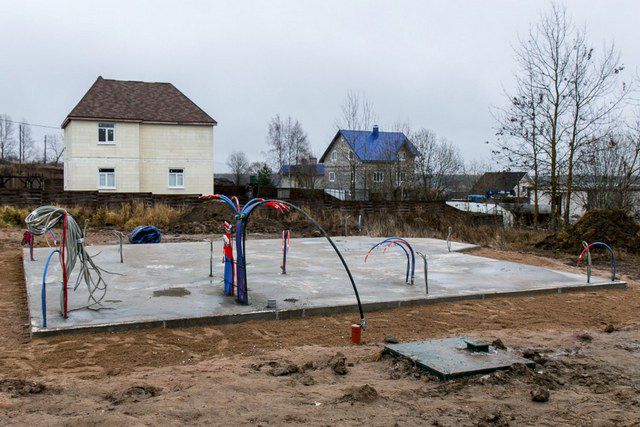
07House construction technologies are improving every day. This also applies to the foundation, the structure of which is constantly becoming more complex, thanks to which it becomes more functional. “Insulated Swedish Slab” (hereinafter referred to as USP) is a promising and modern basis for a private mansion, as well as an excellent alternative to a traditional tiled foundation. We will tell you about the structure of the USHP foundation, its scope, advantages and disadvantages, and also provide installation instructions.
Features of foundation construction.
- Basic information about the Swedish foundation slab
- Necessary work for organizing a Swedish slab foundation
- Making a reinforced concrete Swedish slab
- About the Swedish slab foundation technology
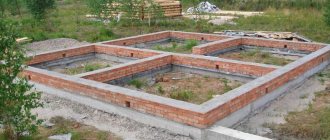
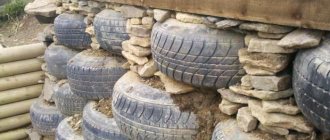
The construction industry, like other industries, is constantly improving its work. New technologies and new materials are being created. The construction of any building or structure begins with the foundation. It can be strip, pile, columnar or tiled. These are standard types of base, and they have existed for quite a long time, but recently a type of base has appeared, such as a Swedish plate. Most people build buildings on their own and make a Swedish slab foundation with their own hands.
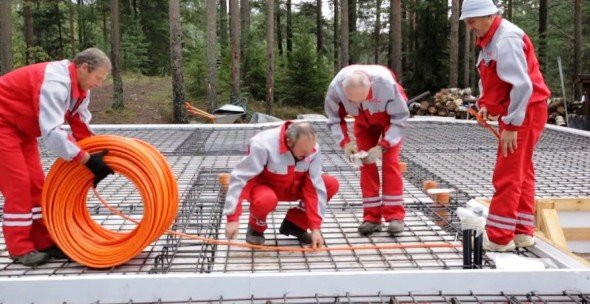
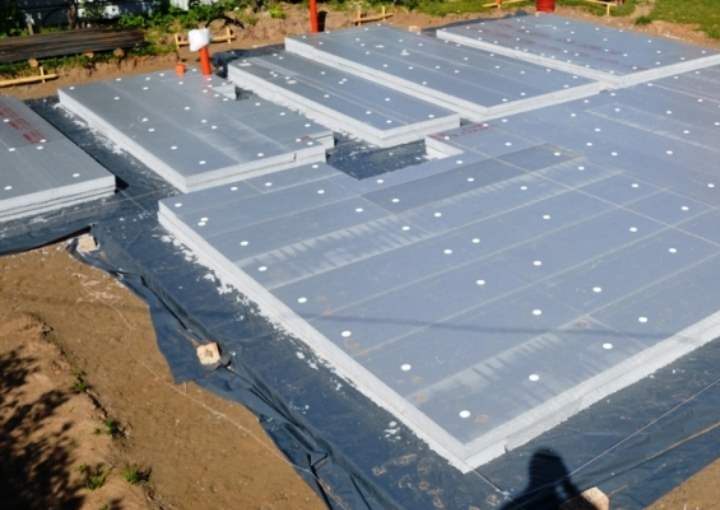
Laying a Swedish slab.
Swedish stove diagram.
Basically, in the past, owners preferred a strip base, but it requires a large amount of cement and various devices and suitable conditions. Today, Swedish foundation slabs are very popular.
USP or monolithic foundation?
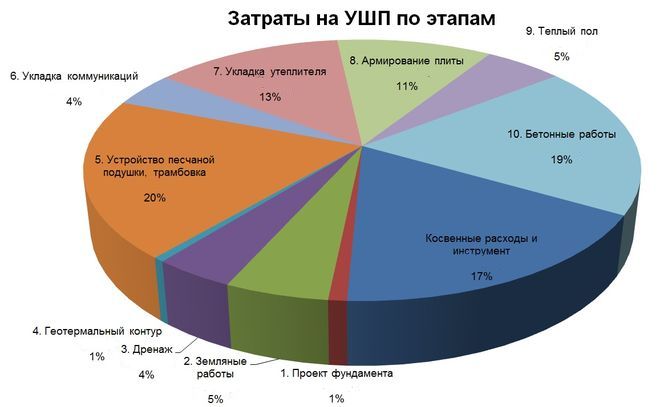
At first glance, the economic benefit of arranging a USP is invisible - a large amount of building materials are required, which cost a certain amount of money. The estimate includes the purchase of:
- insulation;
- pipes;
- fittings;
- floor insulation systems;
- other materials.
When pouring a monolithic foundation, such expenses are not required: the base is prepared, reinforcement is purchased, piping is done and concrete is poured. However, the financial benefits of pouring a monolith are understandable only to non-professionals.
Such a foundation can be compared to a bank loan: there are not enough funds - fill the site, and then gradually build further. The process turns out to be extended over time, which implies an increase in the price of building materials. In addition, the monolithic foundation needs insulation and waterproofing; utilities will also be supplied to the building.
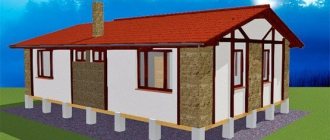
USP is suitable for people who understand the benefits of such a design and are building a house that will be warm and cozy regardless of the vagaries of the weather. If you make calculations for energy savings 10 years in advance, the attractiveness of an insulated foundation will increase. Against this background, a monolithic foundation looks like an ordinary slab, which requires additional investment.
Basic information about the Swedish foundation slab.
Today, such a foundation is considered the most economical, as it is made from energy-saving slabs. For residents of our country, the technology is new, but has long been tested in Europe.
The climate of European countries is similar to our Russian one, and builders have long paid attention to this type of foundation. In recent years, almost all houses are built according to designs by European builders and often with their own hands. The cost of such a foundation is not small, but there are many advantages from installing it.
Properties of Swedish foundation slabs:
Drawing of a Swedish stove.
Drawing diagram of a Swedish stove using Russian materials.
- it doesn’t take much time to lay such a foundation with your own hands;
- The technology for manufacturing such a base is very easy, and the work does not require additional complex equipment, does not require much physical effort, and does not require additional building materials. Another important advantage is that the price also includes pipes and all necessary communications;
- When the slabs are poured and hardened, it is possible to obtain a finished floor that is not only smooth, but also warm. Then you can connect the heating and lay any floor coverings;
- the foundation is made using the latest hydro- and thermal insulation materials with already built-in heated floor systems, which means the house will always be warm and less money will be spent on heating.
Advantages of using this method
To most fully understand what a USP foundation is, it is necessary to study its strengths and weaknesses. In general, the technology of insulated Swedish floors has a large number of different advantages and advantages. Let's list them below:
- There are no thermal seams. This feature is most relevant in cases where floor tiles are used.
- The surface of a monolithic slab can serve as a base for subsequent installation of floor coverings.
- Problems associated with high indoor humidity are eliminated. Thanks to this, it becomes possible to provide a more comfortable microclimate.
- The technology under consideration is available for use in the construction of houses that are planned to be made of any material. There is only one restriction on the number of floors. The height of the building should not exceed three floors.
- No pickiness about the type and condition of the soil. In this regard, the USHP foundation is absolutely not demanding.
Among other things, this technology is distinguished by its relative simplicity. It is quite possible to make the USHP foundation yourself, on your own.
Necessary work for organizing the foundation is a Swedish slab.
Before you start making this base, you need to carefully think through everything and prepare everything.
All work is carried out comprehensively, there should be no mistakes.
If the planned building is small in size, then everything can be calculated independently and done with your own hands. The main thing is to take into account that all communications correspond to the project.
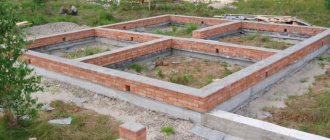
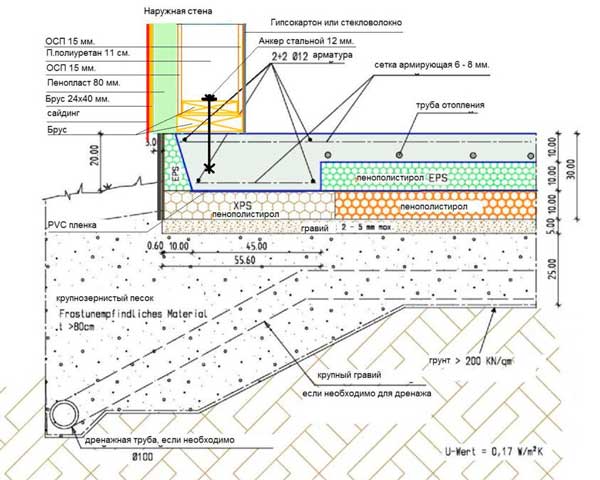
Basic parameters of the Swedish slab foundation:
Scheme of pouring the foundation slab.
Scheme of pouring the foundation slab.
- the thickness of the overall slab is made by casting reinforced concrete and should be from 120 to 180 mm;
- along the entire perimeter it is necessary to make stiffening ribs of at least 300×300 mm, they will be the foundation for the load-bearing walls;
- Under all future walls, internal stiffeners are made at intervals of 1.5 to 4 mm. Reinforcing strips must be at least 200×200 mm in size;
- The depth of the foundation can be any, it all depends on the wishes of the owner, so you need to think about the base in advance. To do this, it is necessary to make the foundation deeper, which means that the first floor will be lowered.
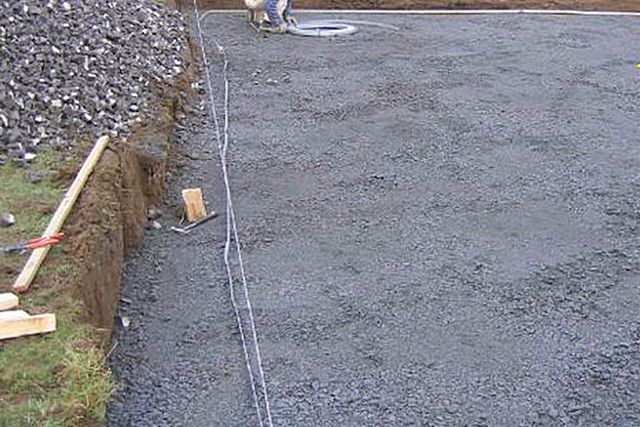
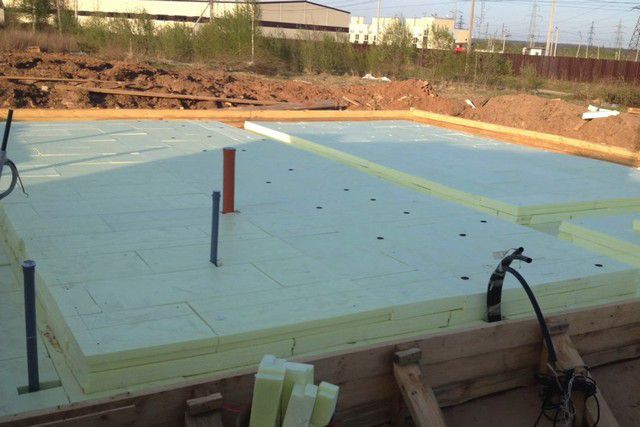
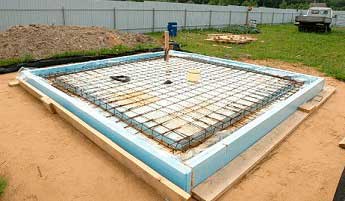
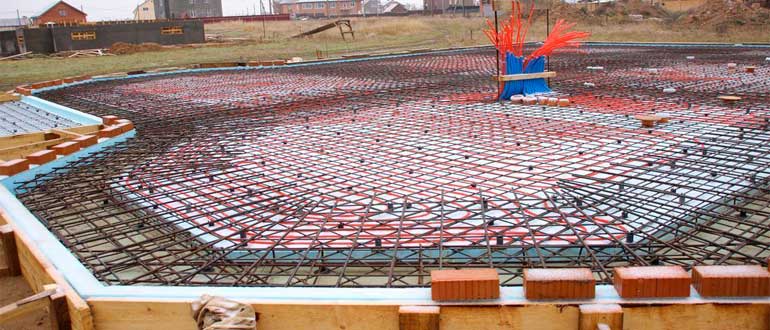
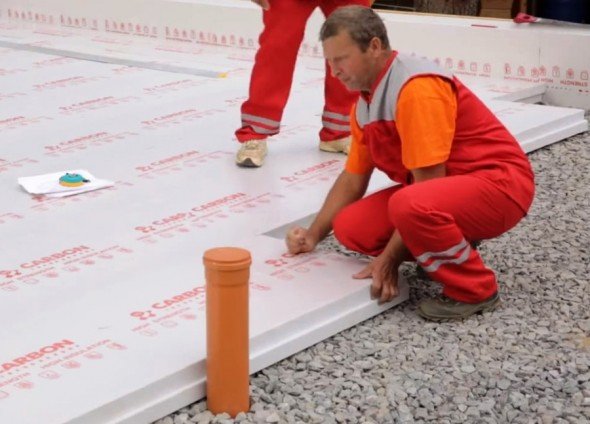
Placing formwork from EPPS/PSB
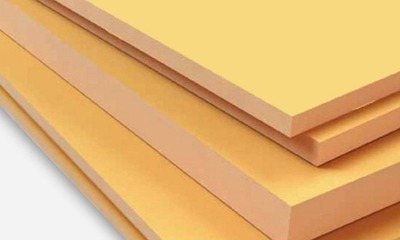
After this, on the already prepared site you can begin to level permanent formwork made of polystyrene foam. This is far from the fragile foam plastic that you are used to seeing in boxes of household appliances, EPS 14/35 according to the new GOST, especially since EPS is much denser and durable. It follows from this that between the concrete and the ground there will be a thick layer of excellent and dense insulation. This will give you the opportunity to heat the house, and not just warm the ground underneath it.
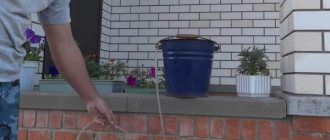
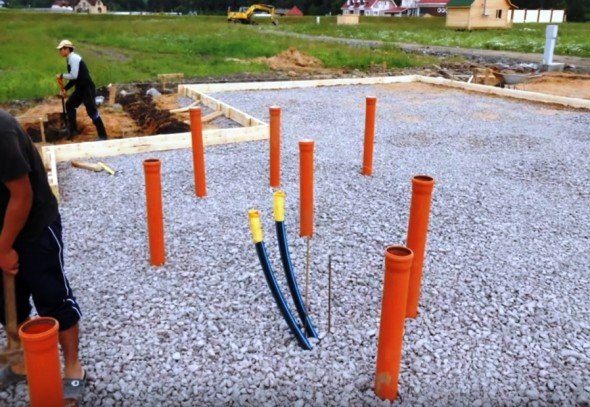
It is interesting that when constructing a USHP foundation, foam plastic is required so that the ground under the house does not freeze, which means there will be no frost heaving, dangerous shifts in the foundation, cracks in the wall and other troubles. At the same stage, you should start laying sewer pipes, introducing water and electrical cables, and grounding. Most often, at the stage of laying the foundation, a septic tank or VOC is immediately installed, so that the issue with the sewerage system will be resolved at the very beginning.
Let us add that the outer part of the formwork should be lined with flat slate. During construction, it will reliably protect the PSB layer from any type of damage, and it can also be used in the future - you can simply paint it in the required color or cover it with mosaic plaster and the base will be ready. It is also convenient to attach plinth panels to the flat type of slate.
By the way, about the height of the USHP base (meaning the height from ground level to the edge of the slab). It will be small - about 20 cm, but this is even a plus - you will not need to make a porch with steps at the entrance to the house. But at the request of the customer, you can easily increase the height. An extra 0.1 meter can be added thanks to additional padding of the pillow, and the same amount can be added by using an additional layer of insulating material under the slab.
About the foundation technology of the Swedish slab.
Scheme of a concrete slab with a reinforced screed.
Scheme of a concrete slab with a reinforced screed.
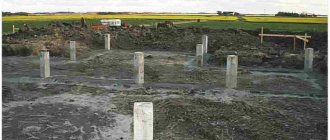
- First, dig a shallow pit, the size of which is slightly larger than the area of the building. Often its depth can be about 2 m, this is quite suitable for a ground floor. It is necessary to make additional recesses for the internal and main walls. This is necessary to create stiffeners;
- then pour an even layer of sand. Sometimes geotextiles are laid on it. With its help, water passes well, but sand is retained perfectly. Typically, the sand layer should be from 10 to 15 cm. Everything must be thoroughly compacted;
- A drainage system and utility lines are laid on top of the sand. This includes water supply, electricity supply, and sewerage. Everything should be removed with reserve and should also be well protected from clogging;
- Next, an even gravel layer is laid. Everything needs to be compacted carefully again to get a dense and even surface. When compacting, you need to use water, that is, first pour water over the layer, and then compact everything again;
- the next layer is foam. It is laid in two layers, and in the middle there is waterproofing. In this case, you need to use a polymer film. You can simply lay a layer of polystyrene foam on the ground. Typically, the thickness of the thermal insulation is about 20 cm, but in place of the stiffeners it can be about 10 cm;
- Pipes are laid on a layer of foam plastic. This is necessary for installing water floors. The pipes need to be inflated with air so that they do not become wrinkled when the concrete is poured;
- Then I lay out reinforcement and mesh on the pipes. This will make the foundation more reliable;
- When the preparatory layers are ready, you can pour concrete and then level everything.
The technology for laying a Swedish slab foundation is not complicated, and you can do everything yourself. You just need to prepare all the building materials and study the execution technology.
Approximate sequence of work during the construction of an “insulated Swedish stove”
During the course of the publication, it has been said more than once, and once again it is especially emphasized, that USP requires a highly professional approach both at the stage of designing the entire house as a whole, and at the stages of constructing the foundation. Therefore, the table below should not be considered as a “guide to action.” This is just an illustrated overview of the general sequence of actions when constructing such a slab. Nevertheless, it will be useful, at least from the point of view that the interested reader will get an idea of how and in what order the main operations for creating a USP should be performed.
| Illustration | Brief description of the operation performed |
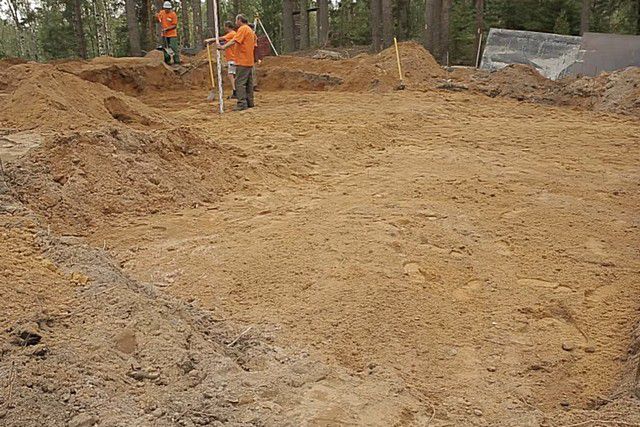
| It all starts, of course, with careful markings on the construction site. It is necessary to immediately outline the outline of the future pit, a pit for placing a septic tank (if it is provided for by the project), trenches for laying utilities - all in strict accordance with the developed project. |
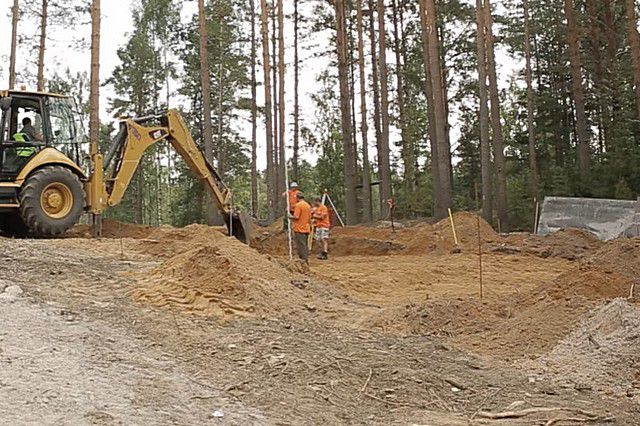
| Next comes excavation work. As already mentioned, the area of the pit usually immediately accommodates the blind area around the perimeter of the building. At this stage, it is quite possible to involve heavy earth-moving equipment - although the pit is not so deep, but given the large area, the total amount of soil removed becomes very impressive. |
| However, there will also be plenty of manual work - the edges of the pit, one way or another, will have to be “ennobled” with shovels. |
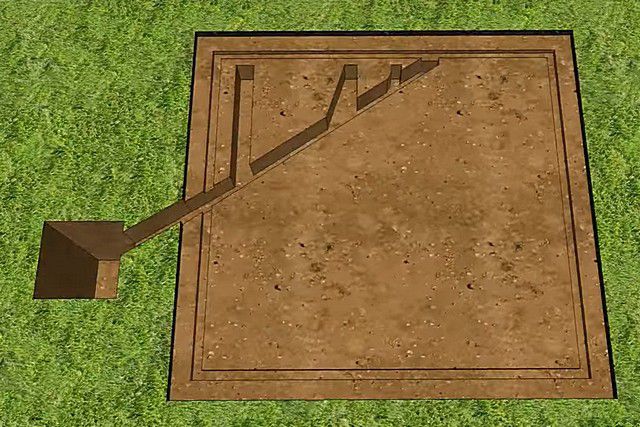
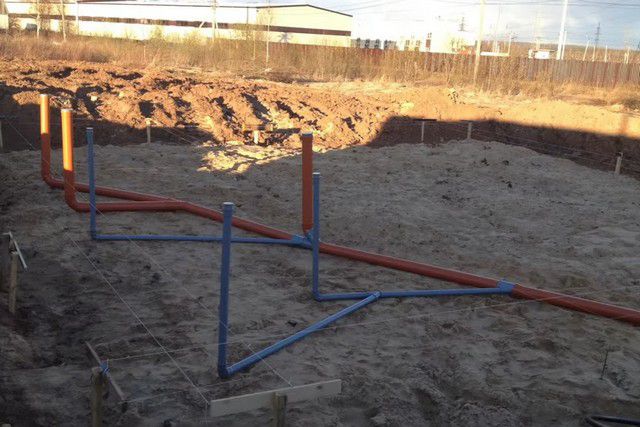
| After digging the pit, it is necessary to mark again - this time for the pipes being laid - drainage, sewer and, possibly, water supply. In addition, often at this stage the power cable is also laid immediately if underground wiring is planned. The illustration also shows a pit for septic tank equipment. |
| This is how the utility system hidden by the slab will look like in this project. |
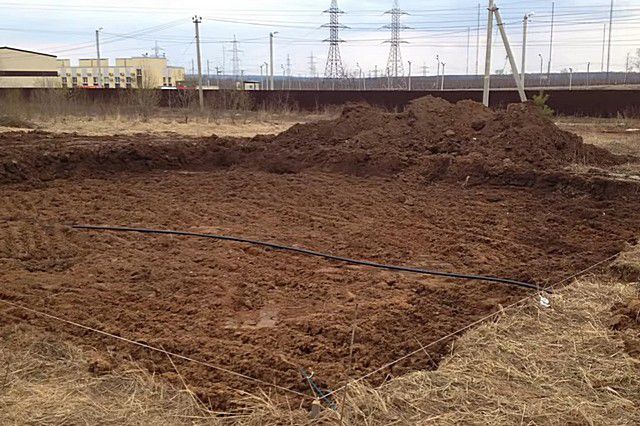
| The pit has been dug. Please note that the power cable has already been inserted into it through the external trench. |
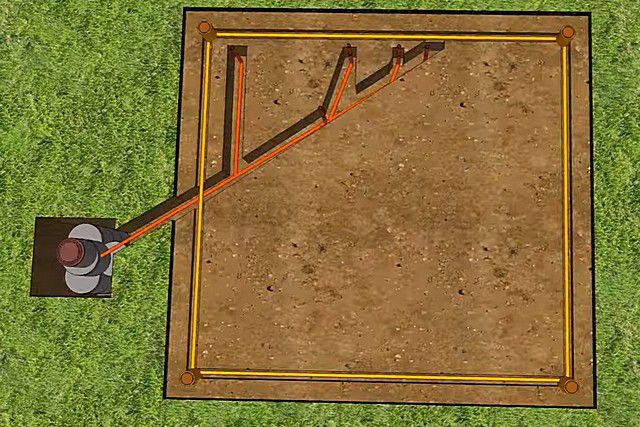
| It is not always convenient to dig trenches specifically for pipes. Usually they do this - a primary layer of sand or sand-gravel mixture is scattered at the bottom of the pit and compacted (this, of course, must be taken into account when calculating the depth of soil removal). This is followed by laying out the pipes in accordance with the project. Horizontal pipe connections are closed with plugs to prevent sand, soil or other debris from getting into them. The pipes are laid with the slope necessary for the free movement of sewage. Using the same principle (only without observing the mandatory slope), plumbing can be immediately installed in future rooms of the house. |
| At the same stage, a ring surface drainage is installed - the trenches under it are lined with geotextiles, and then drainage pipes are placed in them in a layer of crushed stone, connected to the wells. |
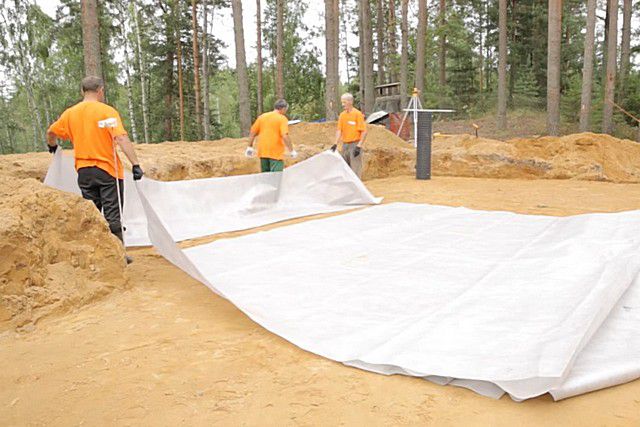
| Now you can cover the primary “cushion” with geotextile - this will become a kind of reinforcement for the preparatory replacement sand layer. An already installed drainage well is clearly visible in the background of the illustration. |
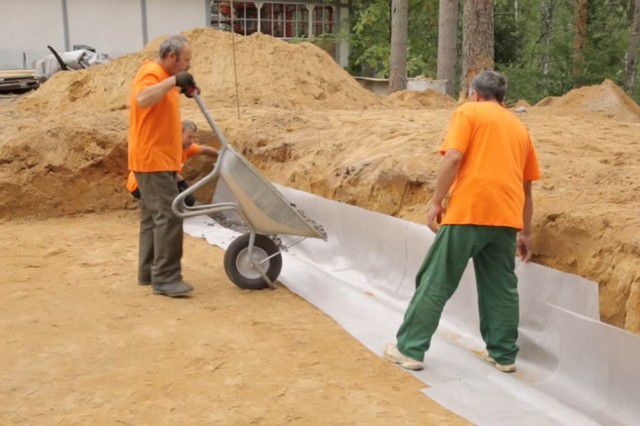
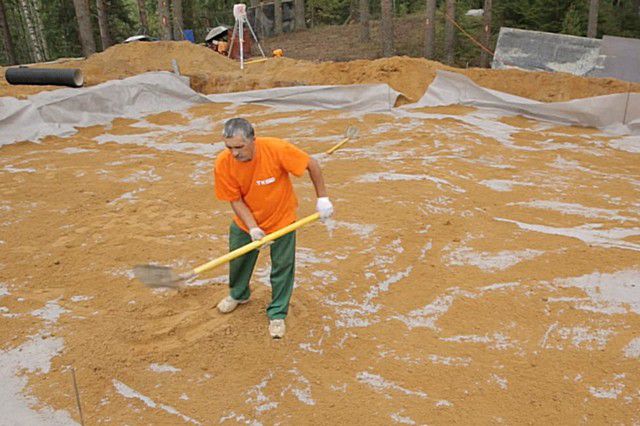
| The creation of the sand cushion continues, but on top of the geotextile “pad”. The sand is evenly distributed first using shovels. |
| This operation is very labor-intensive, but necessary. Gradually, a layer of sand hides all laid utility lines - only the left horizontal pipes and cable outlets remain visible. |
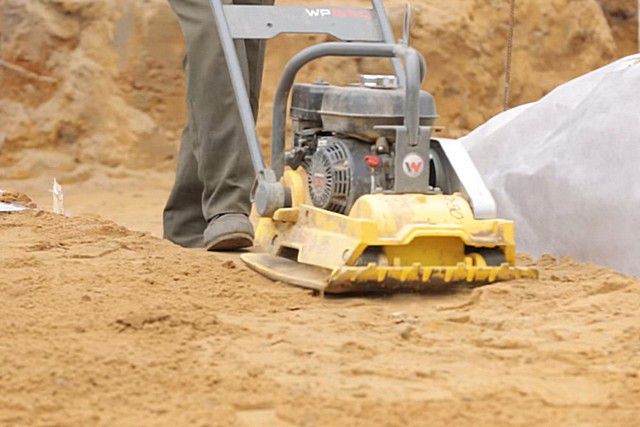
| Each poured layer of sand (or gravel) must be compacted very carefully. There is no need to even think about doing this manually - a special vibrating plate is used. |
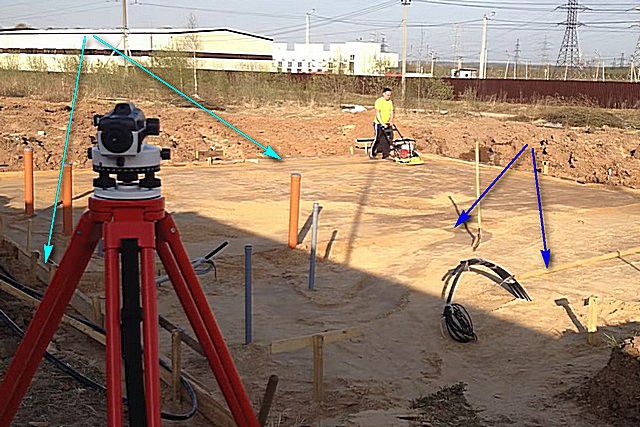
| Of course, when tamping, it is necessary to constantly monitor the level of the created “cushion” and its compliance with the horizontal plane. This illustration shows that for the sand fill, mini-formwork was built around the perimeter of the pit, which both prevents spillage at the edges and sets the upper level of the compacted fill. In addition, beacons made of smooth boards are visible, which are placed on stakes strictly according to the level. However, different craftsmen may have other methods of controlling the horizontality of the sand “pillow” and its planned height |
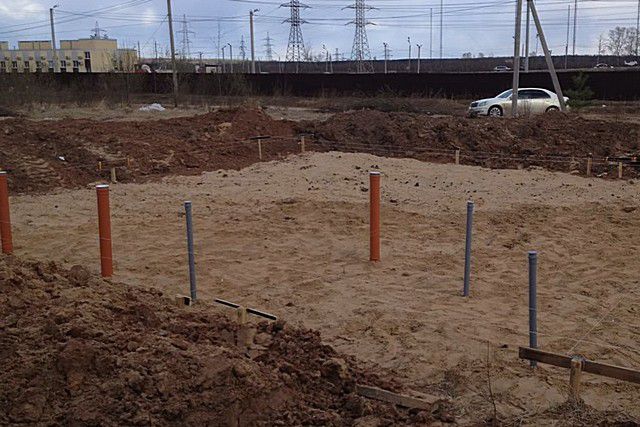
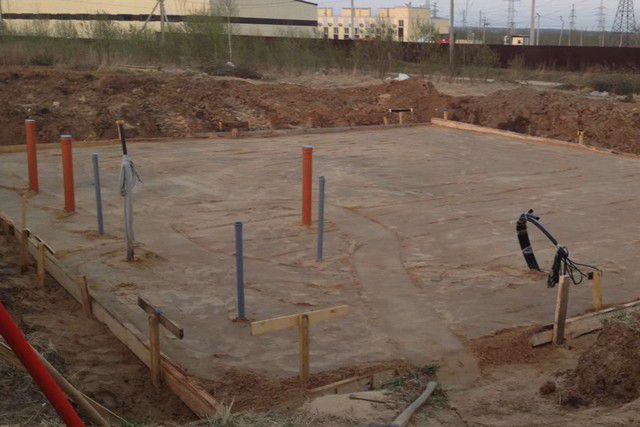
| This is what the finished sand cushion looks like after the compaction operation is completed. All protruding ends of utilities - pipes and cables - are clearly shown. |
| It is necessary to make a small remark. The fact is that the structure and sequence of creation of these replacement “pillow” layers may differ in different sources. An example was shown above where only clean sand was used. However, gravel or crushed stone often becomes the “starting” layer - this is motivated by the fact that on wet soils there is a need to reduce the likelihood of capillary upward spread of moisture. And only after compacting the first gravel layer do they move on to sand backfill. There is also a diametrically opposite solution - they start with sand, and gravel is poured directly under the insulating belt on which the USP is based. It is difficult, being unfamiliar with the intricacies of construction, to correctly choose the optimal location and thickness of layers - but this is just another reason that the design of such foundations should be carried out professionally. But in any case, no matter how the layers of the “pillow” are alternated, each of them must be compacted as thoroughly as possible. |
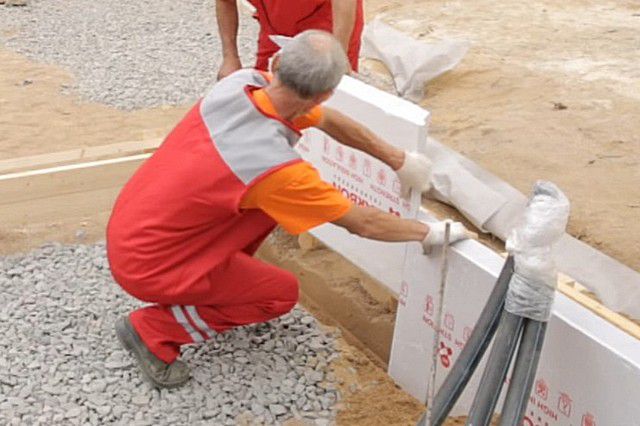
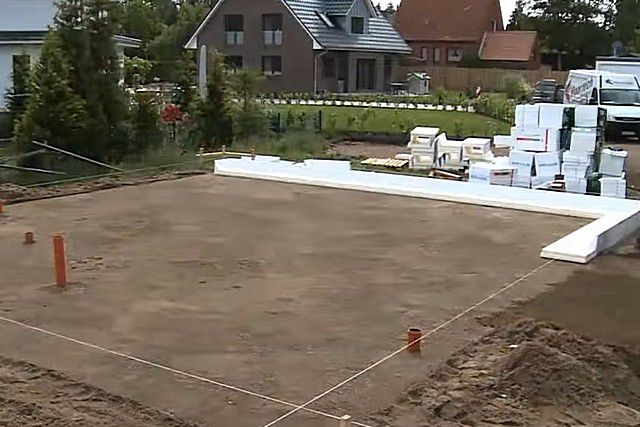
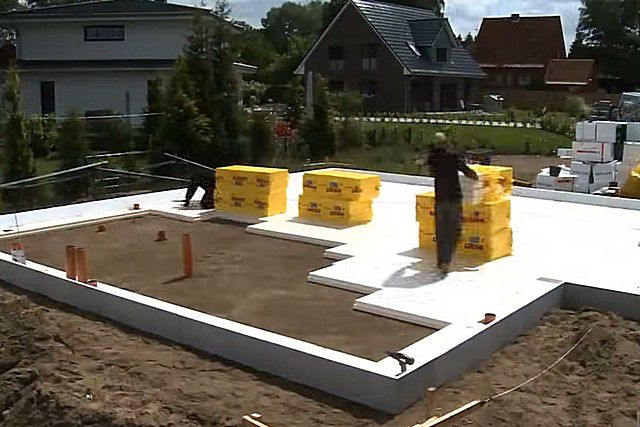
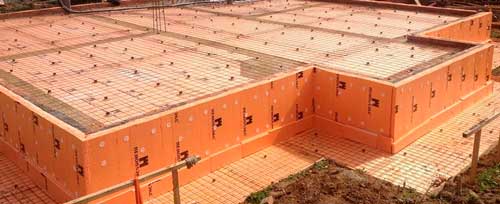
| When the “pillows” are ready, they move on to laying the first thermal insulation layer. They usually start with vertical walls around the perimeter, framing the foundation of the future house. They will also play the role of formwork when pouring the slab itself. This illustration shows how vertical walls made from standard EPS panels are installed. |
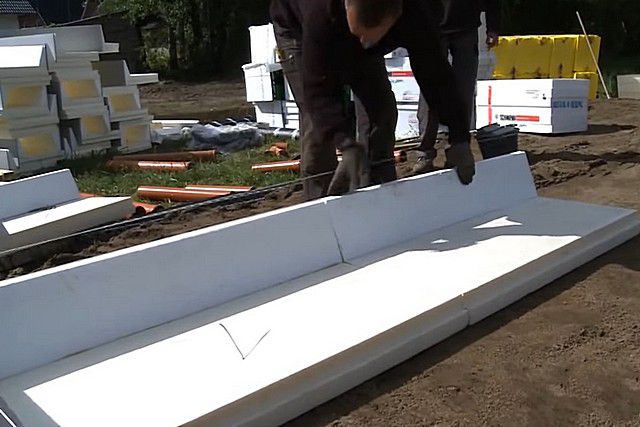
| However, as mentioned above, it is much more convenient to use special L-blocks, which immediately form the angle of transition from the vertical wall to the horizontal insulation belt. They are equipped with a system of locks that ensure tight joining with each other and with horizontal panels. In addition, a panel is attached to their outer surface, facilitating further finishing of the basement part of the foundation. |
| L-modules are placed along the lines of the external markings of the foundation and joined together. |
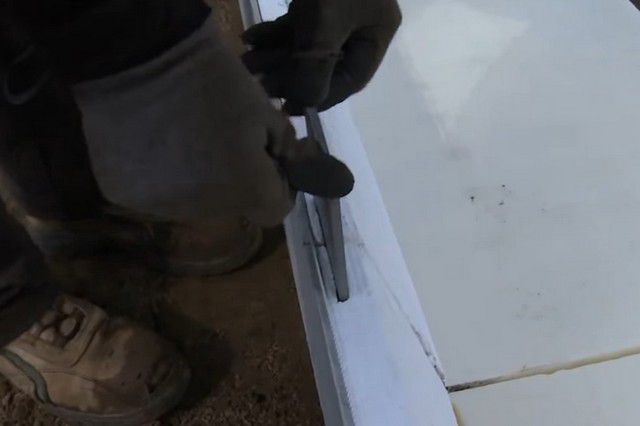
| To avoid even the slightest displacement, a centering groove is provided on top at the junction of the two modules, into which a special liner is inserted. |
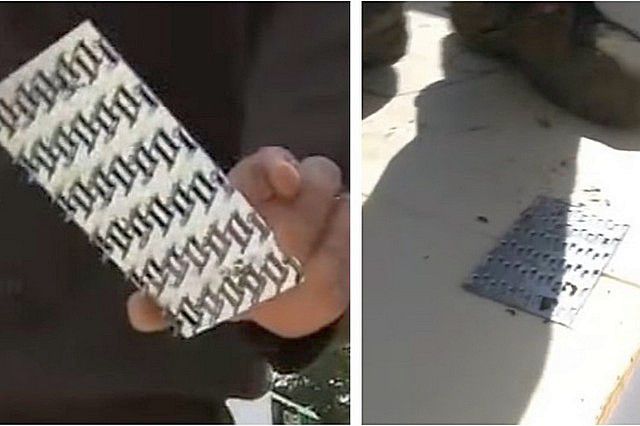
| And along the horizontally located shelf of the module, a reliable connection is ensured by the use of special mounting metal plates with spikes. These plates are simply pressed with your foot along the connection line of adjacent modules - now they are securely connected to each other, and their displacement is excluded. |
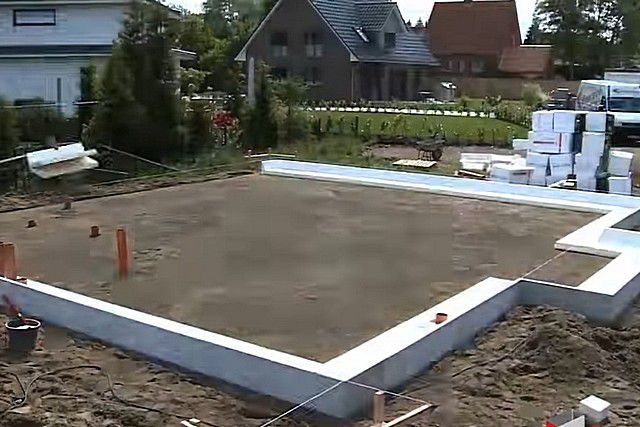
| With well-done markings, the creation of an external insulation contour of the USP using L-modules is carried out very quickly. |
| No additional devices or tools are required - a couple of workers will quickly cope with this task. |
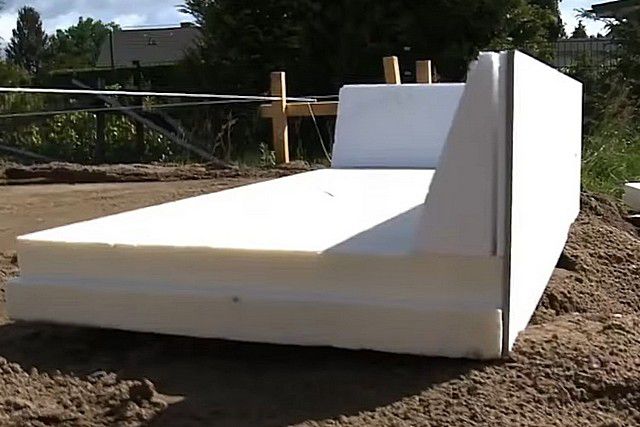
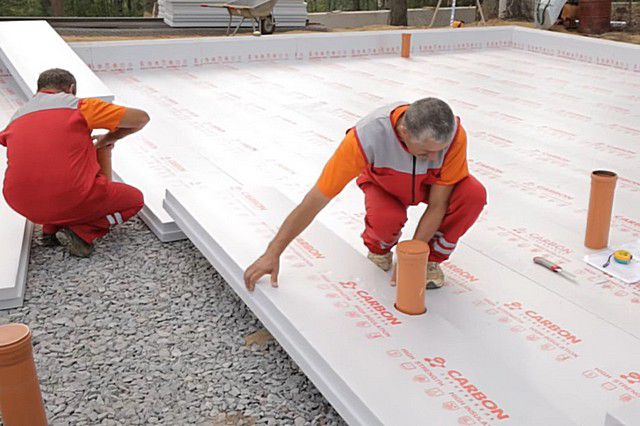
| After laying the outer border of the “insulated Swedish slab”, they proceed to the final laying of the first continuous layer of thermal insulation. |
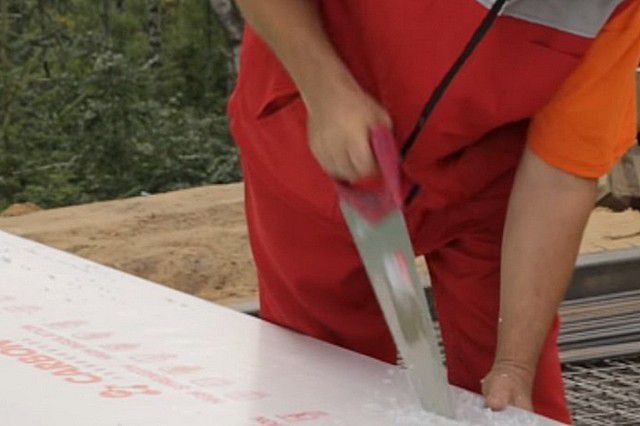
| EPS boards are also easy to adjust - due to the lamellas at their ends, they are precisely joined, without leaving through seams. If it is necessary to adjust the slab to the desired size, it can be easily cut with a hacksaw or even a sharp construction knife. |
| For the passage of pipes or cables, appropriate openings are cut out in the slabs. |
| They try to fit the slabs as accurately as possible to prevent leaving even small gaps. If gaps cannot be completely avoided, they are completely filled with polyurethane foam. |
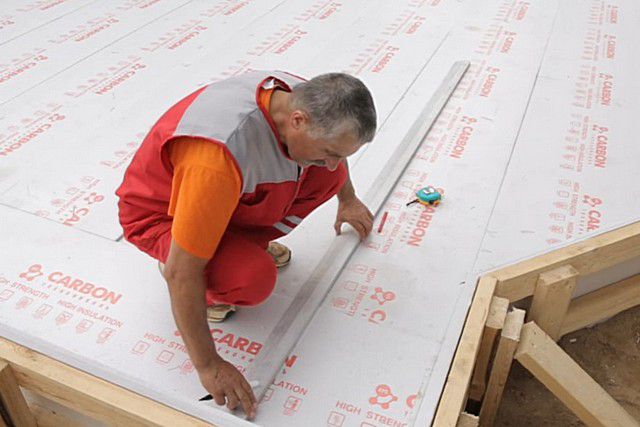
| After laying a continuous layer of insulation, markings are carried out again. Now the main task is to outline the areas where stiffening ribs will be created, that is, on which the second (and, if necessary, third) layer of thermal insulation will not be laid. |
| Next comes the stage of laying the second (third) layer of thermal insulation boards. As a result, “channels” are formed, which will be determined by the stiffening ribs of the USP after concrete is poured. This illustration clearly shows what kind of picture is obtained when using one layer of continuous thermal insulation, and two layers in the rooms of the future house, between the stiffeners. |
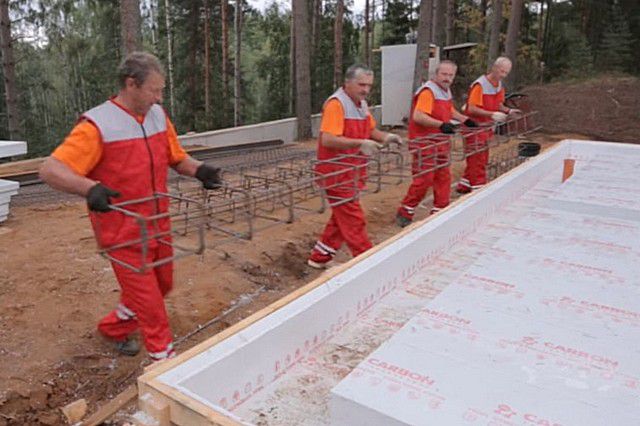
| The next important stage of work is the creation of a reinforcing belt for the future slab. For the stiffening ribs, reinforcing frame structures are knitted, similar to those used in strip foundations. As a rule, such frames are knitted to the side, and then laid in place. The dimensions and number of rods of this design are based on the design results. |
| The frame reinforcing structure is laid in the “channel” of the stiffener. From below it rests on stands, which creates the necessary gap, so that the armored belt is aligned. Pay attention to one more nuance. Although extruded polystyrene foam has sufficient rigidity, it may not be able to fully cope with the formwork function - there is a high risk of fracture under the pressure of the concrete solution being poured. Therefore, an additional wooden structure is mounted around the created “side”, which is reinforced with wedges and oblique supports - the same as when pouring a conventional strip foundation. |
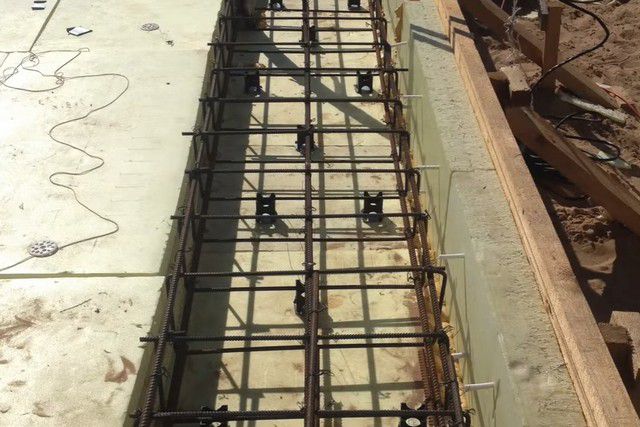
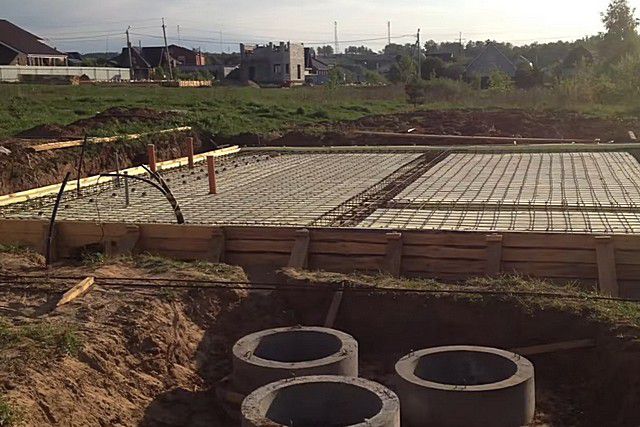
| After laying the belts along the stiffening ribs, a lattice reinforcing structure is knitted over the entire remaining area from rods or using ready-made cards. In any case, the reinforcement structures are linked to each other. Special supplies are also placed under the grating so that it is approximately 40 mm from the lower edge of the concrete slab being poured. |
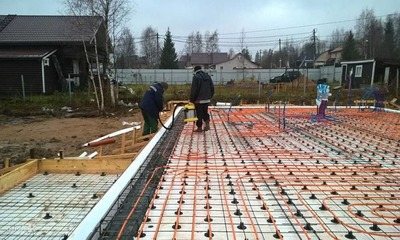
| Once the entire reinforcing structure is ready, they proceed to the installation of water heating circuits for the slab. First of all, a distribution manifold is installed in the place provided for in the project. It is usually placed on two fixed metal profiles, which, after pouring the slab, will become stationary racks of the manifold cabinet. |
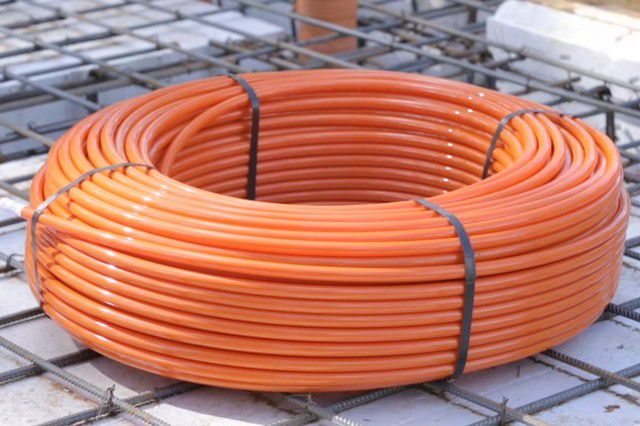
| For laying circuits, only high-quality pipes are used, suitable for many years of trouble-free operation. Typically, pipes made from cross-linked polyethylene PE-HA are purchased for such purposes - this is the best option. It is probably unnecessary to explain that false economy on these materials is completely unacceptable. |
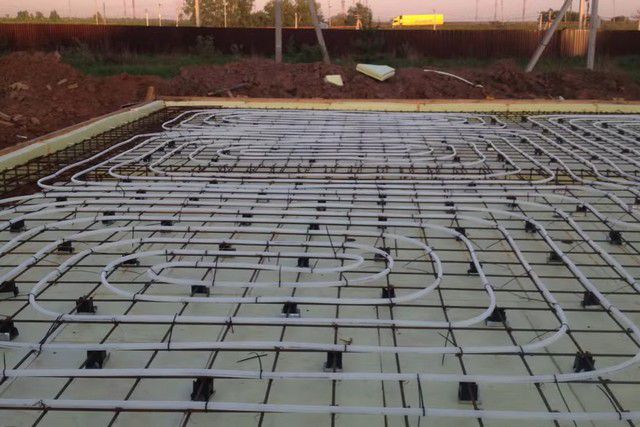
| The pipes are laid out in the future premises of the house in strict accordance with the previously developed project. The ends of the circuits are brought to the installation site of the collector. |
| The pipes are fixed to the reinforcement grid using conventional nylon clamps. |
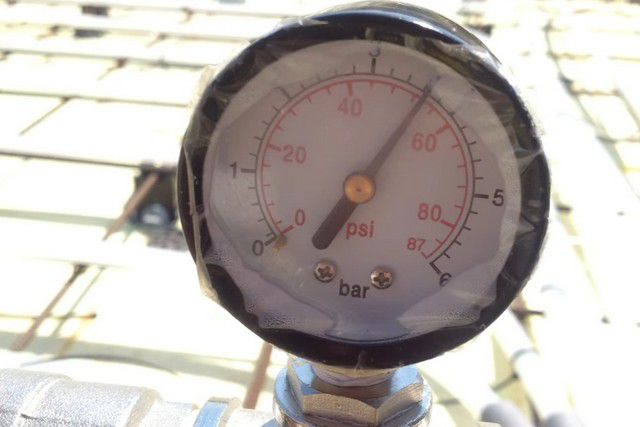
| After installing the circuits and connecting them to the collector, the installed system must be pressure tested. To do this, it is filled with coolant and test pressure is created. The pressure gauge monitors that the pressure remains at a given level. Its fall will indicate that there is a leak somewhere - it will be necessary to identify and eliminate the defect. |
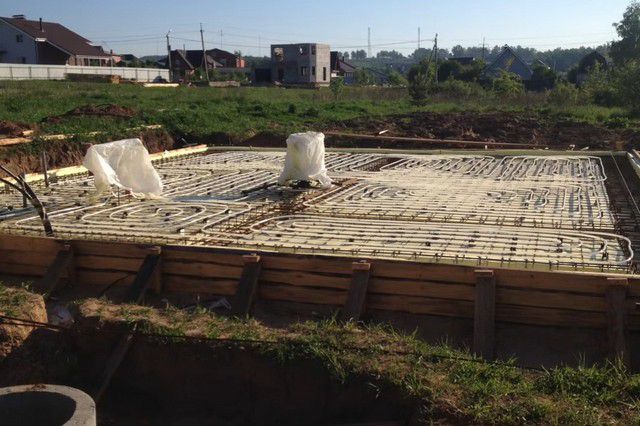
| After testing, the pressure in the system is not released - it is necessary to prevent pipe deformation when pouring concrete into the slab. In fact, everything is ready for pouring - all that remains is to wrap the collector and vulnerable points of the outgoing communications with film so as not to splash them with the solution. |
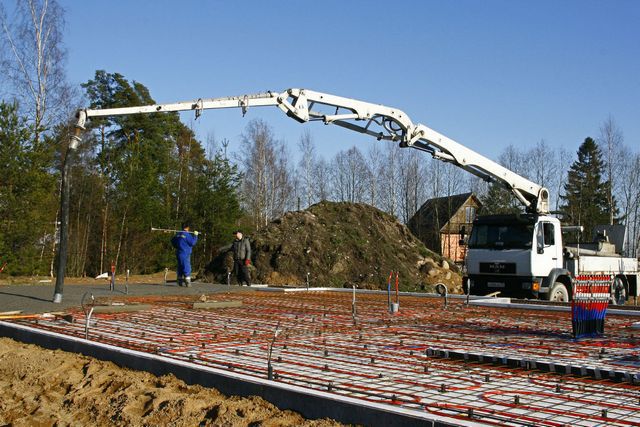
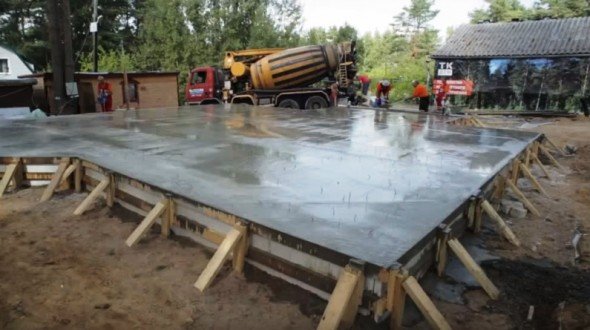
| The USP, to ensure solidity, should ideally be poured in one go. This means that the required amount of solution will have to be ordered and then distributed using a concrete pump. |
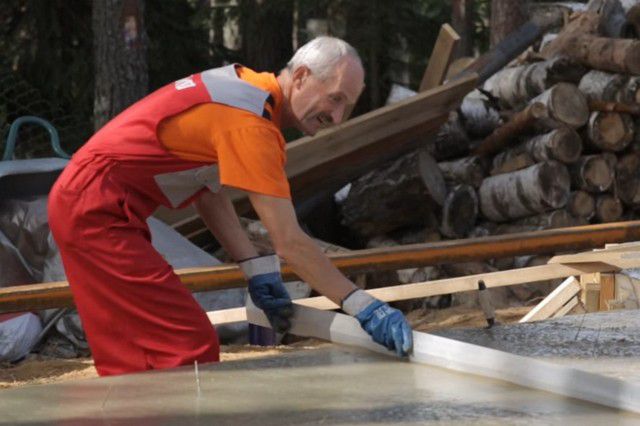
| The solution is distributed first with shovels, then with a rule, so as to reach the specified level of slab thickness. |
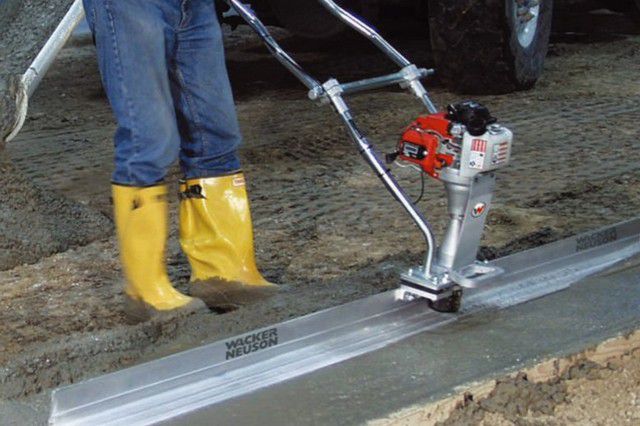
| However, the usual distribution of concrete in this case may not be enough, since it is absolutely unacceptable to leave even the slightest possibility of the presence of voids and uncompacted mortar. For high-quality pouring, a deep vibrator is used, which ensures that all voids and cavities are filled with concrete, and to level the surface of the slab, the optimal solution is to use a vibrating screed. |
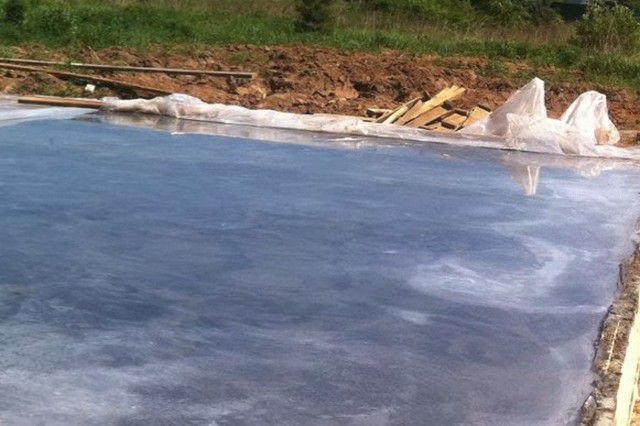
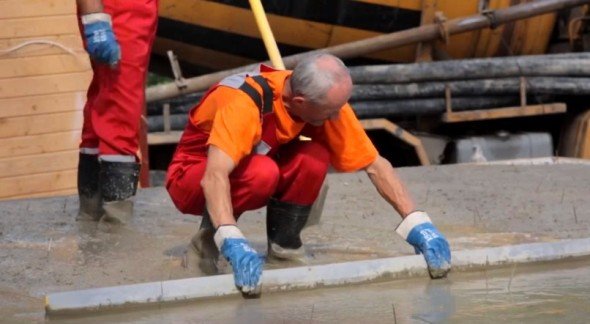
| After pouring, the main stage of work on creating the USP can be considered completed - within the time period established by the technology, the concrete will reach the required maturity, it will be possible to remove the formwork, relieve the pressure in the pipe ducts and move on to the next stages of construction. However, since the resulting slab becomes, in fact, a finished floor, it makes sense to grout it and simultaneously harden it. To do this, after waiting for the initial setting of the solution (when the worker’s foot leaves a mark no more than 2-3 mm deep), they begin to grout the surface using a special installation, which builders often call a “helicopter”. At the same time, you can use one of the concrete hardeners - powder topping. |
| As a result, the sanded slab will have a completely different appearance - perfectly smooth, dust-free, and ready for any further finishing operations. |


So, the result of the work - an insulated Swedish slab that has gained strength - is fully ready for further stages of construction. And at the same time, the owners already have a reliable foundation for the house with a drainage system, heated floors on the first floor, fully suitable for any finishing, and installed utilities.
Ready-made “insulated Swedish stove” with all its “stuffing”
There is no doubt that such a foundation system will certainly become more widespread and developed, and the number of supporters of the “insulated Swedish stove” will constantly grow. There is certainly a bright future for energy-saving technologies in construction.
What is a Swedish stove and how to lay it.
Before starting to build a house, you need to choose a reliable foundation. It is important that the solution is rational and optimal and allows you to make a foundation for a house at minimal cost. One of the popular options for private housing construction is the “insulated Swedish stove” (abbreviated as USP). The technology for constructing this foundation allows you to simultaneously perform several actions that are required when building a foundation with your own hands.
At the end of this article there is a video with instructions on how to build a Swedish slab foundation with your own hands.
Materials and tools
In accordance with the foundation parameters specified in the house design, the amount of materials is calculated. To build a “insulated Swedish slab” foundation you will need:
- sand;
- crushed stone;
- rolled waterproofing material;
- boards 50 mm thick or more, bars;
- extruded polystyrene foam with a thickness of at least 100 mm;
- nails, screws;
- reinforcing bars with a diameter of 10–12 mm;
- distribution clamps;
- knitting wire;
- pipes for heated floors;
- nylon ties.
In addition to materials, the work will require the following tools:
- level;
- yardstick;
- building level;
- shovels;
- grinder, wood saw, stationery knife;
- hammer, screwdriver;
- pliers, special hooks or a gun for tying wire;
- concrete mixer.
Important: When constructing a foundation, it is extremely important to comply with the parameters of the materials used. Thus, you cannot use reinforcing bars of smaller diameter or cement of lower quality than specified in the design documentation. Changing these parameters can lead to skewing of the building and the formation of cracks on the walls of the house.
Having prepared the tools necessary for the work, you can begin construction work.
What is a Swedish stove?
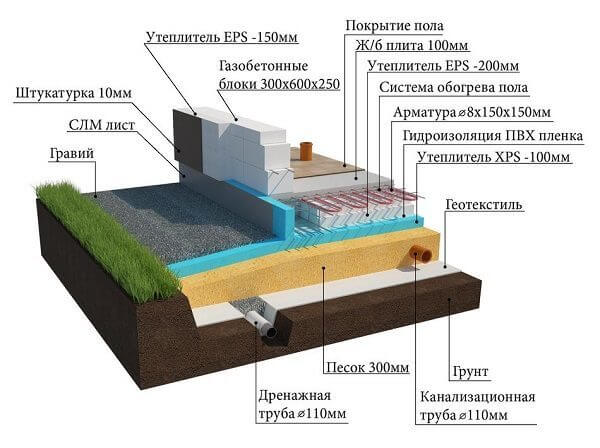
The technology for manufacturing USPs has been used relatively recently. The process of use in Europe has begun. The structure is an insulated monolithic slab in which the main communications and a water floor system are laid. The manufacturing technology of such a foundation allows you not to worry about the occurrence of frost heaving forces, which are so feared by any type of foundation. Foundation structure:
Swedish slab foundation.
Installation of an insulated Swedish stove.
The construction of an insulated monolithic slab (USP) does not have any significant differences in manufacturing from a conventional one. This type of foundation has the following advantages:
- Possibility of installation of heated floor slabs and other communications in the structure. This greatly simplifies the process of building a house. There is no need to arrange a technical underground, where water supply and sewerage pipes are usually laid. Due to this, not only the costs of work are reduced, but also their duration.
- USP allows you to reduce the cost of operating a house. In addition to installing a heating system, the technology provides for the installation of insulation, which prevents a decrease in the temperature in the premises. The foundation allows you to retain heat inside the house and not let it sink into the ground.
- The walls are protected from dampness due to the absence of conditions for condensation. Due to this, they are not afraid of mold, mildew and rot. The Swedish slab foundation allows you to increase the durability of the entire house.
- This support part is suitable for almost all types of buildings with different geological site conditions. Due to the fact that the foundation is not buried in the ground, the influence of the groundwater level on it is excluded. The monolithic slab has a high load-bearing capacity, so the technology is suitable both for the construction of light frame and wooden buildings with your own hands, and for massive brick houses.
- Preventing frost heaving. This phenomenon makes the foundation especially vulnerable because it leads to uneven shrinkage of the foundation. Heaving occurs when simultaneously exposed to two factors: moisture and negative temperatures. Having gotten rid of at least one of them, you don’t have to worry about the safety of the structures. A monolithic insulated Swedish slab (USP) is a foundation that prevents the soil from cooling in winter directly under the building site. This is due to the fact that there is a water heating system in the floor, which, although separated from the ground by a layer of insulation, still gives off some of the heat to it.
- The evenness of the slab surface allows the flooring of the first floor to be laid without additional measures. This allows you to simplify finishing work, reduce the cost and time of building a house.
- The construction of the foundation does not require heavy equipment. An insulated slab, like other monolithic options, allows you to carry out work without the use of cranes. In addition, the non-buried option does not involve serious development of the soil: it is enough to just remove the fertile layer of soil, the depth of which is 20-30 cm (the work can be done with your own hands) and tamp it.
- The structure always has the same temperature. USHP does not have freeze-thaw cycles, which lead to a limited service life of house elements.
Application area
This type of foundation is suitable for use on the following types of soil:
- sand;
- loose sandy soil;
- clay;
- loam.
In addition, USHP can be used in areas with a high groundwater level or on sloping areas with a height difference within the future building of no more than 25 cm. It is not recommended to install an “insulated Swedish slab” on muddy, peaty and vegetative soils. Such a foundation is often used in construction:
- wooden houses (made of logs or timber);
- buildings made from SIP panels;
- small brick structures;
- houses made of aerated concrete blocks.
That is, this technology is used for light, low buildings (maximum three-story).
Selection of thermal insulation material.
Before starting work, it is important to choose high-quality insulation so that problems with the foundation do not affect you. To ensure normal temperature and humidity conditions and retain heat in the volume of the house, USHP will require an effective heat insulator with low thermal conductivity.
The building materials market offers a wide variety of insulation materials, but usually only one type is suitable for foundation work - extruded polystyrene foam (Penoplex). The other two materials from the top three in popularity cannot be used for the following reasons:
Swedish plate foundation construction technology.
Scheme of an insulated Swedish stove.
- mineral wool is not resistant to moisture, its use for the underground part of the house is unacceptable, since when wet it shrinks and ceases to perform its functions;
- polystyrene foam is an inexpensive material that does not have high strength, and the foundation is constantly subjected to increased loads and transfers them to the foundation soil.
Insulation of Swedish foundation slab with polystyrene foam.
Insulation of the foundation and blind area with polystyrene foam.
The advantages of extruded polystyrene foam include:
- durability;
- resistance to rot, mold and mildew;
- resistant to moisture, characterized by low water absorption;
- some manufacturers produce types that are classified as low-flammable materials (fire resistance during foundation construction is of little relevance, since the insulation is protected on one side by a layer of concrete, and on the other by soil);
- safety for humans, the material does not emit harmful substances and does not lead to diseases;
- increased strength (compared to foam plastic) allows it to withstand loads from people, furniture and equipment.
It is important not to allow the thermal insulator to come into contact with chemical compounds or solvents. It decomposes when exposed to this.
USHP foundation design: cross-sectional photo of the product
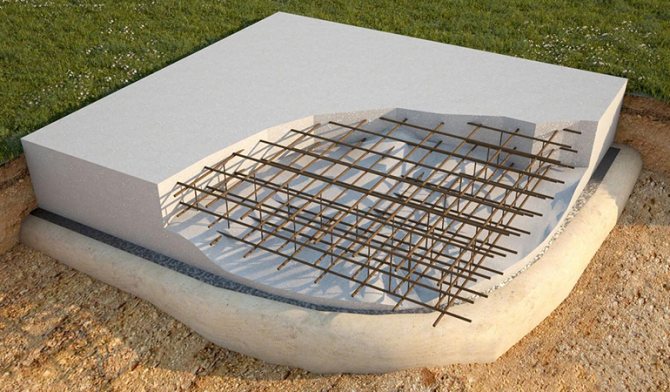
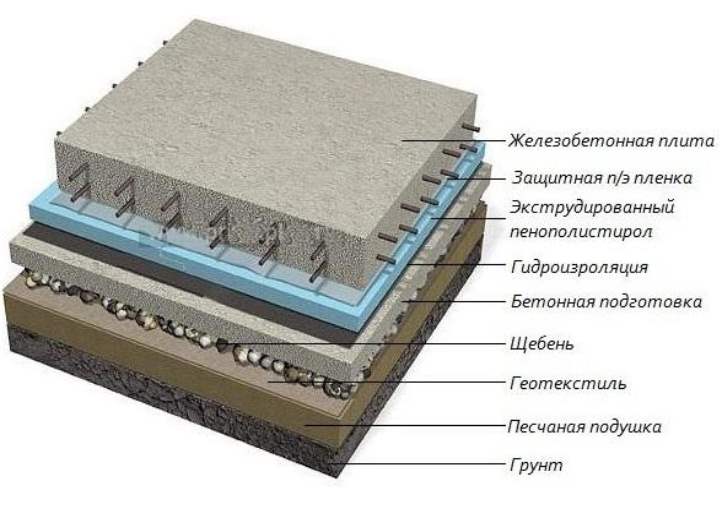
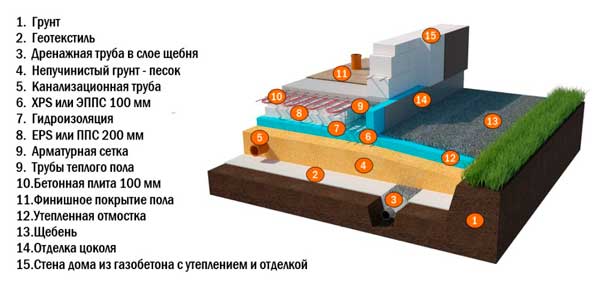
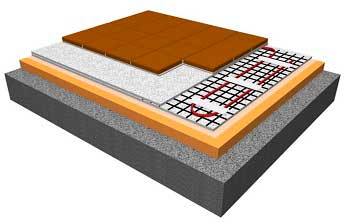
The structure consists of the following layers, which are clearly shown in the cross-sectional drawing of a Swedish foundation slab:
- concrete pouring;
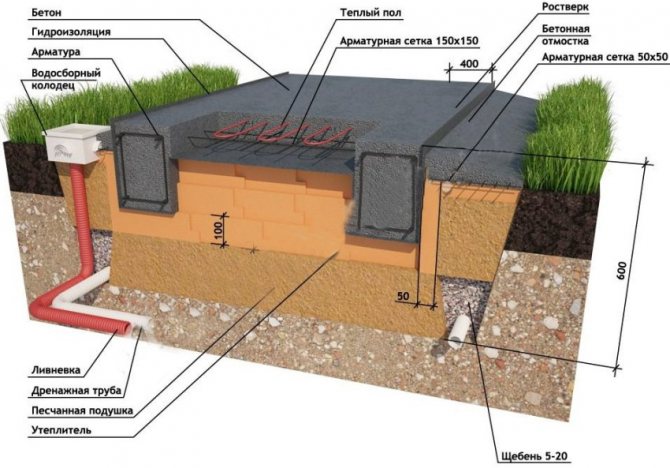
Swedish slab foundation in section
- reinforced layer;
- depreciation layer;
- insulating layers.
A concrete pour, or monolith, is represented by a conventional foundation with a thickness of only 10 cm, thanks to which the structure is created in one day. This has a positive effect on the quality of the slab, namely: layering is eliminated and the cost of work is reduced. A heated floor system is laid in this layer. The base is insulated from the ground with insulation, which is represented by extruded slab polystyrene foam.
Reinforcement is also carried out in a short time due to the use of a small number of metal rods. A tightly knit reinforced mesh prevents cracking of concrete and prevents damage to the foundation due to natural soil movement.
The traditional depreciation layer, consisting of sand and crushed stone, which is used in a conventional foundation, is supplemented using this USP technology with a layer of clay. Thanks to this, geotextiles laid between mineral layers are not exposed to moisture. An additional waterproofing layer in the foundation is necessary in order to protect the structure from the influence of groundwater, which can erode the layers. In the thickness of the sand under a layer of insulation, sewerage and a water supply system are installed, the nature of which affects the price of the USP.
Reinforced mesh prevents cracking of concrete and prevents damage to the foundation
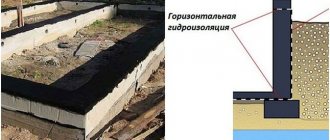
To create a durable and strong structure, it should be insulated, so that the foundation will not crack and heave during temperature fluctuations. The process is carried out using styrene derivatives, as a result of which the service life increases several times. The insulation is laid not only from below, but also vertically along the perimeter of the slab, duplicating the base formwork. Also, the layer is located under the blind area of the building horizontally at the depth of the base of the reinforced concrete structure. This technology increases the cost of USHP, but reduces further costs for heating the room.
Drainage communications are necessary to create a system for removing moisture from the foundation, which prevents it from damage. A waterproofing layer with vapor barrier properties protects concrete from moisture.
Construction technology.
To make a reliable USHP foundation with your own hands, you must carefully follow the technology and order of laying materials. The most important component of the structure is concrete. You can order it from the factory or prepare it yourself (the first option is preferable). For the installation of USHP, it is recommended to use concrete of classes B20-B25, the exact value depends on the load. To avoid problems, it is important to learn how to properly pour concrete before starting the process. It is worth remembering the most important thing: pouring a monolithic reinforced concrete slab is carried out in one step, otherwise the structure will not work as a single whole. More details about this can be found in the video instructions at the end of the article.
Laying a Swedish slab.
The process of laying a Swedish slab.
Construction is carried out in the following order:
- Removal of the fertile soil layer (on average 20-30 cm).
- Laying a sand-gravel cushion, which includes sand of medium or coarse fraction (the use of fine sand is not permissible). The thickness is selected depending on the characteristics of the foundation soil. It is important to perform compaction correctly using a compaction platform or weights.
- Laying "Penoplex".
- Installation of a drainage system made of pipes with holes laid in a layer of crushed stone. The distance from the drainage to the foundation is taken to be no more than 1 meter.
- Installation of formwork is carried out using slab and side elements.
- The structure must be reinforced with meshes, the diameter of the rods is at least 12 mm in increments of 100 or 200 mm, depending on the load (the greater the mass of the house, the smaller the spacing of the rods). The exact diameter and pitch are selected by calculation based on load-bearing capacity. When installing reinforcement, it is necessary to raise it to provide a protective layer of concrete (70 mm). Special plastic clamps are used for lifting.
- After the fittings, underfloor heating pipes are laid, which are connected to the distribution unit.
- Concrete is poured, after which you will need to wait 2-3 weeks before further work begins.
This video clearly presents instructions for constructing a USP, describes the pros and cons, and gives feedback from the builders.
The structure will gain full brand strength after 4 weeks.
In the first weeks, concrete needs constant moisture (every 2-3 hours), which will prevent shrinkage cracks from appearing.
Foundation calculation
When calculating a concrete base made using the “insulated Swedish slab” technology, it is necessary to determine the following parameters:
- pressure of future construction on the ground;
- soil pressure due to frost heaving effect;
- foundation strength.
The amount of pressure a building exerts on the soil can be determined by dividing the total mass of the future building by the area it occupies. The strength of frost heaving for each type of soil is determined according to the information given in construction reference books. As for the strength of the foundation, it depends both on the design features and on the quality of the materials used.
To determine the mass of a building, you need to use a project developed by a specialist in your field. The plan must indicate all the data: dimensions of structural elements, materials used, etc. The expected snow load should also be taken into account. You can find out its value by opening the appropriate reference literature for your region. Afterwards, the mass of all structural elements is calculated, and the sum of these values is divided by the area of the foundation. This way you will get the specific pressure of the building on the ground.
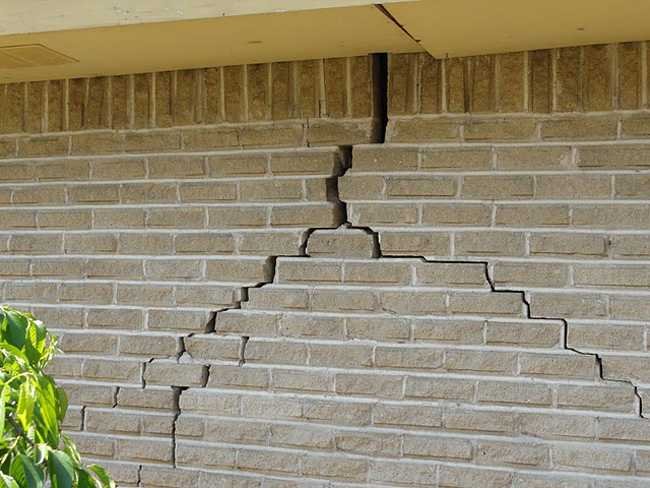
Consequences of frost heaving of soil
Frost heaving is the process of expansion of soil with a high moisture content under the influence of low temperatures. The soil resistivity is determined depending on its type according to the table. This value should be greater than the specific load of the house. Otherwise, you will have to increase the size of the foundation base. As for the depth of the foundation, it is also determined depending on the type of soil.
How does a Swedish slab foundation work and what are its advantages?
The Swedish slab foundation is a shallow monolithic slab that occupies the entire base area of the house and is insulated around the perimeter. A heated floor system, which is considered the most effective in the field of heating private construction, is directly connected to it.
The foundation is Swedish plate technology.
Schematic cross-sectional representation of the Swedish slab foundation.
It is effective on all soils, with any occurrence of groundwater, and can be installed with your own hands.
Design
USP refers to shallow slab foundations , which means the absence of a deep pit.
Usually a deepening of about 40-50 cm is required, that is, it is necessary to remove the top layer of fertile soil in order to prevent plant growth that causes destruction of the base. A recess is dug about a meter on each side more than required according to the building drawings. The perimeter of the recess is equipped with an additional groove into which a drainage pipe is laid to drain water from the preparatory layers. For a material such as Swedish slab, the laying technology has its own characteristics.
The correct design of the USP involves such actions as preparation, which consists of layers of crushed stone and sand, laid alternately and compacted by pouring water. Then a layer of waterproofing is laid, covered with another layer of crushed stone and the construction of the formwork begins.
In parallel with this, the insulation for the USHP is laid out so that it tightly covers the entire area and walls of the formwork. At the same time, reinforcement of the USP and installation of communications and heated floors are carried out. Upon completion of these works, the formwork is poured with concrete, which must be kept until the state of primary crystallization for at least 2 weeks.
Note: it should be noted that the slab has stiffening ribs for reinforcement under the load-bearing walls.
Advantages and disadvantages of the Swedish stove.
As reviews show, a foundation of this type has its positive and negative sides. Among the advantages of the design are the following:
- speed of slab installation. On average, it takes up to two weeks to produce;
- the surface of the structure turns out to be perfectly flat, so it can serve as the floor of the first floor, which does not require additional leveling;
- the level of heat loss in the house is reduced due to the presence of insulation along the entire perimeter of the slab;
- the insulation located in the thickness of the structure “cuts” cold bridges, which also improves the protection of the room from the cold;
- communications can be laid in the foundation, which improves the aesthetic appearance of the building;
- heating the soil under the slab eliminates problems caused by the possibility of soil heaving in winter;
- To work with the foundation, you do not need any other equipment other than a concrete mixer.
The foundation is Swedish slab.
The construction of the foundation is Swedish slab.
The USP foundation also demonstrates disadvantages, including:
- the impossibility of constructing a structure on excessively heaving soils;
- the inability to save on building a house, since the ushp slab is quite expensive;
- the technology is not designed for multi-story buildings made of heavy materials: brick and stone.
Despite the higher cost of a Swedish stove compared to a conventional monolithic structure, a device of this type allows you to save on home heating. A comparative calculation shows that the technology pays for itself within ten years of operating the house.
Technology and installation process
The technology for constructing a Finnish foundation is not regulated by regulatory requirements in force in the Russian Federation, but engineers must obtain data from studies of the hydrogeological features of the site before starting design.
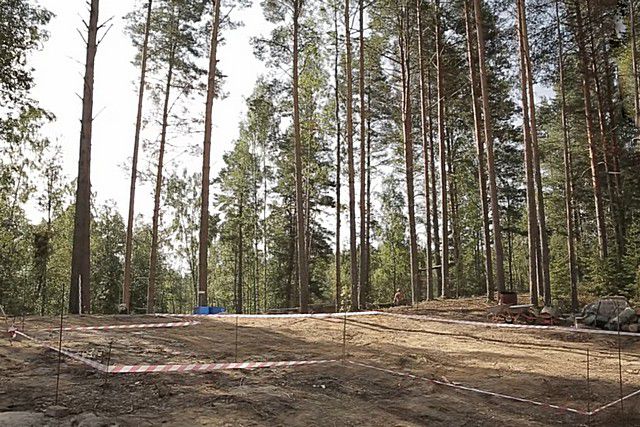
Marking and digging a pit
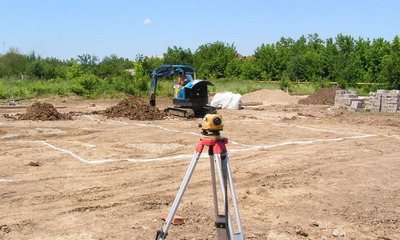
Before moving the design axes to the field, it is necessary to take into account the distances to the neighbor’s fence, roadway, external communications, etc. Marking the area is done using planks and a cord stretched between them.
It is prohibited to build a foundation on a fertile soil layer, because the structure may shrink unevenly during operation.
Therefore, first the fertile layer is removed, and then recesses are made for the strip part of the load-bearing structure under all internal and external load-bearing walls. The width of the sole of the tape can be from 0.6 to 0.8 m, the insulation - 0.6 - 1.2 m from the outer edge of the MZLF , so the pit is much wider than the base area of the house.
Drainage arrangement
Drainage for a Finnish slab is only needed if the groundwater in the area is located close to the surface of the earth. To install a drainage layer, the bottom of the trench is deepened another 0.5 m. Non-metallic material (sand, crushed stone) is laid on a layer of geotextile.
A layer of waterproofing material is laid on top of the compacted pillow (for example, you can use TechnoNIKOL or Bikrost) with a reserve for running on the sides of the foundation.
Concreting tape
For internal formwork, polystyrene foam is used instead of a plank structure to avoid the possibility of cold bridges occurring along the entire perimeter. Each piece of tape is reinforced with a frame made of corrugated steel rods with a diameter of 8 to 14 mm.
When the width of the tape exceeds 160 mm, the frame is arranged in two rows for the upper and lower chords. To fix the rods, U-shaped clamps made of reinforcement with a cross-sectional diameter of 6 to 8 mm are used. The lower belt is placed on plastic stands. After dismantling the formwork, the inner part of the tape is covered with a layer of waterproofing material, after which the structure is covered with non-metallic material for the entire service life of the foundation.
Insulation
Peculiarities:
- The outer part of the tape is not insulated, thus the lower part of the load-bearing structure remains without insulation.
- Two layers of polystyrene foam 50 mm thick are glued to the inner surface of the tape.
- After filling the free space with non-metallic material, the base is insulated with polystyrene foam.
Backfilling the interior
Since the reinforced concrete strip protrudes above the surface of the ground, it is impossible to make floors on the ground without backfill. It is prohibited to use waste soil for this purpose according to the technology, therefore the following is used for backfilling:
- crushed stone;
- coarse sand;
- sand-soil mixture.
To ensure the correct geometry, bulk raw materials are compacted using a vibrating plate every 10 cm of bedding. To prevent mixing of nonmetallic material with soil, a layer of geotextile is laid on the bottom.
Waterproofing
When using permanent tape formwork, the side faces of the load-bearing structure remain unprotected from moisture, so it is advisable to add penetrating hydrophobic additives to the concrete solution even before the mixer arrives at the site.
In the case of removable formwork for tape, the foundation is coated with mastic based on bitumen or epoxy resin. You can also stick rolled hydroglass insulation onto the surface.
When, according to the design, the slab consists of blocks or bricks, then after installation they use welded or glued waterproofing materials. The simultaneous use of several waterproofing methods allows you to extend the service life of the load-bearing structure to 80 years.
Fill
According to the Finnish foundation laying technology, there is no need to install formwork for a concrete screed, since this role is performed by reinforced concrete tape by default.
When the design thickness of the slab does not exceed 0.15 m, and the soil on the site is characterized by the absence or low degree of heaving, then you can limit yourself to one reinforcing belt made of rolled metal with a cross-sectional diameter of 8 to 12 mm.
In other cases, the reinforced frame will consist of an upper and lower chord, which are connected to each other by U-shaped blanks.
Concreting the slab is carried out only after the tape has gained at least 70% strength.
Since the lower part of the Finnish foundation is not limited by a cold contour, but has fragments under the internal walls, the reinforcing frame consists of several independent screeds located under different rooms. This feature greatly simplifies the process of pouring concrete screed.
The slab concreting technology is a standard set of operations:
- Arrange mortgages for the input nodes of utility lines.
- Fill the space with concrete, starting from the corner.
- Compact the solution using a deep vibrator.
- Care for the concrete until it dries completely: regularly irrigate with purified water, cover with film from heat and precipitation.
Foundation manufacturing technology.
The Swedish stove is installed according to the following steps:
- First, a shallow pit is developed. Calculation of its width should include the size of the house along the perimeter plus a little allowance on each side. Recesses are also made for load-bearing walls.
- The pit is covered with an even layer of sand. In some cases, geotextiles are appropriate. It allows water to pass through but retains the sand layer. Its thickness should be 10-15 cm.
- The layer of sand is carefully compacted. Drainage and water supply, sewer and electrical communications are laid on top of it. It is necessary to allow a small margin for their length.
- A layer of gravel is laid to cover the pipes. It must be compacted so that the monolithic reinforced concrete slab is perfectly level. To do this, the layer of material is moistened with water.
- Two layers of polystyrene foam are laid, between which waterproofing is laid. You can use a polymer curling iron. The insulation layer should be 20 cm.
- The pipes of the heated floor system are laid on top of the foam. In order for them to retain their volume when poured with concrete, they should be inflated with air.
- Reinforcing mesh is laid out.
- The multilayer structure is immediately poured with concrete and immediately leveled.
Following the technology of multi-layer cake, a Swedish stove with your own hands is quite feasible and does not require the involvement of specialists.
The foundation is Swedish plate technology.
Construction of a Swedish slab foundation (video).
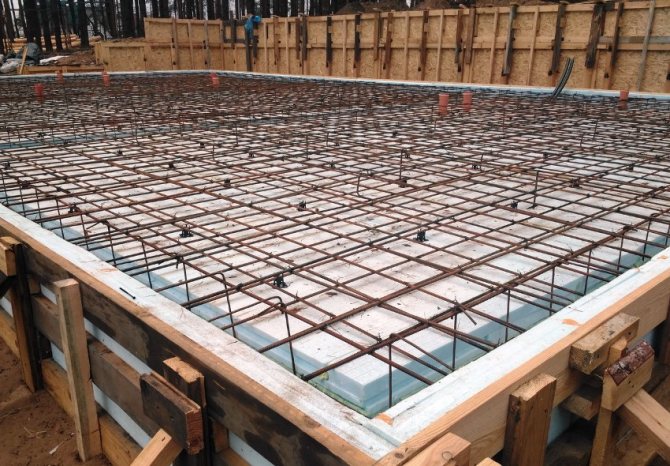
Rules for foundation reinforcement.
To ensure that the slab retains its rigidity and shape throughout its entire service life, reinforcement is used. Before starting work, it is necessary to calculate the rods and prepare them for operation, as well as the wire for connecting the intersections of the rods.
It can have a cross-section with a diameter of 4 to 8 mm. It is necessary to cut pieces of it into 20 cm pieces. The amount of reinforcement is calculated based on the rule that the distance between its rods is from 20 to 40 cm.
The material should not be rusty or have the slightest deformation in its structure . To bind the Swedish slab, it is necessary to use two layers of reinforcement. The first is located at a height of 5 cm from the bottom of the pit, and the second is located just below the level of the formwork.
To tie the rods together, you should use a special hook or a tying gun. If you plan to build heavy walls of a house, you can also use welding. It is important to securely fix the corners of the ligament. To construct a Swedish stove, it is better to use ribbed rods with a cross section.
They are tied with wire, in a figure eight knot. To prevent the insulated Swedish plate from deforming, you must try to ensure that the bond is as strong as possible. It is important to remember that the rods should not come into contact with the ground, as this can cause corrosion.
How to make a calculation?
If you plan to build a “buffet wall” for a small building, then you can calculate the parameters yourself, adhering to the following parameters:
Swedish stove diagram.
The foundation layers are Swedish slab.
- the thickness of the overall slab is made by reinforced concrete casting and should remain within the range of 120-180 mm;
- along the perimeter of the base it is necessary to equip stiffening ribs no less than 30x30 cm. They will become the basis for load-bearing walls;
- internal stiffening ribs are erected under the walls of the house along the entire perimeter in increments of 1.5 to 4 m;
- the size of the reinforcing strips must be no less than 200×200 mm;
- The foundation can have different depths. If a basement room is planned, the pit can reach 2 m;
- the slab is reinforced with a steel rod with a diameter of 10-14 mm and a cell of 20×20 m; Two-layer reinforcement is produced, with a distance between layers of more than 100 mm. It is necessary to ensure that the reinforcement mesh is completely absorbed by the concrete.
Insulation of the foundation.
Foundation technology involves integrating a heated floor system into it. To make an insulated Swedish stove possible, you must follow the following rules for installing heating pipes:
- the pipe arrangement must be dense, and along the outer walls a higher density is required than in the middle of the slab;
- in order to balance the flow of pipes and ensure optimal heat transfer, the distance between them must be at least 10 cm;
- to ensure uniform distribution of heat flows, the distance between the pipes should be no more than 25 cm; temperature changes on the floor should not exceed 4 degrees, then they will not be felt by the foot;
- heating pipes must be laid in the foundation at least 15 cm from the external walls;
- It is recommended to calculate the length of pipes so that it is not more than 100 m, because excessive length leads to hydraulic losses.
Recommendation: Not a bad review article, from it you will learn about the foundation technology of the Swedish slab. In reality, the technology is simple and accessible. But you don’t need to pretend to be a smart guy or a smart girl, it’s better to turn to specialists. They will make competent and correct calculations. As a result, you will not lose your money.
Step-by-step instructions for installing USP
The site has been prepared, communications have been laid, now you can move on to laying the foundation. The procedure looks like this:
- Installation of formwork. The structure should protrude 20–25 cm above the ground level. The formwork consists of boards, wedges and bars. First, we knock down the boards into panels of the required height. To do this, you can use bars, which are also suitable for use as spacers. We place the shields around the perimeter and fix them at the bottom with wedges and stops. A layer of crushed stone up to 10 cm high is poured onto the sand slab, inside the formwork.
- Installation of thermal insulation material. The thickness of the insulation located under the concrete slab must be at least 20 cm, and at the side edges - at least 10 cm. That is, in the horizontal plane it should be laid in two layers (the width of one is 10 cm) with an intermediate layer of waterproofing material, and at the sides of the formwork - in one layer. When laying in insulation, cutouts should be made for sewer pipes. For this procedure, use a utility knife.
- The next stage is the installation of reinforcing mesh. The foundation is reinforced with four metal rods. To fix them, use distribution clamps with a cross section of 6–8 mm and binding wire. The installation step should not exceed 30 cm.
- Installation of a “warm” floor and pouring concrete mortar. We install curved pipes of the heating water system on top of the reinforcement frame, securing them with nylon ties. By the way, the installation of this system can be performed not only before pouring the subfloor, but also after installing the load-bearing concrete slab. In the first case, when pouring together, you will significantly save work time. The second technology will not make you worry too much. The fact is that even with the slightest violation of the integrity of the circulation system, you do not have to hack the entire load-bearing slab. It will be enough to remove the thin layer of fill that covers the underfloor heating pipes. In this case, an additional layer of thermal insulation with marks on the location of the heating system pipes should be laid on the rough foundation. At the end of the installation of the “warm” floor, the lines are filled with a special mixture, which, after hardening, forms the finishing layer of the basement floor.
Gallery: Step-by-step execution of work
After pouring the foundation, you need to let the solution dry completely.
Air bubbles formed when pouring the solution reduce the strength of the concrete base
The pipes are secured using plastic clamps
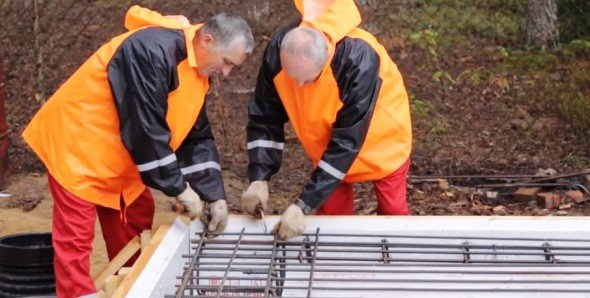
Tying reinforcement bars with metal wire
When laying thermal insulation material, cut holes in the sheets for sewer pipe outlets
After the formwork has been arranged, crushed stone is poured inside onto which the insulation will be laid.

To fix the boards, it is advisable to use powerful screws or nails
Helpful advice: Start pouring the foundation from the corners and move gradually towards the center. Fill in layers 10–20 cm high, leveling them using a flat wooden board. After pouring, the foundation must stand for several days to gain strength. The formwork is removed only after the structure has thoroughly hardened.
Results
So, when you order a USP foundation upon completion of the work, you will receive:
The foundation is in the form of a concrete monolithic slab.- Divided communications, namely water, sewerage, grounding, electricity, etc.
- Ready-made heating system - heated floor throughout the entire area of the building.
- Floor insulation – a layer of EPS/PSB will be laid under the slab.
- Insulated blind area - the ground around the house will never freeze.
- A finished subfloor that will be so smooth that you can lay both laminate and tile on it.
- Finishing the base using flat slate - the problem can be solved by simple painting.
- Storm drainage, storm water inlets.
- Drainage.
- Ready-made sewerage solution - VOC or septic tank.
When comparing USHP with screw piles or with a standard concrete slab, we find that the comparison is not in favor of all other types. Naturally, piles will be cheaper, and you can also build a fairly good house on them, but imagine how much work will be left to do later? Who will carry them out and how much will it cost?
When assessing and comparing the cost of different types of foundations, you should take into account all of the above factors. USP is a ready-made zero cycle, a kind of turnkey foundation. You can also install a house box on the USHP, and the rest will already be carried out inside - communications, heating and insulation. In comparison, in a house on the same screw piles, you will need to make a lower floor, insulate it, install communications, make wiring around the house, fill in the screed, install a heating system, and come up with something with the finishing of the high base. As you can see, the first option has many more advantages, but what type of foundation to choose is up to you!
Providing communications - water, electricity and sewerage
Now let's talk about how to carry out communications, namely sewerage, electricity and water. In addition to the heated floor, communications are also laid inside the slabs, namely cables (electrical, which can even be routed into the walls), pipes for hot and cold water, sewer pipes, water drains for the future shower room, as well as other cables and air ducts. This is the standard set.
The USHP foundation slab is not made for an abstract house with only estimated dimensions. At a minimum, you will need a preliminary design, and then you can immediately supply heating to the rooms, run pipes to the kitchen and future bathrooms, and begin installing underfloor heating collectors and water supply in the technical room.
The main stages of installing a USHP foundation
Before starting work, calculations and soil studies are made to select the thickness of the bedding and the slab itself. On each side of the monolith, 2 m are provided to install a water drainage system from the site.
Do-it-yourself USP, step-by-step instructions:
- Soil development. A plant layer 30–40 cm thick is removed. After mechanical excavation of the soil, the bottom of the pit is cleaned to the mark.
- A geofabric is laid to prevent the soil from mixing with sand; overlaps are made at the joint of 10–15 cm.
- Sand 7 - 15 cm is placed in the pit, crushed stone up to 15 - 25 cm is poured onto it. The layers are spilled with water and compacted.
- A drainage system is being installed.
- The insulation is placed on the bottom and mounted around the perimeter from ready-made factory elements cut to size, or the pieces are selected locally. For fixation, corner and rectangular fasteners are used. Wooden supports are installed on the outer part of the permanent formwork.
- The frame is welded directly in the pit or prefabricated blocks are made from reinforcement, which are welded separately. They are installed into the formwork in parts and connected.
- Collectors and communication pipes are installed, and heated floors are installed. The collectors are laid between the mesh rods.
- The concrete is fed in layers and each layer is vibrated with a power tool to rid the mass of air.
The insulation layer is installed in a checkerboard pattern with the joints shifted in a vertical and horizontal plane. The end insulation plates are secured with plastic dowels with wide caps (mushrooms). The seams are filled with polystyrene foam glue. The insulation is laid under the slab in 2 - 3 layers, and under the stiffeners it is made in one sheet.
Advantages of the stove
Construction of a building based on USP has the following advantages:
- Life support engineering networks are laid either in the slab itself or under it. As a result, there is no need to install a basement or basement floor to accommodate communications, carry out work on insulation and protection of pipelines and cables, which reduces construction costs.
- One of the foundation layers is thermal insulation. Its presence prevents the onset of seasonal cyclical operation (freezing - thawing).
- The widespread use of waterproofing materials protects enclosing structures from moisture penetration, which increases their service life and heat-holding capacity.
- The use of waterproofing materials, drainage, and sand and gravel “cushion” completely eliminates the destructive effect of moisture on the foundation.
- Due to insulation using Swedish technology and the installation of a water-based “warm floor” system, operating costs for heating are significantly reduced.
- The solidity of the structure, reliable reinforcement, and designed stiffeners provide greater load-bearing capacity and do not create restrictions on the building construction technology or the use of various building materials for the construction of walls, ceilings, and roofs.
- Leveling the concrete base with subsequent grinding makes it possible not to carry out the final finishing of the floor of the 1st floor before laying finishing materials, which saves money and time.
- The materials necessary for the creation of the USP are supplied to the construction site in small batches; their use does not require the use of cranes and heavy vehicles;
- The laying of utility networks and the installation of the foundation are carried out within one technological operation, which reduces construction time.
Monolithic concrete slab as a subfloor
And the final work on the USP is pouring concrete and grouting or grinding it. When all the heated floors and communications are ready, the cables and leads are checked, the integrity of the pipes is tested using pressure, you can call the mixer and start pouring the high-quality concrete mixture. You cannot use homemade concrete, only a mixture from the best concrete plant, and the latter must have all the required documents, certificates and samples.
After a certain time after the pouring has been completed, when the concrete has gained a little strength, you can begin grinding the surface using a special trowel, which is popularly called a “helicopter”. Both during pouring and during the grouting process, the evenness of the slab should be constantly monitored, and a laser level will help you with this. As a result, you will get a smooth concrete base with minimal differences. After this, you can immediately begin laying laminate or tiles, and you will not need to pour additional screed - everything will be ready.