Pouring concrete into formwork can be done in different ways. Formwork is made before concreting any of the structures begins. Depending on the type of structure, the methods used to supply and pour the concrete mixture inside may differ. Sometimes one or two concrete mixers are enough, but if significant volumes of concreting are to be done, an automixer equipped with a concrete pump may be required.
Formwork diagram.
Types of formwork
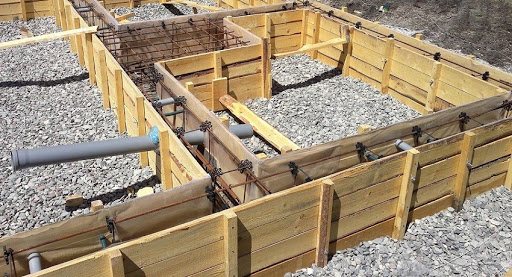
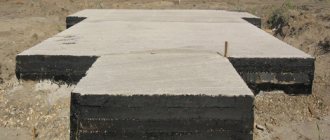
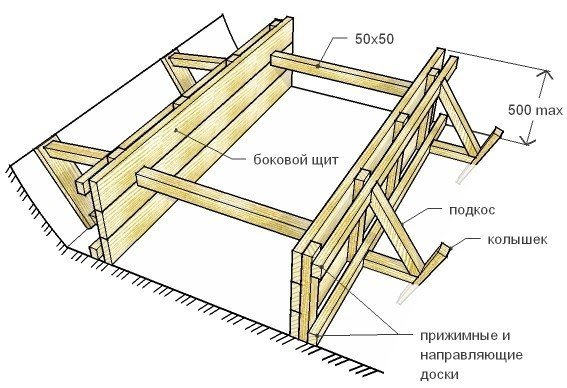
Figure 1. Concrete formwork
The most common type of formwork is a wooden structure made from boards and then held together with beams. The planed surface of the boards is turned inward so that the monolith is smooth on the outside. Dismantled formwork can be reused or its elements can be used for household needs.
It is convenient to use construction plywood with a laminated surface instead of boards. Shields are assembled from it, having metal stiffening ribs on the outside. Also, at large facilities, metal formwork is used, which is mounted with lifting mechanisms. The parts of such a fence are fixed with bolts or welding. To prevent concrete sticking, all internal planes of the formwork are coated with emulsion.
If it is necessary to apply the structure at different levels of the building, mobile formwork is used. After the concrete hardens, its metal panels are dismantled and moved higher. Such mobile fencing is common not only in industrial, but also in mass housing construction.
Types and characteristics
Removable ones are usually used by organizations that deal with such work constantly and professionally. They use metal, laminated plywood, etc., which before use must be lubricated only with special lubricants or emulsions (not harmful to the environment) to subsequently facilitate separation from the concrete.
One of the frequently used formworks (by the way, constantly and for a long time) are trenches in the ground. Such formworks are now often used for the construction of simple strip foundations.
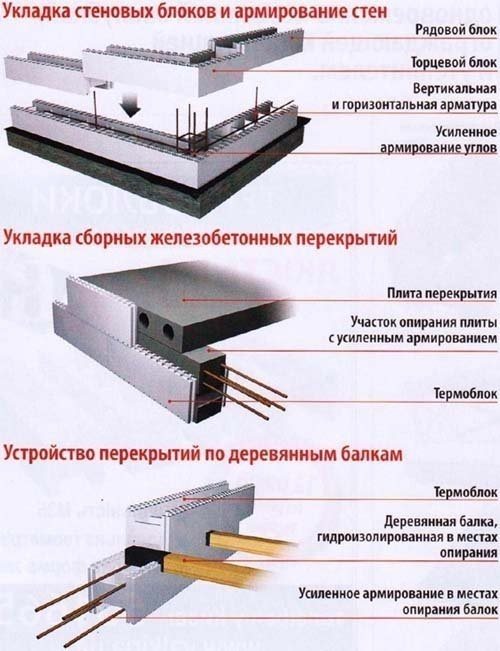
Diagram of the installation of permanent formwork made of polystyrene foam or the “thermohouse” system.
Fixed ones do not need to be lubricated with anything; they can be made from a wide variety of materials, but among them there are favorites that have earned their popularity only in recent years.
Thermohouse systems are now very well known. The system is a foamed polystyrene structure that has no bottom or roof. But it is equipped with partitions in the required quantity, they provide additional strength and rigidity of the entire structure.
In order to assemble such a box system, you will not need any special skills or many years of experience. It is assembled like an ordinary children's construction set according to the appropriate scheme.
Assembly accuracy is increased thanks to the system of protrusions and holes with which each structural element is equipped along the lower and upper perimeters. But to save money, you can use any available materials you have, combining them at your discretion. The most important thing is that their strength is not in doubt.
Preparation and pouring of liquid concrete
Since hardened mortar is difficult to correct, you should initially understand how to properly pour concrete into the formwork. All cracks in the structure whose width exceeds 8 mm must be sealed. Next, all wooden surfaces are wetted. If the formwork is plastic or metal, it is coated with lubricant. All fittings inside must be cleaned, removing dirt and rust.
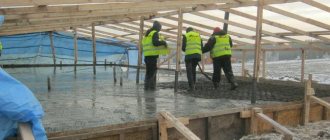
The most important procedure is concreting. The composition must be distributed evenly so that it fills the intended form. It is imperative to control the penetration of the solution into the gaps formed by the reinforcement rods.
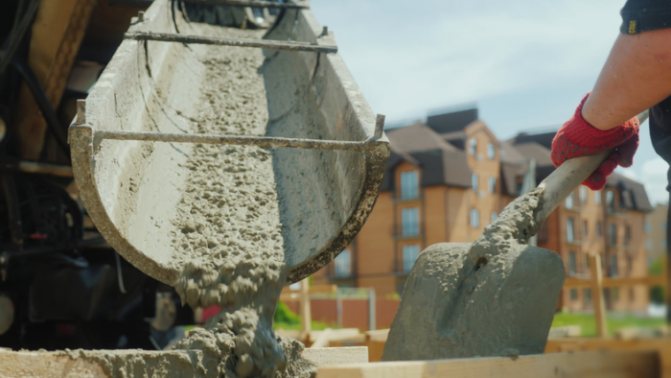
Laying must be done carefully; it is forbidden to overturn the solution in large portions from a height. This is how an impact occurs, which significantly deteriorates the quality of the monolith. Dynamic loads can also destroy the formwork. To compact concrete, deep vibrators are used, and the mortar is bayoneted in the corners of the formwork.
After pouring, the concrete needs to be kept for a short time so that it acquires its original hardness. This period varies, it depends on the air temperature, hardening conditions and the degree of humidity. When the monolith acquires minimal strength, it is allowed to dismantle the formwork.
Mortar unit
When construction is large-scale, it is more convenient to prepare the mixture automatically. To do this, an application is submitted for a mortar unit, where all the concrete ingredients are poured into a container, and then the body of a special vehicle is filled with the finished mortar. After this, the transport delivers the mixture ready for pouring to the site.
Automixer
Also, for large-scale construction it is convenient to use a special vehicle equipped with a rotating drum. Concrete ingredients are loaded inside the container, and during transportation they go through all stages of preparation in a mixer. On site, the transport delivers the liquid solution through a hose directly into the formwork. When there is no access directly to the pouring site, the solution is unloaded into a bunker, which is moved by crane to the construction site.
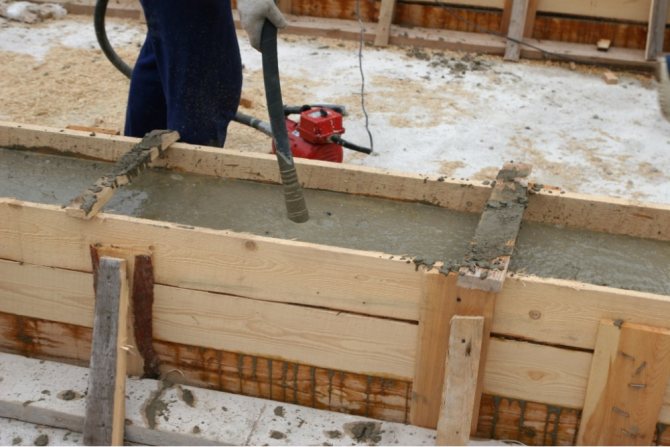
Figure 2. Pouring concrete into formwork
Concrete mixer
A concrete mixer is used when a small portion of concrete is needed. All components of the cement mixture are loaded inside, after which mixing is started. This option for preparing concrete is cheaper than ordering special transport. Also, a concrete mixer significantly speeds up the work.
Manual method
When it is necessary to prepare a small volume of concrete, it is advisable to prepare it manually. The ingredients are poured into a large container, mixed and water is added to obtain the required consistency of the solution.
Compaction and drying process
For compaction you will need a deep vibrator or reinforcing rods.
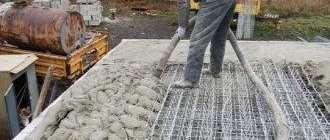
The technology for correctly pouring concrete into formwork requires mandatory compaction, in other words, the removal of air trapped in the mass. You can use a deep vibrator for this in home construction.
Device diagram.
The working element of the vibrator is immersed directly into the concrete in increments of no more than one meter. Each layer (when pouring layer-by-layer) must be compacted separately. If you do not have a deep vibrator, you can use ordinary reinforcing rods, which you will probably find at your construction site. But when joining with a reinforcing bar, the step must be reduced to 40-50 cm to ensure better quality of strength.
You can speed up and improve the compaction process by tapping the formwork with a sledgehammer, of course, with moderate force.
For the drying process you will need:
- Film.
- Water.
The conditions for maturing (drying) concrete must also be ensured in accordance with certain rules.
- It is imperative to protect it from sunlight; for this you can use a regular film, which covers the foundation.
- Wetting the surface with water is also a mandatory process; it prevents premature drying of the top layer. To do this, you need to moisten it with water 4 hours after pouring. Then on the third day, water it 3 times during the day, then a week later water it with the same 3-time method.
Curing
Maximum attention must be paid to the concrete until it hardens completely. In summer, its surface must be moistened and covered with moisture-proof material. Such measures will prevent excessive evaporation of moisture. In winter, it is necessary to insulate the monolith on all sides. There are various heating options: covering with a layer of foam plastic, mineral wool, connecting heaters. After 10 days, the formwork is dismantled, after a month the concrete structure is completely ready.
If you accurately calculate the structure, use the equipment and tools necessary for pouring, and use high-quality materials, then you can count on high-quality and reliable formwork.
Drying and surface treatment
After pouring concrete, you need to wait until the surface dries and sets. This occurs, depending on the temperature and humidity, in approximately 24-48 hours. After this time, you should remove the inserts that were installed to form thermal joints and clean the surface with a wide spatula from remaining deposits and irregularities.
The setting of concrete does not mean that this material has achieved the calculated physical characteristics. The complete hardening time for concrete grade M200 can reach 28 days, but it is believed that concrete structures can begin to be used within one and a half to two weeks.
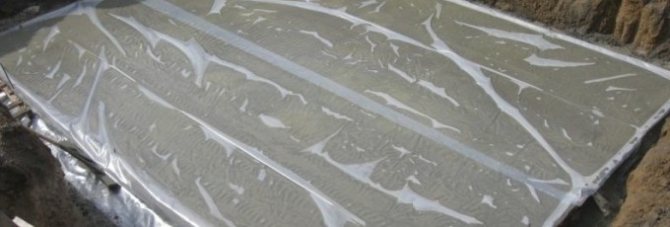
As a preventative measure, it is recommended to cover the concrete area and paths with plastic film to reduce the rate of water evaporation.
At this time, it is necessary to take measures to ensure that the concrete does not dry out prematurely, and that the water necessary to complete the chemical process of cement hydration remains in it.
In too hot sunny weather, the site needs to be watered periodically. After two weeks, you can remove the film and finally start using the new elements of landscaping your yard
Necessary equipment
When custom-made concrete is used, it is delivered to the site using special equipment. A wooden trench is prepared for pouring. When preparing the solution yourself, use a concrete mixer. To work, you need to have a wheelbarrow to make it easier to move the mixture. To remove air from the poured solution, you will need a special vibrator or a piece of reinforcement. The remaining tools that make it easier to figure out how to pour concrete are a hammer and shovels. When the reinforcing mesh is made from rods, you need to have knitting wire on hand.

Figure 2. Tools for pouring concrete
Recommendations
The pouring technology is influenced by the period of work and the region of construction.
Filling in summer
In summer, the solution hardens very quickly, so it is necessary to organize instant filling of the formwork with it. It is advisable to add ingredients to the solution that prolong the setting period of the cement. The poured surface is moistened, however, without excess moisture. After finishing, the surface is covered with film and constantly sprayed with water.
Pouring in cool weather
In moderately cool weather, the hardening of the mixture slows down. You need to wait longer before grouting the surface. Moisturizing is necessary in moderation and is performed less frequently.
Pouring in winter
In winter, it is necessary to prevent the solution from freezing. Frost-resistant ingredients are added to it. Before pouring, you need to make sure that the sand cushion is not frozen. To do this, it is heated. The finished monolith is covered first with film and then with heat-insulating material. It is convenient to use sawdust or straw. When it is frosty, it is prohibited to water the surface.
Concreting the structure yourself is quite possible. This kind of work takes a long time and requires a lot of physical effort to complete it. The main requirement is to carefully plan everything and then strictly follow the technological requirements.
Applicable forms
To make paving stones or paving slabs, you need to have molds. They are conveniently made of plastic. If large products are required, the formwork is knocked down. Before filling the mold, the wood is moistened with water. Sometimes it is convenient to make the form directly in the ground. To do this, the bottom of the hole is covered with sand, it is moistened and the solution is poured. Then the surface is leveled and covered with film, waiting for the monolith to set. It is convenient to make stencils from different materials. Polystyrene foam is suitable for single use. To remove the finished product from it, the formwork must be broken.
How is the solution poured?
Different technologies and filling methods are used for different objects. It is important to control the level of concrete pouring and eliminate the possibility of slopes. If the solution is mixed directly on the site, follow the proportions of the components. The strength of the future coating directly depends on the quality of the fill. Filling the floor should be done in one approach.
Concrete placement speed
When placing fresh concrete into permanent formwork blocks, it exerts lateral pressure on the side walls of the EPS panels. The intensity of this pressure depends on several factors, including;
- Concrete pouring speed
- Specific gravity of concrete
- Type of cement
- Concrete slump
- Concrete temperature
- Fill height
- Internal vibration depth
The maximum deformation capacity of ICF blocks is 41.4 kPa. The table below shows the design lateral pressure for freshly placed concrete that should be used for wall formwork.
Table 1 - Concrete pressure for walls with internal vibration
Table 1. Lateral pressure of concrete 1.2
| Laying rate (m/h) | 10°C (kg/m3) | 21°C (kg/m3) |
| Up to a height of 4.2 m | Up to a height of 4.2 m | |
| 0.305 | 9611 | 9611 |
| 0.610 | 9611 | 9611 |
| 0.690 | 11053 | 9611 |
| 1.219 | 13936 3 | 10572 |
| 1.524 | 16819 3 | 11533 |
- 1 The maximum pressure should not exceed w*h, where “w” is the specific gravity of concrete (kg/m3), and “h” is the maximum pouring height in m.
- 2 Based on cement concrete types I and III with a density of 2400 kg/m3 and a maximum settlement of 178 mm, without additives and with a vibration depth of 1.2 m or less.
- 3 Lateral pressure exceeds the deformation capacity of permanent formwork from most manufacturers.
The recommended concrete laying speed is 915-1200 mm/hour.
Preparing the repair kit
Before pouring, create a set to react to the formwork being pushed through:
- Several pieces of OSB or plywood measuring 600x600mm or so.
- Box of drywall screws
- Fully charged electric drill
- A portable ladder sufficient to reach the height on the side of the wall on the other side of the scaffolding.
Before pouring, inform all crew members of the procedures that must be followed to deal with the rupture.
If a gap occurs, the person standing below must react to it:
- Disable pump and vibrator
- If the formwork has only bulged and has not separated from the plastic lintel, install a support for the formwork in the same place. You can use additional support for this.
- If the formwork is broken, remove it and clear away the concrete, insert the broken piece of foam so that it is flush with the wall.
- Secure one or more pieces of plywood with several screws into the undamaged sheets or ties on either side of the fault.
- Return to normal work - this is a very minor event if you are prepared for it.