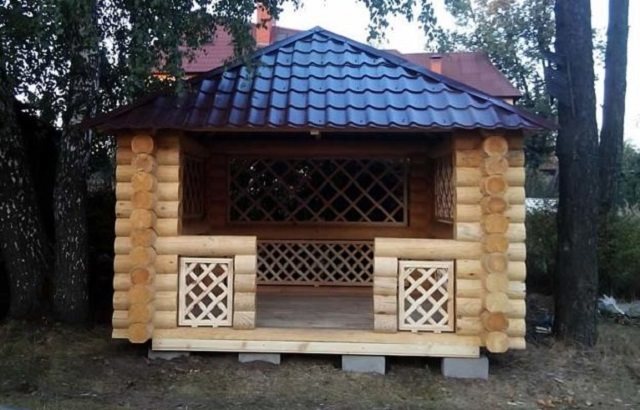
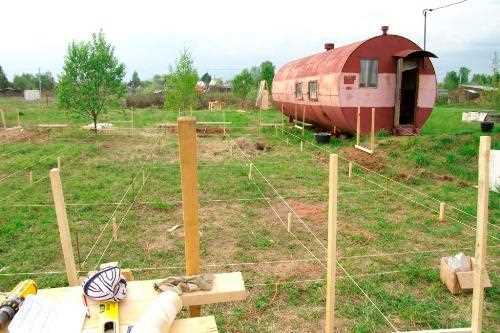
A gazebo is a traditional decoration of any urban or suburban area. Therefore, when planning a territory, a place is usually determined for it immediately after the site has been allocated for the construction of the house itself.
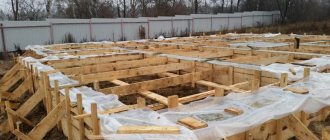
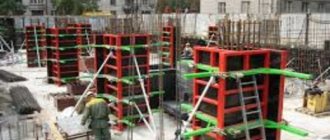
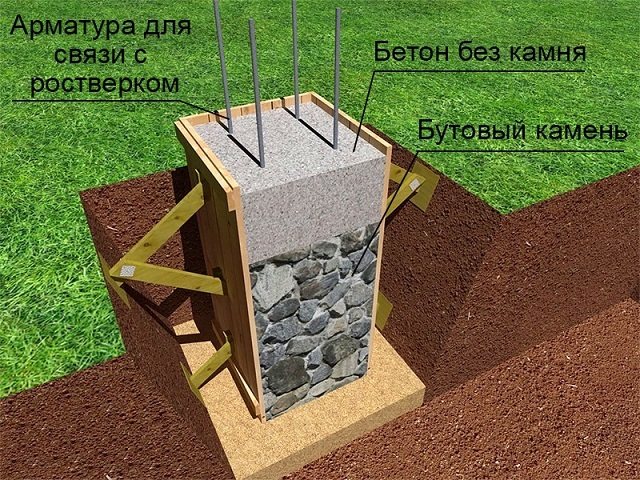
Column formwork for gazebo
The most comfortable corner of the site is usually allocated for the gazebo, since it hosts free leisure hours, during which it is pleasant to sit in the fresh air, at a set table with friends or family members. In addition, the gazebo is one of the key elements of landscape design. Therefore, it is worth carefully considering in advance what material it will be built from. Depending on this choice, the design of the foundation for this building is determined, as well as the formwork for pouring it.
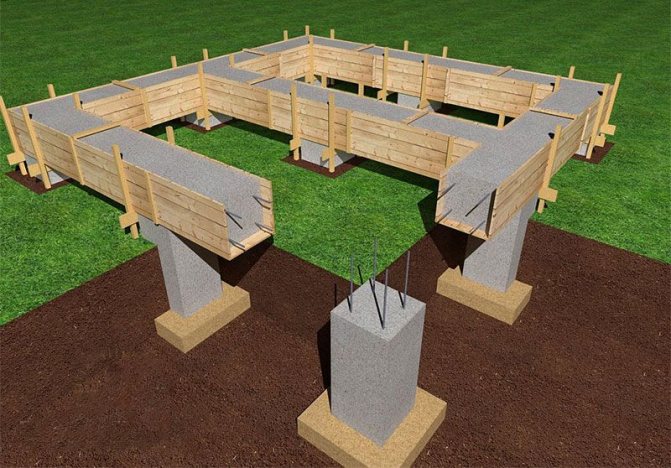
Gazebos are usually not overly massive, so there is little point in pouring a continuous strip or monolithic slab under them. The most common foundation option in this case is a columnar foundation. And column formwork for the gazebo will help to build it.
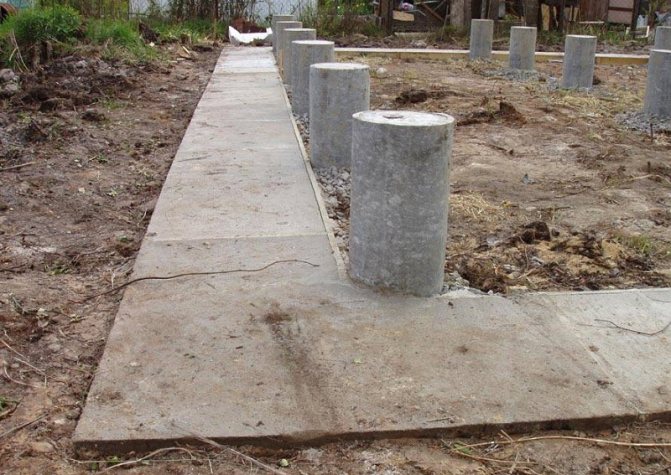
DIY columnar foundation
An interesting version of a columnar foundation with his own hands was proposed on one of the forums by a self-builder.
What do we need to make such a foundation, and so a columnar foundation with our own hands. DIY columnar foundation
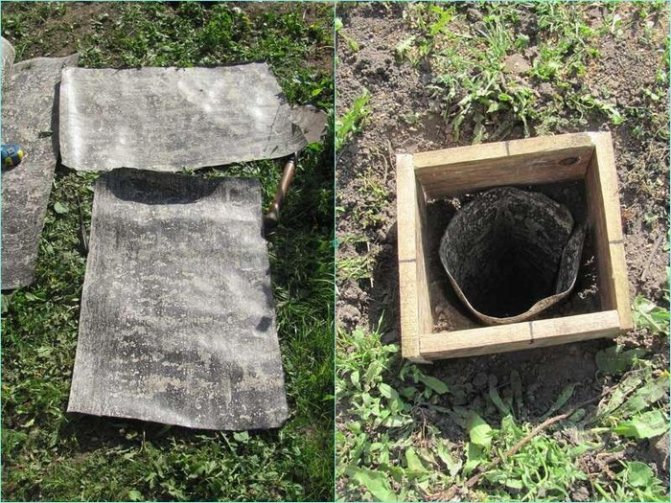
We will need roofing felt, cement, sand, crushed stone, reinforcement, tape, a hairpin, a garden auger and a little patience and hard work. To begin with, we dig a hole like this, at least one meter deep.
With the help of such devices.
And so let's start making a columnar foundation. We make a device: on a wooden board we draw a circle with a diameter of 180 mm, if the diameter of the pillar is 250 mm.
Therefore, the reinforcing ligament had to fit with a gap to the edge of the column. We inscribe an equilateral triangle into the resulting circle. We screw in the screws at the vertices of this triangle. We screw in another self-tapping screw next to one vertex.
It serves as a stop when forming wire. We take a steel wire and insert it between two adjacent screws and begin to shape it along the vertices of the triangle. The result was a kind of triangle. We bite off the excess. The reinforcement bars are located at the vertices of the resulting triangle. We also fix them with steel wire, only of a smaller diameter (1.8 mm). After some manipulation we get something like this.
And so we will continue. As formwork for future pillars we will use roofing felt wrapped on a log with a diameter of 250 mm. We will wrap the roofing material in two layers and fix it in three places with tape.
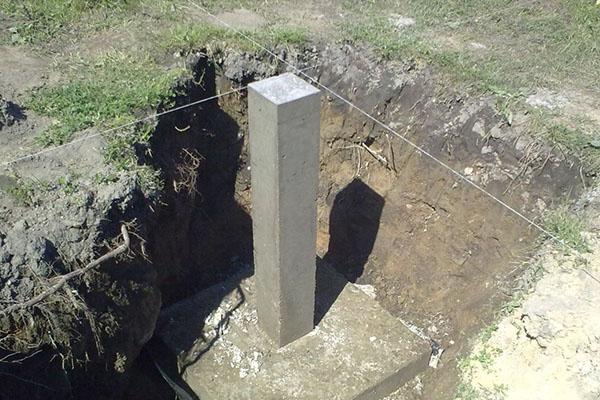
do-it-yourself finished columnar foundation
In the drilled well, first we make a sand cushion 300 mm thick and carefully pour it with water. Next we compact it. Then we insert a sleeve made of roofing felt into the hole. We make a mixture of concrete in the proportions of 5 kg of cement (calibrated bucket): 1.5 buckets of sand and 2.5 buckets of gravel. According to the eye, water is approximately 6-8 liters.
All this is calculated empirically for a concrete mixer, since the moisture content of the sand can be different. After inserting the sleeve, dump a bucket of concrete into the bottom of the well through a funnel; we make a funnel from an old bucket without a bottom. Then we insert the reinforcement and bring the concrete level to 500 mm above the ground surface. We compact each portion of concrete by itself. We cut off the top of the sleeve with a knife along the mark. Next, we bring the concrete to the surface of the sleeve.
Align the cap and insert the pin and nut in the middle of the post. Use a nut to set the required level of the stud above the surface of the post. We make the remaining pillars in a similar way; using a hydraulic level, we mark on each sleeve the upper edge along which we make the cut. We also fill the bases of the pillars with concrete, creating a blind area.
waterproofing a columnar foundation with your own hands
Next we do waterproofing. To do this, you need to melt the bitumen and add a little kerosene to it, so that when it hardens it will not be so fragile. Then we prepare sheets of roofing felt, folded in two layers, slightly larger than the diameter of the column. Next: coat the top of the post with the resulting bitumen mastic and glue the prepared sheet of roofing material onto it through a pin. We again apply mastic on top and along the edges. The do-it-yourself columnar foundation for our frame house is ready. Good luck.
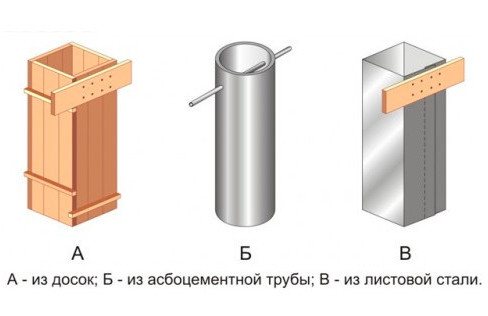
Formwork options for columnar foundations
The standards SP 22.13330, SP 50.13330 for the design and construction of foundations provide for a round and square cross-section of a vertical rod for a columnar foundation. Therefore, in addition to panel formwork, the use of plastic and asbestos-cement pipes is allowed, which are more convenient for self-manufacturing structures.
A columnar foundation is similar in appearance to a bored pile, but roofing felt formwork is unacceptable in this case. Piles always rest on a layer with bearing capacity; the pillars are buried maximum below the freezing mark, which does not guarantee reaching this level. Therefore, backfilling with non-metallic material (sand or crushed stone) is a prerequisite. Roofing felt is not able to provide either the spatial rigidity of the formwork or high-quality waterproofing of reinforced concrete.
Technology for constructing a monolithic columnar foundation in various formworks
A columnar foundation is used on non-heaving soils with a low groundwater level. Due to the small depth and low surface support, the structure is excessively mobile under the tangential forces of freezing soils.
Therefore, a prerequisite is free access to the widening of the pillar in the lower part for waterproofing the sole, backfilling the sinuses of the pit or trench with sand and crushed stone. In these non-metallic materials, heaving forces are minimal; the column is not subjected to pull-out loads even when the adjacent layers get wet or freeze. The construction technology looks like:
- excavating soil from a pit or making trenches under load-bearing walls;
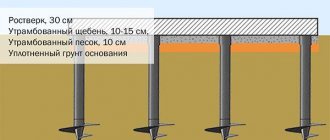
- backfilling with a 20 cm layer of sand, 20 cm layer of crushed stone with layer-by-layer compaction with a vibrating plate every 10 cm;
- pouring the footing - 5 - 7 cm of concrete screed to level the cushion, protect the rolled waterproofing from damage by crushed stone, reduce the protective layer of reinforcement in the upper reinforced concrete structures;
- waterproofing with Bikrost or TechnoNIKOL (2 – 3 layers) for protection from groundwater;
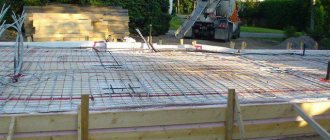
- concreting the base into the formwork with the installation of a reinforcement cage (horizontal mesh + vertical rods tied with clamps);
- installation of asbestos-cement, plastic pipes or panel formwork for a pole;
- pouring the structure with concrete with vibration compaction every 40 - 60 cm in height;
- tying with a monolithic or beam grillage to give the structure spatial rigidity and stable geometry.
The advantage of plastic pipes is the absence of roughness of the outer surface. When tangential forces arise from freezing soils, there is virtually no friction, and the pole cannot be pulled out.
Marking and excavation work
When installing cast-offs, the following factors must be considered:
- in the building area it is necessary to pull the cords along the axes of the load-bearing walls;
- the diagonals must match;
- To develop trenches or holes, additional marking will be required.
To increase the supporting surface, the columnar foundation is widened with slabs, for which formwork will need to be installed. The perimeter of the sole is usually twice the cross-section of the pillar. It is necessary to lay drains along the perimeter of the building and backfill with crushed stone. Usually 11 cm corrugated, smooth pipes are used, so the trench width will be 30 cm, depth 30 cm with a slope of 7 - 10 degrees in one direction.
Thus, when using asbestos-cement pipes for pouring pillars, it is necessary to retreat 0.7 - 1 m from the outer surface of the walls. For panel formwork, 1.2 m around the perimeter.
If the formwork is polyethylene pipes, the technology of bored piles can be used. No soil development will be required. Wells are made in the ground with the base widened with a special tool (for example, a TISE drill), a reinforcement cage is installed, the structure is poured into a pipe, and the formwork remains on the body for the entire period of operation. In this case, it is enough to pull the cords along castoffs (two pegs with a horizontal jumper) on both sides of the pipe on each wall.
The classic columnar foundation has a slab base, which is manufactured in stages:
- backfilling of the cushion - 40 cm of crushed stone at high groundwater level to ensure drainage with layer-by-layer compaction every 10 cm with a vibrating plate, 40 cm of sand at low groundwater level, 20 cm of sand + 20 cm of crushed stone on loams, sandy loams;
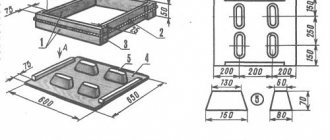
- pouring the footing - square formwork, size 100 x 100 cm for a pillar with a section of 40 x 40 cm, screed thickness 5 - 10 cm;
- waterproofing – 2 – 3 layers of rolled material (fiberglass with double-sided bitumen coating) with an overlap of 10 cm, sealing the seams with mastic;
- pouring the base - formwork 80 x 80 cm, height 30 or 60 cm with mesh reinforcement (reinforcement 10 - 16 mm periodic profile), release of vertical rods of the same diameter to the height of the column + 30-40 cm for connection with the reinforced belt of the grillage.
Purpose and structure of the pillar structure
The columnar base is intended for buildings with low weight, which include:
- one- and two-story buildings made of wood or other material (except brick);
- various utility structures;
- terraces;
- baths;
- gazebos;
- other structures of this type.
It will not be possible to build a large brick house on such a foundation. It consists of supporting parts in the form of pillars that are buried in the soil.
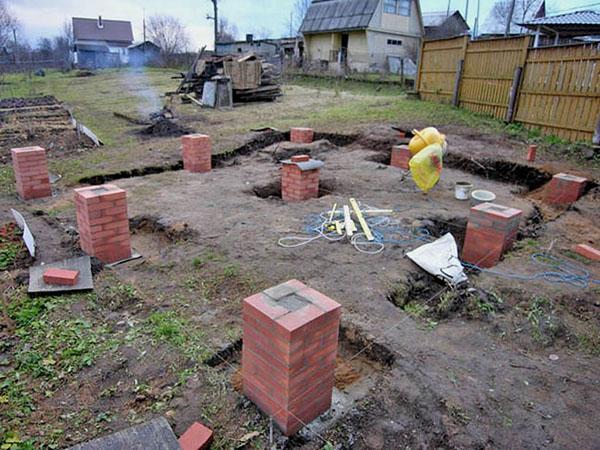
The supports of a columnar foundation are most often built from brick. They must protrude outwards
The parts should protrude outward. The tops of the supports must be at the same level. You will need to install a grillage on top of the supports.
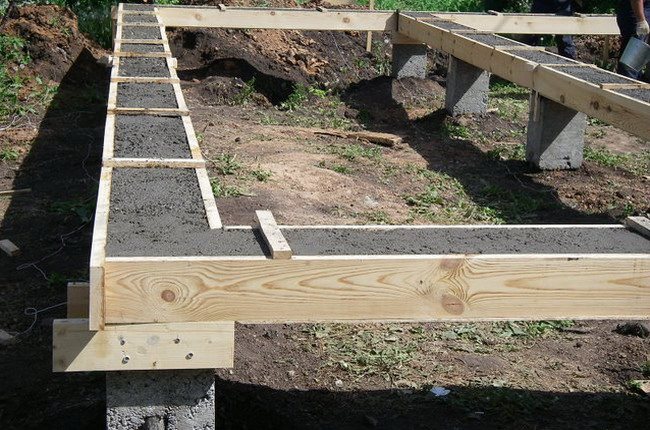
The grillage of a columnar foundation connects the pillars with each other and gives the foundation strength
The part holds the supports together and distributes the load evenly. Posts are placed at all corners of the building, as well as at the intersection of walls and in places where the load will be maximum.
The following materials can be used for supporting parts:
- concrete blocks;
- rubble stone;
- concrete;
- tree;
- iron or asbestos pipes;
- brick.
Wooden poles are rarely used today, as they have a short service life. However, under wooden buildings with low weight, it is quite possible to equip a columnar foundation made of wooden supports.
Wooden foundation supports are installed with a layer of sand and filled with concrete
The diameter of the pillars is from 0.15 to 0.2 m. Before deepening, the parts will need to be treated with antiseptic agents that can prevent rotting and burning. Bitumen mastics are used as waterproofing material.
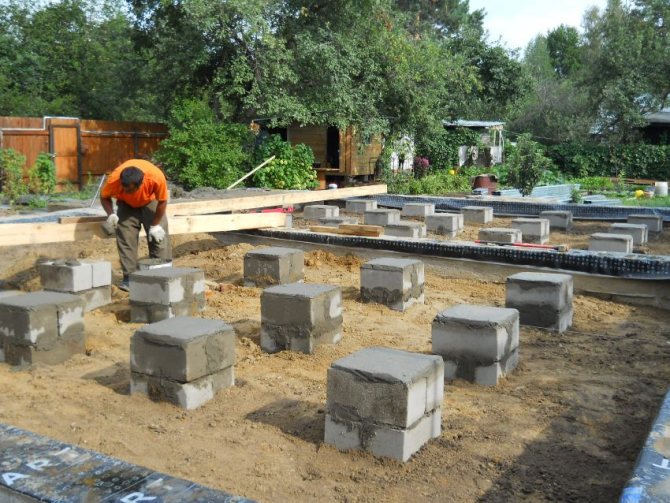
Reinforced concrete supports are the most common and reliable option for a columnar foundation. The parts can be solid or made of concrete blocks. The recommended width of the parts is 0.4 m. The block base has the same qualities as a brick structure. The reliability and service life of a building depend on the quality and type of material used.
Iron ore brick fired in a kiln can be used for shallow or non-buried structures. The optimal support width is 0.38 m or more. This type of foundation is suitable for the construction of a private house of one or two floors. Construction can be carried out on dense soil.
Pipes made of asbestos cement or metal can be used in the process of arranging supports as a permanent frame, since reinforcing bars are installed inside the elements and concrete solution is poured. A columnar base made of rubble stone is not recommended for installation on hills, as it will have low stability on moving soil. The construction made of rubble concrete is reliable. There are 2 manufacturing options:
- Concrete mixed with rubble. In this case, sequential installation is performed.
- Concrete solution poured into a well. The structure will need to be made of rubble.
Rubble concrete foundation support consists of rubble stone, which is filled with concrete mortar
The depth of the columnar structure must be calculated based on the structure of the soil, the level of groundwater and how strongly the ground freezes. A shallow structure is a structure buried 0.4 m into the ground. A buried base is immersed 0.6–0.8 m below the freezing level.
Quite often, a columnar structure is built in areas where the soil freezes 1.7–2 m deep, since making a strip base in this case is impractical. The lower part of the support must be buried 20–27 cm below the freezing level of the soil. This will make the base more stable and avoid deformation.
The distance between the supports can be from 1 to 2.5 m. If parts are installed in increments of more than 3 m, then a reinforced grillage will be needed. In this case, the structure must be made of reinforced concrete, which may entail additional financial costs. Installing additional supports will cost less.
The grillage can be made from durable bars. If the structure is made of wood, then it can be used as a mortgage crown. A solid grillage made of concrete, which is poured into a wooden frame, is becoming increasingly popular. The grillage can be low or high (40–80 cm above ground level). The choice depends on the type of soil.
An important design feature is that it is impossible to create a basement in the building. In some cases, to enclose the space between the pillars, a fence is formed, which is laid out from bricks, but is not connected to the base supports, so as not to violate the integrity of the structure during movements.

The fence of a columnar foundation does not need to be connected to the foundation pillars, otherwise it will compromise the integrity of the structure
Ventilation must be provided in the enclosure so that it is possible to ventilate the space under the floor. However, picking up is not necessary.
If the area is often flooded, then the columnar base should be erected at a high height above ground level. The optimal value is 1–2 m. In this case, the building will “float” in the air on supports.
How to prepare for work
The main principle by which a columnar foundation is selected is the low weight of the construction project. Therefore, houses made of wood, bathhouses, gazebos, and buildings made of SIP panels are often placed on a columnar basis. Depending on the developer’s budget, the load capacity of the foundation, the type of soil, general preferences and aesthetics, the columnar foundation is divided into the following types:
- Concrete, reinforced pillars. This option is the most common. It requires the use of formwork to raise the future house to the desired height. The resulting monolith has high strength, is resistant to soil heaving and can withstand the loads of even two-story wooden houses.
- Brick-monolithic option. This variety has been used for a long time, which proves the durability of the chosen base. The columnar foundation, the dimensions of which must correspond to the design documentation, is a monolithic base filled with concrete M200-M300 to ground level. Next, the base is laid out from red ordinary brick, leveling the plane for the future house. Brick is often replaced with a block. It is more convenient and faster to work with it.
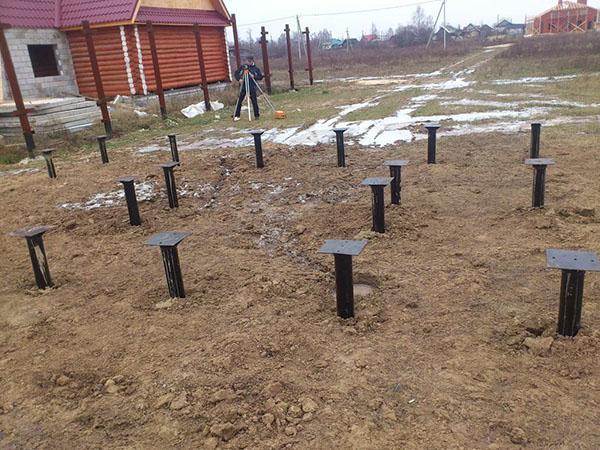
- Foundation in the form of piles. The support points here are metal piles that are screwed into the ground. The depth of a columnar foundation can vary, since the piles can be joined together.
Pros, cons of columnar support
The main advantages of a columnar base are low cost and speed of erection. Compared to tape or monolithic slab, construction budget and time savings reach several times.
Reducing costs does not come from purchasing cheaper raw materials, but from reducing quantity. Less cement, sand, reinforcement, crushed stone, and insulating materials are needed.
If the owners are building a house or cottage on their own, the pillars will be the most successful solution, thanks to the gradual filling. You don’t need to do everything in one go; you can divide the work into stages.
It’s easy to make a pole without hiring special equipment or a construction crew. If in doubt, you can consult a specialist.
The foundation is laid very deep, the building turns out to be very stable. The finished structure will be slightly raised above the ground, therefore reducing the risk of flooding.
Pillar foundation in the project
The foundation soil under the foundation, with equal pressure from each pillar, does not shrink significantly, and compared to tape, this figure is significantly lower. Once shrinkage on the ground decreases, it becomes possible to increase the total load on the ground by reducing the area of the foundation being poured.
If the site has very heaving soil, even a deep location will not protect the pillars from shifting. In such a situation, it is recommended to perform tape or monolithic filling.
If the landscape is very uneven, you will have to make efforts to make the posts at the same level. But the threat of structural distortion remains.
Concrete pillars are characterized by a limited service life, not exceeding 70 years, and an inability to withstand high loads. Pillars are used only for the construction of bathhouses, gazebos, terraces, small sheds for gardening equipment, frame houses, and wooden beams.
Creating formwork for a columnar foundation
Columnar foundations are very popular in individual construction. This is due to its simplicity and accessibility, as well as a fairly wide scope of use. This type of foundation is suitable for lightweight wooden houses, frame and frame-panel buildings, outbuildings, gazebos, summer kitchens, etc. Such a foundation can be used on heaving, slightly heaving, sandy, peaty and swampy soils. If you chose concrete or reinforced concrete to make the supports, then you will need formwork for a columnar foundation. In our article we will tell you how to make it correctly and from what.
Types of formwork
The main purpose of formwork is to form a structural product and give additional strength to the entire structure. Any formwork must cope with the following tasks:
- The formwork product must easily withstand the pressure of the concrete solution without movement or deflection.
- During the process of pouring and hardening of concrete, the structure configuration specified by the formwork should not change.
- Installation and dismantling of the product should be as simple and quick as possible.
- The formwork structure must ensure high tightness and prevent concrete leaks.
All formworks are divided into two types:
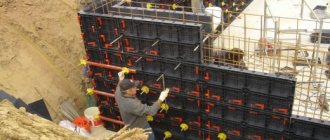
- Non-removable - such products are quickly and easily installed and do not need to be dismantled after the concrete has hardened. They remain part of the foundation structure. The advantage of these structures is the additional strengthening of the foundation due to the material used for the formwork.
- Removable - usually made of boards or wooden panels. After the concrete has set, the structure is disassembled.
Material selection
Formwork for a columnar foundation can be made from different materials. It can be a structure made of steel or wood. Metal, asbestos-cement or plastic pipes are also used, which are an integral part of the foundation.
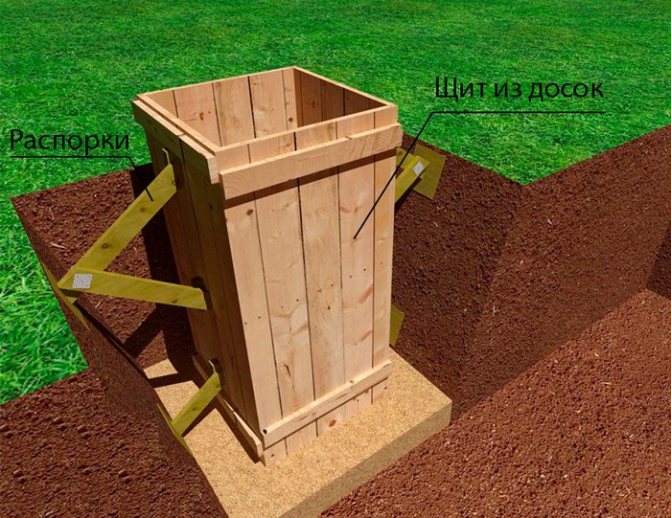
Wood is most often used to make removable formwork. Boards 15-20 cm wide and 25-40 mm thick are suitable for these purposes. The boards are attached to a frame made of wooden blocks. Thus, a box is formed for pouring concrete mortar.
In addition to boards for these purposes, you can use:
- chipboard;
- waterproof laminated plywood;
- steel sheets (they are assembled into a single structure using bolts and steel angles installed from the outside).
In some cases (dense, non-crumpling soil), roofing felt formwork is used. But this option is more suitable for bored piles installed at great depths. Such permanent formwork will simultaneously perform the functions of waterproofing the foundation. However, when constructing a shallow foundation on heaving soils, it is better not to use this option for the following reasons:
- since heaving forces are directed upward tangentially to the supports, they can cause supports that are not connected to the ground to be squeezed out of the ground;
- as a result, earth will be packed under the sole or slab, which will not allow the pillar to reach the design level;
- all this will lead to gradual deformation of the building structures and cracking.
Tip: if you want to save money, the formwork can be made from slabs. Its smooth smooth sides can be used to form the inner surface of the box for supports.
Technology for manufacturing formwork from boards
To make formwork with your own hands, you need to stock up on the following tools and materials:
- nails;
- hammer;
- tape measure and level, pencil;
- hacksaw;
- boards and bars.
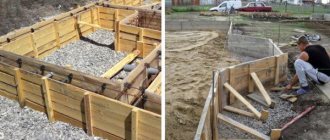
The easiest way is to make formwork for a columnar foundation from boards, so we will consider this option for manufacturing this structure step by step:
Preparatory work

- First you need to prepare the area for construction. The site is cleared of debris and unnecessary green spaces. Using a cord, level and pegs, the contours of the future structure are broken down. The locations for making holes for the pillars are determined and marked.
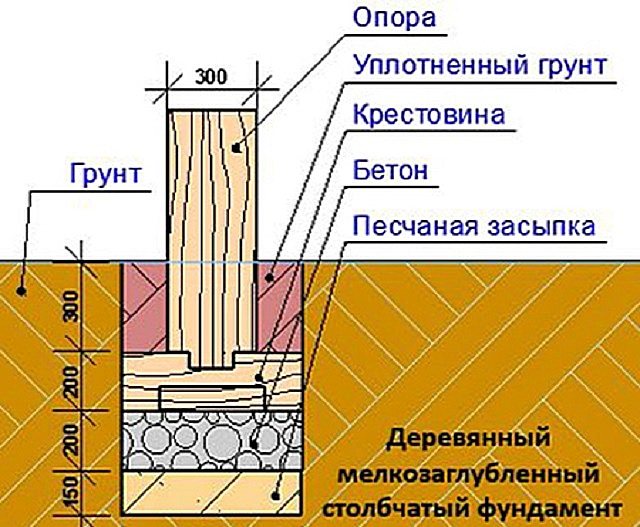
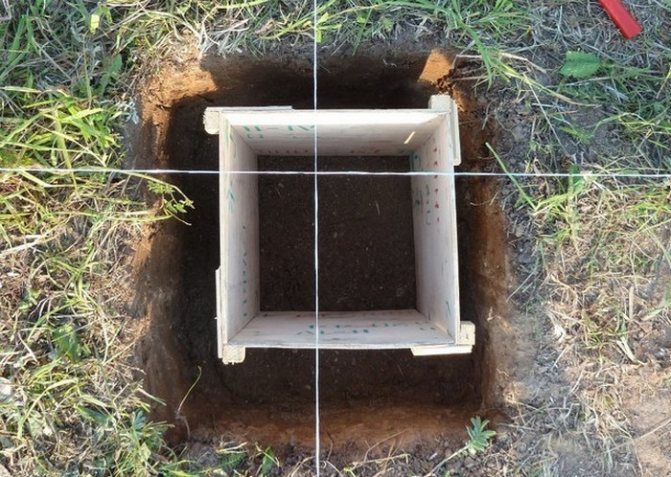
- Let's start digging a hole. Its depth depends on the type of foundation used (buried, shallow or shallow). It is worth considering that the bottom of the pit must be 100-150 mm below the support installation mark to make a sand cushion. The width of the pit depends on the formwork used. To install boards and spacers, the width of the pit must be 20 cm larger on each side than the dimensions of the supports. If permanent pipe formwork is used, then the hole is drilled 2-5 cm larger than the diameter of the support.
- After this, the bottom of the pit is compacted and filled with sand or a mixture of sand and crushed stone. Layer height 100-150 mm. The layer is moistened with water and compacted thoroughly.
- To prevent moisture from being absorbed into the soil during the pouring of concrete (this can lead to a decrease in the strength of the structure), a layer of roofing material or dense polyethylene is laid on top of the sand cushion.
Preparation and assembly of formwork
- Boards for the formwork structure must be prepared. If their surface is uneven, it is sanded to obtain the desired smoothness. If pipes are used for permanent formwork, they are cut into pieces of the required length.
- To form the frame, wooden blocks of the required height are driven into the corners of the pit.
- After this, boards are formed from boards, which are attached to the bars in the pit using nails and screws. To obtain greater tightness of the structure and a smoother surface, the inside of the boards is covered with plastic film. This additional measure will facilitate the process of removing the formwork after the concrete has hardened.
- To prevent the boards from splitting apart after pouring the concrete solution, oblique spacers made of wooden blocks are installed on the reverse side. Typically, such spacers are attached at the corners of the structure and in the central part of each shield.
Tip: instead of spacers, you can use pins that tighten the walls of the formwork.
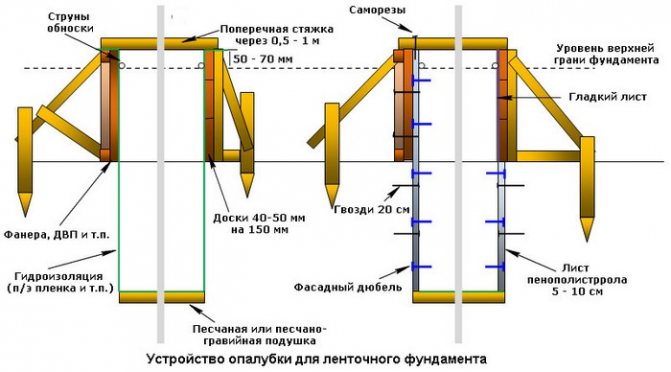
During the installation of the formwork, it is necessary to strictly control the verticality of all structures using a level. You should also try to avoid large gaps between the boards into which the solution can leak. It is better to seal cracks wider than 4 mm with improvised means to protect against concrete leaks. The height of the formwork panels should be several centimeters higher than the concrete mortar pouring level.
The final stage
- After installing the formwork structure, it is necessary to check the box for tightness and verticality.
- Before pouring concrete, it is worth waterproofing. To do this, the inner surface of the box is lined with roofing felt. The seams between individual sheets are connected by hot melting.
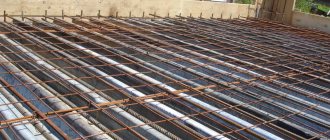
- After this, the reinforcement cage can be lowered into the prepared formwork structure. It is adjusted vertically using a level and secured with spacers. When installing it, it is worth remembering that all metal frame structures must be protected from corrosion by at least a 5-centimeter layer of concrete.
- After this, you can begin pouring the concrete solution.
- The formwork is removed after 4-5 days.
Preparing for the construction of the foundation
Preparation for the construction of the foundation begins with the preparation of a detailed drawing indicating scaling. At the planning stage, data is collected on the study of the soil, local climatic features, and the expected weight of the building is calculated with an increase for cladding and space filling.
The depth of the foundation, the dimensions of the pillars, how much material is required, the amount of stock, and what tools should be prepared are immediately determined.
The area under the base is cleared of debris and bushes, and markings are applied. According to the diagram, the far corner of the building is set, a section of reinforcing rod is driven in. The size of the column to be poured and the distance to the outside of the next one are set off from it. They drive in the reinforcement and tie it to the previous one, pulling the cord tightly. In this way, the outer edge of the structure is outlined.
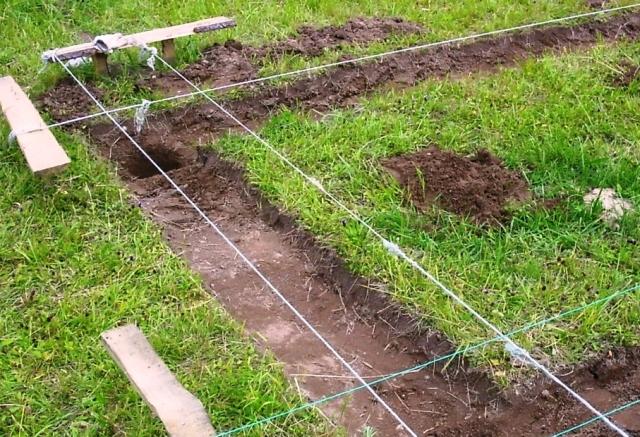
Site marking
The next step is to carry out similar actions for the inner edge, arranging the cords so that they intersect, forming precise markings for each support.
At selected points, holes are dug, the walls are leveled, and the bottom of the excavated hole is compacted. The width of the pit is made to allow free access inside, increasing the parameter before digging by 30 - 50 cm.
The reinforcement and formwork material are immediately cut to size, and components for the mortar are delivered.
Pipe formwork structure
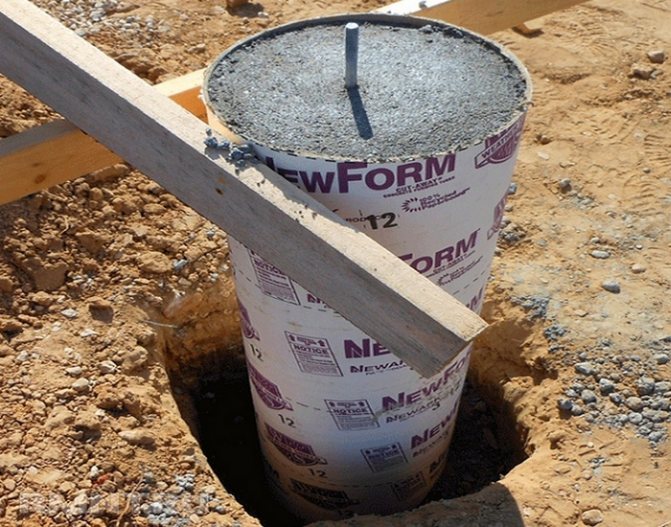
Since the main load is carried by the reinforced concrete filling of permanent formwork, the choice of material for its manufacture is not limited. These can be plastic sewer pipes and asbestos-cement products. The greatest strength of the entire structure is given by metal pipes, which take on part of the loads.
Work on installing the formwork is carried out in the following sequence:
- After preparing the area for construction and marking it, you can drill wells for supports. The depth of the well should be 10-15 cm greater than the design mark of the bottom of the supports to create a base that will protect the entire structure from heaving forces. The width of the well is selected based on the diameter of the supports and pipes, and should be 5-10 cm larger.
- After this, a pipe is lowered into the well.
- A little cement-crushed stone mixture is poured into it. Then the pipe is raised 10 cm and fixed in this position. In this case, it is necessary to control the verticality of the pipe. It is fixed with spacers in the well.
- After the concrete has hardened at the bottom, you can install the reinforcement cage into the pipe and pour concrete.
- There is no need to remove such formwork.
Stages and nuances of pouring forms with concrete
Concrete is prepared from fine crushed stone, sand - better than river sand, cement of a grade of at least 300, and preferably 500. The components are mixed in a ratio of 1: 2: 2, that is, for 1 part of cement you need 2 parts of crushed stone and sand. Water is added in such an amount that the mixture remains viscous. Plasticizers are added as desired.
- Filling is completed in 1 or several days.
- The mixture is carefully poured into formwork made of plywood or sewer pipe. Try to prevent bubbles from appearing. Then, using a reinforcement rod, the mass is pierced to the very bottom in several places. This is how the concrete is compacted.
- It is more effective to use a hammer drill in jackhammer mode or an internal vibrator. It is enough to process the mixture for 5 seconds to compact the concrete.
The formwork is removed after 2 weeks. Concrete will gain full strength only after 4 weeks.