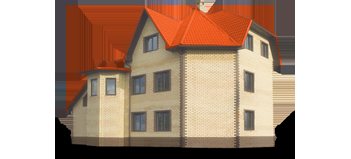
Before building a house, it is important to take time to choose a foundation, since the durability of the entire structure depends on it. Most often, a strip base is created. This is due to many reasons, but the main one is the ability to carry out the work independently. At the same time, a small amount of money is spent on creating such a design. To make a strip foundation for a 6x6 m house, you do not need to have experience in carrying out such work, you only need to follow the basic rules by which the foundation is poured.
We decide on the type of foundation.
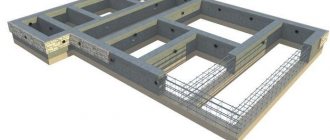
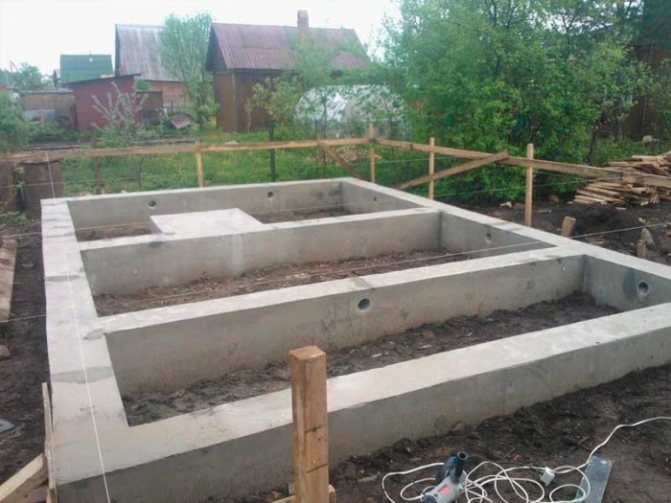
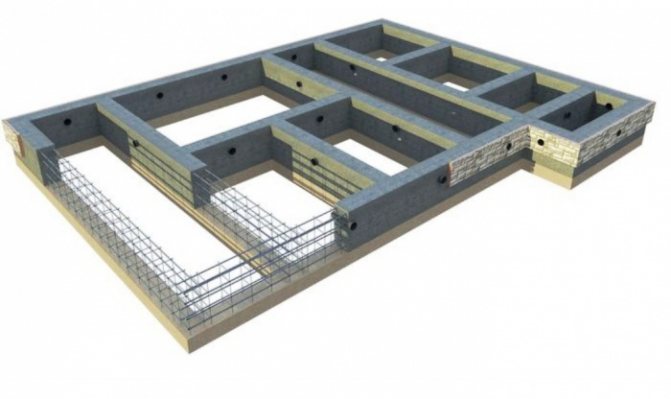
Before pouring the foundation, it is necessary to decide what load it will bear. The type of foundation depends on this. In our case, the project provides for a strip shallow foundation. Its main characteristics are given in the following table:
- Pillow
- Size
- Concrete
- Armature
- Board
- Polyethylene
- sand and gravel cushion 30 cm high.
- width 6.0 meters, length 6.5 meters;
- wall thickness of the transverse lintels is 0.5 m;
- height - total 1.1 m;
- height above the ground, at the bottom 0.6 m, at the top 0.4 m.
wall thickness - 0.3 m;
- 50-piece board 150 mm wide - 2 m3;
timber for supports - 5x5 cm, 10 pcs.
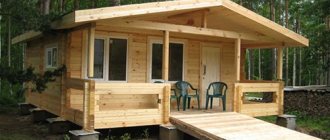
DIY strip foundation for a wooden house 6 by 6 m
Content
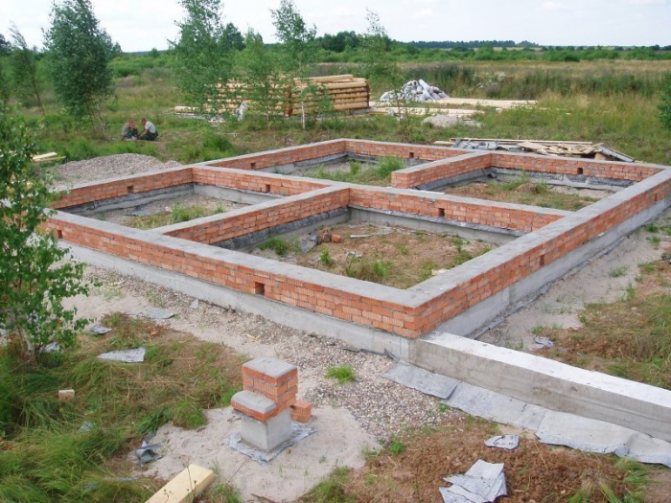
A plot of ten acres was purchased from individual housing construction in installments for a period of one year. Therefore, we decided not to involve equipment in the excavation work, we decided to independently, slowly, make a strip foundation with our own hands for a wooden house 6 by 6 meters in the centers. I also wanted to find out what it was like with my own hands, whether we could master quite labor-intensive work. I’ll say right away that the work was not easy, it takes a lot of time and effort, so the next year they called in equipment to dig the ground under the slab foundation for the gazebo.
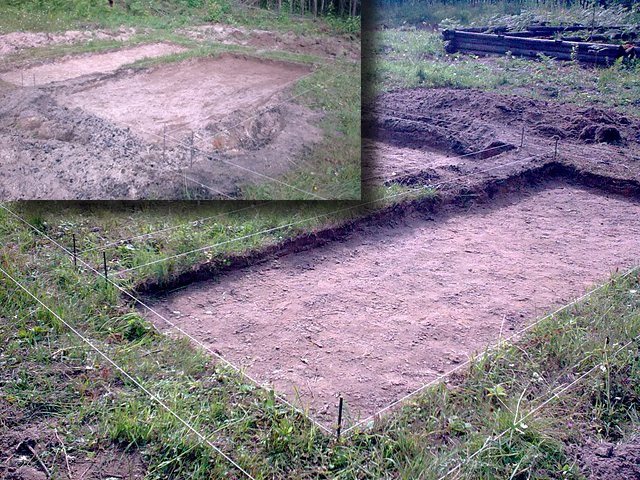
Excavation
We retreated 3.1 meters from the border of the site and marked a perimeter of 6.3 by 6.3 meters with a cord, where the width of the foundation strip was assumed to be 0.3 m, the height of the foundation was 0.6 m. The only tools were shovels and a garden cart for transporting fertile soil to places where the ground level in the area is lower. We worked in the evenings after work and on weekends, fortunately, the site is not far from the house 13 km. The fertile soil on top turned out to be sandy, which is a plus, but digging is not easy, since in mid-May the root system is already quite powerful. A positive aspect was the removal of soil on a cart to places where there were various hollows and depressions, which were immediately covered with earth directly on the grass and later leveled.
Creating a pile under a strip foundation
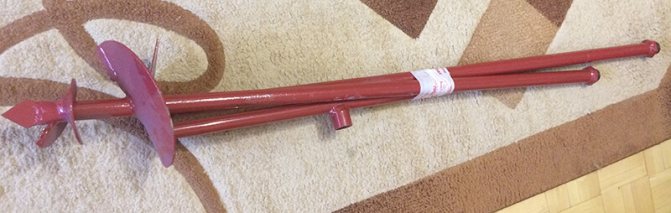
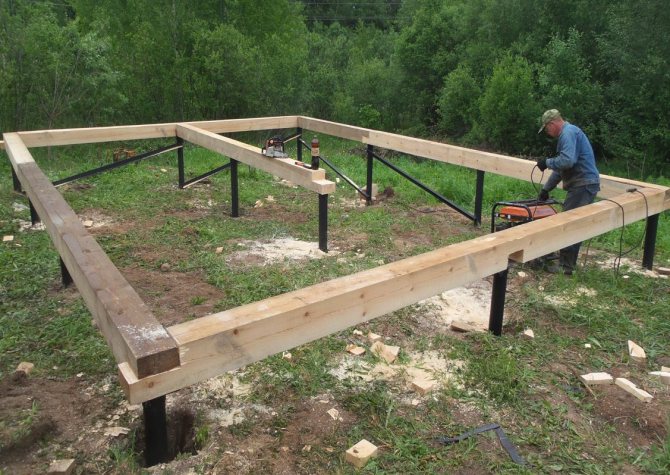
The soils on the site are dense, the place where the individual housing construction is located on a small hill is not low, fogs are rare. We didn’t order geology for the guest wooden house, so we decided to make 12 piles under the strip foundation to make it more reliable. Using a garden drill with a diameter of 200 mm and a length of 2 meters, holes were dug, the depth from ground level was two meters.
The bottom of the hole was compacted with river sand, about 30 cm, above granite crushed stone, about 15-20 cm. They rolled the roofing material into a cylinder in 1.5-2 rows and lowered it to the bottom. For the pile, I tied a frame of reinforcement with a diameter of 10 mm. Thus began my first acquaintance with viscous reinforcement.
So that when pouring concrete, the structure on top does not fall apart, I made rings from corrugated sheets for the fence, you can see in the photo, they are blue. To mix the concrete, a box was made from plywood and also reinforced with the same corrugated sheeting, which has a wave, however, with your hands and a sledgehammer, you can completely level the iron as you need. Rings of corrugated sheeting and river sand on the sides of the pile really helped, this design kept the concrete in an upright position and prevented the roofing felt from tearing. A reinforcement bar was used to shrink the concrete in the pile. Not everything was easy when manually drilling holes for the piles; sometimes the hole went a little to the side and it was difficult to align.
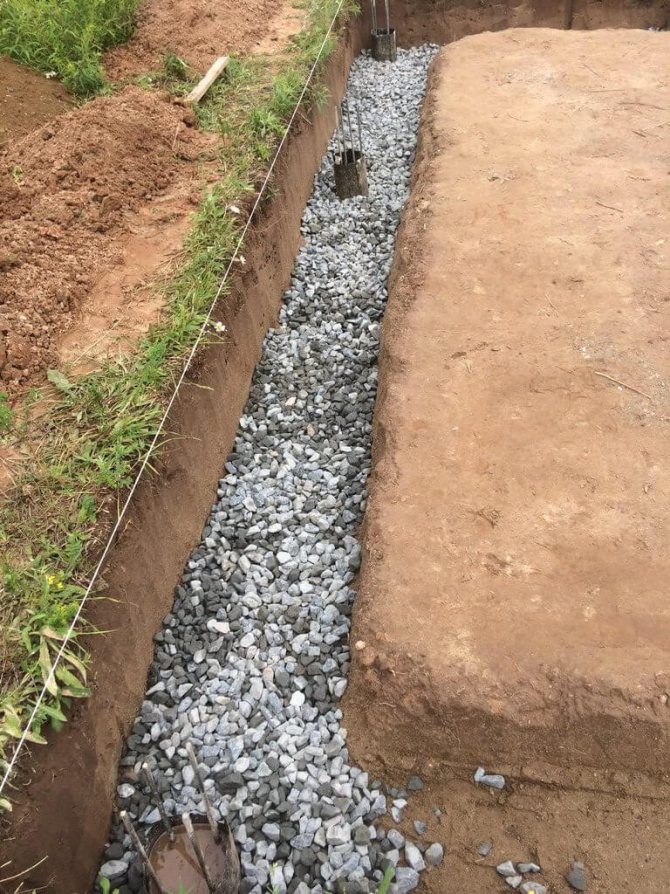
During all the construction work to create a strip foundation, work was done that is rarely practiced. For example, river sand and granite crushed stone were placed and compacted under the strip foundation. We understood that this was not necessary, but since we do it with our own hands (this is already saving money), so it was not a pity, in some cases, to overuse materials.
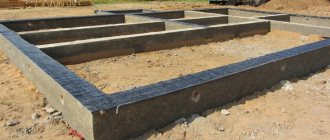
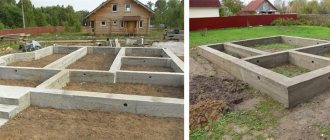
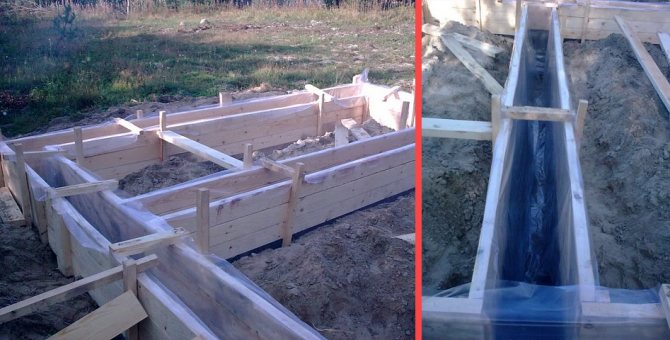
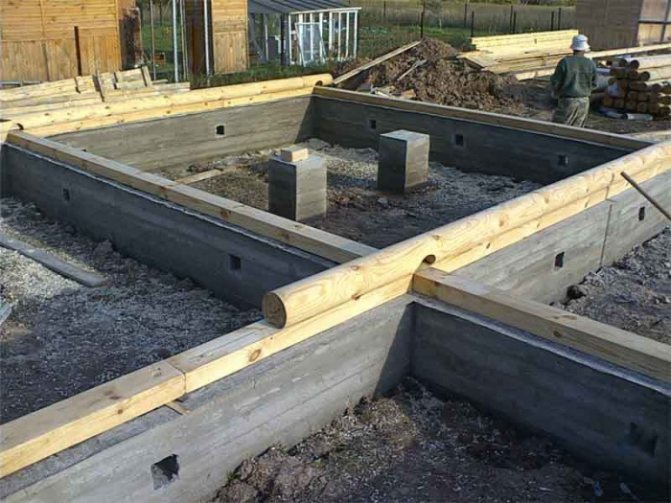
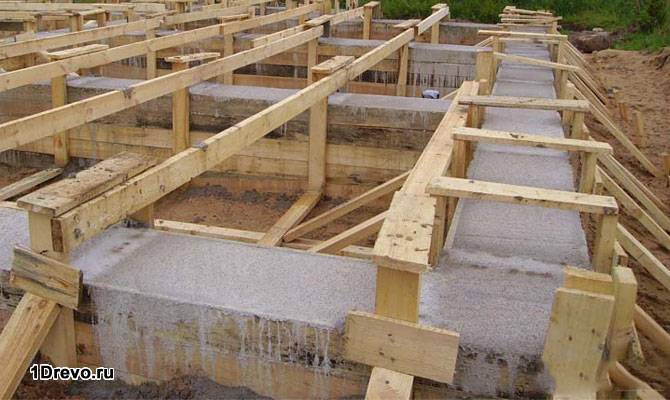
Formwork and reinforcement knitting
An inch board was used to form the strip foundation. To strengthen the formwork more firmly, laminated chipboard (laminated chipboard) was used as a second layer, as well as 8 mm studs. To bend the reinforcement, I ordered a reinforcement bender from a welder, who was very helpful; I found his diagram on the Internet. I knitted the reinforcement with knitting wire; previously, clamps were made from reinforcement with a diameter of 6 mm; the video shows the process.
The foundation frame was knitted from longitudinal reinforcement with a diameter of 10 mm, in the corners the reinforcement was bent at 90 degrees, the width of the overlaps was 40 cm. The tool for tying the reinforcement was an old roller, which was sharpened at the end with sandpaper and bent. The entire frame was knitted near the formwork; for ease of knitting, “cranes” were made from bars.
The foundation for the stove is poured separately.
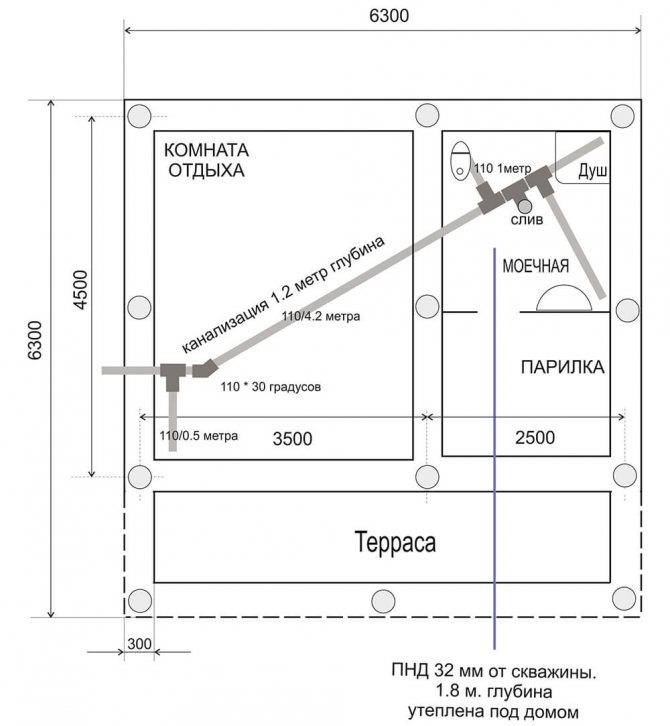
Communications under the foundation strip
Since the guest house was supposed to have floors on the ground, all communications were laid under the foundation strip. In addition to sewer pipes, a 32 mm HDPE pipe for water supply was laid in the trench.
As a result, the sewerage and water supply in the guest house were laid according to the diagram below.
Waterproofing the foundation with mastic
For waterproofing, a bucket of mastic was purchased (price 950 rubles). I covered the foundation on all sides with mastic in two layers, the consumption was small, and there was still 20% left. The mastic had to be diluted with white spirit, several bottles were required, the financial cost of waterproofing with mastic was ≈1500 rubles.
Layer-by-layer compaction of sand and crushed stone for floors on the ground
For the floors on the ground, 20 tons of river sand was ordered, as can be seen in the photo. The soil between the foundation walls was pre-leveled. After that, backfilling with river sand began with careful compaction with a homemade beater and a roller for compacting the lawn. Each layer of sand was carefully sprayed with water from a hose. About 30 cm of river sand was compacted, and it all overwintered in this form. The next year they took a vibrating plate weighing 90 kg, and went through the vibrating plate several more times and again added a little river sand.
Granite crushed stone was ordered for 5 tons, fraction 5-20 mm. Almost all the crushed stone was backfilled in a 10 cm layer, which was also compacted with a vibrating plate.
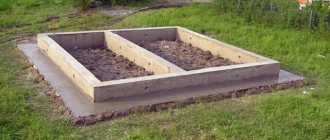
Laying masonry mesh and pouring concrete on the ground
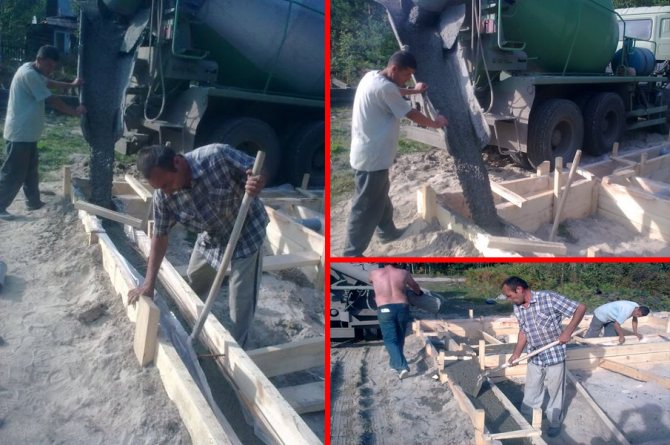
Before pouring concrete, a masonry mesh with a cell of 50 by 50 mm was laid on the crushed stone and tied together with knitting wire. Plastic clamps were placed under the mesh for reinforcement, which were reinforced with a little concrete so that they could not move when pouring concrete from a mixer. A 40-meter damper tape was laid along the entire inner perimeter of the foundation strip. We ordered two mixers because we were simultaneously pouring a concrete slab under the gazebo along with the floors on the ground.
Laying a plinth for a guest house
For the base, solid red brick 2 pallets were purchased. Before laying the brick, roofing felt was placed on the foundation. When laying bricks, masonry mesh was used.
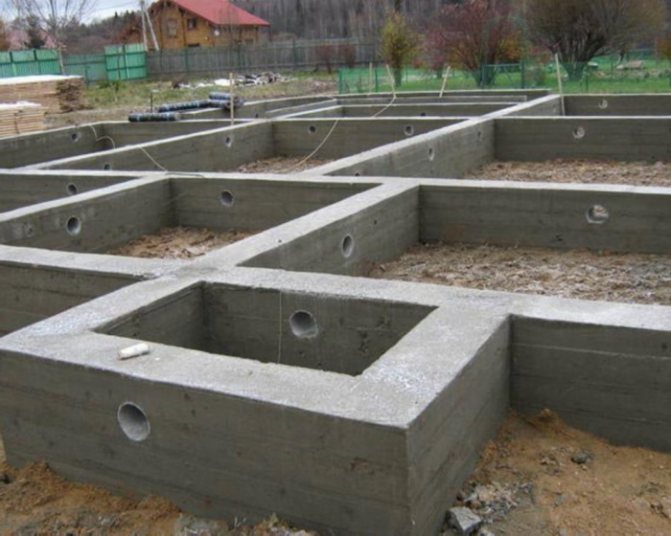
The last photo shows that the construction work has been completed at this stage.
Video on arranging foundation work
Some types of construction work at this site.
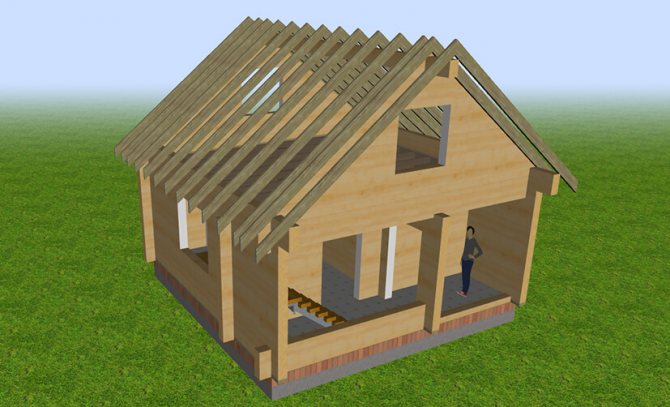
Guest house project in 3D
On this page you will see what we want to build, you will be able to zoom in and rotate the 3D wooden house project yourself.
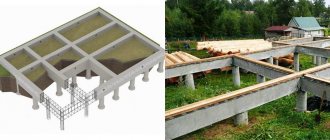
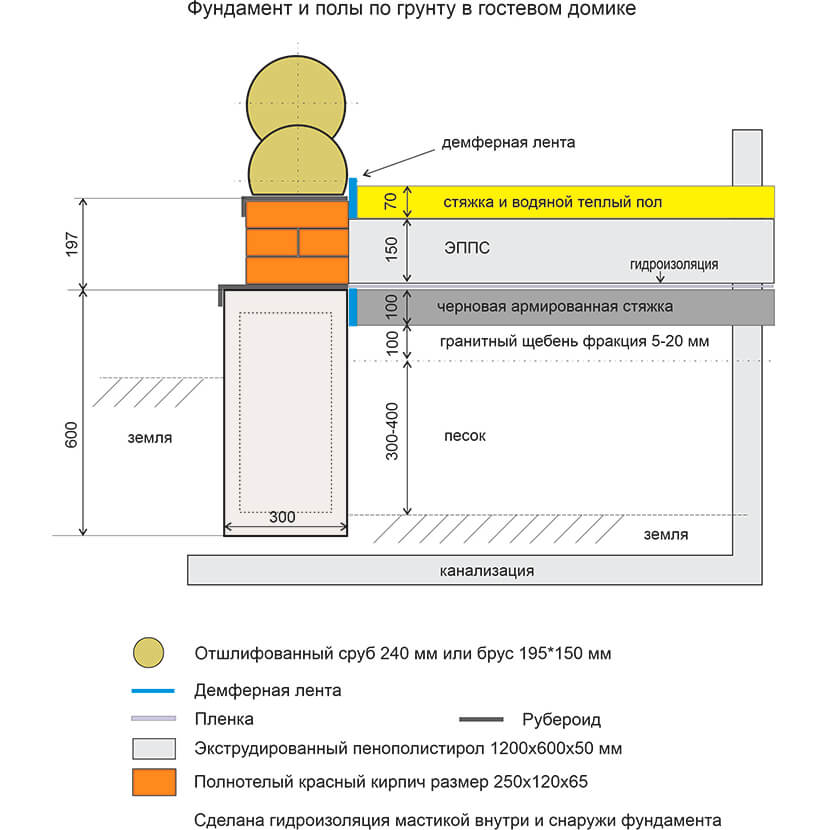
Floors on the ground in the guest house
The result of foundation work should be floors on the ground, as in the figure below.
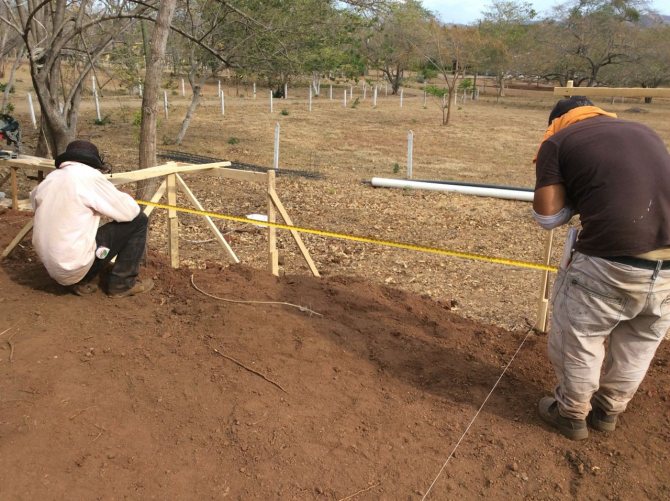
Marking the area for the foundation.
In order to correctly mark a site, you need to set a base relative to the main points of the site: a fence, other buildings, a garden, etc. Then you need to set the approximate dimensions of the foundation, but always with a margin. It is mandatory to remove the fertile layer over the entire area of the proposed development.
Marking the area for the foundation
After this, the final and accurate marking of the foundation is made to the nearest centimeter.
Important! The axial dimensions and diagonals of the entire building and each of the rooms must match.
4. Digging a trench.
To dig a trench for the future foundation, it will take 1 working day if you do everything with your own hands alone.
On sandy soils and loams, it is enough to go 30 cm deep into the ground, and it is better to raise the rest of the foundation 60-100 cm above the ground. This measure prevents moisture from penetrating into the future home.
![]()
Digging a trench
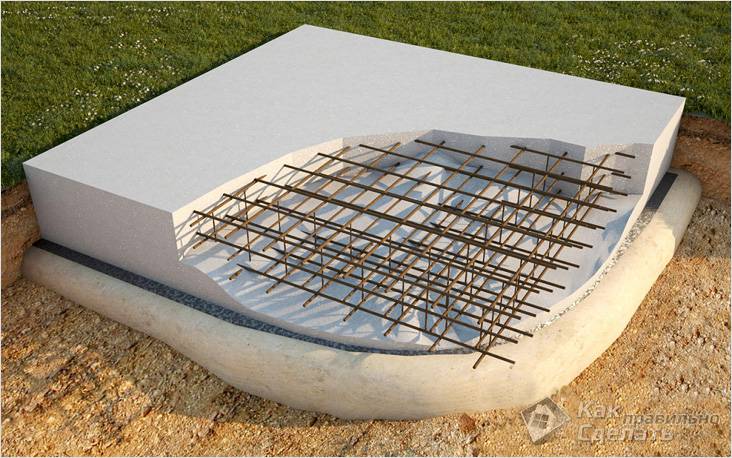
On clay soils, the best solution would be a bored foundation, which is tied with a concrete grillage. To do this, you need to make holes in the ground with a drill or using a drilling machine to a depth below the freezing depth. Roofing material is placed into the resulting holes for waterproofing, reinforcement is installed and concrete is poured.
It is necessary to leave the outlets of the reinforcement in order to subsequently connect it with the grillage reinforcement. Then a trench is dug around the perimeter, but no more than 30 cm deep. The reinforcement of the pillars is tied to the reinforcement of the trench, the formwork is installed and the foundation strip is poured.
Important! If the area is not level, then at the highest point the height of the formwork should be at least 60 cm.
This will create a high foundation. If you take measurements from the bottom point, the height of the foundation will reach no more than 30 cm, which is not enough.
To measure heights, you can use a water level, but it would be better and more accurate to purchase or rent a leveler.
What determines the amount of money spent?
The cost of the foundation can be determined taking into account the following characteristics:
- Volume of concrete used. By drawing up a drawing of a future building, you can easily determine how much concrete will be spent on creating a strip structure.
- Reinforcement section. The cost of the foundation for a house may vary depending on the cross-section of the rods used. The choice of such products depends on the weight of the house.
- Material used to create formwork. Before starting work, you need to decide which material will be more profitable to use during construction. Most often, boards are used, but plywood and permanent polystyrene foam formwork can be used.
In addition, it is necessary to calculate the costs of delivering materials to the site. In different regions, the cost of materials for creating a foundation varies. It is worth considering the cost of different types of solution fillers. For example, gravel of different fractions has different prices. To create a strip base, crushed stone of a small or medium fraction is most often used. This material is universal for creating a foundation.
Formwork
In order to assemble the formwork, it is necessary to knock down panels from 50x150 boards. The use of thinner boards is not recommended, as this can lead to the fact that the concrete poured into the formwork can either squeeze out the boards or bend the foundation.
Formwork
In order to obtain a leveled upper plane of the foundation, it is necessary to ensure that the upper formwork boards are leveled to zero. If this cannot be achieved, you can pull the thread level inside the formwork.
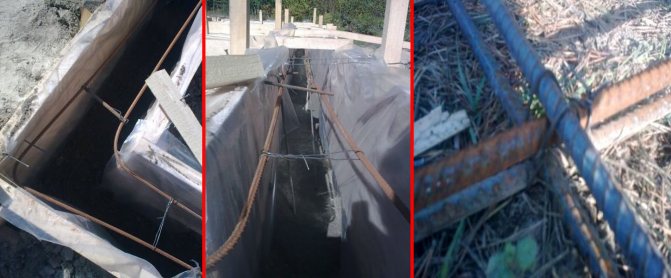
Then you need to lay polyethylene inside the formwork. This will allow you to achieve a smooth surface of the foundation walls, and will also protect the boards, which can later be used for other purposes.
It is necessary to make strong spacers in the formwork. When pouring concrete, unreliable formwork may fall apart and concrete may leak.
Due to the fact that the foundation strip absorbs tensile loads, reinforcement must be laid in the lower and upper parts of the formwork. Tying wire is used to fasten the reinforcement.
Important! Reinforcement must not be welded together.
Armature
Advantages and disadvantages of a strip base
The advantages of a strip foundation include:
- Low costs. This is due to the fact that the strip foundation is small in size when compared to a monolithic slab.
- Ability to withstand heavy loads. Concrete strips can be the basis for both a frame structure and a brick one.
- Speed of building construction. It only takes a few days to pour the finished elements, after which you need to wait for the concrete to harden.
- The ability to do all the work yourself.
If we talk about the disadvantages, it is worth noting the need for a thorough analysis of the soil on the site before carrying out work. Also, in some cases, construction equipment is required to create a reinforced concrete strip. An example is the construction of large country houses. Another disadvantage is the large weight of the created structure, which provokes uneven shrinkage of the house.
Pouring concrete
Pouring concrete
Concrete must be poured into the formwork within 1 day. The strength of the entire structure depends on the uniform setting of concrete.
To ensure ventilation, it is necessary to provide a vent in each wall. They are very easy to install if you first lay plastic sewer pipes cut to the width of the foundation strip into the formwork. It is imperative to secure the pipes so that the poured concrete does not squeeze out their formwork.
Another important point is the installation of communications: you need to decide where communications will be brought into the house, and also lay and secure pipes in those places.
After pouring the concrete, it is necessary to level the surface with a trowel to the level of the tensioned thread.
The nuances of constructing a 6*6 foundation
The pile-screw foundation is being erected in a short time. Once you receive an approved house design, construction work can begin. To do this, first of all, you must deliver all the necessary material and tools to the construction site.
Based on the project, the construction site is marked out with the designation of places for installing piles. If you have a tape measure on hand and plan to build a simple structure, you can do it yourself. But if you are not confident in your abilities, it is better to entrust the work to professional surveyors who will perform all the necessary work efficiently.
It is recommended to install flags at points for installing supports in order to indicate them on the ground and subsequently quickly find them. Afterwards you can proceed to the installation of piles. This is done by screwing the pile until the required limit is reached mechanically or using a tool. Upon completion, a concrete mixture is poured into the pile cavity, fixing the support in place and creating additional strength. At the end, the upper part of the piles is trimmed to one level.
Advantages of reinforced concrete piles
- A good indicator of load-bearing capacity and load tolerance without reducing performance characteristics.
- Long service life - about 100 years.
- They sink tightly into the ground.
- Increased strength due to design features - internal reinforcement.
- High moisture resistance, fire resistance, resistance to changes in atmospheric pressure.
- Convenient storage. Products are stored in stacks and do not require any special conditions.
- They are quickly installed, beneficially reducing the time for preparatory and installation work.
The price of constructing a 6*6 pile foundation
The exact cost of building a foundation for your building can only be calculated by a construction organization that you contact with a corresponding request. When creating an estimate, the following factors are taken into account:
- The required number of piles, their length and diameter;
- The material from which they are made;
- Characteristics of your site, possible difficulties during the work;
- Installation of grillage (if necessary);
- Finishing the foundation.
Construction time is several days. This will not require a large team of workers, so the cost of the work will be acceptable.
A 6x6 foundation is a reliable support for your building. If you follow the work technique and use high-quality materials, the result will please you for many years.
Type matters
Owners who are planning to build two floors or a special architectural object should think about the fact that the weight of a 6x6 m log house will increase, and will directly influence the choice of foundation compared to an ordinary frame. All known types of platforms are available to a small timber house - monolithic slab, strip, pile grillage, block. Below are the advantages and disadvantages of each:
Plate. Advantages:
- The house is not afraid of the vagaries of the soil. It is installed precisely on such soils.
- The shrinkage is uniform, so the same process applies to the house.
- The filling process is simple.
The disadvantages include the cost of concrete and the use of equipment; in total, it reaches half of the entire budget allocated for construction. And the impossibility of installing a basement or basement floor.
Construction of columnar foundations
The columnar base is placed under light frame-type structures. In fact, this design is no different from a pile foundation. Only instead of a beam grillage or a cast grillage for columnar bases, they use the lower beam of the frame itself or the basement floor joist.
Well, the pillars themselves are poured at marked points into shallow pits, with sand filling at the bottom. In addition, the pillars can be laid out of brick, using two or three ceramic or silicate products per layer as standard.
Application of driven reinforced concrete piles
Buildings made of foam blocks and aerated concrete
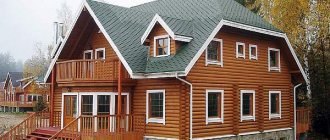
Wooden houses and baths
Brick houses, garages and hangars
Driven pile foundations have been used for many centuries to construct buildings on unstable soils. More than 60 percent of all multi-story buildings are built on foundations using driven piles.
Standalone device

This section will describe the construction of a monolithic tape, since this is a common type of foundation that is accessible for self-installation. So, the construction stages include:
- Clearing the area of plantings, leveling the soil and digging a trench.
- Installation of formwork, shock-absorbing cushion and reinforcement.
- Filling and holding.
More details:
- Vegetation in the area intended for the construction of the platform is mercilessly destroyed. It can have devastating consequences in the future and bring moisture with it. To do this, the area designated for concreting is spilled with chemicals to prevent the spread of the root system.
- Next, the soil is leveled. The foundation for a 6x6 m log house must be brought into a single plane. To do this, use a level and cut the surface to the desired height.
- Sometimes, with ambiguous architecture, trenches are dug according to stencils. This, for example, applies to objects with bay windows. The walls of the dug pit are leveled with shovels and left to dry.
- Everything is used in formwork construction - panels, unedged and edged boards. The main thing is that the “front” side remains smooth - when removing it, a flat surface for further finishing is important. As for the pillow, these are sand and gravel layers, up to 30 cm thick together.
- They are poured onto the bottom of the trenches and thoroughly compacted, and then spilled with water for better adhesion to the concrete. The installation of such layers will help reduce the negative impact of wastewater and make the load of the log house bearable.
- Reinforcement is the necessary reinforcement of concreting to support tall objects. For this purpose, a steel rod with a cross-section of at least 3.5 cm is used. You need to knit the metal by hand - welding can burn through the nodes, which will affect the strength of the reinforcement.
- Next, the filling begins. To save money, you should use a construction mixer that brings the total volume of concrete - mixing it yourself is labor-intensive, and uneven pouring will result in delamination at the joints of the solutions. After concreting, the finished foundation for a 6x6 m log house is left to stand, periodically spilling the surface with water to prevent cracking in the heat.
According to the rules, the platform must last a year, but the lightness of a timber house allows this period to be reduced by half.