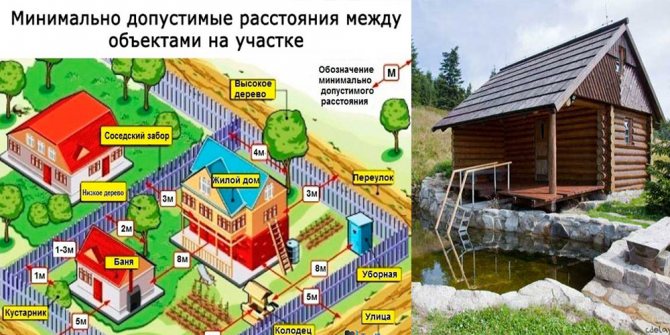
Where to install a bathhouse on the site
As a rule, the main structure on the site is the house. It should be closer to the main entrance. The bathhouse, as an auxiliary structure, is often located in the depths of the territory. At the same time, you should not remove it from the house as much as possible - long walks will not be beneficial for steamy guests and owners.
Location of the bathhouse on the site
When planning the location of the building, it is necessary to take into account the proximity of the septic tank, since the process of using a bathhouse is accompanied by the formation of a large amount of wastewater. It will also be convenient to connect a separate elbow of the home water supply to it. To provide the building with fuel, it is desirable that there is convenient access to it. Otherwise, the firewood will have to be transported in a wheelbarrow.
Do not forget about fire safety requirements and the convenience of neighbors. Smoke from the sauna chimney should not reach neighboring buildings and, if possible, neighboring areas. First determine the preferred direction of air movement in your area.
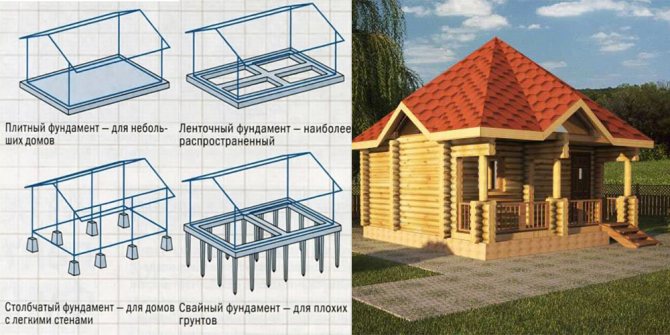
Types of bath foundations
For the construction of a bathhouse, as for most other capital buildings, any of the currently widely used types of foundations are suitable. The most widespread of them are the following:
- A slab foundation is the most complex and expensive to manufacture, having the maximum strength characteristics of all analogues. Used on troubled heaving soils.
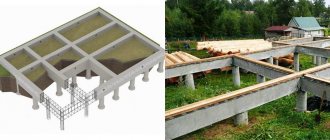
- Pile and pile-grillage are one of the types of foundations on separate supports. At the same time, currently all piles can be divided into several types:
- By type of installation - driven-in, screw-in (screwed-in), monolithic with in-situ filling;
- According to the material - steel and reinforced concrete.
Screw piles are most widely used for bathhouse construction. To strengthen and additionally connect the upper parts, grillages are used - wooden, steel or reinforced concrete beams attached to pile heads.
Types of foundation for a 3x4 bath
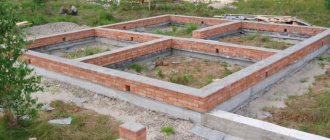
- A strip foundation is perhaps the most common base option for a small bathhouse. It is a continuous closed block, brick or reinforced concrete strip, installed at a particular depth depending on the quality of the soil at the construction site.
- A columnar foundation also refers to a type of foundation on separate supports. The posts are individual rectangular structures made of brick or concrete blocks. They, like piles, are installed in the corners of the future log house, at the junction of internal partitions and under the walls in increments of about two meters. This is the best lightweight foundation for a 3 by 4 bath.
Despite the abundance of options, choosing a specific one is a rather difficult and responsible task. A mistake at this stage can lead to the collapse of the entire structure or the need for expensive foundation repairs or replacement.
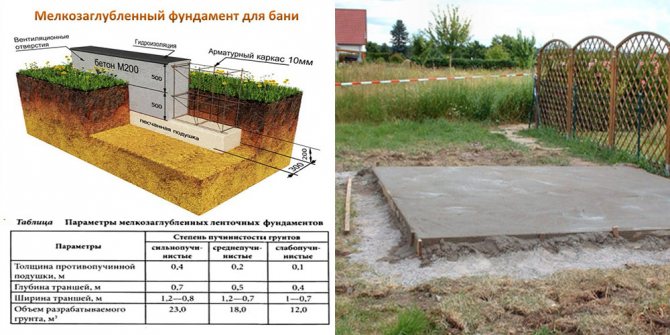
In order for the foundation of a 3x4 bathhouse to last as long as possible, it is necessary to choose the right type of foundation. For a one-story building located on dense clay or loamy soils, the best option would be a shallow shallow strip base. It is not difficult to make a bathhouse with your own hands, does not require special skills, and is accessible in terms of the materials and equipment used.
Heavier two-story or attic buildings are best installed on a recessed strip foundation. It is installed based on the soil freezing level, which in different regions of our country can range from one to two and a half meters. In this case, the volume of work and the required material increase, but the strength of the base also increases.
Cost calculation
- Total length of tape
- Tape sole area
- Outer side surface area
- Concrete volume
- Concrete weight
- Load on soil from foundation
- Minimum diameter of longitudinal reinforcement bars
- Minimum number of rows of reinforcement in the upper and lower chords
- Minimum diameter of transverse reinforcement bars (clamps)
- Spacing of transverse reinforcement bars (clamps)
- Amount of reinforcement overlap
- Total length of reinforcement
- Total weight of reinforcement
- Formwork board thickness
- Number of boards for formwork
– The length of the foundation in the center of the strip, taking into account the internal partitions.
– Area of support of the foundation on the soil. Corresponds to the dimensions of the required waterproofing.
– Corresponds to the area of the required insulation for the outside of the foundation.
– The volume of concrete required to pour the entire foundation with the given parameters. Since the volume of concrete ordered may differ slightly from the actual one, as well as due to compaction during pouring, it is necessary to order with a 10% reserve.
– The approximate weight of concrete based on average density is indicated.
– Distributed load over the entire support area.
– Minimum diameter according to SP 52-101-2003, taking into account the relative content of reinforcement from the cross-sectional area of the tape.
– A minimum number of rows of longitudinal rods in each belt to prevent deformation of the belt under the influence of compression and tension forces.
– Minimum diameter of transverse and vertical reinforcement bars (clamps) according to SP 52-101-2003.
– Spacing of clamps necessary to prevent shifts of the reinforcement cage when pouring concrete.
– When fastening sections of rods with overlap.
– The length of all reinforcement for tying the frame, taking into account the overlap.
– Weight of the reinforcement cage.
– Design thickness of formwork boards in accordance with GOST R 52086-2003, for given foundation parameters and at a given support spacing.
– The amount of material for formwork of a given size.
The cost of any foundation is calculated as the sum of the cost of concrete and reinforcement. When the volume of the foundation is calculated, it is laid out according to its components according to the principle - to produce one m3 of concrete it is required:
- cement - 0.22 m3 or about 0.35 tons (costs 5,600 rubles/t);
- sand - 0.31 m3 or about 0.45 tons (costs about 100 rubles/t);
- crushed stone - 0.70 m3 or one ton exactly (costs 600 rubles/t).
Reinforcement Ø 6 mm – 4,500 meters:
- 8 mm – 2,530 meters;
- 10 mm – 1,600 meters;
- 12 mm – 1,120 meters;
- 14 mm – 820 meters;
- 16 mm – 630 meters;
- 18 mm – 500 meters;
- 20 mm – 400 meters.
Calculation of the foundation for a bathhouse
Before making a foundation for a 3x4 bathhouse, you need to correctly calculate its parameters. The main criterion determining the size of the future foundation is the mass of the structure. To determine it, it is necessary to summarize the following indicators:
- The mass of material for the walls of the bathhouse and ceilings - floors and ceilings;
- The weight of the roof truss system;
- The mass of roofing material;
- A lot of interior decoration, shelves, stove, doors.
An example of calculating the foundation for a bathhouse
Therefore, the basis for calculating the foundation of a 3x4 bathhouse is a high-quality building design. It is necessary to decide in advance on all the basic parameters.
Preparing the work site
A fairly important point, which is often not given due attention, is the preparation of the future place of work. The construction site must be leveled, all plants must be mowed, trees and bushes must be cut down. A mandatory element is uprooting the roots.

Preparing the work site for the foundation
In case of high humidity in the area, it is necessary to carry out drainage in advance of building a foundation for a 3x4 bathhouse with your own hands. To do this, trenches are dug along the perimeter of the future building, into which perforated pipes are laid, having a general slope towards the septic tank or beyond the boundaries of the site.
Installation of a columnar foundation
In the case of a low mass of the future structure and the absence of an attic or second floor, a columnar foundation is quite suitable for a 3x4 bathhouse. Its use will significantly reduce the overall costs of construction, since there is no need to purchase or manufacture a large amount of concrete mixture and reinforcement.
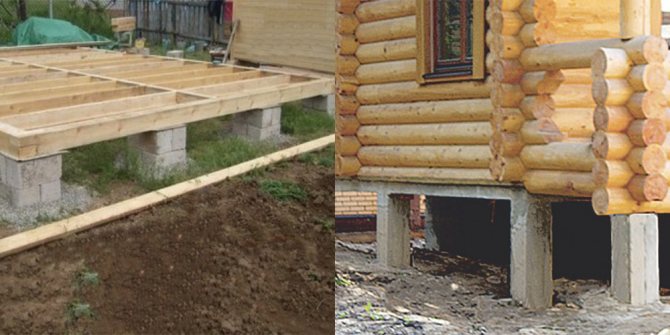
Columnar foundation for a bathhouse
Columns can be made from high-quality bricks or concrete blocks of one composition or another. For installation, we first mark the area at the site of future construction.
Marking the area for a columnar foundation.
We determined the size of the foundation for the 3x4 bathhouse. With its orientation to the cardinal directions and relative position with the existing buildings on the site, too. Now, in the cleared area, drive two pieces of reinforcement or wooden pegs at a distance of 3 meters from each other. This will mark the first short wall.
The next pin should be 4 meters from the right one, and 5 meters from the left one. The fact is that the sides of a classic right triangle are in a ratio of 3:4:5. Hence, it is easy to obtain a right angle on the ground using two tape measures and two pre-installed rods. In our case, we can easily mark the next 3x4 meter wall of the bathhouse with our own hands. We also orient the remaining fourth pin using two tape measures at a distance of 4 and 5 meters.
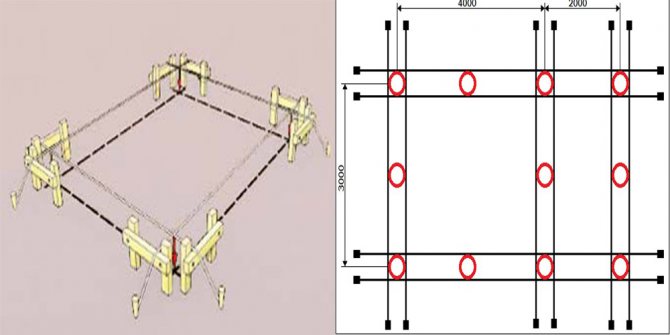
Marking for a columnar foundation
Additionally, to mark the perimeter, a strong nylon cord is pulled between the rods and tied around the corner pegs. Recesses for foundation columns should be located in the corners of the building, at the junction of external walls with partitions and along the perimeter. In our case, corner posts, connecting posts and one in the middle of the partition will be sufficient.
Digging holes for posts
The next stage is making the recesses. It is not advisable to use construction equipment in this case. To work with your own hands, you will need the following tools:
- Bayonet shovel;
- Shovel;
- Pickaxe or pickaxe;
- An ax for cutting off any existing roots;
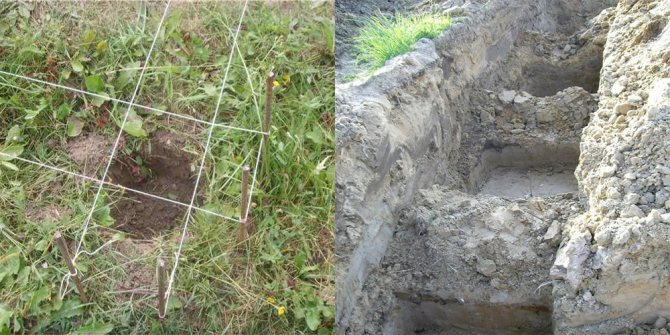
Making recesses for posts
The size of the recess in the plan should be between 60x60 - 80x80 cm. This is necessary for free placement when digging and further laying the posts. The depth of the holes depends on the type of soil, its moisture content and the calculated mass of the structure.
Laying foundation columns
As noted, a columnar foundation is a fairly simple type of foundation to make with your own hands. In addition, its use is economically beneficial. To make prepared depressions, pour a couple of buckets of clean, seeded sand into the bottom, lightly moisten it by sprinkling from a watering can and compact it thoroughly.
We pour concrete onto the sand cushion. To do this, we first make a reinforcing mesh from rods with a diameter of 10-12 mm, connecting the rods with a weld or twisting them with soft steel wire. Next, we lay out concrete in a layer of 10 cm on the sand, lay down the mesh and lay out the concrete again. The total layer thickness should not exceed 20 cm.
Let the concrete sit for several days to gain maximum strength. Next we lay out the columns on it. For them, it is better to use solid ceramic bricks that have high moisture resistance. Cement foundation blocks are also suitable instead. In this case, the concrete fill should be 40-50 cm larger, and instead of a sand cushion it is better to make a crushed stone one.
Laying bricks and blocks with your own hands is done using cement-sand mortar of grades M400 and higher. The thickness of the joints for bricks should not exceed 1 cm, for blocks - 1.5 cm. We raise the columns above the soil level by 25-30 cm. We fill the free parts of the holes with previously extracted soil. We cover the upper ends of the foundation elements with roofing felt for waterproofing. Using this technology, you can make a foundation for a 3x3 bathhouse with your own hands.
Determination of the mass of a structure
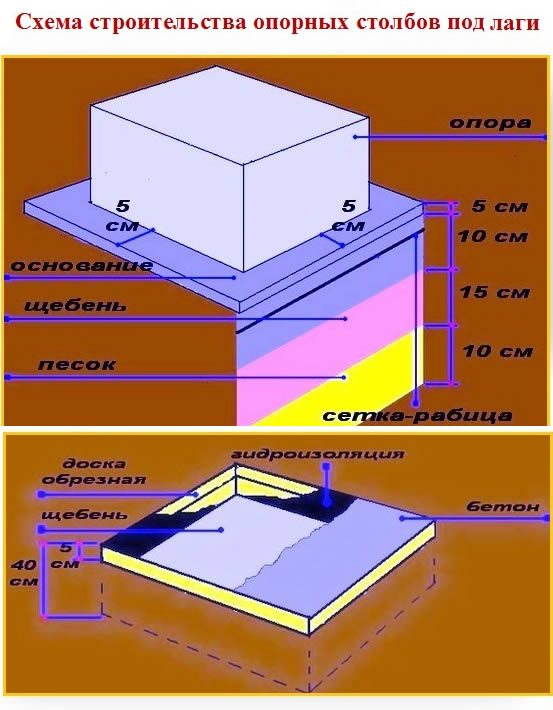
Scheme of construction of support pillars.
To calculate the approximate mass of the bath, you need to have several important data on hand:
- the material from which you are going to build the bathhouse;
- roof type;
- height, thickness, length of load-bearing walls and ceilings.
You will need to sum up the specific gravity of each square meter of the structure.
To do this, you can use ready-made programs or use a calculator to make the calculation yourself, using the average data from the table:
| Frame wall with insulation, thickness 150 mm | 30-50 kg/sq.m |
| Brick wall, thickness 150 mm | 200-270 kg/sq.m |
| Wall made of logs or timber | 70-100 kg/sq.m |
| Reinforced concrete walls, thickness 150 mm | 300-350 kg/sq.m |
That is, 1 sq.m of log wall will have a mass of no more than 100 kg. But that's not all, because you have thinner partitions in the bathhouse, which also put pressure on the foundation. They need to be taken into account too; you can use the data from the same table. If the thickness of the partitions is half that of the load-bearing ones, then it can be calculated by halving the specific gravity.
The roof, like the walls, has weight, and considerable weight. Its approximate mass can be calculated from the table, which shows the average mass of 1 sq.m of coverage:
| Sheet steel | 20-30 kg/sq.m |
| Slate | 40-50 kg/sq.m |
| Ruberoid | 30-50 kg/sq.m |
| Pottery tiles | 60-80 kg/sq.m |
But do not forget about the floors, which also put pressure on the base with their weight; the calculation must take them into account. We add the mass to the total:
| Reinforced concrete floor | 500 kg/sq.m |
| Basement ceiling on wooden beams, density 200 kg/cub.m or less | 100-150 kg/sq.m |
| Basement ceiling on wooden beams, density 500 kg/cub.m or less | 200-300 kg/sq.m |
| Attic ceiling on wooden beams, density 200 kg/cub.m or less | 70-100 kg/sq.m |
| Attic ceiling on wooden beams, density 500 kg/cub.m or less | 150-200 kg/sq.m |
When calculating, you should take the average value, but if you take the maximum, you will make a base that will have strength with a margin. Consequently, the likelihood of destruction from heavy loads is reduced many times. What to do is up to you to decide.
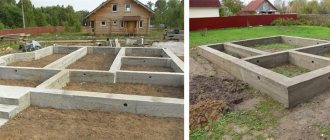
Installation of strip foundation
Terrain marking
The installation of a strip foundation has several significant differences from the construction of a columnar foundation. They appear already at the stage of marking the tape on the plane. In this case, it is necessary to install two cords along the outer and inner perimeter. The distance between them should correspond to the width of the base.
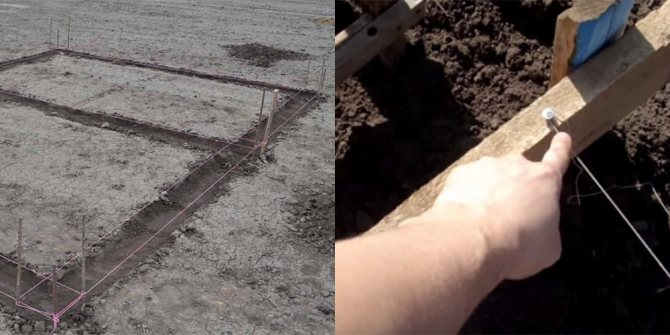
Marking for strip foundation
For marking, you can use the method described in the strip foundation installation technology. But a 3x4 rectangle will only be auxiliary. Our markings will be figures with dimensions of 2.8x3.8 and 3.2x4.2, respectively. That is, the width of the tape, for example, will be 40 cm.
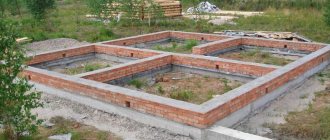
Digging a trench
The strip foundation is mounted not in separate recesses, but in a closed trench, which must be made along the perimeter of the walls of the 3x4 bathhouse and under the partition separating the steam room from other rooms. In this case, you can extract the soil not only with your own hands, but also with the use of special construction equipment.
The width of the tape is calculated similarly to the calculation of the columnar base. It should be taken into account that concrete can withstand a load of 2 kg per centimeter of area. The strip foundation should be laid to a depth exceeding the freezing level by 15-20 cm.
![]()
Digging a trench for a strip foundation
Please note that the width of the trench must exceed the width of the tape by 200 mm. This is necessary for installing panel formwork, which is often made independently or rented. On clay and loamy soils there is no need for formwork for the underground part of the foundation.
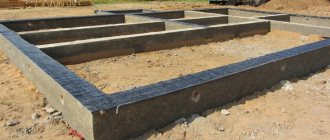
Features of formwork installation
The formwork consists of panels made from edged boards 25 mm thick or sheet wood materials - plywood and OSB. For ease of installation, pointed stakes are nailed across at intervals of 50 cm. With their help, the shields can be easily driven into the ground.
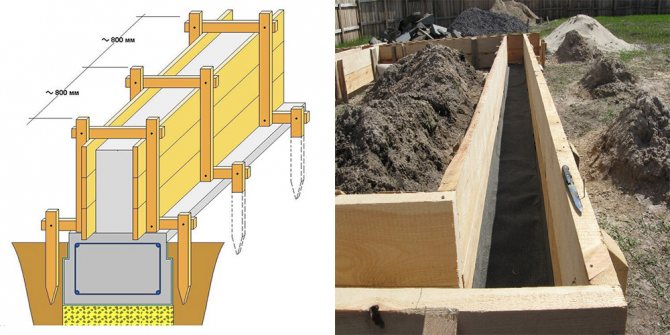
Formwork for strip foundations
Additional fixation of the formwork will help maintain the correct geometric shape of the strip foundation. For this purpose, external spacers made from scraps of boards are used, buried in the ground. Additionally, you can connect the panels to each other at equal distances with wooden slats. Reinforcement must be installed in the prepared formwork and concrete can be poured.
Formwork reinforcement
The installation of a reinforcing belt, which is a steel frame made of reinforcement, helps prevent the destruction of the concrete base for a 3x4 bathhouse. To make it, the rods are tied with knitting wire, installing several pins vertically and passing 4 or 6 rows of horizontal rods between them. L-shaped reinforcement helps strengthen the corners.
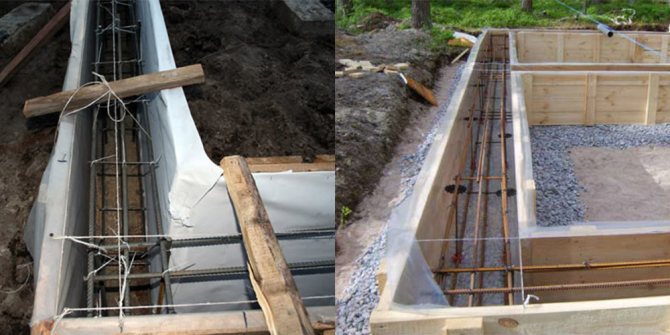
Strip foundation reinforcement
To make an armored belt, you can tie separate longitudinal structures at the top, then install them in a prepared trench and combine them there with L-shaped (at the corners) and T-shaped (at the joints) inserts. If possible, continuous, non-composite pins should be installed along the length.
Concreting tape
Concrete can be poured into a trench with an armored belt. Ideally, filling should occur in one go. Otherwise, if you have to pour concrete in parts, a decrease in the strength characteristics of the bathhouse base may occur. You can get a large volume of the mixture only in one case - when purchasing it at the nearest concrete plant.
To save money, it is possible to make concrete with your own hands directly on the construction site. In this case, mechanical assistants will be required - electric concrete mixers. Even when using them, work may require a full day of daylight. It is advisable to involve additional forces in the process. It will be faster to make a smaller foundation for a 3x3 bathhouse with your own hands.
After pouring concrete, you should not leave the strip foundation unattended for a long time. After setting, its surface is covered with thick canvas, which is periodically moistened, preventing the top layers from drying before the inner ones. Only after a couple of months will the foundation for a 3x4 bathhouse made with your own hands be ready for installation of the wall frame.
Preliminary work on foundation construction
These types of foundations are quite extensive both in terms of labor costs and financial calculations. After all, you have to dig trenches along the entire perimeter of the future bathhouse and internal partitions. And the average depth is from 0.8 to 0.9 m. Of course, in some cases shallow burial is used, but it also takes a lot of effort and time from the builder. Since you will have to go half a meter or more deep.
After marking, you can begin to dig trenches without removing the top layer of soil. But the width of the trenches should be 20 cm greater than the width of the walls of the future building. And the bottom of the trench should be as flat as possible. The walls must be made vertical, without any protrusions.
The most expensive types of bathhouse foundations are considered monolithic. They are used extremely rarely, only in cases where another type of foundation is not suitable for soil parameters.
Digging a pit by hand is quite problematic. It will take a lot of time. Therefore, they often hire special equipment to which it is necessary to clear passage. But such a foundation is the strongest, although its cost often coincides with other construction costs.