Individual construction is becoming increasingly widespread these days. Indeed, in conditions when any building materials and devices for self-construction have become available, the service for delivery of materials and rental of equipment and devices has significantly increased, an increasing number of people are deciding to build their own homes or summer cottages on their own.
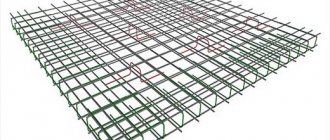
Reinforcement is used to strengthen the ceiling, where the reinforcing element is a grid of reinforcement.
With such construction, quite a lot of questions arise, and one of them is: how to reinforce the floor.
The use of monolithic reinforced concrete slabs as floors is very convenient. The advantages of this solution include the following:
- comparative simplicity of design;
- low cost;
- high strength;
- ability to withstand significant loads;
- the load from a single floor on the walls is distributed evenly.
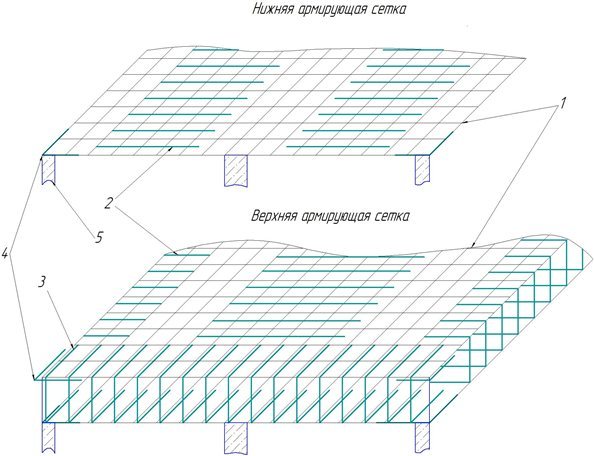
In finished reinforced concrete floor slabs, the reinforcement that carries the entire load is located in the lower part.
And floors made on your own also have such an important advantage as the fact that the slab can be made of any size, while ready-made ones are offered in certain sizes and it can be difficult to choose the right ones for your house under construction. Working with cement mixtures does not cause any particular difficulties, but reinforcing floors is not such a difficult task.
Before making a slab, it is advisable to make a drawing according to which you will make it. In this case, you need to answer the following questions:
- What should the thickness be?
- What are the plan dimensions?
- What reinforcement to use, how to tie it constructively?
- What is the pitch of the reinforcement mesh?
- What reinforcements are needed and in what places?
An example of calculating a monolithic floor slab
Before you start making the slab, it is advisable to make a calculation. Next, an example of calculating an interfloor slab for deflection will be performed.
Initial data for calculation
Let’s take the size of a building with a monolithic ceiling as 6x6 m, separated in the center by internal walls (span 3m). We will take the thickness of the floor to be 160 mm, while the working height of the floor section will be 13 cm. For the manufacture of the slab, class B20 concrete will be used (Rb = 117 kg/cm2, Rbtn = 14.3 kg/cm2, Eb = 3.1 * 10^5 kg/cm2) and steel reinforcement A-500C (Rs=4500kg/cm2, Ea=2.0*10^6 kg/cm2).
Collection of floor loads
The load on the floor will consist of the weight of: the floor slab (in our case 160 mm), cement screed 30 mm thick, ceramic tiles, standard weight of the partitions and payload. All data is summarized in the table below, taking into account the coefficients.

Calculation of a slab based on deflection deformations
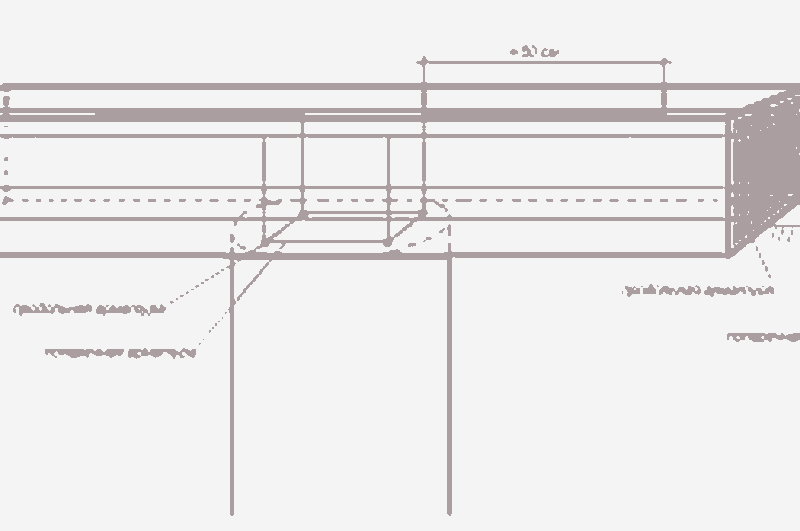
Floor operation diagram:

Now we need to select the cross-section of the reinforcement; to do this, we determine the maximum moment:
and coefficient Aо with the width of the slab section b=1(m):
The required cross-sectional area of the reinforcement will be equal to:
Therefore, to reinforce 1 linear meter of a floor slab, you can use 5 rods with a diameter of 8 mm with a pitch of 200 mm. The cross-sectional area of the reinforcement will be As=2.51 cm2.
We have come close to calculating the slab based on deflection deformations. From the initial data we know that the permanent load on the floor is 0.63t/m² and the temporary load on the floor is 0.2t/m².
We calculate the maximum moment from the action of a long-term load:
And the maximum moment from the action of a short-term load:
We find a coefficient that takes into account the type of load and loading pattern S = 5/48 - for beams with a constant uniformly distributed load (Table 31, “Guide to the design of concrete and reinforced concrete structures made of heavy concrete”). y'=y=0 (Table 29 “Guide to the design of concrete and reinforced concrete structures made of heavy concrete”).
Coefficient for determining: k1cr; k1dl ; k2dl.
We calculate the curvature of the axis under the simultaneous action of short-term, long-term and constant loads:

Now we need to determine the maximum deflection in the middle of the span:
The condition is met, which means that the reinforcement Ø8 A-500С we adopted with a step of 200 mm is correct!
Features of marking and filling
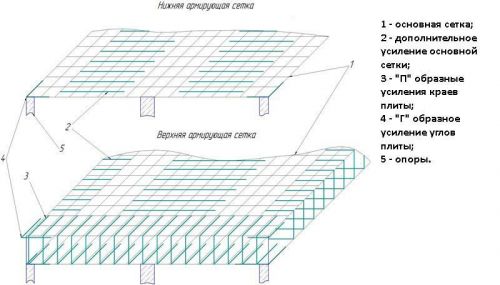
Scheme of reinforcement of a concrete floor slab.
A reinforced concrete product has its own brand, which depends on the quality and proportion of the materials used. The marking consists of letters and numbers. The letters indicate the type of product. For example, PC is a floor slab, and NV is an internal flooring. The following numbers indicate the size of the product, which is determined not in centimeters, but in decimeters.
When choosing a reinforced concrete product, you should pay attention to the last digit of the marking. It indicates the maximum permissible loads that it can withstand. For example, if the last digit is 5, then the design loads should not exceed half a ton per m2 of product.
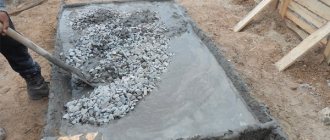
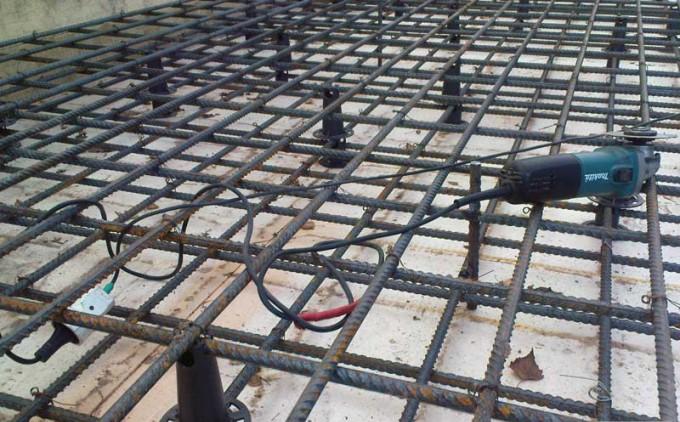
When pouring concrete (grade no lower than M200), it must be compacted. For this purpose, a deep vibrator is used. Concrete tends to shrink as it dries, which is accompanied by the appearance of small cracks on its surface. Therefore, when pouring it yourself, the slab should be moistened during the first couple of days, preventing the concrete from drying out. To do this, it is advisable to use the spraying method rather than pouring a stream of water from a hose.
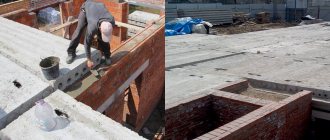
Monolithic floor slabs for garage
Even building structures such as floor slabs can be made with your own hands. Let's look at the garage floor design. We will be covering a span of 4300 mm long, so the slabs will be made 4500 mm long. On each side the slab will rest on a 100 mm brick wall.
Materials for making the plate
How to make floor slabs with your own hands? To make a slab we will need:
- corrugated sheet H75/750 x 4500 mm, it will be used as removable formwork;
- wooden boards 150 mm high and 25 - 30 mm thick;
- fittings with a diameter of 16 mm;
- mesh with a cell 100x100 with a diameter of 5 mm;
- screed with a diameter of 8 mm, 2 pieces per slab;
- concrete class B20.
The process of making a slab with your own hands
A sheet of corrugated sheets is laid on a rigid base. You need to place cross members (wooden boards, 4 pcs) under the sheet. We arrange formwork from boards around the perimeter of the sheet.
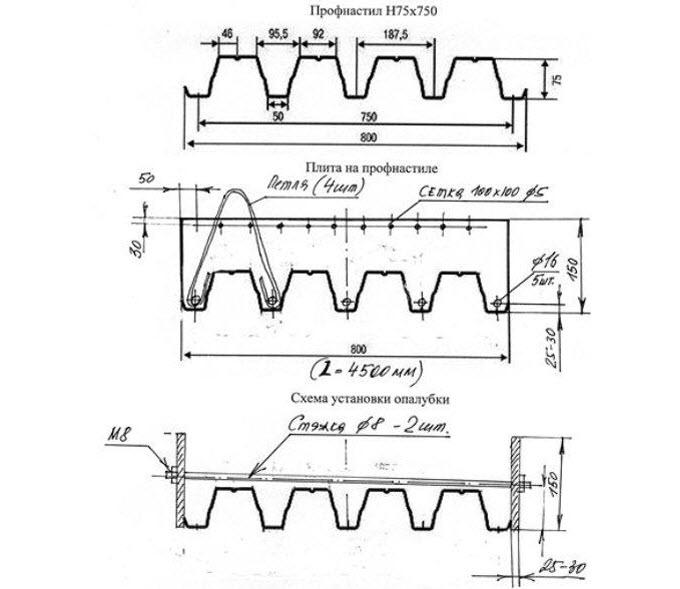
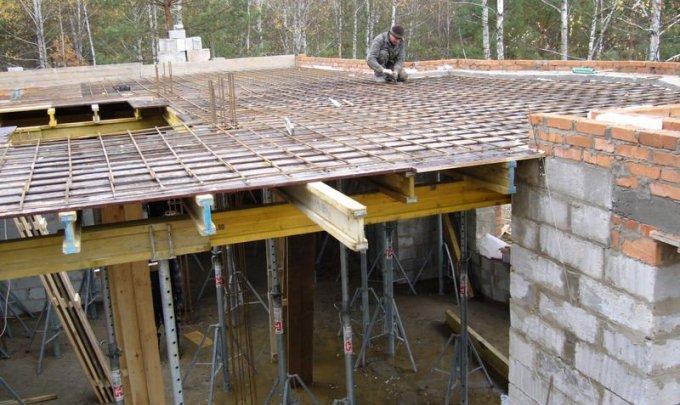
We place reinforcement in each sheet tray (5 pieces). The protective layer of concrete should be 25-30 mm. We attach loops (4 pieces) to the same reinforcement bars for transporting the slab (in our case, raising it to the height of the garage floor level). We lay a mesh at the top of the slab, which should also be protected by a 30 mm layer of concrete.
In order for the corrugated sheet to adhere well to the concrete, it must be lubricated with oil (working off) or covered with plastic film. Concrete consumption per slab will be 0.4 m3. Concrete is prepared in a gravity concrete mixer, poured and compacted with a vibrator. The slab can be removed only after 7 days, when the concrete has gained 70% strength.
It is also possible to install ceilings directly on the walls. Sheets of corrugated sheets are laid, reinforcement is performed and formwork is installed. The concrete is lifted by crane into a bucket and poured in a continuous layer. It is necessary to install supports under the ceiling while the concrete gains strength. This method will be more expensive, since the corrugated sheets remain in the ceiling.
How much does it cost to make a floor slab?
Now let’s calculate the costs of manufacturing slabs with a total area of 29 m2 and a height of 150 mm. The cost of concrete is $335, the price of H75 corrugated sheeting is $400, fittings are $235, crane services are $135. As a result, we get the amount of $970. This cost will be if you make the slab directly in the garage, that is, the corrugated sheet remains under the concrete floor.
If you make floor slabs with your own hands on the ground, then the cost of the floor will be slightly cheaper; we remove the cost of corrugated sheets. The total will be 705 $.
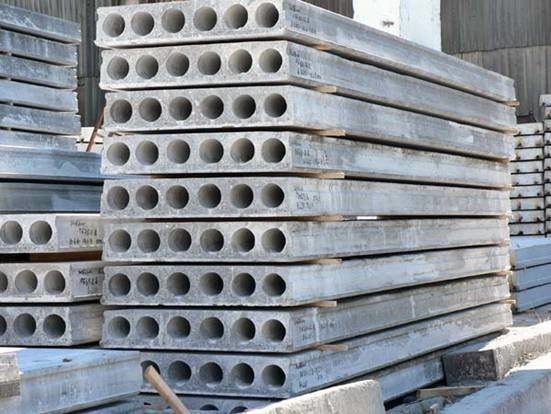
Which fittings to choose
The fittings used in construction are produced in accordance with the regulations of GOST 5781.1982 and are classified as follows:
- Class AI corresponds to the previous designation A240, the fittings have a smooth surface;
- Class AII - corresponds to class A300, which is still in force today, reinforcement with a discharged periodic profile;
- Class AIII - corresponds to marking A400, the reinforcement has a surface with a variable profile.
Types of fittings
Reinforcement A500 C or A500 is rarely used in private construction due to the high price of the product, since the steel for its manufacture is alloyed, and not the usual grade 35 GS, 32G2Rps or 25G2S.
In individual construction, a simplified calculation of reinforcement parameters is usually used. The frame diagram looks like a two-row lattice made of reinforcing bars with a distance between the lattice of 10-40 cm, with cells of the same size. To calculate the optimal parameters with changes in the diameter of the rods in the center and along the edges of the slab, it is necessary to order a service from specialists.
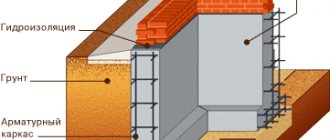
If the length of any side of the foundation is ≥ 3 m, the reinforcement of the monolithic slab is tied with rods Ø ≤12 mm. The minimum diameter value is determined as follows:
- The cross-section of a reinforced concrete slab is calculated by multiplying the thickness by the length;
- The minimum cross-section of the rod is calculated by dividing the cross-sectional value of the slab by the minimum percentage of reinforcement content in concrete (class B 20 concrete - 0.3%, 0.15% class B22.5 concrete - 0.1%, class B15 concrete - 0.15%) ;
- The total area of reinforcing bars in a row is calculated by dividing the minimum cross-section of the bar by 2;
The table in GOST 5781 (a fragment is shown in the figure above) contains information on the sections of rods of various diameters. Thus, based on the diameter of the reinforcement, you can find out the optimal cross-section of the rods without calculations, which will provide a reserve percentage of the reinforcement content in the body of the slab in comparison with the minimum requirements. Hand knitting of reinforcement for a monolithic slab is done layer by layer (in rows), from bottom to top, with the reinforcement being tied with transverse and vertical rods.
To make a correct calculation of the amount of reinforcement for one monolithic foundation slab, we also use data from GOST 5781. The standard length of the reinforcement bars is 11.7 m; to tie long rods, an overlap of 4050 cm is left. The piece of reinforcement from which the U-shaped clamp is bent is should have a length equal to five times the thickness of the slab. To find out its weight by the footage of the reinforcement, they still use the same GOST.
The top row of the reinforcing lattice is tied on supports. These could be the following designs:
- U-shaped metal spider clamp;
- Rectangular lattice in the form of a supporting frame.
U-shaped clamps for fastening reinforcement
The U-shaped clamp is pre-bent from rods Ø 8 mm.
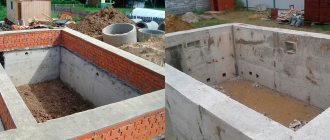
Do-it-yourself prefabricated monolithic floors (SMP)
SMP series TZhBS are developed as an alternative to wooden floors and monolithic reinforced concrete hollow slabs. SMP TZhBS is a prefabricated structure, combined at the installation stage into a solid ceiling using a reinforced screed.
A distinctive feature of SMP TZhBS is that all concrete elements are made from rigid solutions. In order for the production of SMP to be economically feasible, all floor components must be produced industrially using modern, high-performance equipment.
Composition of SMP TZhBS
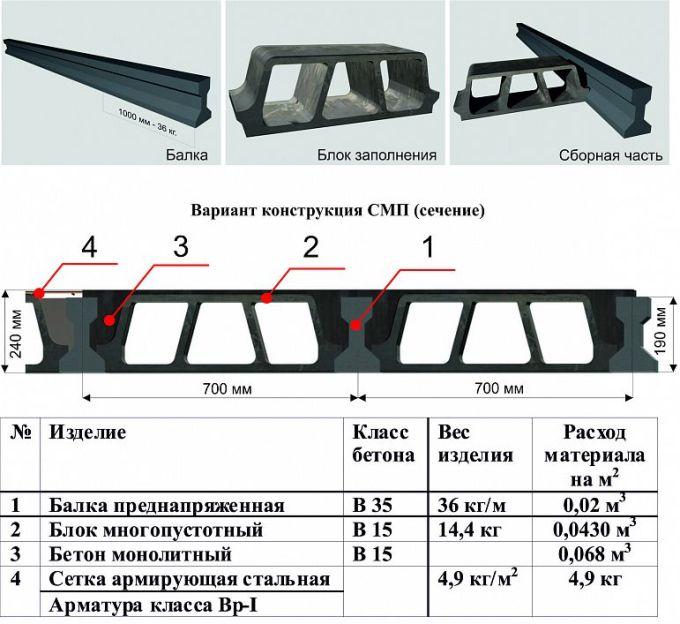
Prefabricated monolithic floors include:
- I-beams made of stressed concrete;
- hollow-core blocks made of expanded clay concrete or concrete, laid between beams;
- reinforced concrete layer connecting the ceiling into a solid structure.
Advantages of SMP TZhBS
- High load-bearing capacity, up to 1000 kg/m2.
- Refusal to perform a monolithic belt.
- High heat and sound insulation.
- Possibility of laying utility lines in voids.
- Low consumption of materials per square meter of flooring.
- Possibility of installing the ceiling yourself.
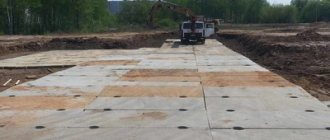
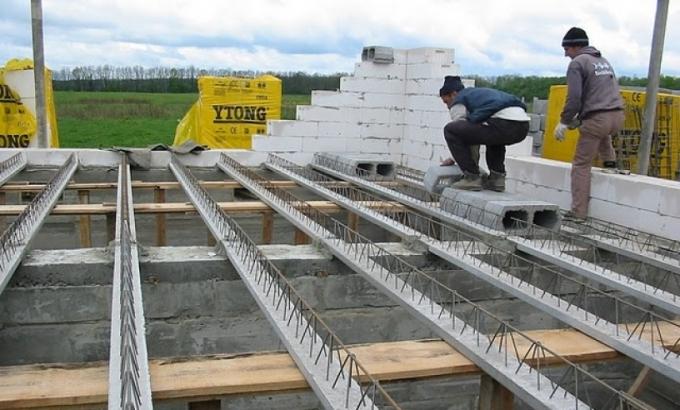
SMP installation technology
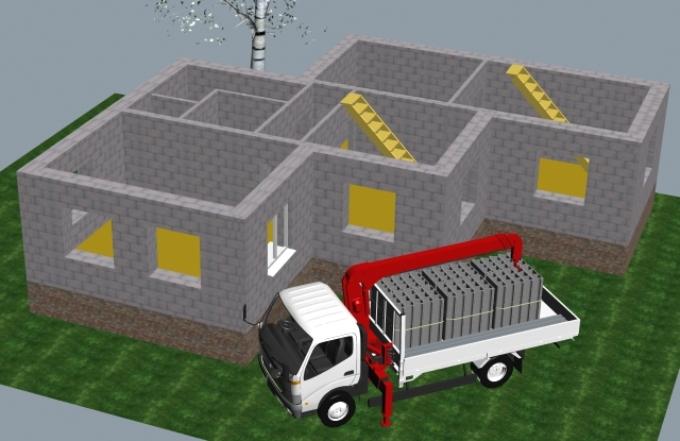
1. Delivery of SMP elements to the construction site. Produced by trucks with a capacity of at least 3.5 tons with a crane. One flight provides delivery of materials for 30 m² of flooring. Unloading is done manually or with a crane.
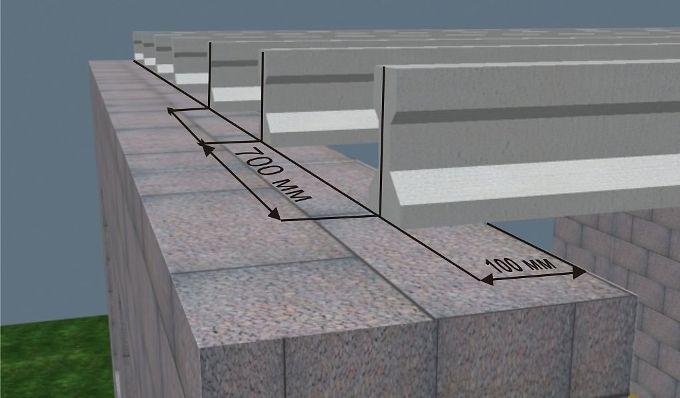
2. The installation of a floor slab with your own hands begins with laying I-beams on load-bearing walls with a step of 70 cm and support of at least 10 cm.
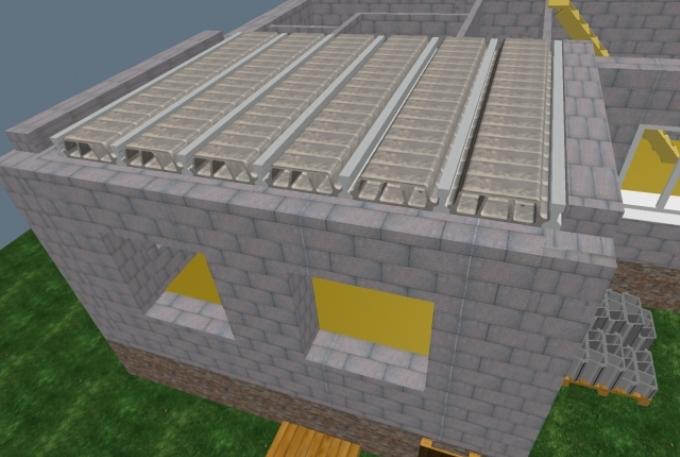
3. Laying hollow-core blocks between beams.
4. Fixing the outer beams with masonry.
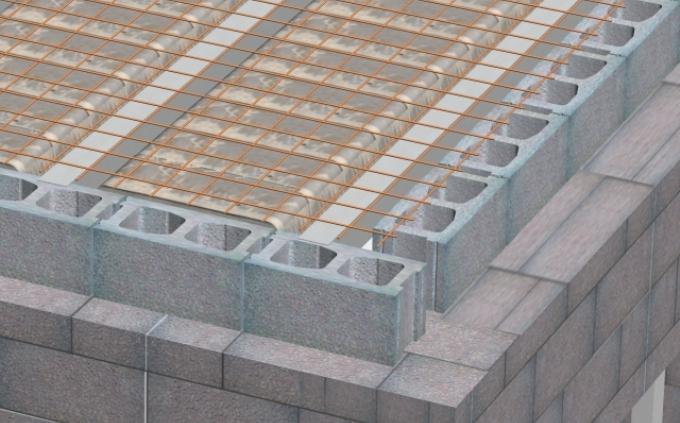
5. Laying reinforcing mesh over the entire floor area.
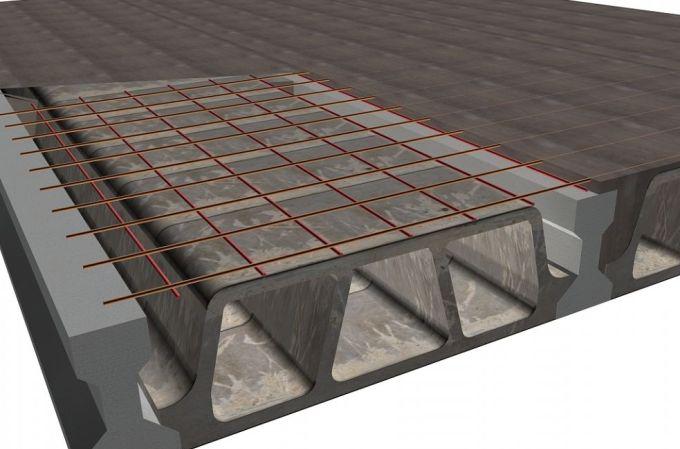
6. Pouring a monolithic concrete screed that combines beams and hollow blocks into a single structure. Concrete flows into the space between the hollow core slabs and beams, creating a strong, rigid structure.
Options for installing floors on prefabricated monolithic floors
All types of floors can be laid on SMP TZhBS. As an example, linoleum and parquet floors are considered. The order of layers is indicated from bottom to top.
Linoleum floor
- Sand layer 30 mm thick.
- Soft fibreboard 12 mm thick.
- Roofing felt waterproofing.
- Cement-sand screed from mortar grade M 150, 40 mm thick.
- Leveling layer of polymer cement 8 mm thick.
- PVC linoleum on a heat and sound insulating substrate, laid on bustilate.
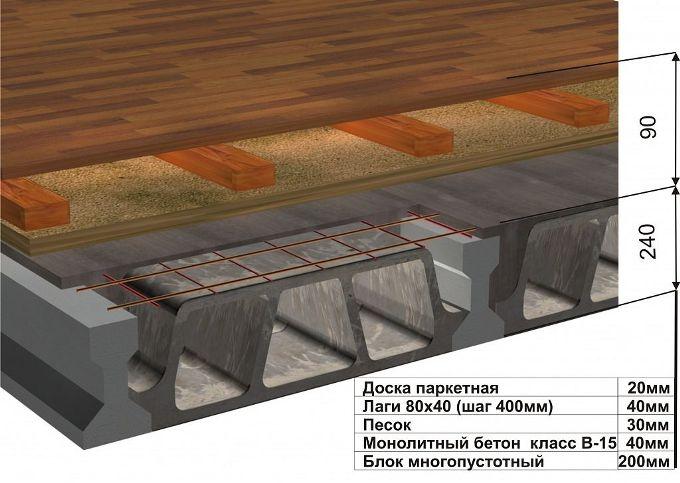
Parquet floor
- A layer of sand 30 mm thick.
- Wooden logs with a cross-section of 80×40 mm, laid in increments of 400 mm.
- Parquet board 20 mm.
The height of the floor with the finished floor is 340 mm (240 mm floor + 100 mm floor).
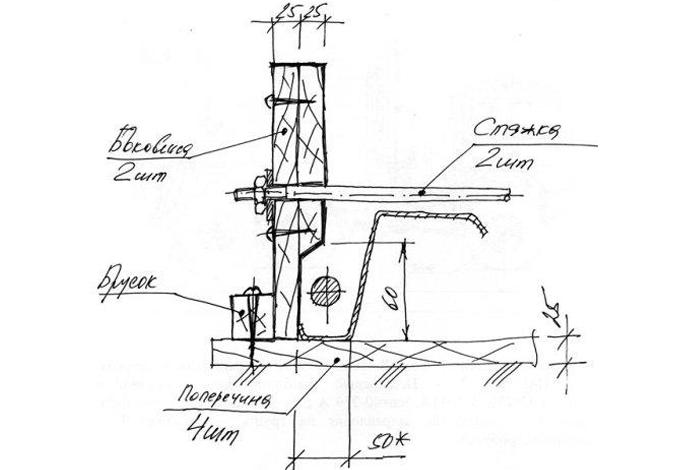
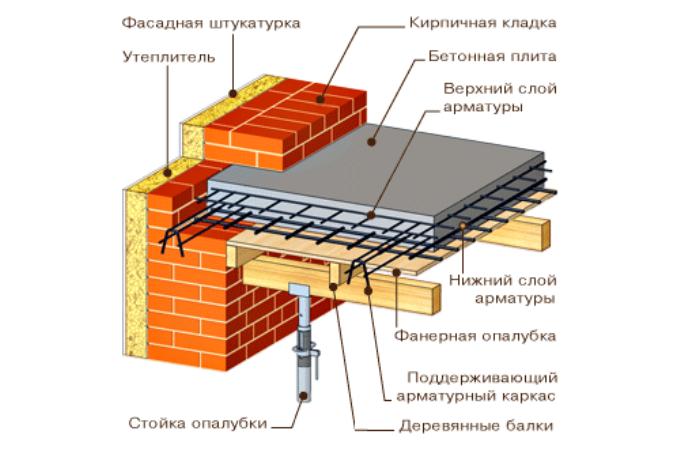
Formwork installation
For a private developer, purchasing professional removable formwork is too expensive a purchase, especially since it will not be useful later. Therefore, if possible, it is wiser to rent formwork. If this is not possible, then you can get by with boards and plywood. After dismantling the formwork, they will be useful in construction, for example, for installing a roof or ceiling. The boards must be at least 1.5 cm thick, and the plywood must be moisture resistant.
Stages of formwork installation:
Floor reinforcement diagram.
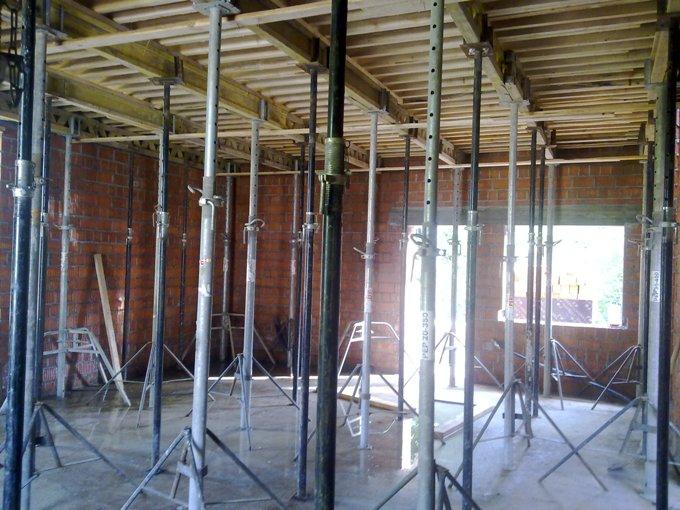
- Particular attention should be paid to the installation of racks. Without them, the formwork will not have the required stability. Telescopic stands can be rented. It will cost 70-100 rubles. per linear meter. Such structures can withstand up to 2 tons of weight;
- First, markings are made on the ground and the locations for installing stands with tripods are determined. the distance between them should be maintained within 1-1.2 m;
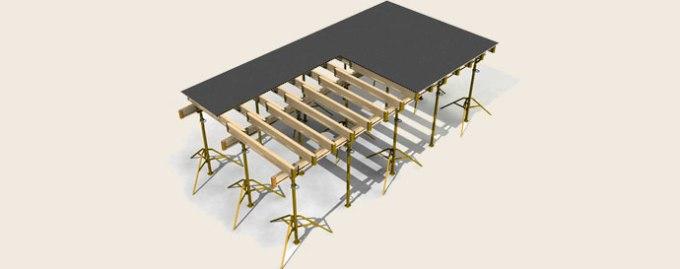
- then beams are laid on top along the perimeter;
- after which the cross beam is laid;
- then the boards (beams) are knocked together into a solid, durable sheet;
- the inside of the formwork is sheathed with sheets of smooth plywood;
- Next, calculations, reinforcement and pouring of concrete are carried out.
DIY monolithic floor slab for home
Slabs used in houses are usually made of reinforced concrete. These are typical ready-made factory structures that only need to be placed correctly during the construction process. They have good performance properties, but there is an option with better characteristics. This is a monolithic floor slab, and it is quite possible to make it yourself, without ordering from construction companies. Such a slab is not only an order of magnitude superior to conventional reinforced concrete ones, but also does not require special skills or specialized complex equipment for its manufacture.
Compared to standard reinforced concrete slabs produced in factories, monolithic flooring has several advantages:
- The structure will not have seams, which adds strength to it, since the load on the foundation is distributed evenly over the entire surface. This improves the overall durability and safety of the building.
- Monolithic pouring makes it possible to experiment with the layout of the house, since it rests directly on the columns. You can create various corners and crannies for which it would be quite difficult to select individual floor slabs. This opens up wide scope for design ideas.
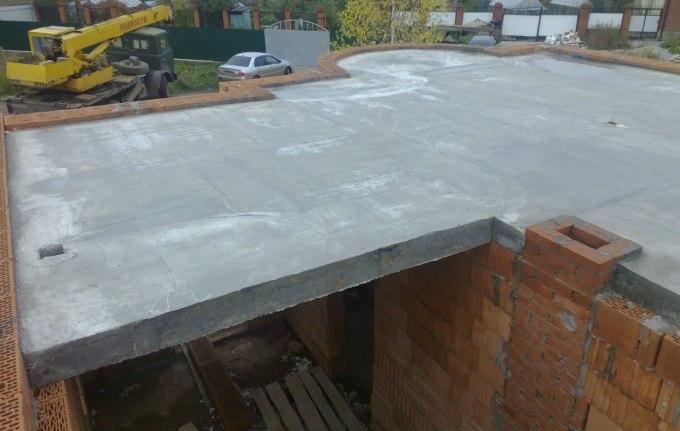
- Finally, the monolithic design allows you to equip a safe balcony without any additional support. Creating a balcony is not mandatory, but many people want to have one in a country house, so why not do it.
You can create a monolithic floor slab with your own hands, without hiring a team of workers or using complex equipment. It is enough to do everything step by step, carefully and in compliance with safety precautions. In addition, you need to choose high-quality materials for your structure.
Technology for constructing a monolithic floor slab
In order to make a monolithic slab, you will need a drawing. Any construction begins with a diagram and calculations. It is better to place an order at a construction office and entrust the calculations to professionals. The result will tell you what the correct dimensions of a slab suitable for construction should be, what reinforcing reinforcement to choose for it, and which of the existing grades of concrete is best to use. You can try to perform all the necessary calculations yourself; there are diagrams on the Internet that can be used to perform this operation. An ordinary country house, as a rule, has a span of no more than 7 meters, for which a slab with standard dimensions and a thickness of 180 to 200 mm is suitable, this is the most commonly used size.
To make a new monolithic slab you will need the following materials:
- Steel reinforcement having a diameter of 10, or, alternatively, 12 mm and a bending device for it.
- Concrete marked M 350. You can also make a concrete solution yourself by mixing sand, cement and crushed stone.
- Formwork and supports to support it, you will need one support per square meter.
- Plastic stands for reinforcing reinforcement for fixation.
The pouring process necessarily includes several points that are performed sequentially:
- If the existing span of the building is significantly larger than the standard 7 meters or the project being carried out clearly involves support on columns, you will have to calculate the floor slab.
- The first step is to install the formwork to begin work.
- The slab is reinforced with steel rods from which the frame is assembled.
- Concrete is poured.
- Using an internal vibrator, compaction is performed to enhance strength.
Once the height of the walls has reached the required level, you can begin to create a floor slab.
Installation of formwork
Conventional formwork used in construction is sometimes called a deck, and this is what is needed to create the slab. You can simply rent a ready-made, removable one, which is made of metal or plastic. You can also easily make it yourself from boards or plywood sheets. Of course, renting is much simpler, since the formwork is removable and collapsible, which means it can be easily removed. In addition, it has a telescopic device that allows you to adjust the height.
To create formwork manually you need to take sheets of plywood or boards. Structures made from boards must be well knocked down, carefully adjusting the wooden parts. If there are cracks and holes left, you need to use a waterproofing film and wrap it around the formwork.
How to install formwork?
- First you need to build vertical supports. If this is a rented formwork, then their role is performed by metal racks with a telescopic height adjustment system. You can take wooden logs. The distance between the posts used is one meter. The racks must be at least 20 cm away from the wall.
- Crossbars are placed on top of the installed racks - these are special longitudinal bars necessary to hold the formwork.
- On the crossbars there will be a deck made of moisture-resistant plywood. The horizontal beam should rest tightly against the adjacent wall without leaving any holes.
- The top edge of the structure used must match the existing top edge of the wall, so the height of the studs should be adjusted to an acceptable level.
- The location and exact horizontality must be checked using a construction level.
In some cases, for convenience, the formwork is covered with a film with waterproofing properties or lubricated with automobile oil if it is made of metal. This is done to make it easier to remove the formwork and make the surface of the resulting concrete slab smoother. Telescopic rented racks are preferable to homemade wooden ones, since they can withstand significant weight - up to 2 tons, do not break, and cracks do not appear on them, as can happen with homemade supports. Temporary rental of such racks costs approximately 3 USD. that is, one square.
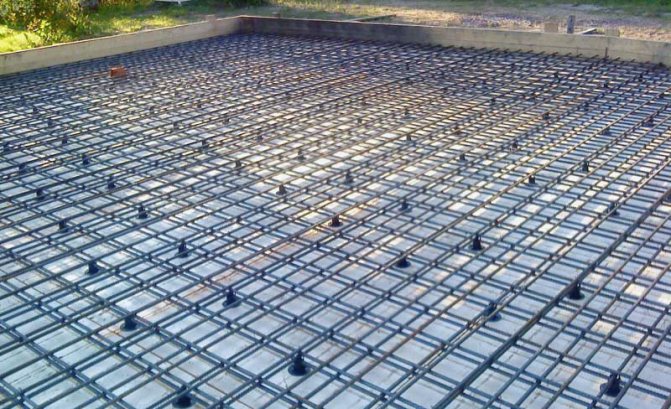
Slab reinforcement
When metal or homemade formwork is installed, you need to tie a frame of reinforcement mesh into it. For this purpose, strong steel rods marked A-500C are used. The size of one cell of the resulting mesh should be about 200 mm. The rods are connected using wire. Usually the length of the rod is not enough to cover the entire space, so you have to connect several pieces. To make the mesh strong, the rods must be overlapped by at least 40 mm.
The mesh must be applied to the walls, the norm for brick structures is 150 mm or more, for walls made of aerated concrete - at least 250 mm. There should be a distance of 25 mm between the protruding ends of the arranged rods and the installed formwork.
Additional reinforcement of the future slab is consistently carried out using a durable frame made of reinforcement. There are two meshes, the one at the bottom is carefully placed at a distance of 20-25 mm from the bottom edge, the other mesh, the top one, is placed lower at 20-25 mm from the top edge of the slab.
Plastic clamps are placed under the bottom tile to hold it at the required distance. They are located in increments of 1 meter, at those points where the intersection of the frame rods is located.
The total thickness is pre-calculated in a ratio of 1:30, where the first number means the thickness of the future product, and the second – the span length. For example, if the standard span is 6 meters, then the width of the slab will be exactly 200 mm. Since the reinforcing mesh is located at some distance from the edges of the slab, it is necessary to separate them, there should be a gap of 120-130 mm between them.
Stand clamps are needed to space the laid out reinforcement mesh in the frame at a distance from each other. The size of the upper shelves of the clamp should be 350 mm, while the vertical dimension is 120 mm, the location step is 1 meter, the fixing elements are arranged in a checkerboard pattern, alternately.
The end fixing element in the structure is installed in constant increments of 400 mm, directly at the ends of the frame. With its help, the slab will rest on the wall.
The mesh connector is needed so that the two meshes accept the load as a single reinforcing device. The installation step should be 400 mm, and when moving to the support area, you need to reduce it to 200 mm.
Pouring the slab
The best option is to purchase suitable concrete at the factory, from professional companies engaged in the manufacture of goods for construction. This greatly simplifies the task. In addition, if you carefully pour concrete evenly and using a mixer, the surface of the slab will be smooth and very even. But manual pouring will require an inevitable break while preparing a new portion of the mortar; accordingly, hardening will proceed unevenly, which can lead to defects in the finished slab. It is better to fill in an even layer, approximately 200 mm, acting without delay.
Before pouring concrete, you must remember to install special technical boxes in the formwork, designed to create chimneys or ventilation. After pouring, you need to use a special deep concrete vibrator. This will make the structure of the slab more durable, so it will be reliable and of high quality. You then need to be patient and allow the poured surface to dry and gain strength over a period of 28 days.
The emerging surface should be carefully monitored in the first week after pouring and moistened with plain water, but only moisten it and not pour it generously. The formwork can be carefully removed from the slab a month after pouring. After this, the new monolithic slab will be completely ready.
The total cost of materials and devices required to obtain a monolithic floor slab, as a rule, takes into account the costs of reinforcing reinforcement, possible rental of formwork, purchase of concrete and short-term rental of a construction mixer, as well as a deep vibrator. According to average estimates, it turns out to be approximately 45-55 USD. per square of constructed floor.
How to correctly calculate the amount of reinforcement, wire and steel rods
Before you start calculating the amount of reinforcement, its diameter, as well as other related materials, you need to have an idea of the mesh and the correct frame.
The following requirements apply to the metal frame (mesh) that goes under the monolithic base:
- it must be double-sided, that is, consist of a lower and an upper layer, which should be located at a distance of no more than 2-5 centimeters from the edges of the sides of the concrete base;
- its edges should also be at a distance of 5 centimeters from the concrete monolithic slab.
Now you can proceed to calculating the required amount of reinforcement that needs to be tied.
As a basis, you can take the dimensions of the house as 8x8 meters. The reinforcing mesh should have a pitch of 200 millimeters. In this case, the correct calculation will occur according to the formula:
- first you need to determine how much reinforcement will be needed for laying: 8 meters (perimeter side)/0.2 meters + 1 reinforcing rod = 41 pieces, and to obtain a mesh, such rods must be laid perpendicular to each other;
- the following calculation is the total quantity: 41 pieces x 2 and you get 82 pieces of metal fittings.
This calculation allows you to find out the amount of reinforcing material on one side, of which, as you know, there are two, and therefore 82 will need to be multiplied by 2, resulting in 164 pieces of reinforcing pins.
Now you can calculate the total number of required reinforcing pins, whose diameter is 10 millimeters and the standard length is 6 meters. Thus, if 164 is multiplied by 6, it turns out that for a house with a perimeter of 8x8 meters you will need 984 linear meters of reinforcement with a diameter of 10 millimeters. You can immediately estimate the total cost.
For a monolithic floor, the calculations will be similar.
Now you can proceed to calculating the number of rods. As mentioned above, having a diameter of 6-10 millimeters. They are also suitable for monolithic flooring inside a building.
There are 1681 connection points between the two sides where the reinforcement rods will be tied together (41x41). It follows from this that a metal rod with a diameter of 10 millimeters will need 0.1 millimeter x 1681 = 168.1 meters. Total quantity: 984+168.1=1152.1 meters. That is, you can calculate the cost of the rod that will be needed for the layout.
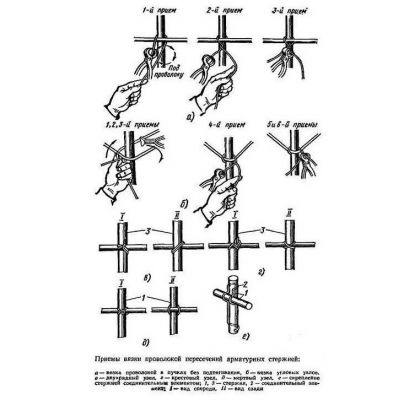
Knitting methods.
It should be noted right away that the calculation includes a rod with a diameter of 10 millimeters. Well, now you can take up the wire that will be used for knitting. Its calculation will be based on the following considerations. There will be 3362 knitting points on both sides of the mesh. This calculation is taken from the fact that there are 1681 knitting points on one side, and 3362 (1681+1681) on two sides, respectively. As stated above, the wire for knitting should be steel.
To make the binding strong, it is better to bend the wire in half and then tie it.
This method can also be used for the manufacture of monolithic floors. They are no different from the foundation, but in the production of floor slabs it is better to use small fractions of crushed stone, or even cement-sand mortar, so that the surface is smooth.

Scheme of reinforcement of a monolithic slab.
In order to create a monolithic reinforced concrete foundation for a house, you must first calculate its area and height, and then start determining the amount of material that will be used to make it. It's simple.
What to remember when reinforcing
To ensure that the structure does not become less flexible, having the same mass in the building above the columns, support beams must be used. The working pressure in monolithic sections occurs downward, distributed more or less evenly across the platform.
The location of the holes in the places where the covering rests on the columns (where the pushing zone is) is undesirable, since this is one of the most stressed areas in the slab, which can reduce the efficiency of work.
Technology
Welding of reinforcement is rarely used and only in exceptional cases during the construction of large monolithic structures.
In private and low-rise construction, the only option left is to tie the reinforcement with wire or other mechanical fastening materials.
For tying reinforcement the following is used:
- Special baked steel wire with a diameter of 0.8 to 1.5 mm. Annealing the wire gives it toughness and softness, due to which it can be twisted and tied even by hand;
- Ready-made clamps made of unfired steel wire for cross-connecting reinforcement;
- Polymer clamps and ties.
Annealed knitting wire has become more widespread, but more as a historical fact, it is polymer clamps or ready-made spring-loaded steel wire clamps that can speed up the knitting process.
The task of tying the reinforcement frame is as follows:
- The boundaries of the future monolithic slab are marked along the prepared site, indicating all boundaries and angles. Next, bosses are laid - special clamps, supports, on which the first layer of reinforcement is laid out in order to maintain a given distance from the lower boundary of the slab being poured, so that the reinforcement is completely covered with concrete;
- The reinforcement is laid first in one direction, with obligatory overlap at the points where the reinforcement is made to cover the entire length;
- Transverse vertical elements are distributed to connect with subsequent layers of reinforcement;
- Knitting is performed at all points of triple intersection, where there are vertical transverse drains, along the entire perimeter of the reinforcement and inside in a checkerboard pattern or at each intersection;
- Next, bosses are installed for the second row of reinforcement. The entire procedure is repeated, only on the condition that the checkerboard knitting pattern in the central part of the slab will be shifted diagonally relative to the first row.
Crochet
The simplest and most accessible knitting option. A hook made of thick, strong steel wire (even a slate nail) of a special shape is used. The end of the hook is pointed, the bend of the hook itself has a turning diameter of approximately 3 cm and an end extension of 3-4 cm.
The handle of the hook is made rotary and shifted relative to the hook to the side so that they are not located on the same axis.
The purchased version will be stronger, more reliable and incredibly more convenient, since a convenient ergonomic shape of the tool and a grip option have long been found so that the hand does not get tired.
For knitting, a piece of wire about 20-25 cm is used. It is folded in half and then bent again in the middle at an angle of 90 degrees. The result is a curved hook on one side with a loop and two free ends on the other side.
The wire is hooked under the intersection or overlap of the reinforcement. The hook is inserted into the loop on the wire so that its tip catches on the second end. If you twist the hook around the axis several times, the ends of the wire twist and tighten the loop around the reinforcement.