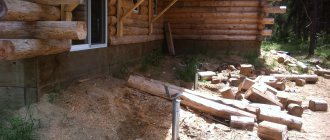
In private housing construction, the strip foundation is often not buried, i.e. it is poured directly onto the surface of the earth. This type of foundation can be used on water-saturated and highly heaving soils, because it is not affected by frost heaving.
The main feature of this type of foundation is its penetration into the ground to a depth of no more than 20 cm.
Conditions for using a non-buried strip base
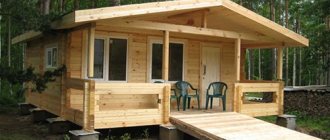
A non-buried strip foundation is suitable for light structures. For example, a frame cottage or a timber house of no more than two floors, you can also build a bathhouse, veranda, gazebo, or any outbuilding.
It is impossible to build a brick house on (NZFL), because the foundation will not withstand such a load. A shallow foundation is suitable for this.
Conditions for construction on a shallow foundation:
- The soil on the site should not be heaving. Non-heaving soils are considered to be those soils that do not change their physical and mechanical properties when frozen. This type includes: silty sand, coarse sand, pebble sand, gravel sand, coarse sand, soil without clay impurities.
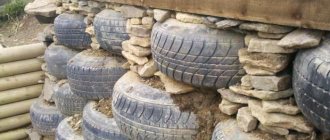
- The presence of slightly and moderately heaving soils requires taking measures to drain them by building a drainage system under the foundation. And an additional replacement of the soil from heaving to non-heaving. It is impossible to use NZFL on clay and loam, regardless of the ground level. In this case, the heaving forces will depend on the precipitation.
- Do not build long ribbons, since long bases are more susceptible to the negative effects of frost heaving forces. The outer wall of the tape should not exceed 10 m, and the inner wall 7 m.
Advice! Before using NZFL, conduct a soil analysis on the site. As a rule, in 80% of cases the soils are unsuitable for the construction of this type of foundation. If you are building a country house, then consider shallow or pile-strip foundations.
Flaws
- Among the disadvantages, first of all, it should be noted the high consumption of building materials, which in turn makes this type of foundation quite expensive.
- In addition, its construction requires significant earthworks, which affects the timing. When using technology to speed up work, the cost of a buried strip foundation again increases. The price is considerable, but sometimes it justifies itself.
- Finally, buried foundation strips are highly susceptible to soil heaving, which makes it necessary to involve surveyors to analyze the site.
Types of non-buried strip foundation (NZFL)
The non-buried strip foundation is divided into three types:
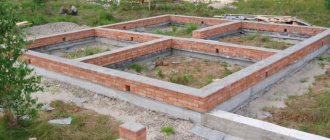
Prefabricated strip foundation
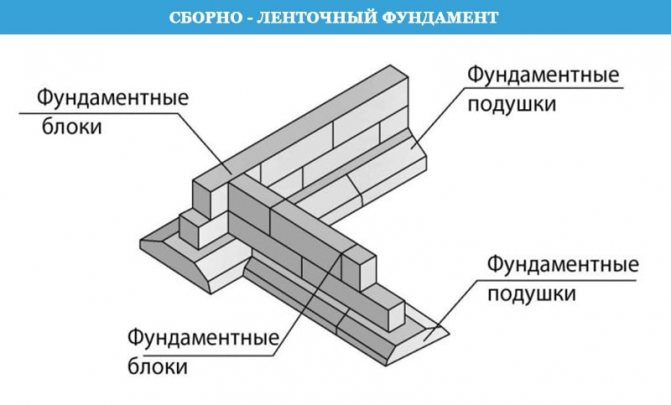
The prefabricated foundation is erected from FBS slabs, in accordance with GOST 13579-78.
The size of the blocks is selected depending on the area of the structure; as a rule, these are FBS 9 and 12. The prefabricated foundation is constructed on soils with low heaving. Since heaving soils will push out individual blocks unevenly, after which they will settle under the influence of frost heaving. But if you take action, this can be avoided. Having carried out a set of measures to reduce the negative effects of heaving soils.
A prefabricated strip foundation is considered the best option for heaving soils, since FBS blocks only bend when deformed, and the monolithic strip breaks.
It is possible to neutralize heaving forces during the construction of a prefabricated strip foundation by performing the following steps:
- Install the blocks on the bedding prepared in advance.
- The blocks should be placed evenly and strictly in one plane.
- FBS blocks are fastened together in two ways. The first is with cement mortar M200 or M300. The second is with metal embedded elements.
- To ensure the reliability of the base, the prefabricated tape is reinforced with metal structures made from reinforcement.
The advantage of the foundation is the low cost of concrete work. Easy to install blocks. Complete absence of formwork work.
The disadvantage is the rental of a crane for installation.
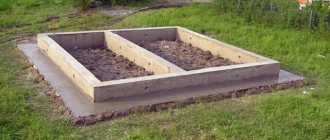
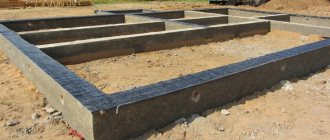
Monolithic strip foundation
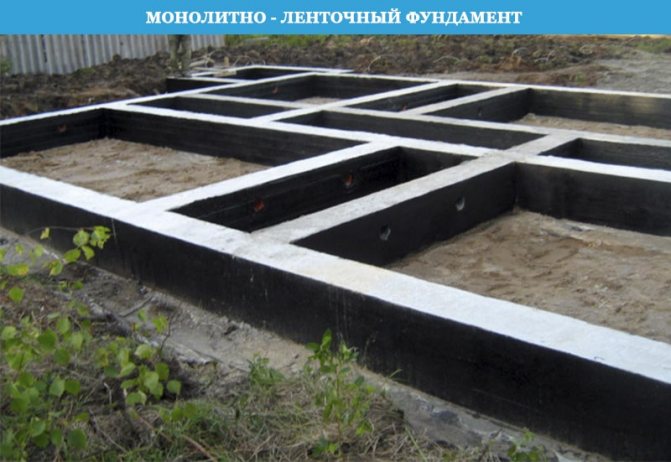
A monolithic strip foundation is erected by concreting the strip. The concrete solution is poured into the previously constructed formwork. With reinforcement of the base with reinforcing mesh. Reinforcing rods with a diameter of 12 and 14 mm are connected to each other. Afterwards, the M200, M300 solution is poured, depending on the structure we want to build.
The advantage of a monolithic strip base is that it does not require additional equipment for installation. All work is done by hand. Although you will still have to rent a concrete mixer. Since the solution must be poured into the tape along the entire perimeter at once.
The disadvantage is the high cost of materials: boards, reinforcement, concrete mortar.
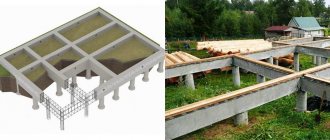
Combined strip foundation
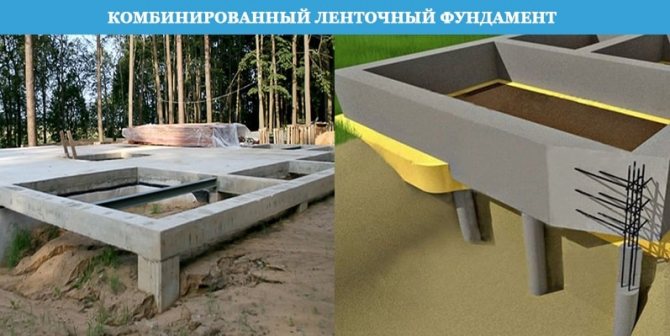
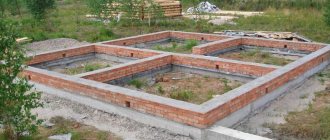
Combined NZFL is a combination of a columnar and strip foundation. The base of the tape is mounted on poles dug in advance.
There are also prefabricated monolithic types - a combination of FBS blocks and part of a concrete-filled strip. Rarely used in the construction of small buildings, because the budget is inappropriately spent.
Preparation
Preparing a deep strip foundation with your own hands is a task that is almost impossible to cope with alone. Therefore, the work should be done together with a team of assistants. The preparatory work plan is approximately as follows.
All work should begin with the planning of the base. To insure against possible problems in the operation of the future building, it is best if the project is drawn up by a construction organization.
The foundation plan must be transferred to the selected plot of land. It is highly recommended to allow surveyors to inspect the site.
Bearing capacity of soils (SP 22.13330)
Table No. 1. Values of bearing capacity of the main types of soil.
| Soil Type | Load capacity kg/sq.cm | |
| Dense soil | Medium density soil | |
| Sands are gravelly and coarse (regardless of humidity) | 4,5 | 3,5 |
| Sands of medium coarseness (regardless of humidity) | 3,5 | 2,5 |
| Fine sands: | — | — |
| Low moisture | 3,0 | 2,5 |
| Very wet | 2,0 | 2,0 |
| Saturated with water | 1,5 | 1,0 |
| Sandy loam: | — | — |
| Dry | 3,0 | 2,5 |
| Saturated with water | 2,5 | 2,0 |
| Dry loams | 3,0 | 2,0 |
| Clays: | — | — |
| Hard clays | 4,0 | 3,0 |
| Plastic clays | 2,5 | 1,0 |
| Coarse soils (crushed stone, gravel, pebbles) | 6,0 | 5,0 |
Calculation of a non-buried strip foundation
There are two ways to determine the load on a shallow strip foundation (NLF). Use special calculators to calculate the base or independently, using formulas and algorithms. Calculations are needed to determine the width and height of the base. And understanding whether the soil will withstand the load exerted on the foundation by the walls of the structure.
Let's calculate the base using the following algorithm:
- We determine the weight of the future structure. To do this, you need to sum up the weight of all building materials. We calculate the weight of 1 m2 of wall - divide the total weight of the building by the area of all walls.
- Snow load - determined depending on the region of residence and the angle of the roof. The angle of inclination does not exceed 25 degrees, then we take the exact value presented on the map (shown below). A slope of more than 60 degrees allows you to ignore the load from snow on the building.

- NZFL width. The width of the foundation should be at least 25 cm or be 5–10 cm wider than the thickness of the wall. For example, if you are building a house from a log frame 200X200 mm, the width of the base will be 25 cm. To build a building from aerated concrete blocks, the width of the wall will be no less 45 cm, so the base will be from 40 to 50 cm wide, the parameters of the base depend on the number of storeys of the house.
- NZFL height. The minimum height of the tape is determined by the sum of the snow level + 10 cm, and the maximum is equal to the width of the tape multiplied by two. For example, a house made of aerated concrete blocks has a base 50 cm wide, in which case its height will be 1 m. Do not forget that although the foundation is not buried, due to natural shrinkage, 10% of its height will be below the zero mark.
- The calculation of the NZFL load depends on the parameters that we defined above. To calculate the load, we need to sum (weight of the structure + snow load and divide the resulting number by the area of the base). We calculate the area using the formula: multiply the length by the width. This value will show us the specific load per 1 cm2.
- The bearing capacity of the soil is determined by visually assessing the soil of the area on which we are building an outbuilding. Having determined the type of soil, you can find out the bearing capacity according to Table No. 1.
Important! The bearing capacity of the soil on the site must be higher than the load from the building, in this case the calculations are correct. If not, then the width and height of the base needs to be increased.
Design Process
When designing a strip foundation, special attention is paid to the following factors:
- Operating loads. They are summed up from the weight of all structural elements of the house (walls, floors, roofing) and the weight of the foundation itself; weight of equipment, furniture, household appliances and people; snow and wind loads.
- Soil type and condition. For classification, GOST 25100-95 is used. The tables determine soil resistance, swelling, mobility, heaving and other parameters necessary to determine the bearing capacity and loads on the foundation from the soil.
- Soil freezing level. It varies in different parts of the country. So in the Moscow region the soil freezes by 1.4 m, and in Novosibirsk by 2 meters.
- Groundwater level. It can vary from a few tens of centimeters to several meters. Moreover, even in one area, significant differences can be found in different places.
- Terrain. The presence of slopes creates special requirements for the project when different heights of the strip foundation walls are laid on different sides of the contour.
Analysis of the above factors allows you to make the necessary calculations and plan additional measures (for example, drainage system, insulation, additional strengthening, etc.).
Installation of a non-buried strip foundation (NZFL)
Marking and excavation work
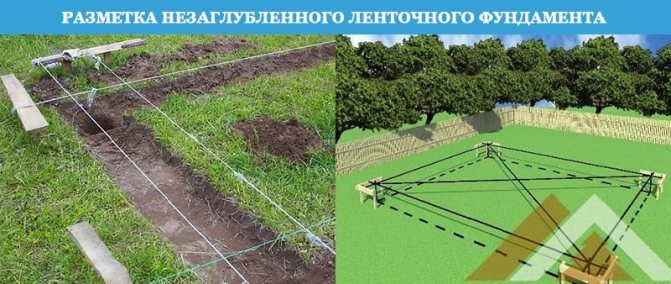
The first thing that is important to do before marking is to prepare the area. Clear away debris and remove the first layer of soil.
For marking you will need:
- stakes;
- rope or strong fishing line.
Next, we determine the first angle using a theodolite or a nearby building. We mark the second corner at the required distance depending on the project and drive in the necklace. We stretch a rope or cord between the stakes; this will be the outer surface of the wall. We mark the remaining walls relative to the first. We mark the length of the walls according to your project. If the structure is rectangular, a diagonal is drawn between the corners to check the correct placement.
After marking the outer corners, move on to the inner ones. The width between them depends on the calculations.
To make digging a trench easier, move the driven stakes to a distance of 0.5 m from the edge of the trench.
For excavation work you will need:
- shovel;
- wheelbarrow (for removing excess soil).
We dig a trench 30–40 cm deep.
Sand, gravel substrate
For a cushion (bedding), recesses are made at the bottom of the trench on the sides, which will be 10–15 cm wider than the base tape.
Next, lay geotextiles on the bottom of the trench to prevent groundwater from flooding the cushion.
There are two ways to create a bedding:
- Gravel-sand mixture. Proportion for preparation (gravel/sand – 2/3) The thickness of the pillow will be 20–30 cm.
- We fall asleep in layers. The first is a 15–20 cm layer of coarse sand, and the second is a 20 cm layer of fine crushed stone or gravel.
Important! Any non-ore materials are suitable for backfilling. For example, expanded clay, blast furnace slag and others.
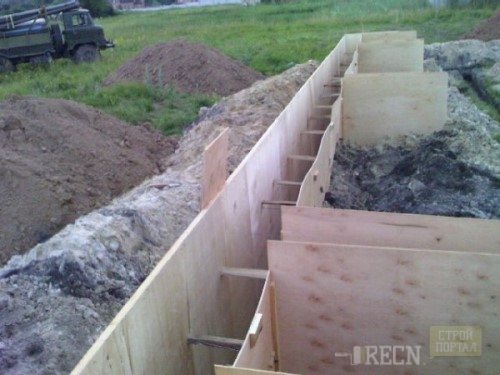
Formwork
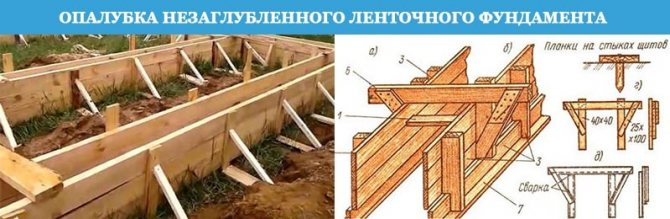
The foundation formwork must be able to withstand the load of concrete. Therefore, the structure should be durable. It is constructed from wooden boards or plywood with a thickness of at least 3–5 cm.
The structure of wooden panels is buried 5–7 cm into the bedding on the outer and inner sides. The corners of the formwork are further strengthened, since the main load acts on them. It is also strengthened along the perimeter with racks every 0.5-0.8 m, and the outer and outer sides are fastened together with studs.
Formulas for calculating lumber for formwork can be found in the article.
To install the formwork you will need:
- plywood or board thickness – 3–5 cm;
- self-tapping screws;
- studs and posts (for strengthening).
Important! Depending on the project, we install vents.
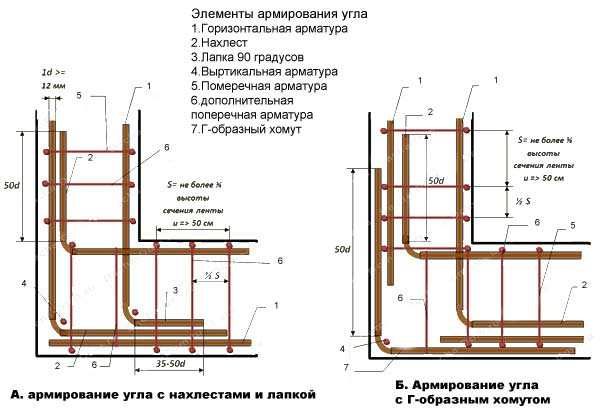
Reinforcement
The reinforced frame is created using spatial knitting to strengthen the foundation. The frame is tied on top of the formwork or special stands are used. The shape of the reinforced frame can be square or round, depending on the project. Corrugated A3 class reinforcement with a diameter of 12–14 mm is placed longitudinally to each other, tied together with 3–6 mm wire at a distance of 40–60 cm. The reinforcement rods are installed vertically at the same distance. Thus, a square is formed.
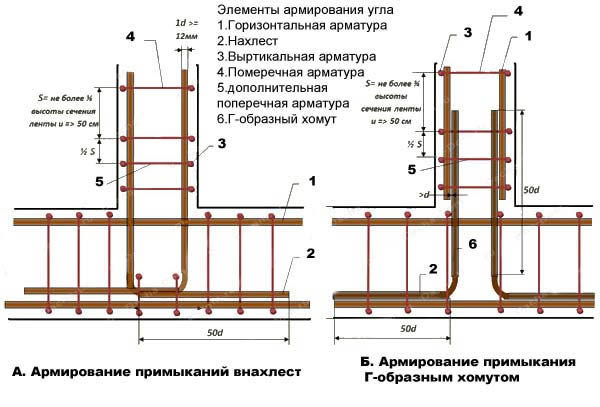
The corners of the reinforcing frame are connected by curved rods on the outer and inner sides at the bottom and top, the rods are connected with annealed wire.
The finished reinforced frame is lowered into the formwork onto previously installed metal mushrooms - these are metal structures that lift the reinforcing frame 7 cm above the ground. Also, the frame should not touch the walls of the formwork.
Fill
Concreting a non-buried foundation occurs by pouring concrete mortar into the formwork. Concrete of class not lower than B15 is used.
To prepare cement you will need:
- cement;
- sand;
- crushed stone;
- water;
- concrete mixer.
Recipe! Preparation of concrete class B15 grade M200 per 1m3. Proportion for mixing in a concrete mixer: cement, sand, crushed stone - 1 / 3.5 / 5.6 (kg). Add water by eye to form a heterogeneous mass.
The finished concrete solution is poured into the tape in portions or layers, compacted. Compact with a deep vibrator for uniform shrinkage along the tape and expulsion of bubbles. After the concrete work is completed, the foundation is covered with film and left to harden. From 25–30 days, the base takes a solid, solid form, ready for insulation and blind area.
Waterproofing and insulation
The foundation (NZFL), like any other, needs waterproofing and insulation after hardening. This is necessary in order to increase its durability, strengthening the structure by reducing moisture resistance.
There are several types of waterproofing:
- Coating. The tape is treated with bitumen or epoxy mastic - this is a moisture-proof material.
- Rolled. We cover the tape on all sides with roll materials: Bikrost, TechnoNIKOL: external, internal and on top.
- Penetrating. At the stage of creating a concrete solution, a special additive is added - a primer. The special properties of the primer additive can reduce the porosity of concrete, while reducing its moisture permeability.
Advice! A good result shows an integrated approach. A combination of penetrating injection into a solution with a coating or roll material.
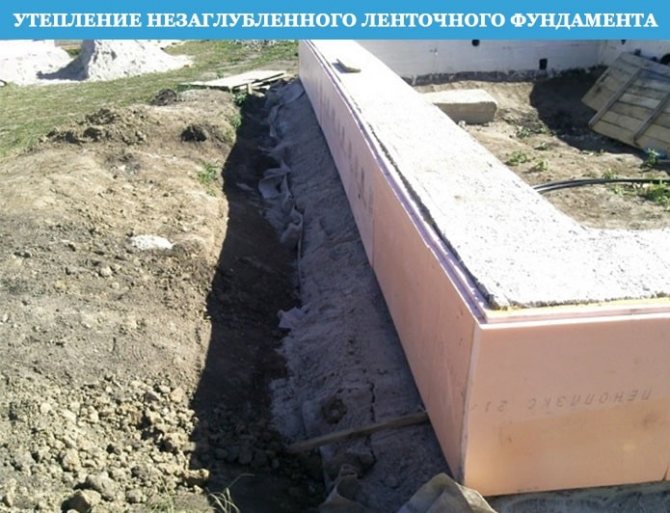
For insulation, the foundation is sheathed on the outside with penoplex or extruded polystyrene foam. The advantage of the materials is a high heat saving coefficient, as well as resistance to moisture and rodents.
The material is attached with slabs to the foundation. The base and the base are insulated. Then they move on to the next stage, creating a blind area.
Blind area
The blind area of a non-buried strip foundation serves to protect against precipitation and soil heaving in winter. Therefore, the width of the blind area depends on the size of the building’s roof eaves. Often its size is 20–30 cm longer than the canopy. If we talk about a private house, the width of the blind area will be up to 70 cm at an angle of 8 cm, since it is used not only for protection, but also as a sidewalk path.
Installation technology:
- We remove soil over the entire area of the foundation, 30 cm below its depth.
- We build a formwork into which we fill a mixture of crushed stone and sand with a layer of 10 cm, then compact it.
- After compaction, we lay hydro- and thermal insulation. Geotextiles and roofing felt, on top of which we lay foam boards.
- Next, we install the reinforcing mesh.
- Fill 5–10 cm with concrete mortar.
- Decorative finishing. You can use cobblestones, tiles and other materials.
Important! Don’t forget about expansion joints that will protect the blind area from cracking. We place seams every 2 m, 1-1.5 cm wide. Also, in the absence of drainage, you need to install a drainage tray, which will be part of the drainage system.
Drainage
The builders have not yet fully decided whether drainage is needed for a non-buried strip foundation. Some professionals argue that the drainage system is important for the NZFL, since groundwater and precipitation are drained away from the structure. The other part, on the contrary, argues that the foundation, located not below the zero level, is subject to less influence of groundwater on the foundation, without causing significant damage to it.
Drainage is necessary when there is a high level of ground water in the area. Protecting the gravel-sand cushion from erosion.
The drainage system for a private house is made of polymer pipes. The optimal diameter of the polymer pipe is from 10 to 14 cm, and the depth of their installation should be 30–50 cm below the bedding. It is installed at a distance of 1.5-3 m around the house.
Drainage technology:
- Before backfilling the sand and gravel cushion, additional holes are dug in the trench at a distance of up to 2 m and 10–20 cm of fine crushed stone is poured into them.
- Drainage tubes made of polymers are installed in the wells. The tubes are wrapped in geotextile to protect the drain from flooding. The drainage is located under the base and future blind area, with a slope of 5–10 degrees, this will ensure the removal of moisture by gravity.
- After the foundation concreting stage, a trench 20 cm wide and deep is dug at a short distance of 0.5 m (where the drainage was installed). We line geotextiles in the trench and fill everything with crushed stone on top. We install a pipe that will collect water from the drains and discharge it into a drainage hole or ditch.
Important! Drainage must be designed at the stage of NZFL calculations. This will facilitate the correct implementation of drainage work and reduce the negative impact of groundwater on the base, and the floors will become much warmer.
Do-it-yourself monolithic grillage.
This is a strip-type structure, built on the ground surface, drainage is provided under the lower edge of the foundation, and the structure provides for mandatory reinforcement. The grillage is not affected by horizontal seasonal soil movement, only vertical.
Due to the mass of the structure, small vertical movements of the soil are fully compensated, and the reinforcement evenly distributes the loads over the entire area.
The tape grillage lies on a sand cushion, which is not difficult to make with your own hands. You can use another type of pillow, but the material should not have a high degree of heaving and exposure to climatic influences. The dimensions of the structure are selected for specific buildings; it is popular in the construction of small houses, bathhouses, garages and other buildings.
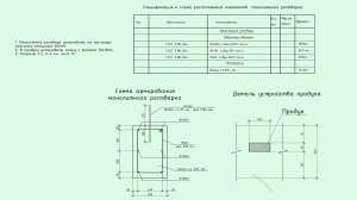
Layout diagram of a monolithic grillage.
Monolithic grillage on a sand cushion (bedding) - specification for the arrangement of elements of a monolithic grillage.
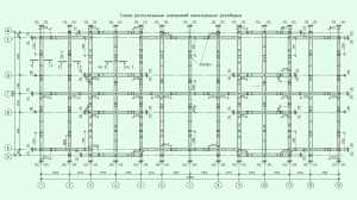
Scheme of a monolithic grillage.
Arrangement of elements of a monolithic grillage.