The strip foundation differs from all alternative design options in its versatility.
It is equally suitable for the installation of heavy and massive buildings, structures of complex and simple configurations.
The load-bearing capacity of the tape depends on the composition of the soil in which it is placed and the parameters of the base itself - width, depth, design features of the sole, etc.
By changing the dimensions of the tape, you can change the load-bearing capacity, resistance to external loads or other influences.
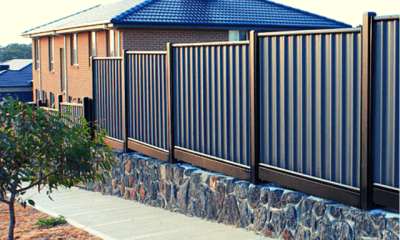
Let's consider the features of using a strip base for a continuous fence made of corrugated board.
What types of fences are strip foundations used for?
A strip foundation is used when a reliable foundation is needed, which must be installed under fences with increased weight.
Types of fencing:
- brick;
- forged;
- stone;
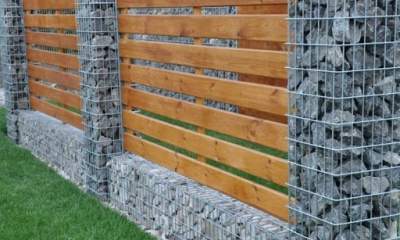
- gabion;
- profiled sheet;
- solid wood;
- concrete.
The strip foundation option is suitable for areas where a deep columnar foundation is not possible. For weak soil, a buried tape is used, and for hard soil, a non-buried one.
Among the advantages are:
- high strength even with small depth;
- increased resistance to mechanical load and environmental influences, including wind;
- the service life of the fence is increased by several decades due to the formation of a solid base;
- if necessary, you can strengthen the foundation structure using additional pipes or metal corners;
- It is possible to carry out cladding, which gives a more aesthetic appearance to the fence.
Among the disadvantages are the complexity of the work and increased costs of materials. In some cases, installing a fence is only possible using special equipment.
Another significant nuance will be the requirement for strict implementation of the work order, since any mistake can lead to a decrease in the characteristics of the foundation and a reduced service life. Before work begins, all factors are taken into account and a foundation arrangement plan is drawn up in the form of diagrams and drawings.
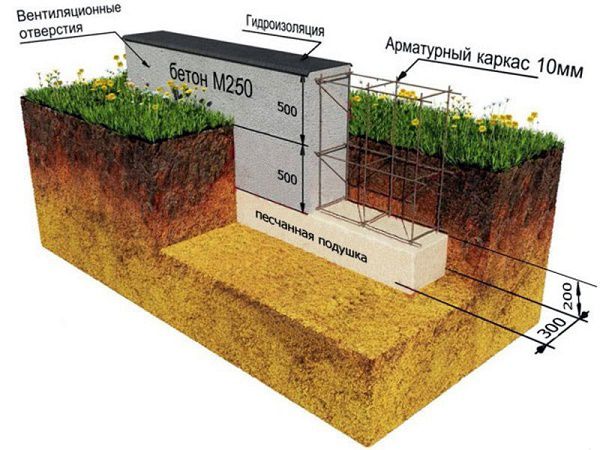
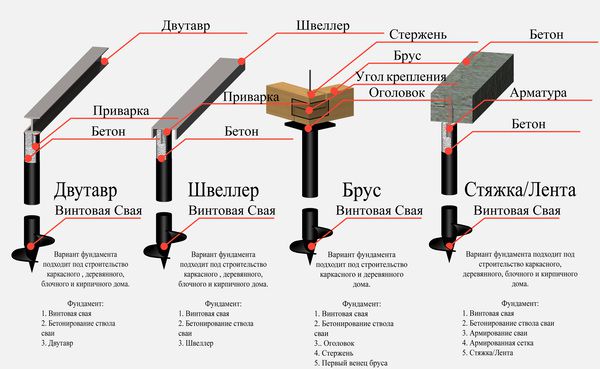
Drawings and diagrams
At the preliminary stage, calculations are carried out and drawings are created , which take into account all the basic data on the foundation and fence. For each type of fence, the drawing is drawn up individually. Example:
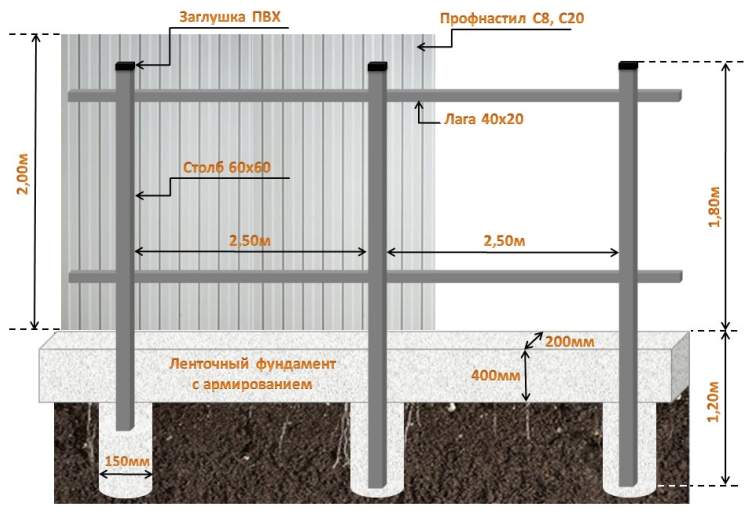
The diagrams indicate all sizes and materials used:
Additionally, places with reinforced foundations using reinforcement or similar methods should be taken into account.
How to choose the type of foundation for a fence
The base for a fence made of corrugated sheets must be selected taking into account the following factors:
- the likelihood of future intake being washed away by groundwater;
- before you build a fence from a metal profile with your own hands with a foundation, you must definitely take into account the type of soil and the level of probable subsidence during seasonal temperature fluctuations;
- when arranging a fence near highways and railway tracks, one should not forget that the base must withstand high vibration and loads from the movement of underground layers of soil;
- during the construction of a fence from corrugated sheets, choosing the type of base and the height of the fence itself, you need to take into account the likelihood of bending due to the high windage of the material;
- When constructing a fence made of metal sheets, despite the light weight of the structure, it is necessary to take into account that any type of soil can sag under the weight of the fence.
Before installing a fence, you still need to consult with specialists regarding carrying out work in a certain area.
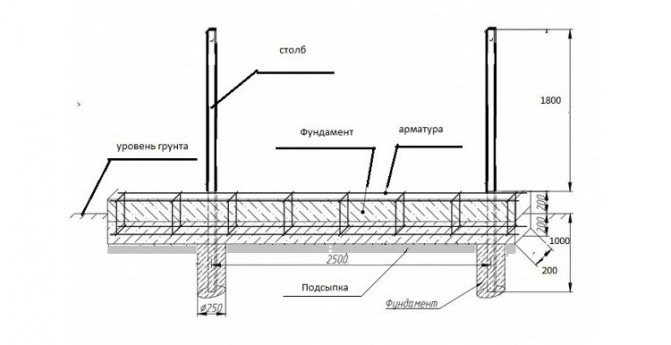
Structure construction drawing
Types of foundation tape
The tape can be prefabricated or monolithic . The latter option is considered a solid base, which is used only for massive structures.
A monolithic or solid structure has greater load-bearing capacity than a prefabricated base, but also requires increased costs and experience.
The prefabricated tape consists of individual blocks, artificial or natural stones. The installation process has a simplified form, but it is necessary to comply with the requirements for strength and moisture resistance.
Based on the materials used, the foundation is divided into:
- brick,
- reinforced concrete,
- rubble concrete,
- soil-cement,
- stone.
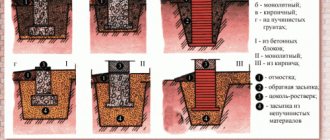
The main division of the tape into types occurs according to depth. Each option applies under certain conditions. Kinds:

Recessed foundation.
Installed at a depth below 1 meter from the ground freezing level. The higher the looseness of the soil, the lower the tape needs to be buried, since the load-bearing capacity, as well as the stability of the structure, will depend on this.Used for a massive fence made of bricks, concrete, stones or with forged elements.
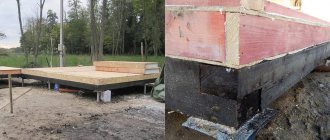
- Shallow. Can be used if soil stability is good. The arrangement takes place below the freezing level of the soil layer by 50 cm. This version of the tape is suitable for a high fence using corrugated sheets, euro picket fences, siding or wooden boards. Posts can be pipe, concrete or screw.
- Not buried. With this design, the support is installed on the ground surface.
This base option is used on sandy soil when constructing a small fence that does not have large weight and height parameters. The difference between the foundation is the absence of exposure to frosty soil heaving. Dimensional width parameters depend on the weight of the fence. The greater the weight, the wider the trench under the base needs to be made. The standard value will be 0.40 m.
Each tape option has certain selection rules. An example would be the arrangement of a shallow belt on stable or slightly heaving soil for a lightweight barrier structure made of profiled metal.
At the preliminary stage, it is necessary to pay attention to the main factors on which the type of base used depends. Among them:
- the nature of the fence design, its features and all requirements - an example would be the need to strengthen the base in several places due to secondary factors, including the presence of laid pipes or other communications;

the mass of the fence and its individual elements, including supporting or decorative ones;- load indicators on support type pillars;
- nature of the soil;
- freezing depth of the soil layer;
- relief and landscape features of the area - this includes the presence of slopes, unevenness and similar factors;
- the presence of nearby layers of water or reservoirs - this will affect the possibility of soil erosion, which will require increasing the stability of the structure;
- financial and labor costs.
In the latter case, the feasibility of using one or another type of foundation is calculated .
An example would be the absence of the need for a buried monolithic foundation with stable soil and a small fence mass.
Installing posts for a lightweight fence
A lightweight fence is one whose spans are covered with relatively low-weight materials: chain-link mesh, wood of any design, corrugated board, metal picket fence, welded or forged metal mesh. Pillars without plinths are most often placed under them.
Posts for a mesh fence or picket fence
The cheapest and most universal way is in a wide hole and filling the gap with crushed stone. It works great on heaving soils with a high groundwater level, and costs many times better than poured concrete. A light fence installed correctly using this method will never be pushed out in the spring.
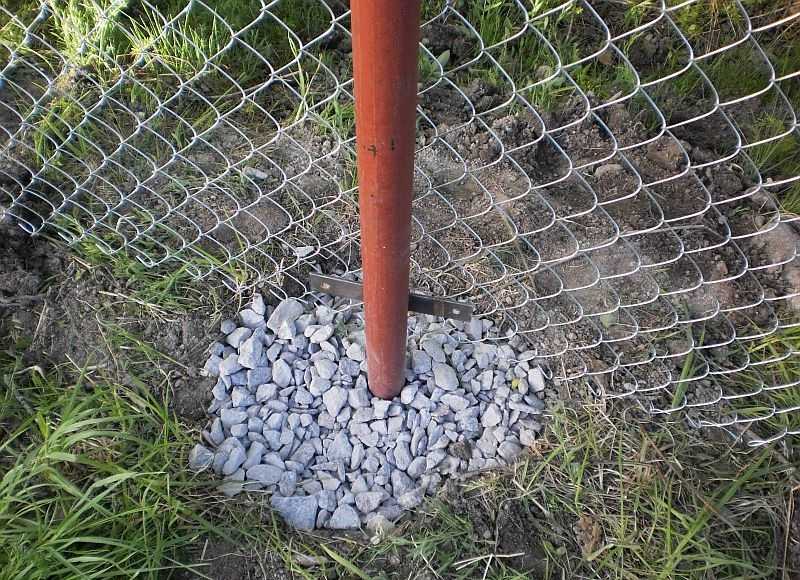
The cheapest, and yet most reliable way to install a fence is with pillars in a compacted backfill.
Holes for posts of this type are obviously drilled much wider than the diameter of the pipe. They poured crushed stone or sand onto the bottom, compacted it (with a long pole or crowbar), set up a post, covered it with crushed stone around it, set the post up vertically and secured it with temporary spacers. Pour crushed stone around in layers - 10 cm each, carefully compact it to the maximum possible density. That's it, the installation is complete.
On normal soils
It is worth explaining why it is more stable and how such a pillar works on soils with normal drainage ability. Water in any quantity goes deep through the crushed stone, where it disperses naturally. When freezing, the amount around the pillar is not enough to have a noticeable effect. The soil freezing around the pillar puts pressure on the crushed stone, which, due to its mobility, compensates for it almost completely.
It is better to make a foundation for a fence made of corrugated sheets by pouring the upper part with concrete, otherwise wind loads will cause the posts to loosen over time (see the next paragraph)
On such soils, crushed stone can be replaced with coarse sand. The coarser the grain, the better, but dusty or fine-grained sands are not suitable. Lay the sand in layers, pour it thoroughly. Otherwise the whole system works the same.
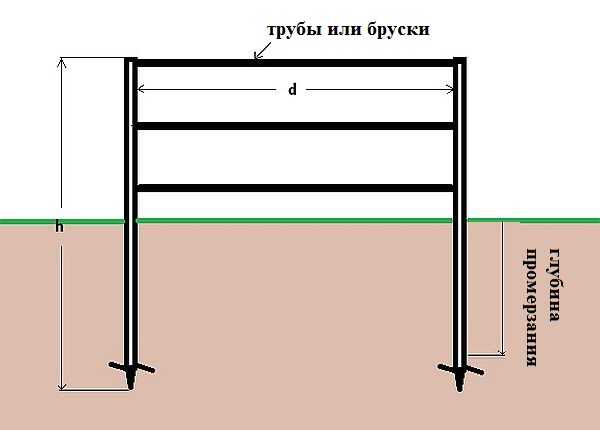
The key point here is the depth to which the post must be buried. If the windage is small and the soil drains well, it is enough to bury it to 1/3 of its height or a little more. In this case, the hole needs to be made a little deeper: so that there is a cushion under the pipe of about 10-15 cm. Water will go into it and the column will remain almost dry. This is good for both its durability and stability.
Depth of holes for pillars in heaving soils
If the soils are clayey, it is necessary to dig 10-15 cm below the freezing depth. Water will collect in this crushed stone cushion, since they do not always have time to drain on clayey soils. If the pillow is located below the freezing depth of the soil, there will be no problems with heaving: there is still no water around the column, it has accumulated below and is in a liquid state.
If the freezing depth is very large - 2 meters or more, even this “economy” option will be very expensive. Then you can make a drainage system around the fence to lower the groundwater level. The decision is correct, but implementation is even more expensive.
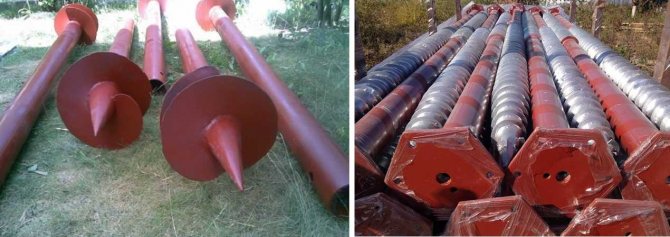
Different types of screw piles
Another option is to use screw piles. They can be drilled 2 meters much faster. But the piles themselves, and the services for their installation, are not the cheapest. You can, of course, try it manually first; if that doesn’t work, call the technician.
The most budget-friendly option in such a situation is to bury the pillars to a depth that is more or less acceptable, make the hole wider - about 50 cm in diameter or a square with the same side, that is, increase the damping layer. In winters with average temperatures, the fence will stand normally, but in abnormally cold or little snow some pillars may fail. But in most cases, light fences react to this normally, and in the spring everything “sits” into place. It is necessary to correct the position only if the pole is skewed.
Posts for a light but “sailing” fence
If the spans have a continuous or almost continuous surface, the wind creates a decent load on the foundation pillars of the fence. But if the weight of the filling is still small - corrugated sheets, wooden panels - you can still get by at low cost. In this case, to compensate for the wind load, the upper part of the backfill must be concreted. The depth of the concrete block is about 30 cm.
To compensate for windage from the fence, the upper part of the backfill must be concreted
To prevent the concrete block from being destroyed by gusts of wind, a reinforcing mesh is laid. You can use a ready-made mesh with a pitch of 5 cm, you can make it from a 6-8 mm rod. If the mesh is galvanized, it is placed so that it is buried in the concrete by at least 30 mm (monitor the distance from the sides). When using ferrous metal, the layer of concrete along the edges of the rods increases: at least 70 mm. In total, the dimensions of the concreted area with a ferrous metal mesh are: depth 30 cm, sides - at least 34 cm, with a galvanized mesh, the side of the square around the column is 30 cm.
Foundation for fences on loose soils
If the bearing capacity of the soil is very low - these are peat bogs, dusty, loose sand - in addition to backfilling with crushed stone, the hole must be concreted to the full depth. In this case, the measure is necessary. Concrete creates a significantly larger supporting surface, and this is important for these soils: the load from the fence is distributed over the entire surface and it stands normally.
Cheaper in this case are bored-rammed piles: a hole is drilled, a sleeve of roofing material rolled into a tube of suitable diameter is inserted into it, preferably 2 or 3 layers. A pole is inserted inside this formwork, set up, and around it is filled with concrete grade M 300 and no lower.
If the groundwater level is high, but the inflow rate is low, you can try to pump it out of the hole and then fill it with concrete. If the water arrives quickly, take a plastic bag of suitable length. It is lowered inside the formwork, the edges are secured around the protruding sleeve. A pole is carefully placed in the bag and concrete is poured. Concrete gradually displaces water and fills the entire form.
Light fence on screw piles
The second method is suitable if below, under peat or sand, there is a layer of soil with normal bearing capacity. In this case, you can make a foundation for the fence on screw piles. They are twisted to the required depth - going 20-25 cm into the supporting layer. Fence posts are attached to the protruding heads, or the remaining length of the pile is used.
Do-it-yourself pouring technology: step-by-step instructions
The strip foundation is installed according to standard step-by-step instructions, which includes several mandatory steps.
If the sequence is not followed or a number of rules are not followed, the foundation will be built with violations, which will affect its durability and strength.
The correct process of forming the tape allows you to obtain good characteristics in terms of stability and load-bearing capacity . If the conditions are not met or errors in preliminary calculations are made, important indicators will be lower than the required values, which will negatively affect the quality of the fence.
Calculations and determination of tape size

At the stage of preparation for the work process, it will be necessary to carry out the necessary calculations, which will indicate the overall dimensions of the foundation and its type.
There are two options for this. The first is to use the automatic method . There are a number of special-purpose programs for calculating all data.
Such programs are available on construction resources. To determine the type of foundation and its dimensions, you will need to enter basic characteristics, including fence material and soil type.
The second calculation option would be to use special formulas for calculating bearing capacity. The greater the mass of the fence and the lower the coefficient of soil resistance, the greater the width of the base required.
Additionally, all SNiP standards must be taken into account. In each specific case, the parameters of the tape will be individual, since there is a dependence on the type of soil, the fence materials used and the type of foundation used.
All dimensions and data must be plotted on a drawing , which will be the basis for planning and marking the territory in the future. It is taken into account that the preparatory stage with markings and calculations determines most of the characteristics of the future fence.
Marking
The markings are applied in accordance with the diagram, which is based on calculations. For this, stakes, rope or fishing line, and a measuring tape are used. All points are fixed.
When marking, they check all the data that was entered into the drawing, and also make an internal indentation from the marking to the site. This will allow you to immediately create a place for the future trench and foundation.
Excavation
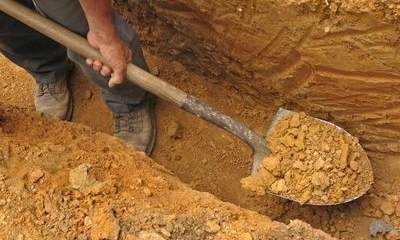
After marking, excavation work is carried out, which means cleaning the area and preparing it for the formation of the foundation. A trench is prepared with the required dimensions in width and depth.
The walls and bottom of the trench are leveled . After this, a cushion is placed on the bottom, which is formed from a mixture of sand and crushed stone of various fractions. Mainly crushed stone of the middle fraction is used.
The pillow is watered and compacted. The height of the pillow is 10-15 cm. Before preparing the formwork and reinforcing frame, the first layer of waterproofing must be installed on the bottom of the pillow.
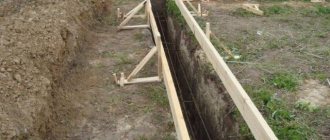
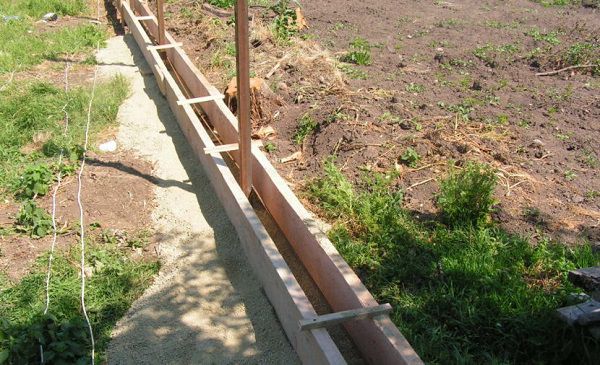
Formwork
For formwork, plywood panels or edged boards and beams are used . When using boards, they are hammered into panels of the required size. The height of the formwork is adjusted when installing the panels. They should be 10 cm higher than the base.
Installation of shields is carried out taking into account the position of the flat side inward. Roofing felt is also applied to the panels to prevent leakage of the poured concrete. The outer side of the formwork is supported.
Reinforcement
The reinforced frame consists of longitudinal and transverse elements. The longitudinal material should have a thickness of 10-12 mm and a ribbed surface. The cross member usually does not exceed 8 mm in thickness.
When the weight of the fence is increased, thicker metal rods are used. The cut metal elements are tied together, after which the finished frame is laid in a trench.
Read more about reinforcement of strip foundations here.
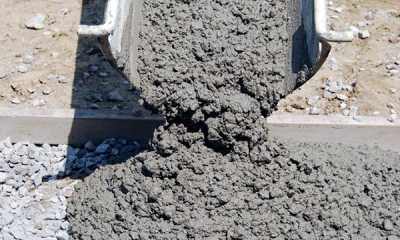
Concreting and hardening
A concrete mixture is pre-prepared, which is mixed in a concrete mixer in a ratio of sand, fine crushed stone and cement of 3 to 5 to 1. After pouring water, it is necessary to stir the composition until homogeneity is obtained with the necessary plasticity.
Filling is carried out taking into account a number of rules:
- feeding is carried out evenly and continuously;
- Vibrating devices are used to increase density;
- After finishing the pouring, the surface is leveled.
After the process is completed, you need to wait for complete hardening. This period depends on environmental conditions and the composition of the mixture. Typically, concrete gains full strength after 28 days.
Stripping and waterproofing
After the concrete has completely hardened, stripping is required . After this, repeated waterproofing is carried out, which eliminates the penetration of moisture into the resulting base.
Finishing work
After stripping, the foundation is treated with special solutions that will increase the protection of the surface from moisture and other negative factors.
Additionally, the foundation base can be faced, but this will require waiting for the protective compounds that were applied after stripping to dry.
General diagram of the device
Procedure for creating a feed:
- Surface preparation - marking, removing the top layer of soil, if necessary, dividing into sections for a stepped strip foundation.
- Digging a trench. A ditch is dug about 70 cm deep and 20-30 cm wider than the width of the tape. The excavated soil is stored nearby; it will also be useful for backfilling the sinuses.
- A layer of sand cushion is placed at the bottom of the trench.
- The surface of the sand is covered with a layer of geotextile and a double layer of roofing felt for waterproofing.
- The sheathing for pouring concrete is assembled and installed.
- A reinforcement frame is created.
- Concrete is poured and the necessary procedures are carried out when curing the material.
- Stripping of the tape is carried out 10 days after pouring.
- After the end of exposure, further actions are carried out - waterproofing, filling the sinuses, etc.
In accordance with the construction and design of the fence, additional procedures may be required - creating recesses for pouring posts, installing intermediate supports for the canvas, etc.
Surface marking and trench preparation
Marking is done by setting the center line using stakes. On both sides of it, a layer of fertile soil is removed to the width of the future trench .
Then markings are made for the wicket and gate, the installation locations of pillars and other elements that have their own supporting structures are marked.
If required, recesses are dug for the installation of pillars for the canvas , gates and wickets. After this, dig out the remaining parts of the trench under the tape.
Pillow under the base
The sand cushion is usually covered with a layer not exceeding 20 cm . This is due to the light weight of the structure and the shallow depth of the trench.
The surface of the sand is carefully leveled horizontally and compacted to the most dense state. To do this, you can use hand tools or a construction vibrating plate .
At the same time, the sand is moistened for greater packing density. Upon completion, it is recommended to lay geotextiles on top of the sand layer, which retains moisture inside the concrete when pouring.
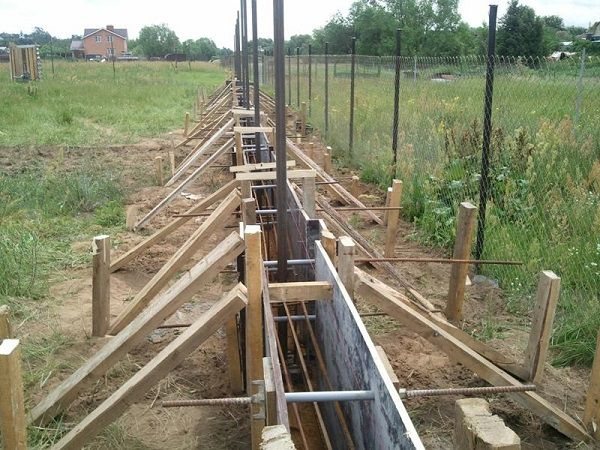
Installation of formwork
The formwork is assembled from edged boards 25 mm thick. The shields are assembled next to the trench, after which they are lowered inside and installed in the desired position .
The panels are fixed using stops and inclined struts; all connections must be as tight as possible to avoid concrete leaks.
Slots more than 3 mm wide are not allowed (ideally there should be none at all). If found, all gaps are plugged with oakum or thin slats.
Base reinforcement
To create an armored belt, two types of reinforcement are used:
- Finned metal or composite with a diameter of 10 mm.
- Smooth reinforcement 6 mm thick.
The frame is a spatial lattice of 4 working rods (2 at the top and 2 at the bottom) and a number of vertical clamps installed at intervals of 1-1.5 m from each other.
Vertical reinforcement is needed only to maintain the working rods in the desired position; after pouring concrete, they simply remain inside the belt, not performing any other functions.
Knitting reinforcement
The elements of the armored belt are connected using the knitting method. For this purpose, soft annealed steel wire 1 mm thick is used.
The knitting process is quite simple - the wire is cut into pieces of 25-30 cm . The piece is folded in half, placed from below under the connecting rods, the ends rise up.
The loop is picked up with a special hook, and with a rotational movement it is twisted 4-6 times around the other end, tightly tightening the connecting rods.
The process is simple, even an inexperienced person acquires the necessary skill almost immediately.
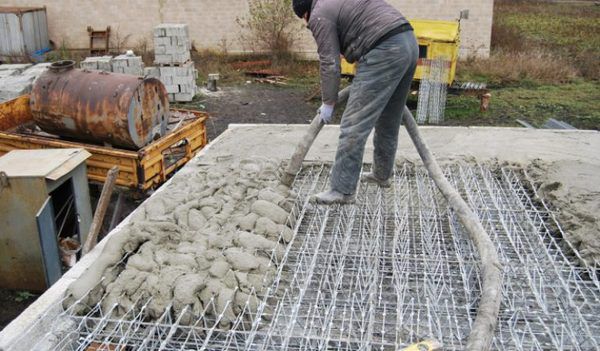
Pouring concrete
Concrete is poured from different points evenly spaced from each other. The faster the pouring is done, the more uniformly the material hardens, and the stronger the tape will be .
In order to avoid downtime or interruptions in pouring, the process of manufacturing or delivering ready-made concrete to the site should be organized in advance. When pouring, it is necessary to bayonet the material or process it with a construction vibration machine in order to remove air bubbles from the mass.
IMPORTANT!
It is necessary to complete the work in one go, since cold seams reduce the strength of the tape, especially if it is long.
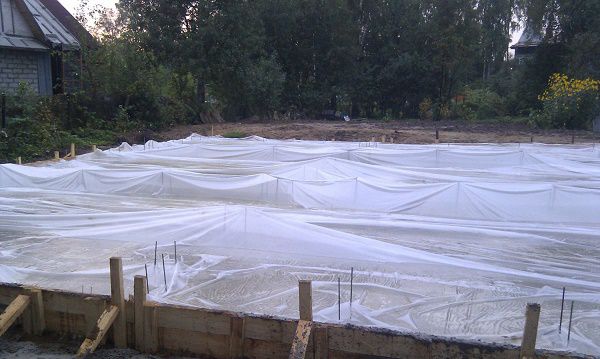
Caring for concrete after pouring and how long it takes for a strip foundation to dry
The filled tape should be covered with plastic film to protect it from the sun's rays and create a special microclimate that slows down drying. For the first 3 days, the tape is watered with water every 4 hours .
Then, for a week, watering is done three times a day. After 10 days of curing, the formwork is stripped, and the total period is 28 days, after which the concrete is considered suitable for further work.
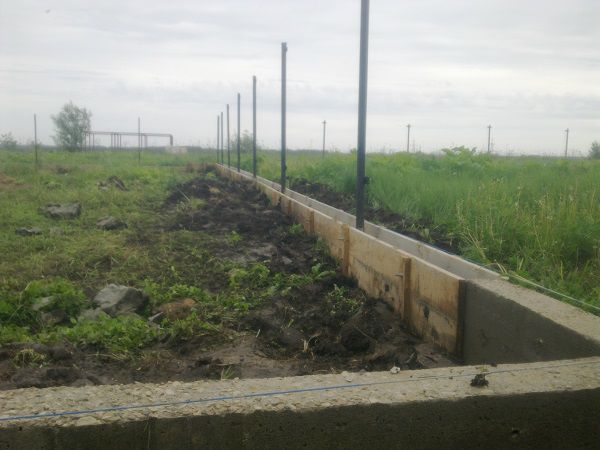
Stripping
Stripping is the procedure for dismantling formwork.
The procedure is carried out as carefully as possible, since the strength of the material is still low and the edges or corners of the tape can be damaged. After removing the formwork, the tape has the opportunity to dry on the sides , which helps to gain technological strength.
In order for dismantling to occur accurately and without destruction, it is recommended to use planed boards (at least from inside the mold).
Waterproofing
Waterproofing prevents the penetration of moisture into the concrete mass .
The procedure is necessary because almost the entire surface of the tape will come into contact with rain or soil moisture, which destroys the material and shortens the service life of the base.
To apply a layer of waterproofing, different materials and methods are used, the most common of which are the application of hot tar, bitumen mastic or special impregnations .
The most effective of them are special impregnations that completely eliminate the penetration of moisture into the concrete mass, although builders still have little information about them and prefer more proven methods - mastic or hot tar .
Construction Features
In each specific case, certain problems may arise due to external factors . In this case, you will need to take into account a number of nuances and additional actions.
How to do it correctly on a slope?
The uneven terrain through which the barrier will pass complicates the work process. There are two options.
The first step is to fill the slope and level it, but such a process can be labor-intensive . For this reason, a stepped foundation is used.
It consists of one tape, which differs in thickness under each span. This method will create a stable base that will support the structure.
With a slight slope, you can install a fence with a slope angle that is equal to the slope. In this situation, concreting is carried out in parts along delimited areas.
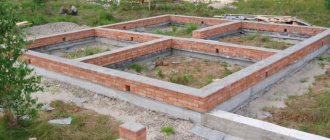
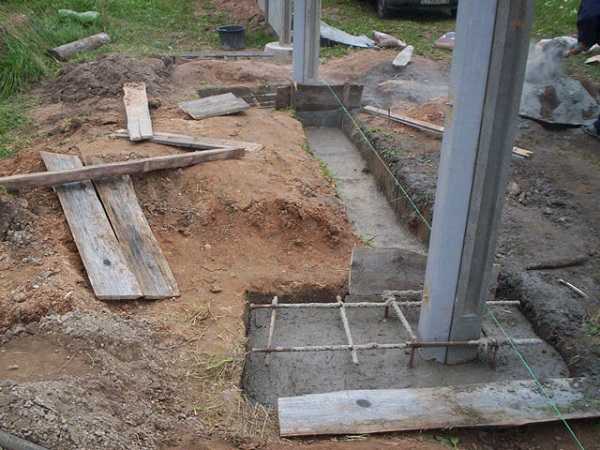
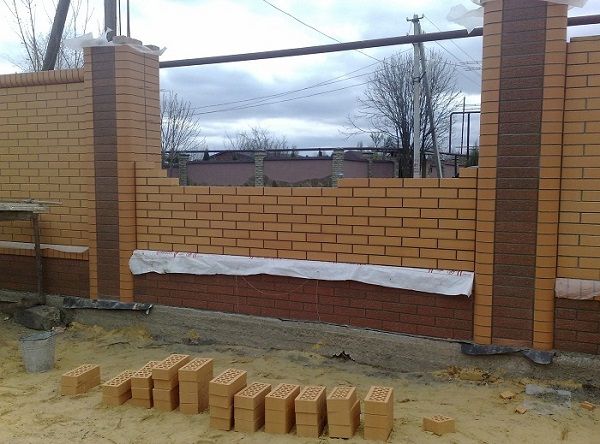
With brick pillars
Brick pillars have a large mass, which requires an increase in the foundation base . With this option, it is additionally taken into account that the required trench depth is lower than the soil freezing level.
The base of the pillar itself is buried along with the main tape, which ensures uniformity and increases the load-bearing capacity. Read more here.
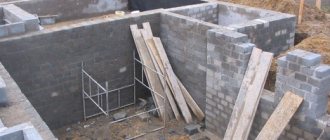
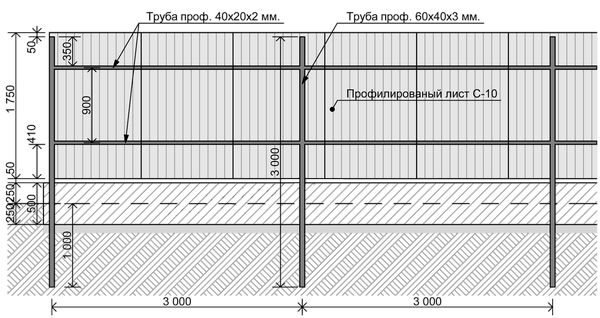
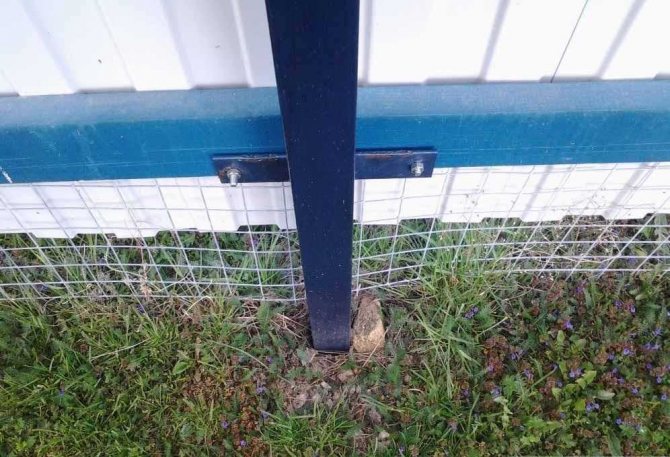
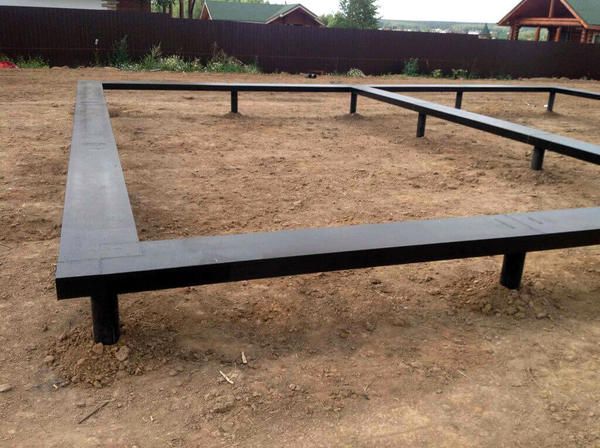
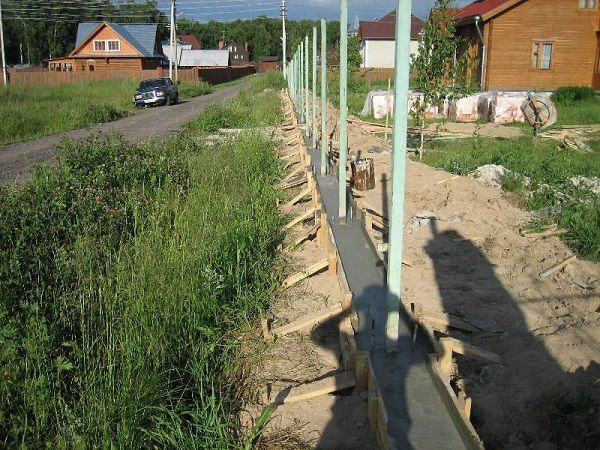
From corrugated sheets
When using corrugated sheeting, it will be necessary to install pillars before laying the reinforcement frame . The pillars are placed every 1-2 meters with a depth of 0.8 - 1.2 m into the ground.
When installing pillars, they need to be covered with a cushion, which will fix the position before pouring concrete.
Read more about the construction of a fence from corrugated sheets on a strip foundation here.
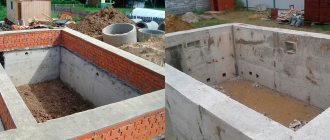
Prefabricated foundation
A prefabricated foundation consists of the installation of factory-made reinforced concrete blocks. This base has become very popular in our country due to its ease of installation. Even if you have never thought about how to make a strip foundation, you can always install a prefabricated foundation without any construction skills.
Advantages of a prefabricated foundation
- easy to install;
- waterproof;
- quite durable;
- minimum time spent on installation.
- heavy weight of the block (more than 30 kg);
- expensive material;
- installation limitation depending on the soil;
- the need for installation with special equipment;
- high installation costs;
- the design requires waterproofing;
- limited choice of block widths (from 0.3 to 0.6 m);
- the need to use concrete mortar to fasten the blocks together.
Flaws
The prefabricated foundation can withstand a sufficient amount of stress and can be used for at least 65 years. By using reinforced steel bars and mortar to strengthen the foundation, concrete blocks are a reliable choice when building a fence.
Prefabricated strip foundations can be installed on soils that are characterized by high throughput, for example, loamy or bulk soil.
Construction cost

The cost of building a foundation depends on a number of factors. Among them:
- foundation type;
- materials used;
- required load-bearing capacity and stability - the higher the required indicators, the higher the costs will be;
- attraction of specialists and special equipment.
The cost may be influenced by external factors, including the need to develop in uneven terrain. The type of soil is also important. An example would be increased costs if soil resistance is weak or there is a nearby aquifer.
On construction sites you can calculate the cost using a calculator. The average price per linear meter is 600 rubles. Read more about the cost and its calculations in this article.
Possible errors and tips for construction
When forming the foundation, a number of mistakes are made that deteriorate the quality of the strip base. To eliminate possible problems, you need to follow several rules:
- Even with a small fence mass, the depth should not be less than 50 cm, since a shallowly buried tape will be exposed to soil when heaving.
- If there are slopes or ditches, as well as other negative factors, install a powerful foundation that will be stable.
- You should not skimp on the quality of materials, in particular this applies to concrete, as this will reduce the strength of the tape.
- Covers are installed on metal tubular posts, which eliminate the possibility of moisture getting inside.
- The pillow requires mandatory compaction.
- The pillars are tied to the metal frame before pouring.
- Waterproofing is mandatory, including when installing pillars.
Another important point is that the formwork corresponds to the poured level, that is, concrete should not be poured into the ground. In this case, the base loses its shape and acquires negative qualities.
Preparation of concrete
To make a strip foundation, it is permissible to use either a ready-made mixture purchased at a local concrete concrete plant or prepared independently; by the way, if all technological requirements are met, the quality of such concrete will not be inferior to factory-made concrete. The sequence of operations is as follows.
- A dosed amount of cement and water is poured into a container with pre-filled water; constant mixing is required during the filling process.
- Lastly, sifted sand and crushed stone are added.
During production, the solution will become either excessively thick or thin. The density of concrete is adjusted by adding sand or water.
Expert opinion
Vladimir Ulyanov
I have been involved in fences for over 10 years, answering questions and helping people cope with the installation task on their own.
Ask a question to an expert
To make concrete for pouring the foundation, it is advisable to use cement M400 and higher.
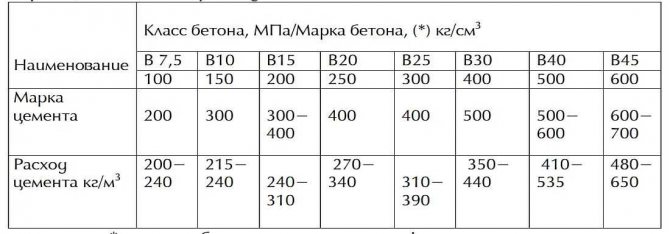
Often, cement manufacturers indicate the dosage in kg in recommendations for the production of mortar, so using reference materials, it makes sense to convert kg into volumetric values. This will make it easier to produce ready-mixed concrete.