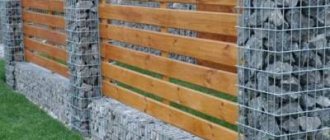
Fences with brick columns belong to the “luxury” class of fences. The foundation for a fence with brick pillars is an integral part of such a structure. The stability and durability of the entire structure depend on how well and correctly it is executed. Its construction must be approached carefully and technical standards must be observed so that the fence does not become a big disappointment.
At the summer cottage
How to make a foundation for brick fence posts?
- Strip foundation for brick pillars Stages of work on installing a concrete strip for fence posts
- Columnar foundation: stages of work
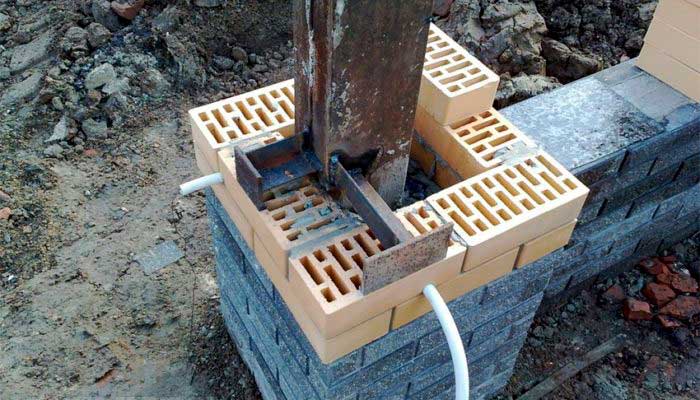
Brick posts are often used as fence posts. If they are correctly and beautifully folded, then they are so aesthetically pleasing that they decorate the site, gates and fences. Such pillars are erected for canopies and used to decorate the entrance area. In order for all these structures to be durable and not warp due to ground movements, the foundation for a brick pillar must be done correctly.
If you do not know the nuances of this work, you can make serious mistakes that will affect both the appearance of the support and its strength.
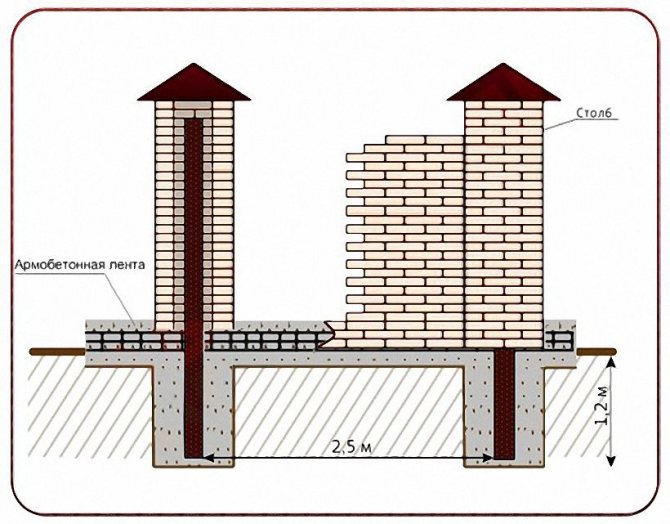
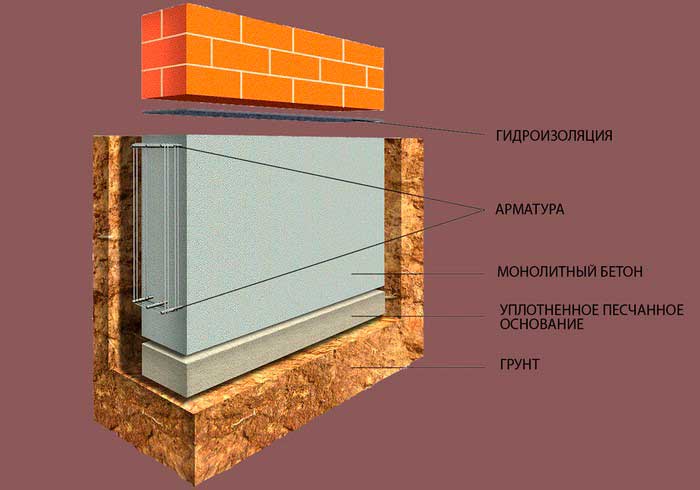
Construction of a foundation for a fence with brick pillars.
If the depth of soil freezing is 80 cm, then the foundation should be laid at least 1 m.
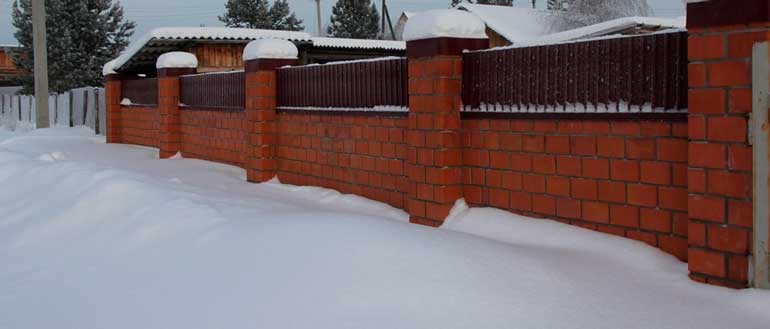
A fence with brick pillars looks presentable, especially if the masonry is smooth and with patterns. Therefore, it is often located along the facade of the building. As a rule, the same supports are built for metal gates. And this is not surprising: such pillars can withstand any load. If you invite professionals to build them, this pleasure will cost a pretty penny. Therefore, many private owners try to do most of the work themselves. Therefore, information on how to build fence posts with your own hands is in great demand.
Which foundation to choose for a brick fence?
There are only two options here: the pillars can be installed either on a concrete strip or on a block support.
Both of these bases are reliable and durable. Which one to choose, each developer decides for himself, based on his preferences and capabilities. Brick laying can also be different. If you take materials of different colors (white and red), then with due diligence you can build real masterpieces.
Strip foundation for brick pillars.
Depth of foundation for a fence with brick pillars.
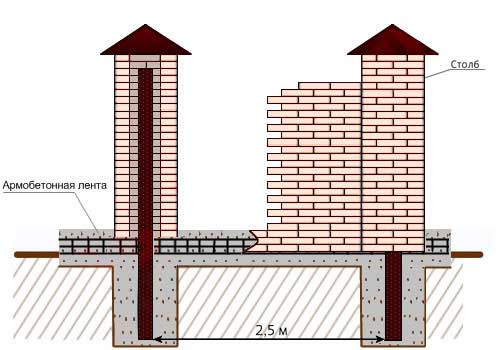
Diagram of a brick pillar on a foundation.
It is made shallow. If the soil on the site is dense and non-heaving, with a low moisture content, then the depth of laying the tape is 20-30 cm. This is the thickness of the fertile layer. This is what should be removed. If the depth of soil freezing exceeds 80 cm, then the tape should be placed no higher than 1 m in depth. The same recommendation applies to heaving soils saturated with water. For other types of soil, a depth of 40-50 cm is sufficient. This foundation for fence posts is a reliable foundation that will last for many years.
Concrete will be required to fill the shallow tape. It can be ordered from the factory, but it will be quite expensive. To prepare the solution yourself you will need:
- concrete mixer;
- cement grade M400;
- medium grain sand;
- a sieve for sifting it;
- gravel or crushed stone of medium fraction (optimally 20/40 mm);
- shovel;
- containers for filling ingredients;
- water;
- To increase the plasticity of the solution, you can add a little inexpensive washing powder to the batches.
To make formwork you will need lumber. To make the foundation for the pillars smooth and beautiful, you can use an edged board 2-2.5 cm thick or thick (from 8 mm) moisture-resistant plywood. In order not to stain these materials with concrete (since lumber is always useful in the household), they will need to be protected. For this you will need plastic film. The formwork can be assembled using metal corners or wood screws. If you decide to use nails, then you need to hammer them in from the inside and bend them on the outside. This will ensure the safety of the polyethylene and simplify the dismantling of the formwork.
Stages of work on installing a concrete strip for fence posts.
How to pour a foundation for a brick fence.
Scheme of a fence with brick pillars on the foundation.
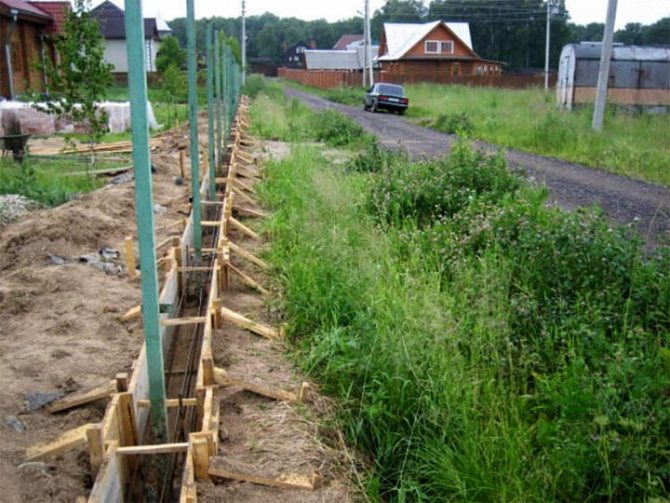
- First of all, you should mark the line along which the fence will be built. This is done using pegs, a tape measure and a marking line.
- A trench of the required depth is formed. The width of the ditch should be 20 cm greater than the thickness of the future tape. Usually for such a foundation 40-50 cm is enough.
- The bottom of the pit is leveled using a hydraulic level and compacted.
- Waterproofing is installed, roofing felt or dense polyethylene is laid. The sheets should overlap by 10-15 cm
- Next, you will need to pour a layer of sand 5-7 cm thick. It is spilled with water from a hose and compacted.
- The next backfill is gravel or crushed stone. This layer should be 10-15 cm thick. It should also be compacted.
- The formwork is being installed. It collects inside the trench. To ensure that the foundation is level, it should be checked frequently to ensure that the tape meets the required dimensions.
- Reinforcing material is laid. Typically, thick reinforcement bars (section 8-12 mm) are used for this.
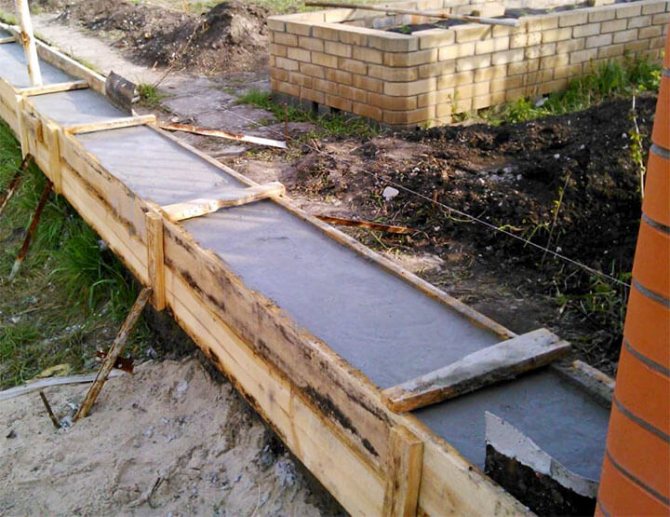
- Cement-sand mortar is poured layer by layer. It must be carefully compacted by piercing it with a metal rod. This will allow air to escape the concrete and there will be no cavities inside the tape.
- The last layer of the solution is made more liquid, since it is intended to level the foundation horizontally.
- Concrete ripening occurs within 3-4 weeks. But it is rare that the owner waits until this time. Usually the formwork is dismantled 4-5 days after pouring.
- While the solution is setting, the tape should be protected from the sun so that it does not dry out and cracks do not form. To do this, concrete is periodically watered with water from a hose. At night, the tape is covered with polyethylene in case of rain: it can wash away the top layer of concrete that has not yet set.
Columnar foundation for brick pillars.
How to pour a foundation for a brick fence.
Scheme of types of columnar foundation.
This type of fence base is good because bricklaying becomes less labor-intensive. If in the case of a tape the pillars are lined up directly on it, in the case of a columnar one they are formed around already installed supports. This is how bricks are saved. As for the depth of laying this foundation, all recommendations regarding heaving soils are relevant here. That is, the pillars should be installed at a depth below the freezing point of the soil.
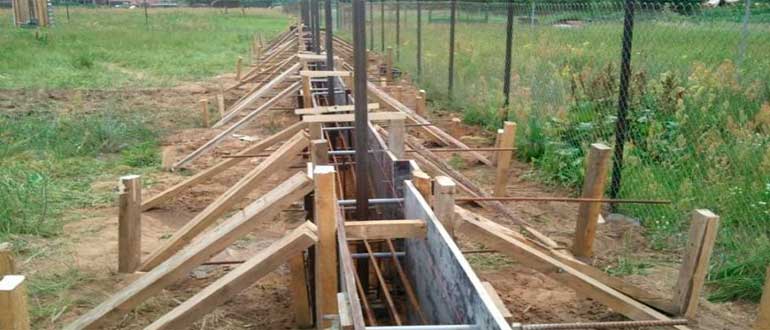
There is no need to dig a trench; you will need holes at those points that are found using markings. It is best to form depressions in the soil using a TISE drill. It is capable of creating widening at the bottom of the hole. The concrete that fills them will be an excellent obstacle to pushing out the pillars by soil heaving forces. The supports themselves can be either factory-made or self-made. In the second option, you will need either wooden formwork or asbestos-cement pipes. Concrete will be poured inside them.
Columnar foundation: stages of work.
Dimensions of foundation for a brick fence.
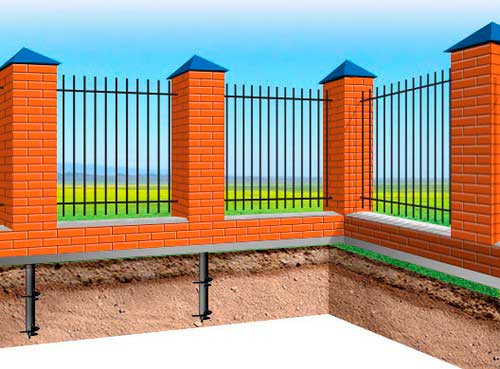
Installation diagram of a columnar foundation.
- Marking is being done.
- Holes are dug in the right places.
- The bottom of the pits is compacted.
- The sand is poured out, moistened and compacted.
- A concrete support pad 15-20 cm high is poured.
- After the mortar has set, a pillar or formwork is installed on it for pouring concrete.
- Using spacers, the support is fixed in a vertical position, which is verified by the building level.
- Backfilling is in progress. This work is carried out slowly, with careful compaction of the soil. Gravel, crushed stone, and construction waste are added to the pit. The backfill is concreted in layers.
- Within a few days, the pillars should be firmly in place due to the setting of the concrete. Now (if required) you can pour it into the formwork, having previously placed reinforcement in it. In two weeks the foundation will be completely ready for use.
Methods for installing pillars in the ground
- Clogging. Using a drill, a hole is drilled in the ground smaller than the diameter of the pillar. The support is hammered in with a sledgehammer, not forgetting to check the verticality of the post with a level. The method is the simplest, but is only suitable for dense soil and light fences with minimal windage. This method is not suitable for sandy, sandy-clayey, sandy loam soils, and it is not recommended to clog asbestos-cement pipes at all.
- Screwing in. Screw piles are used as support pillars, which are screwed into the soil thanks to the blades at the bottom of the pillar. Such supports can be installed at any time of the year.
- Full and partial concreting. If the soil is loose, the pole, immersed in the ground, is filled with cement, completely or halfway. The hole should be 10–15 cm larger than the fence post. When partially concreting, the post must be additionally driven into the hole and filled with concrete. When concreting is complete, a gravel cushion is poured, a post is installed, and the hole is filled with a cement composition with crushed stone. Concreting pillars is a fairly reliable method, however, on heaving soils and after a frosty winter, the pillars can be pushed out by the force of frozen water.
- Zabutovka. Crushed stone is poured around the buried pillar and compacted tightly. This method works well even on heaving soils.
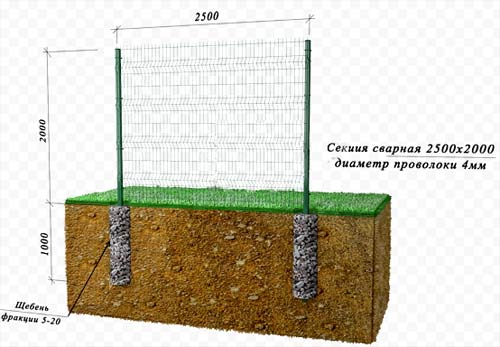
Diagram with dimensions for backfilling a fence post
The gravel around the support acts as drainage, and frozen water has no effect on the post.
- Foundation for fence posts. With heavy fences and support posts, for example, made of stone, brick or concrete, a more solid structure is required that will reliably connect the posts and fence spans.
Return to contents
Bricklaying: rules of work.
Bricks are not laid on the base of the fence just like that - they should be tied with thin reinforcement or metal wire. Masonry around already installed supports is no exception: it also requires dressing. Some people practice the construction of hollow pillars, this is quite acceptable. But it should be taken into account that the masonry in this case should be of the highest quality and it is better to entrust it to a professional. Particular attention should be paid to the supports for gates and fence gates.
If you decide to lay bricks around the pillars, then the internal space should be filled with concrete. Having built several rows on one, it is recommended to move on to the next one. While its brickwork is being done, the mortar will set at first, and it will be possible to begin pouring concrete into the cavity of the pillar. This way the fence will be built evenly and efficiently.
Upon completion of this stage of work, rainwater protection should be installed at the top of each fence post. There are various beautiful caps on sale that will decorate any fence. They make the brickwork look complete.
How to make a foundation for a fence with brick pillars.

Foundation for a fence with brick pillars.
The choice of the type of foundation for a fence with brick pillars depends on the requirements for the arrangement of fences. If they are not followed, then after some time the structure may become covered with cracks, which will cause the destruction of the entire structure. The dimensions of the thickness and height of the fence will not play any role. Therefore, when preparing to carry out work, it is necessary to keep in mind that without a foundation, you can only build an ordinary wooden fence with your own hands.
Features of construction on a slope
Some areas, due to the terrain, force the owner to build fences on slopes, which is much more difficult.
Let's consider the nuances of building such a fence:
- The most optimal solution for such a structure is the construction of a stepped foundation. In this case, you should work from the upper boundary of the slope, gradually pouring each section into the trenches.
- If the area has a fairly large relief, it is necessary to identify all possible level differences.
- The simplest, but sometimes not possible, solution is simply leveling the terrain.
Preparing for the construction of a brick fence.
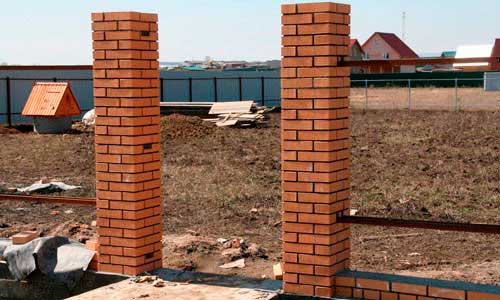
To build a foundation for a brick fence, you need to choose a type of foundation that will best suit the massive fence. Before installing a fence with brick pillars, you should keep in mind that inside them there must be metal posts or pipes with a diameter of 80 mm, concreted into the foundation. They can be replaced with reinforcing bars in the amount of 6 pcs.
If all the brick pillars of the foundation are secured with a core of a certain type, then it will serve as a reliable support for the structure. In any case, the brackets for mounting the logs are attached to the pipes or fittings. When erecting supports near a gate or gate, you will need to calculate the additional load, so it is important to choose the right type of core for brick posts.
When the base for the brick pillars has already been prepared, you can proceed to determining the distance between the supports. Professionals recommend installing pillars every 2.5-3.0 m. The more massive and tall the brick structure, the denser the placement of the pillars should be. The height of the brick support can be 2-3 m.
If you follow these rules, you can build a fence around the house that meets the requirements of reliability and strength, as well as optimal expenditure of financial resources. After completing the preparatory stage, you should proceed directly to pouring the foundation for the brick fence posts.
Once the total number of posts has been calculated, you will need to stretch a rope or cord to mark all the locations where posts will be installed once the foundation is complete. The support in the form of a core is installed exactly in the center of the platform with cement mortar. The foundation is poured for each support separately.
Columnar-ribbon
This type of foundation for a fence is used as often as the previous one. In this case, more labor will be required, since the construction of a columnar foundation involves a large amount of excavation work. The time costs are also higher. However, the high load-bearing capacity of the base and tolerance to different types of soil compensate for the described disadvantages.
In this case, a concrete strip is also created. It can go directly along the ground or go deep into the ground. But the depth at which the grillage is placed does not exceed 0.1 m. This is due to the purpose of the tape: it does not take on the main weight of the fence, but only ties together the main load-bearing elements and redistributes the load between them.
The main load-bearing elements using this technology are support pillars placed in wells drilled in the ground and filled with concrete. The depth of each well is from 50-70 cm to 1 m, depending on the ability of the soil to bear weight.
There is also a purely columnar version of the columnar-tape base, when there is no concrete strip connecting the supports together. This solution allows you to significantly save cement and time spent on construction. However, the load-bearing capacity in this case is lower. Therefore, purely columnar bases are often placed under fences made of chain-link mesh, euro-fence, etc.
The use of screw piles will help speed up the creation of a columnar foundation. These structures are screwed into the ground like large self-tapping screws and then filled with concrete inside. Quick installation and savings on cement are ensured, but it is necessary to take into account the costs of purchasing the piles themselves.
Sequence of work.
Before laying brick fence posts, you will need to take care of the foundation, the type of which can be strip, columnar or grillage. The same types of foundations are used for the fence as for the house. The instructions suggest choosing the cheapest type of foundation that allows you to build reliable structures. It is important to follow the established sequence of work:
- Use a drill to make holes measuring 40x40, the depth of which should be more than 20 cm.
- Compact the bottom of each hole with a 10 cm layer of sand.
- Install a support post in the middle of each recess.
- Fill all the holes with concrete mortar, choosing the M200 cement grade.
- Leave the foundation for 2 weeks until completely hardened.

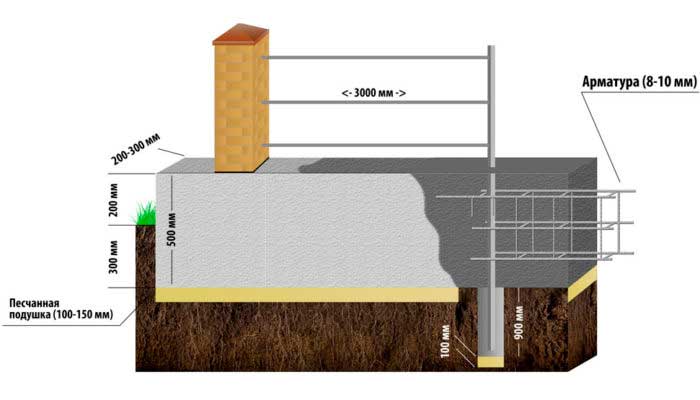
The correct foundation for a brick fence.
The given instructions will allow even a beginner to fill the base for the fence without much difficulty. For the mid-latitudes of the continent, experts recommend digging holes for fences made of brick up to 1.0-1.2 m deep. Compacting the holes with sand is necessary to maintain the stability of the brick structure and reduce groundwater fluctuations. When installing support pillars, you can use the method of strengthening the frame using reinforcement rods.
The components of the mortar for preparing the foundation for a fence made of brick pillars can be selected in the following ratio: sand and crushed stone 2.8:4.8 per package of cement. If you plan to build a massive fence, then a concrete type of base is suitable. Each base can be connected to each other using concrete plinths. To give the cement mortar additional strength, you can add broken bricks, crushed stone and construction waste to it.
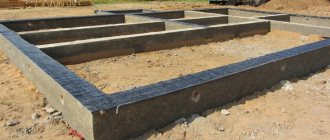
Monolithic strip base
One of the most common foundation options for a brick fence is a base in the form of a monolithic concrete strip. Such a foundation is placed at a shallow depth (0.1-0.3 m), which simplifies the construction. It is possible to build a belt relatively quickly, since the volume of excavation work is relatively small.
The tape-type base is located above the freezing point of the soil. Therefore, it is recommended to build it only where the ground has sufficient bearing capacity. If the soil on the site is prone to subsidence, frost heaving, and horizontal movement, it is better to choose a different foundation option.
The parameters of the strip foundation (also abbreviated MZL - shallow strip foundation) are determined by the characteristics of the future fence. The depth to which concrete must be poured depends on the height of the fence:
- For fences whose height does not exceed a meter, it is enough to deepen the foundation into the soil by 10 cm.
- For higher fences, the base depth is from 20 cm to 30 cm.
The width of the tape is determined by the parameters of the support column. The tape should be 2-6cm wider than the widest element of the fence. Minimum width – from 40 to 60 cm.
How to prepare a concrete solution for pouring a foundation.
For different types of foundations, all components should be selected in the required proportions, since a certain type of foundation requires a different ratio of fillers (sand, lime, cement). The quality of the foundation will depend on the strength of the mortar.
The ratio of fillers is determined after choosing the brand of cement. For example, if brand M50 is used, then the ratio of lime and sand should be 1:5.8. For M75 cement it is equal to 1:4.2. The table (IMAGE 1) will help you prepare a concrete solution for the foundation.
If you add lime to the solution, the concrete mixture will become more plastic, which will greatly facilitate the process of laying bricks. The use of this filler allows you to reduce the cost of necessary materials. If the amount of lime in the concrete mixture is too high, cracks may form in the masonry. Beginning builders should always observe the proportions of all materials used.
To build a foundation for a brick fence, the following types of devices will be required:
- A metal container required for preparing the mixture.
- A bayonet shovel or other device for stirring the concrete mixture.
- A container for measuring the required amount of filler for the composition.
All components for the concrete mixture will need to be placed in a prepared container, into which water must be added. All contents should be mixed thoroughly. The cement mixture and water are taken in proportions of 1:1. The finished composition must be used within 1.5 hours, otherwise it will begin to dry out.
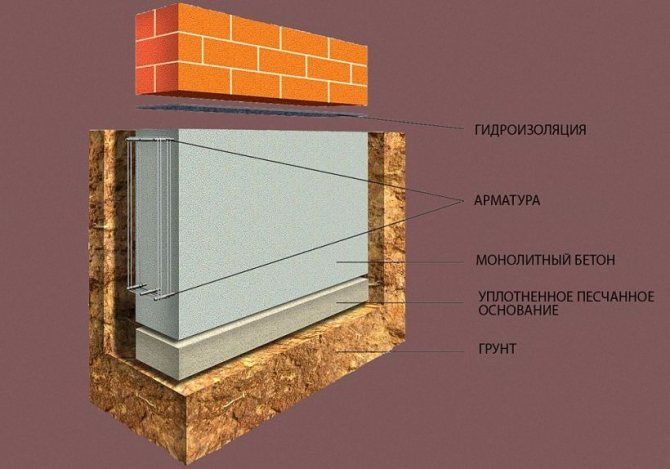
The need for waterproofing
Waterproofing is mandatory so that excess moisture does not accumulate in the base. You can do this in the following ways:
- Lay roofing material or at least a plastic bag on the crushed stone - then moisture will not get on the concrete.
- Special compounds are also used that are added directly to the solution. If added, the base will be resistant to water.
As you can see, the main thing is to choose the right foundation. If the base is chosen correctly, it will last for more than one year.
Construction of a strip-column foundation.
A strip-and-column brick foundation is poured with your own hands into pre-prepared formwork, for the reinforcement of which a metal mesh is used. The base for a house fence should be 50 cm deep and 40 cm wide.
The base for concrete pillars should be wider and deeper. A foundation with such parameters will be less at risk of displacement. It is suitable not only for installing brick fences, but also for installing wooden fences on stone pillars.
The process of installing a strip foundation for a brick fence with your own hands involves performing the following steps:
- digging a trench manually or using special technical means;
- compacting a sand or gravel cushion 20 cm thick;
- laying a layer of broken brick or crushed stone;
- covering the crushed stone support with reinforcing mesh;
- installation of formwork capable of holding the concrete mixture until it hardens completely.
Foundation depth for a brick fence.
Experienced craftsmen believe that digging a trench by hand allows you to complete all the work more accurately, but it takes more time. Planed boards or other materials with a flat surface can be used as formwork.
Since the foundation strip for the fence must be 30 cm above the ground surface, the formwork is installed accordingly, that is, to the entire depth of the trench. It is necessary to install metal supports for the pillars in the prepared recesses.
Installation of formwork can be carried out using special prefabricated kits that guarantee the correct geometry of the foundation of the fence around the house.
How to paint
To make the base look more neat, you can use special plaster, or simply spray it with soluble milk using a brush.
Also, special paints designed specifically for concrete are used for this. Mortars for borders are also suitable. But ordinary acrylic, latex and other compositions are also quite suitable.
Expert opinion
Vladimir Ulyanov
I have been involved in fences for over 10 years, answering questions and helping people cope with the installation task on their own.
Ask a question to an expert
If you choose from the best and most suitable, then these are epoxy paints. Their service life exceeds 25 years. Apply this product in a couple of layers. They are highly permeable to moisture, which makes them resistant to UV rays.
Installation of a grillage type foundation.
The grillage is a more reliable structure. It must be done under each pillar, so this type of foundation is more labor-intensive to construct than a strip foundation for a fence. Pre-dig holes for each support to a depth of 1.5 m. The technology for installing a grillage with your own hands requires the use of the most suitable materials. All work will need to be performed in the following sequence:
- Determine the place where the gate with a wicket will be located, under which there is no need to build a foundation.
- Drive in marking pegs and string a rope or wire as a guide for digging the trench.
- Install the first pile in a hole, the depth of which is 2.5 times greater than that of the trench, and the width is 2 times.
- Mount the piles at equal distances and equal depths.
- Place gravel in an even layer 6 cm thick at the bottom of the trench to improve soil drainage under the foundation.
- Lay out a sand cushion and a layer of geotextile.
- Make formwork from boards.
- Use horizontal bars to connect the formwork panels.
Foundation for a brick fence.
The depth of the concrete base, which must be poured between the pillars, should be 30 cm. The frame of reinforcing bars should be made as follows:
- place 4 reinforcing bars parallel to the ground at a distance of 10 cm from each other;
- weld a rod 30 cm long perpendicular to each of the ribbed reinforcement rods, taking into account a gap of 20 cm;
- weld the frame elements together at the joints of rods 15-20 cm long, if reinforcement of a suitable size is not found;
- make a frame with cells 20x10 cm, the length of which coincides with the length of the fence.
Once the preparatory work is completed, you can begin pouring the concrete solution. The mixture can be purchased or prepared with your own hands. First you need to mix the dry ingredients and then add water in small portions. To make the foundation for a brick fence strong and of high quality, you will need to take materials in the following ratio:
- Cement - 1 part.
- Sand - 2 parts.
- Gravel - 1.5 parts.
- Water - 1 part.
The entire solution must be mixed thoroughly. After preparing the concrete, you can proceed to pouring the formwork. In order for the solution to harden evenly, the entire process must be carried out within a short period of time. To eliminate air voids, you can use a vibrator or shovel handle.
Preliminary calculations of volumes and costs
At the beginning of construction, you need to choose the type of foundation, determine the depth of the foundation, and calculate the amount of materials. Find out the depth of soil freezing in your region from any construction organization or on the Internet. Check the groundwater level and soil type in the area. To do this, you will have to make holes in different areas. Ask neighbors with basements about groundwater levels.
Calculation of concrete volume and cost of work
In order to correctly calculate the amount of materials, it is necessary to draw a detailed plan. The calculation comes down to determining the entire volume of concrete based on the thickness of the brick pillars, filling the gap between them and the depth of the foundation.
There can be many options for filling the gaps between them: brick, stone, wrought iron fence, mesh, corrugated board. To fill the gap with brick, the thickness of half or a whole brick is taken into account. Half is 125 mm, and a whole brick is 250 mm, respectively. The columns are laid in 1.5 bricks or 380 mm wide.
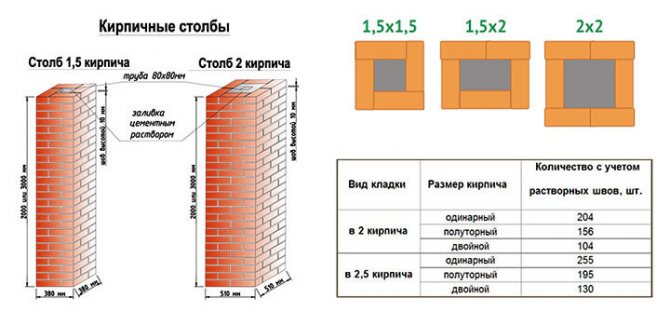
Photo. Calculation of the number of bricks for pillars: 1.5x1.5; 1.5x2; 2x2.
From these dimensions it is necessary to subtract the thickness of the finish:
- plaster – 10 mm;
- tiling – 15 mm;
- artificial stone cladding – 25 mm;
- facing with natural stone up to 45 mm.
This is done so that the decorative elements do not protrude from the general plane of the fence.
Based on these data, the total volume of concrete is determined: the width is multiplied by the length and height. The minimum grade of concrete is M200.
To prepare 1 m3 of grade 200 concrete, you need:
- cement M400 – 1 part;
- sand – 3 parts;
- crushed stone - 5 parts;
- water as needed.
When making your own concrete mortar, measure cement, sand and crushed stone in the same units: in volumetric parts or in kilograms. In practice, materials loaded into a concrete mixer are counted as buckets or shovels.
The quantity of bricks is calculated in pieces. With a pillar width of 1.5 bricks, there are 3 bricks per row, the seam thickness is 10 mm. Accordingly, 21 bricks are needed for 1 meter of height.
For 1 m3 of concrete, an average of five bags of cement weighing 50 kg are required.
Formwork work
The formwork consists of wooden panels made from edged boards with a thickness of 25 to 40 mm. The thinner the board, the more braces need to be installed to provide rigidity. To control the width, wooden spacers are installed inside. To align the formwork strictly along the line, it is tied together with 1 mm thick wire. For ease of use, so that it becomes soft, the wire is pre-fired.
To prevent the shields from moving to the side during pouring, they are reinforced with wooden pegs. To achieve an absolutely smooth surface from the inside, the boards are covered with plastic films, which are nailed to the boards with a construction stapler. It is recommended to remove the formwork after a week. At the same time, they cut down the mortar that has seeped into the cracks between the boards.
A horizontal level is drawn inside the formwork and nails are driven into the boards. A wire or colored cord is stretched between them to indicate the upper boundary of the concreting.
To create a concrete foundation for a brick fence without large investments, choose the option that suits you from the above. The filling technology is simple and suitable even for people without experience in such work. Step-by-step instructions with a detailed description of the phased construction of the foundation can be viewed in this video.
Installing brick supports with your own hands.
For high-quality construction of a fence on a columnar, strip and grillage type of foundation, it is necessary to maintain an equal gap between the individual bricks. For this purpose, small metal tubes, bars or reinforcement rods are used. Solid brick is always used for laying the first layers of brick.
Width of the foundation for a brick fence.
When erecting pillars with your own hands, it is possible to use facing stone. All work can be done professionally using the following types of tools:
- A trowel for applying and spreading concrete mortar onto bricks.
- A shovel that looks like a scoop so that it is convenient for her to apply the mortar to the brick.
- A level that allows you to measure the vertical and horizontal positions of a brick pillar.
The first row is laid on a foundation under brick pillars according to a scheme based on the position of the support of 1.5 bricks with a slope towards the wide side of the pillar. After laying the first row on the foundation for a brick fence, you should use a level. When laying the columns, it is necessary to take into account that the end part of the second row and the length of the brick in the amount of 1 pc. should form the entire width of the support.
If you plan to install a facing brick fence around the house, you should use a special impregnation for treating finished brick surfaces. As a result, a very thin film will appear on them, protecting the structure from destruction.
A solution for concreting voids can be prepared from crushed stone, sand and cement, taken in a ratio of 3:3:1. It is better to fill voids in parts, since it is impossible to provide high-quality compaction of the support. To speed up the process, you can erect a pillar, and then move on to filling the internal space with large stones, pieces of brick, and small gravel. After this, the entire contents are filled with concrete.
After laying the pillars on the foundation under the brick fence, you should wait until the brick pillars are stable. Attaching the joists can only be done after 3 weeks, depending on the climate of the region and weather conditions. After completing all the work, you should take care of caps for the top of the posts so as not to render your fence unusable due to precipitation.
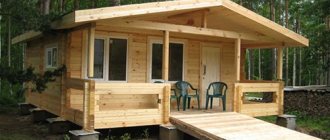
Making a foundation for a brick fence with your own hands.
Fence sections made entirely of brick are notable for their considerable weight. Such fences need a solid foundation that evenly distributes the load on the ground. The technology for pouring a concrete foundation is relatively simple and the homeowner can do this work with his own hands if desired. You just need to choose the appropriate type of base and attract a couple of assistants.
DIY foundation for a brick fence.
A brick fence is a heavy structure that requires a reliable foundation.
Choosing the type of foundation.
Nothing special has been invented for the construction of massive fences; the technologies used are the same as for the construction of buildings. There are 3 types of foundation for a brick fence:
- columnar;
- tape;
- ribbon-columnar.
- pile solutions
Strip foundation for a fence with brick pillars.
Strip-column fence foundation.
The construction of columnar foundations is practiced in dense and stable soils when constructing pillars made of brick and spans of light materials - wood, corrugated sheets, polycarbonate, and so on. The structure is a reinforced concrete monolith, enclosed in a well and resting on lower, denser layers of soil. Placed under each fence support.
Although the columnar structure is the simplest and cheapest, it cannot be made under a solid stone fence; here you will need a strip foundation. This is a concrete strip with reinforcement, immersed shallowly in the ground (up to 50 cm). Part of the base protrudes above ground level in the form of a plinth (30-40 cm), from which brick or stone masonry begins.
A concrete strip in combination with underground pillars combined into a common monolith is a strip-column foundation. It is built with your own hands on soil prone to subsidence from external loads. In exceptional cases, when the soil is susceptible to frost heaving, such foundations are made on screw piles.
Strip foundation for a brick fence.
Pile foundation for a brick fence.
Under normal soil conditions, with a relatively shallow freezing depth, monoliths in the form of a tape are the most common, and it is worth examining them in more detail.
Pouring the foundation for a brick fence.
Scheme of a strip monolithic foundation for a brick fence.
Calculation of the volume of concrete mixture
To pour the foundation, it is extremely important to know not only the proportions of the mixture, but also the required volume of concrete for the foundation. It is most convenient to carry out the calculation using a strip-column foundation as a template. Such a base combines all of the listed types of concrete bases: columnar (including with expansion) and strip. Visually, a fragment of such a base can be divided into the simplest geometric shapes: cube, parallelepiped and cylinder.
The foundation represents simple geometric shapes
Using mathematical formulas from a school geometry course, it is easy to accurately calculate the volumes of these figures, as well as the total amount of mixture for the foundation.
As an example, a calculation will be made for a fence 16 m long. Let’s assume that the concrete pillars will be located at a distance of 2.5 m from each other. The diameter of each pillar is 0.15 m. First you need to set their total number to the specified length. To make it convenient to calculate, you need to use the parameters of the thickness of one column and one span: 2.5 + 0.15 = 2.65 m.
Now you need to find out how many such distances will fit into the length of the fence: 16:2.65=6.03. We need to add one more pillar, since it will be the outermost one, 6.03 + 1 = 7.03 rounded up to 7 pieces.
Based on the design of the strip-column base, there will also be 7 thickenings of the foundation. It should be noted that each thickening has a parameter of 0.4x0.4x0.4 m. Their total number in the foundation is calculated using the same principle. The span length in this case will be 2.15 m. Let’s substitute the values: 0.4 + 2.15 = 2.55 m.
We determine how many such distances will fit along the length of the fence (and add one cube): 16:2.55+0.4=6.27+0.4=6.67 pcs. In this case, you can make the fence a little longer or shorten one span. The number of spans will be equal to 6 pieces.
Foundation with optimal dimensions
Using the obtained parameters it is easy to calculate the volume of concrete for each figure.
Calculation for pillars
To calculate the volume of the mixture for one cylindrical column, you need to use the appropriate formula: V=πR²h, where π is a mathematical constant equal to 3.14, expressing the ratio of the circumference to its diameter; R is the radius of the circle; h is the height of the cylinder.
It should be noted that according to this formula the radius will be 0.075²=0.005625 m (according to the rules for rounding numbers, this value will be equal to 0.006 m). Let's substitute the values: 3.14∙0.006∙0.5=0.00942 m³ - this is the volume of concrete for one column. For all pillars: 0.0942∙7=0.06594 m³, rounded to 0.07 m³.
Calculation for thickenings
Since the foundation thickenings have a cubic shape, calculations must be made using the formula for calculating the volume of a cube, which is as follows: V=h³, where h is the height, length and width of the figure. Let's substitute the values: 0.4∙0.4∙0.4=0.064 m³.
Findable volume of mixture for thickening the entire foundation: 0.064∙7=0.448 m³.
Calculation for spans
The spans have the shape of parallelepipeds. To calculate their volume, you need to use the formula for the volume of a cube: 2.15∙0.4∙0.3=0.258 m³. We determine the total volume of the mixture for all spans: 0.258∙6=1.548 m³.
Now it is not difficult to calculate the total volume of concrete required for the construction of the foundation of the entire fence, 16 meters long: 0.07 + 0.448 + 1.548 = 2.066 m³.
Purchase of materials.
To pour the foundation for a brick fence yourself, you need to prepare the following building materials:
- Portland cement M400 – the basis of concrete;
- sand for preparing a concrete mixture and installing a cushion at the bottom of the trench;
- crushed stone with a fraction size of up to 40 mm – concrete filler;
- periodic profile reinforcing bars (corrugated) Ø8-10 mm for tying the frame;
- soft knitting wire;
- bitumen mastic and roofing felt for waterproofing.
You also need to make panel formwork in advance from wooden boards and beams or rent it. Another option is to put together boards with your own hands from sheets of old chipboard and cover them with plastic film to prevent them from becoming soggy from moisture.
Preparing for pouring.
The structure of the foundation as a whole depends on how carefully the preparatory stage is carried out. Work begins with marking the line of reinforced concrete tape and determining its width. For example, if you plan to lay a fence made of ordinary brick 250x120x65 mm, then a base width of 20 cm is sufficient. The principle is this: the base should protrude beyond the edges of the fence wall by 3-5 cm in both directions. Further work is carried out according to the following algorithm:
- Dig a trench 45-50 cm deep and 50-100 mm wider than the size of the future foundation in each direction, so that it is convenient to install the formwork.
- Place and secure the metal supports, which are the stiffening elements of the brick pillars.
- Compact the bottom of the trench with your own hands and arrange a sand cushion 10-15 cm high.
- Tie the reinforcement cage. The distance between the outer rods is selected so that they are immersed in the concrete by 40-50 mm. The pitch of the transverse rods is 10-15 cm.
- Install formwork in the trench. To prevent the shields from moving apart, make supports on the sides and fasten them securely.
The reinforcement cage should be placed at an equal distance from the formwork panels and installed on supports so that the lower rods are inside the monolith. Otherwise, the protruding reinforcement will quickly rot in the ground. Steel fence posts must be connected to the frame, preferably by welding.