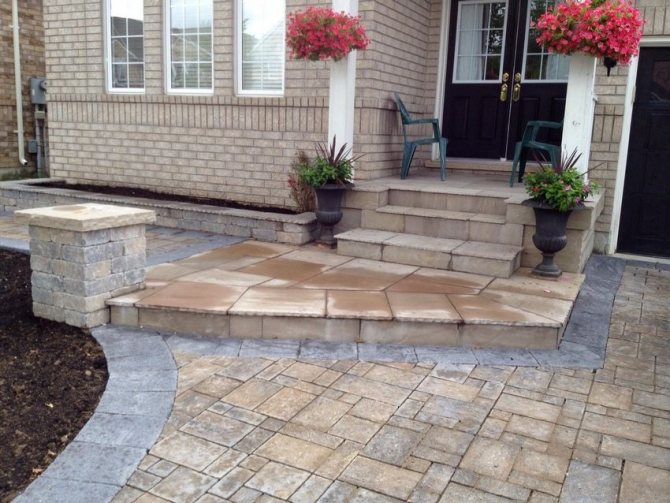
You can often see blind areas made of concrete. Today they are increasingly made from paving slabs. The use of this material allows you to carry out the work yourself. Laying tiles is very easy. This blind area provides reliable protection of the base from excess water. In addition, when making such a path around the house it will be convenient to move around. You can create a blind area from paving slabs with your own hands quite quickly if you follow the advice of professionals. Numerous photos of installation work will help you with your work.
Features of creating a blind area with your own hands
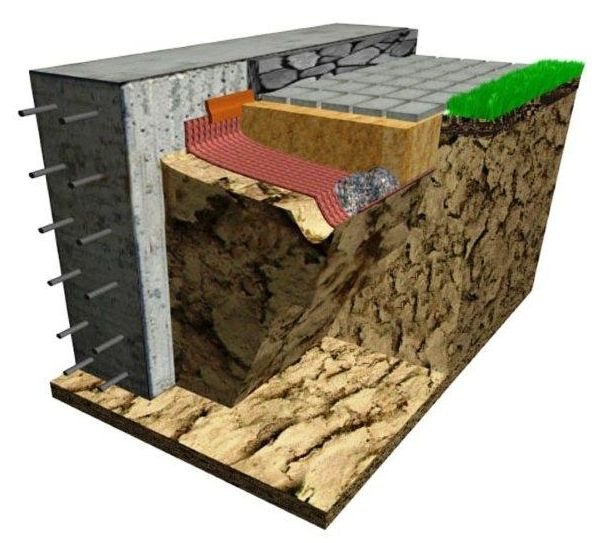
A blind area near the house is made of two layers. One of them is internal (substrate), and the second is external. Paving slabs are chosen as the latter. For maximum performance, each layer should be laid according to certain requirements. If you follow them, the installation process will go quickly, and the result will delight the owners of the house.
First, select materials for the blind area:
- Paving slabs. For novice builders, you should take simple brick-like tiles. Many craftsmen believe that with a large tile size, installation goes faster. However, this opinion is fundamentally wrong. Aligning such elements is much more difficult. For the blind area you should choose 40 mm tiles.
- Border.
- Waterproofing material.
- Insulation – you don’t have to use it.
- Clay – necessary for performing a hydraulic lock. Experienced builders advise choosing fatty clay that contains little sand and various impurities.
- Sand. It is better if it is sifted.
- Crushed stone. It is used to create a dry cushion under the tiles. To make a high-quality pillow, you will need to choose crushed stone ranging in size from 20 to 30 mm.
- Cement powder.
- Communication pipe.
In addition, the work will require certain tools. It is necessary to prepare in advance a trowel, a shovel, a container in which the concrete solution will be prepared, and a grinder.
The time spent on laying the blind area depends on the parameters of the surface to be finished - area, degree of preparedness. The bulk of the work goes into preparing the foundation. To perform all the procedures correctly, you will need to know several subtleties of constructing a blind area.
Technological process
“How to properly make a blind area at home?” - This is a question that worries every non-professional builder. The first step is excavation, that is, a trench is dug along the entire perimeter of the structure. The approximate depth should be thirty centimeters. It is important to point out that the integrity of the blind area can be damaged by plant roots.
That is why it is necessary to treat the soil with special herbicides in advance. After all of the above, a curb stone is installed across the entire width. You can also use removable formwork. Next, the underlying layer is laid down a slope into the dug trench.
Preparing the site
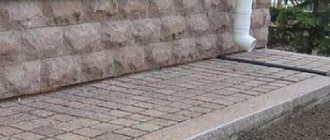
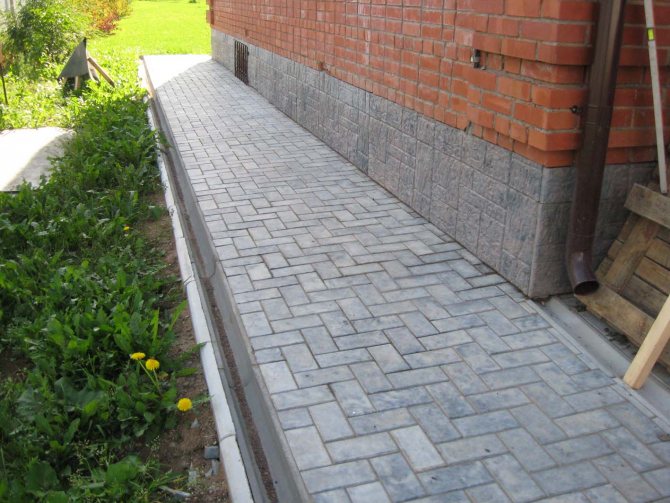
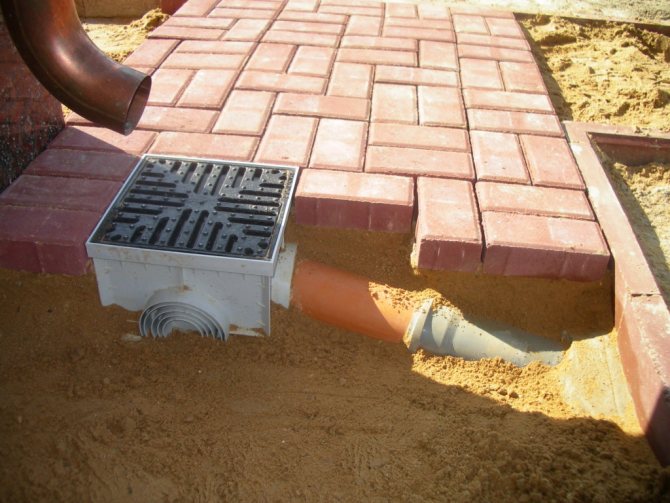
A blind area around a house made of paving slabs can be installed at the base of both a new and an old building. In the first case, it is necessary to remove part of the soil layer. When constructing a blind area for an existing house, you should remove the old covering and clean the foundation. When performing storm drainage, a recess for the pipe is made at the edge of the blind area.
Advice! If the house was built recently, you should not immediately lay the blind area. It is necessary to wait until the soil near the foundation is compacted. This way you can prevent the formation of voids under the tiles.
How wide the bed will be is determined by taking into account the characteristics of the border. It is convenient if the width of the blind area is equal to the dimensions of the tiles. In this case, there will be no need to do any trimming. The work will be noticeably reduced, and you won’t have to use an angle grinder.
What the depth of the bed will be depends on the height of the base layers. It is usually 150 mm. However, in practice this figure increases to 400 mm. Clay castle should not be done if the soil is very clayey. In this case, only 300 mm can be removed.
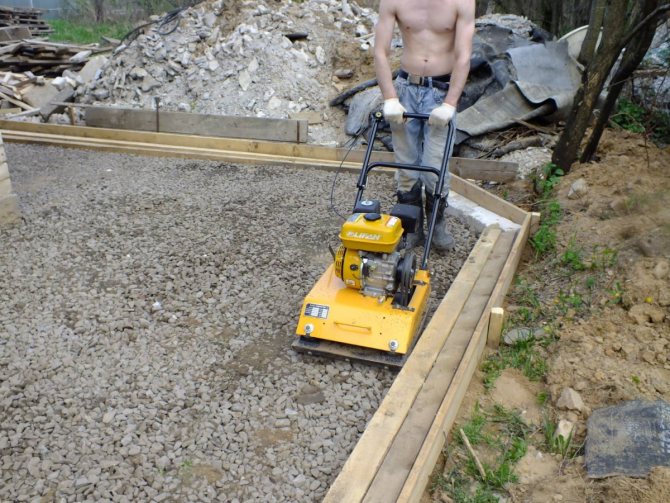
It is worth remembering that during excavation, large piles of soil are formed. It is important to immediately determine where it will be placed. If you do not think about this in advance, the embankment will interfere with movement around the territory. The bottom of the bed must be thoroughly compacted. This work should be carried out until the soil stops moving under the impact of the tool.
Advice! Experienced builders advise using herbicides to treat the bed. This will prevent weed growth. It is better to choose herbicides that have a continuous effect.
Adviсe
Professional advice will help you correctly install the blind area waterproofing.
- Don't leave waterproofing for later. The blind area must be done immediately during the construction of the building.
- Observe the slope. Try to keep the slope the same throughout the entire perimeter. For this you can use a building level.
- Do not mix concrete and clay.
- To ensure that the insulation does not deform under the weight of the blind area, it is recommended to choose a material with a high density.
- Remember, the blind area does not last forever, it requires care and repair.
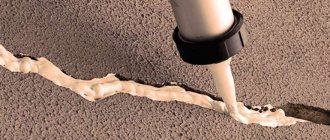
- When repairing blind areas, various sealants and mastics are used. The damaged surface is coated to prevent further deformation.
- If there is a large crack or chip on the surface, it is necessary to punch a wedge-shaped hole and fill it with a mixture of concrete. Then cover with film to prevent premature drying.
- The outer layer performs not only a decorative function, but also a protective one. Finishing can be done using paving slabs. Of course, no one forbids you to leave ordinary concrete or crushed stone, but, from the point of view of aesthetics and design, it is better to use decor.
- Numerous reviews on the Internet say that membrane or rolled materials are suitable for waterproofing; they are most often used when used independently.
- You can resort to the advice of the Finns and make a soft blind area.
- For special occasions, when the entire garden around the house is a complete design fantasy, you can use colored crushed stone.
For gardening enthusiasts, the outer layer can be covered with soil and grass or flowers can be planted, the main thing is what is “inside”.
To learn how to properly waterproof a blind area, see the following video.
Marking
To mark, you will need to install pegs in the corners of the bed and stretch a string between them. It will become a guide. It is important to tighten it using a level, this will allow you to make a level base for the blind area.
As stated in SNiP III-10-75 , it is prohibited to bend the edge of the blind area by more than 10 mm. This condition must be met if straight sections are equipped with a blind area. If the work is carried out on private property, the paver himself can adjust this parameter.
Base structure
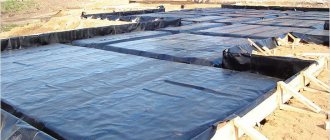
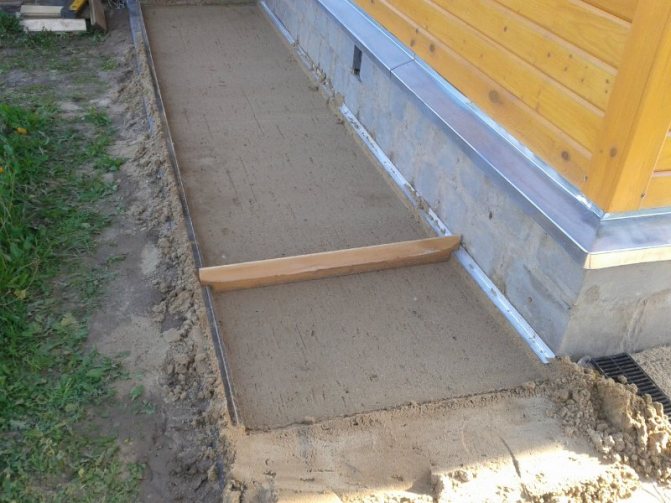
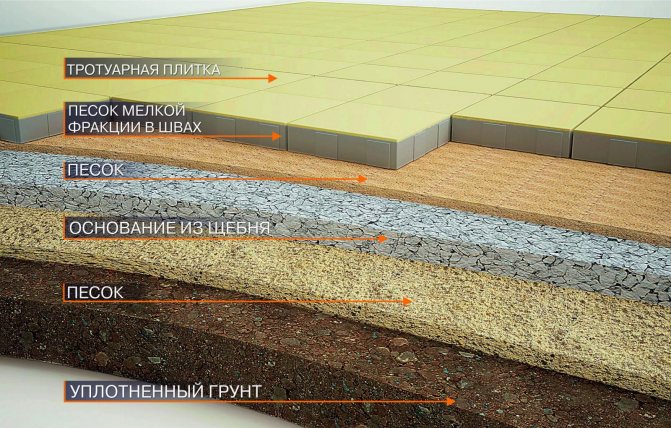
A layer of sand about five centimeters thick should be poured onto the waterproofing layer. This layer must be carefully leveled and compacted. If the sand is dry, then you need to moisten it, otherwise you simply will not be able to lay and compact it well. To level the sand, you can use a simple piece of plywood with a straight edge.
The next layer (see photo), 8-10 cm thick, should be compacted crushed stone. A layer of sand up to five centimeters thick is again poured over the crushed stone.
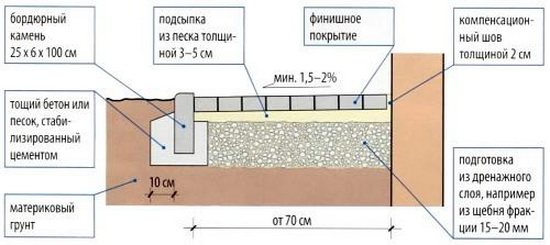
After this, all layers must be simultaneously spilled with water and compacted well.

Scheme of blind area with waterproofing.
At this point, the preparatory work with the foundation structure is considered complete.
Base for blind area
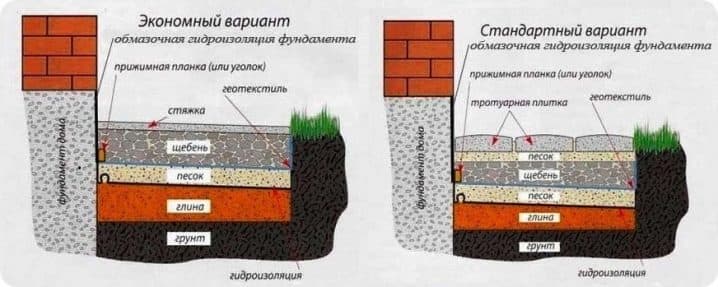
The base for the blind area of paving slabs is made in layers. It must be of the highest quality. Such products are very similar to layer cake. To save on materials, you can reduce the layer thickness. The construction of a blind area from paving slabs is often done independently.
Creating a hydraulic lock
The blind area must have a certain slope for water to drain. It can be created both at the stage of filling the clay and during the installation of the last layer. There is no difference between these options. When the bottom is compacted, clay is poured onto it in a layer of 5 to 10 cm. Some builders replace clay with concrete. This layer should be made up to 15 cm thick. At the same time, it will drain water perfectly.
Advice! To reduce the lateral load on the base, a gap should be made between the base and the blind area. It is covered with sand or roofing felt is laid. You can lay polystyrene foam, which will not only compensate for the load, but also make the blind area insulated.
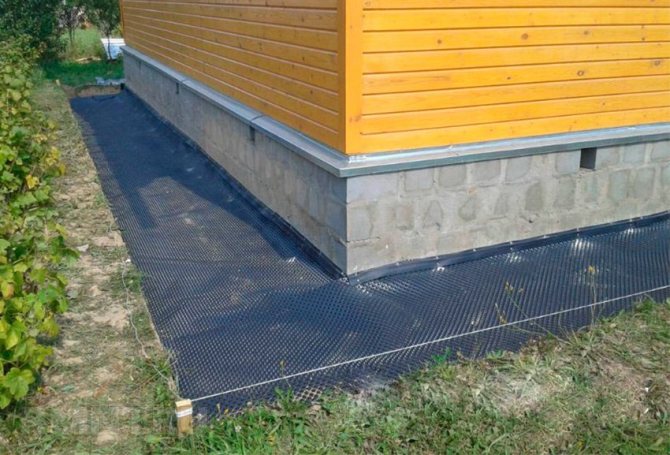
The hydraulic lock is made of PVC film, roofing felt or geotextile. When laying the film, it should not be stretched. If this condition is not met, it may break during changes in ground temperature. This ensures its preservation for a long time. During installation, the overlap on the foundation should be observed. To prevent movement, press the top edge of the film with a strip.
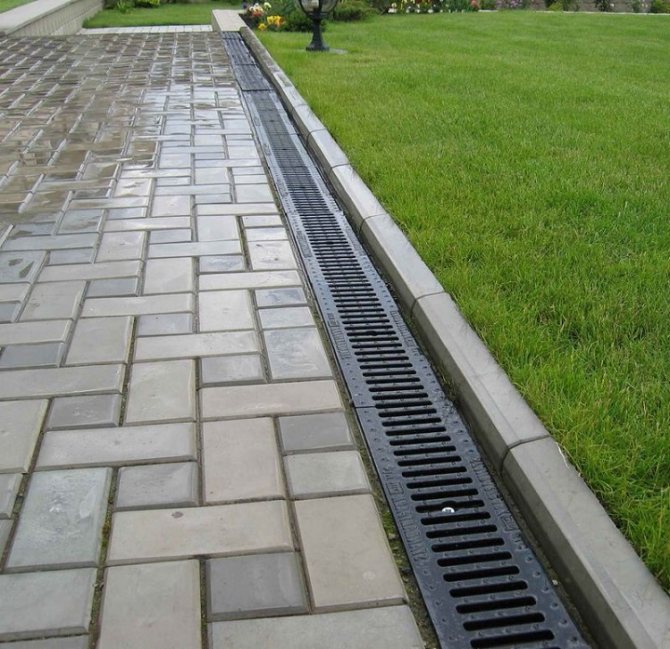
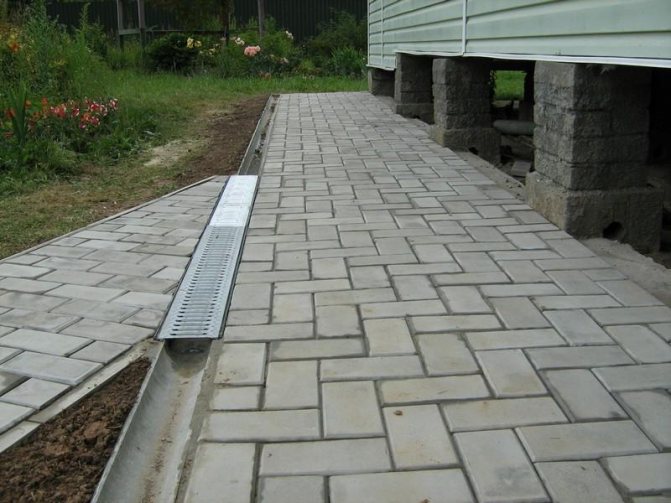
When creating a stormwater system, a pipe is mounted on the edge of the film. It must be covered with crushed stone. This will protect the pipe from clogging. In addition, it is necessary to install a storm drain and lay a storm drain pipe. This technology for creating a hydraulic lock is simple and time consuming.
Backfilling with sand
The sand is covered with a layer of 5 cm. During compaction, it is poured with water. It is important to take into account one nuance. Watering is done using a nozzle. This could be a tip from a garden watering can or a spray bottle.
Watering is carried out until small puddles appear. You need to wait until they dry and tamp. Such a layer will perfectly protect the waterproofing substrate from damage by crushed stones.
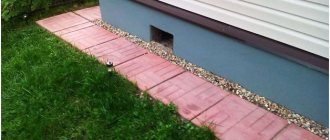
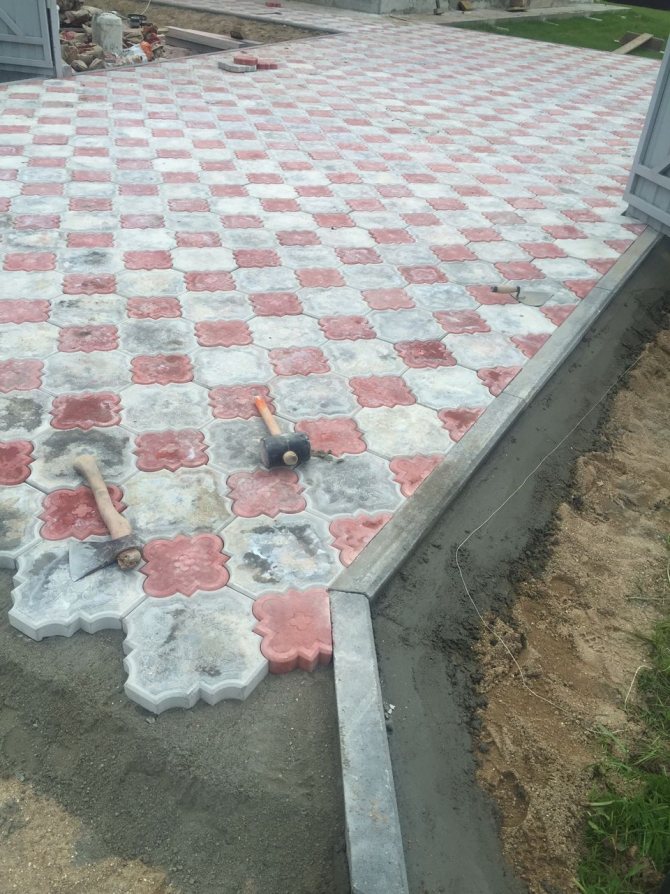
Installing a curb
The border should be aligned with a stretched cord. Its alignment is carried out using a level. The border should be secured with pegs. It is cemented on the outside. This is necessary to protect the tiles from spreading. Concrete curbs can be easily replaced with plastic ones. In this case, it is installed at the very end of the work.
Crushed stone
The gravel backfill should have a thickness of 5 to 10 cm; the exact figure is selected depending on the level of precipitation in a particular area. When the crushed stone is filled in, the pegs are removed. This layer must be leveled, compacted and covered with sand.
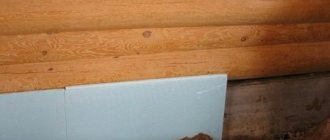
In the case of a basement or ground floor, the blind area is created insulated. For this purpose, rigid insulation is used. Foam boards are usually chosen. It is not recommended to lay sheets directly on crushed stone, since such materials are not able to withstand point loads.
If a high load on the blind area is expected, you will need to combine 4 parts of cement and 1 part of sand. Tiles are laid on this layer. If there is no slope, it is formed at this stage, since the tiles will be laid on top. If the curb is not formed, plastic elements should be installed and a curb installed. At this stage, a storm drain is also installed. Now you can start laying the tiles.
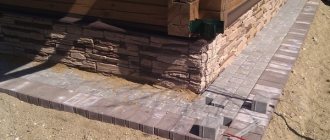
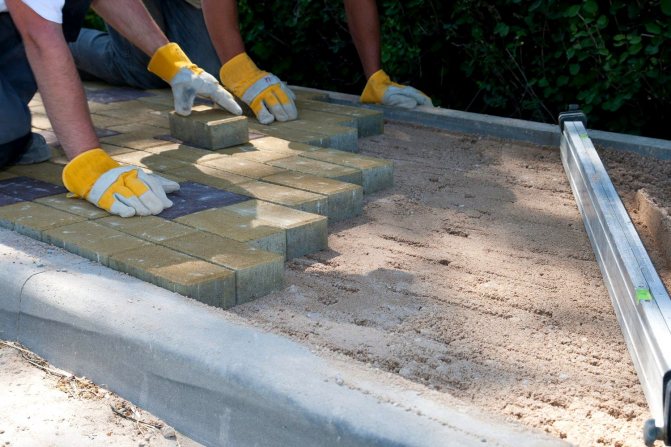
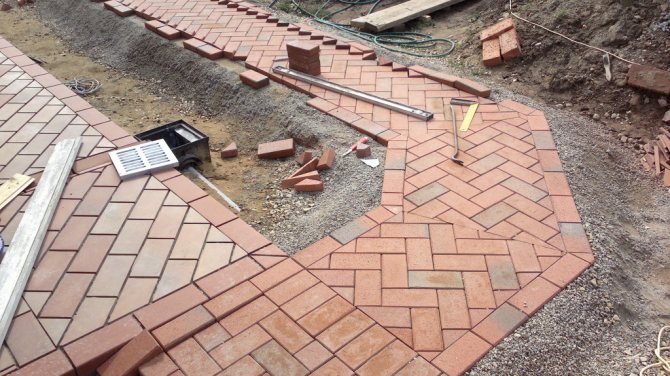
Laying paving slabs
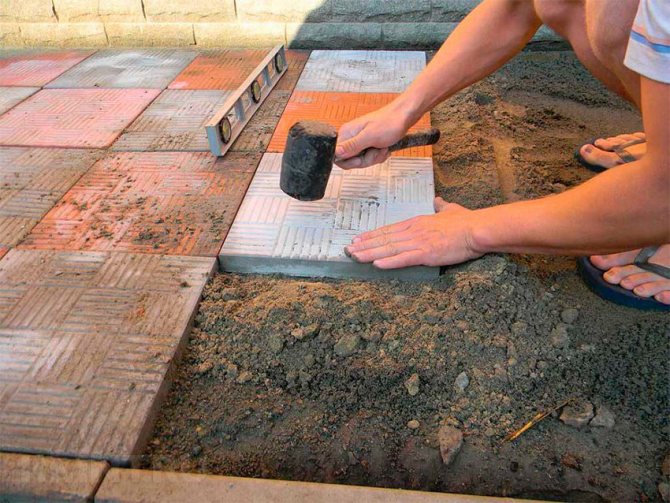
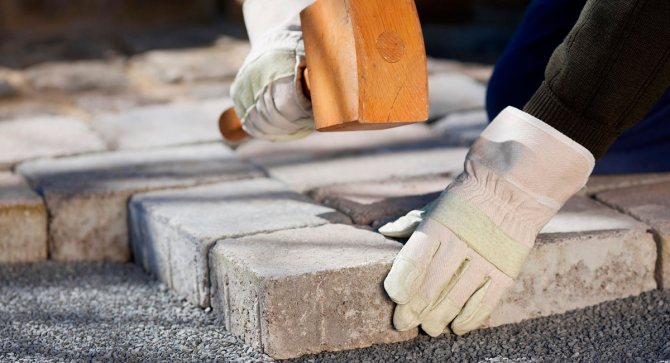
The blind area should be laid from the side of the foundation. In this case, the tiles are mounted away from themselves, which avoids compromising the integrity of the cushion layer. Each tile should be laid in a strictly designated place. Then the elements are tapped with a rubber hammer. A level is used for leveling. The tiles are struck through a plank. This avoids the tiles from splitting. When the tile is lowered below the required level, the prepared mixture is poured under it.
There should be a distance of about 2 mm between adjacent tiles. Usually the gap is formed due to the distance lock on many types of tiles. If a border is not provided, edging tiles should be laid.
Sealing seams
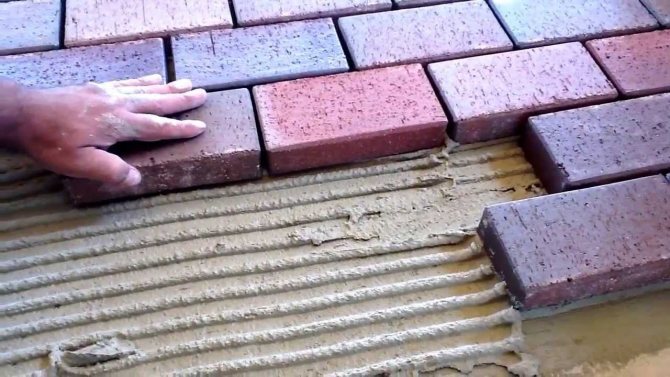
To grout the seams, use the same mixture as for the finishing layer. When creating a cement-sand cushion, it is better to use a dry mixture in a ratio of 4:1. It should be poured onto the tiles and then spread with a broom so that it penetrates the seams. After this, the surface of the tiles on the concrete blind area is watered. The cement sets and provides good reinforcement to the tile.
Waterproofing
Despite the fact that clay has water-repellent properties, this layer must be installed.
Even small movements of the soil can cause cracks to form in the primary “backfill”. In addition, the clay can dry out, which will also cause cracks to appear. What to use? From the author’s point of view, the traditionally used roofing material is hardly suitable, given the complexity of the likely repair. No matter what manufacturers and sellers claim, its service life will not exceed 4 years, even if we are talking about euroroofing felt. We must not forget that the material will be used outside the building, and not under the best conditions (sub-zero temperature, excess humidity).
From the standpoint of a reasonable combination of quality and price, the best option is polyethylene film (thick). It must be laid so that the top is wrapped onto the wall, and to a height slightly higher than the level of the surface of the future blind area. In this place (in the corner of the wall - the ground), the film is pressed down with a lath, and its top is fixed (for example, with construction tape).
Geotextile material has proven itself well, but its cost is higher than that of film.
Paving slabs on a concrete blind area
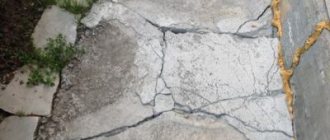
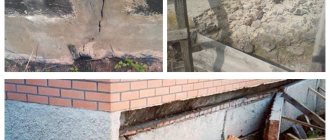
The concrete blind area is in any case susceptible to destructive forces. In addition, it may lose its functional properties if the filling technology is violated. Usually this causes it to crumble or crack. Repairing it can be even more expensive than creating a new blind area. Covering a concrete blind area with tiles is a profitable solution that will allow you to decorate your site in an original way.
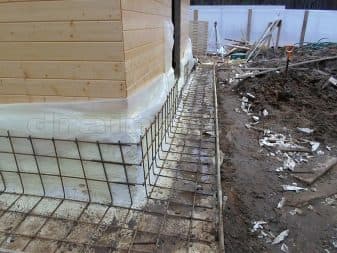
Concrete is used as the base. The concrete mixture is used to create a hydraulic lock. In addition, it strengthens the blind area. This may be necessary if cars will move along the blind area.
The work is carried out according to the following technology:
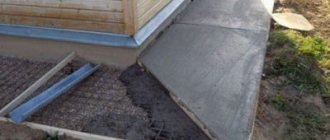
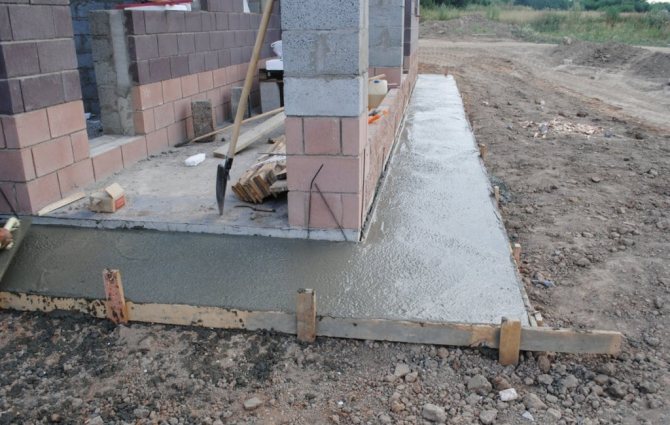
- the soil is removed to the required depth;
- formwork is installed;
- polystyrene foam is laid on the foundation to insulate the basement;
- sand is poured on top, and then crushed stone;
- reinforcement is laid;
- wooden spacers are installed to compensate for the expansion joint;
- concrete solution is poured.

When pouring the solution, a certain slope should be made, since during the installation of the finishing layer it will not be possible to create such an effect. When mixing concrete during work, the proportions of cement should be observed in order to obtain a mixture of the required strength.
Then the formwork is removed. If necessary, a curb is installed. The finishing layer is formed only after the concrete has completely hardened. Paving slabs are laid on the concrete, and then the seams are sealed. The blind area with insulation provides reliable protection of the basement floor from frost.
What should she be
Before we look at the step-by-step instructions, let’s find out the requirements for the blind area:

- It should be continuous along the perimeter of the house.
- It must be at least 600 mm from the wall. Based on the eaves overhangs, it should be 200 mm wider. If necessary, you can increase it.
- There must be a slope away from the house. For paving slabs, a slope of 3 degrees is sufficient.
Paving slabs on an existing blind area
If the concrete blind area has already been laid previously, it is necessary to follow the correct technology for installing paving slabs. The work is performed only after certain preparation. The sequence of work is as follows:
- First, you need to assess the condition of the existing concrete blind area.
- Then all defects are eliminated. This work includes sealing cracks and delaminations. For this, cement paste and a special composition containing liquid glass are used. If there is significant damage, it must be removed and then a new blind area must be poured.
- Curb installation. In this case, this stage of work is mandatory. Since the old blind area is located at soil level, and laying paving slabs raises it by at least 10 cm, the blind area should be strengthened. Typically, a higher blind area is used for this, serving as a limiter.
- Applying primer.
- Laying tiles.
After completing such work, it is necessary to carefully seal the seams.
List of tools and materials

In order to lay a tile blind area, you will need the following tools and materials:
- shovel and bayonet shovel;
- pick;
- manual or electric tamper
- metal buckets;
- tape measure with 10 m tape;
- cord for marking;
- bubble level;
- ground rubber (mallet);
- grinder with diamond blade;
- sifted sand;
- crushed stone of medium fraction;
- geotextile fabric;
- polyethylene or roofing felt.
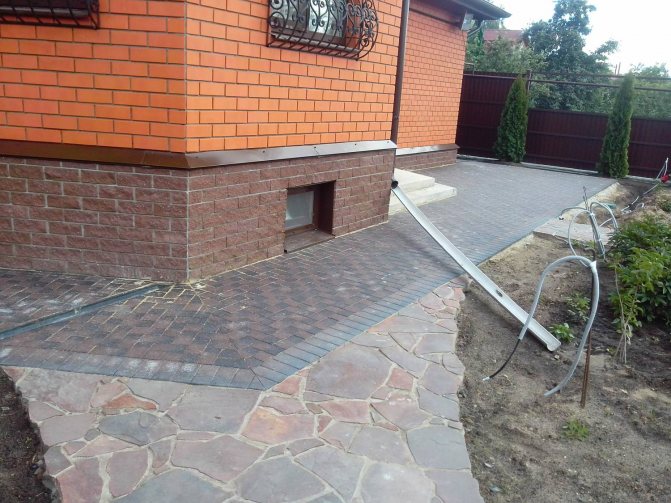
Design of the blind area
Those who appreciate beauty should take care of creating an original design. To do this, you can plant a flower garden on the blind area. To create full-fledged flower beds, you can limit the tiles using borders. Soil should be filled into the existing recesses, and various plants should be planted.
It is important that water from flower beds is effectively drained away from the foundation. Otherwise the base may be damaged. Each recess must be equipped with water drainage. To avoid problems with plant growth, the recesses for flower beds are selected of the appropriate size.
It is worth remembering the different watering needs of plants. If there is no quality drainage from the flower beds, they should be covered during prolonged rain. In addition, it is necessary to feed different bushes. Plants planted in this way cannot obtain nutrients from open soil. You can create a beautiful design using climbing plants.
Cost of work
Saving a significant amount of time and money is quite simple - you can do the work yourself. It is necessary to calculate how much money will be required for laying paving slabs for the blind area if professionals are involved. Calculations are carried out depending on the amount of necessary work that is carried out using the technology. These include:
- removal of old coating;
- digging the necessary trench for the blind area;
- creating a hydraulic lock;
- film laying;
- backfilling with sand and crushed stone;
- creation of the finishing layer;
- curb installation;
- work to create an effective drainage system.
The total savings when performing the work yourself will be about 2 thousand rubles. Considering this, you can spend the extra money on better materials.
If you follow these tips, you can create a high-quality blind area around the house from paving slabs at minimal cost and without the involvement of specialists. The main thing is to prevent water from entering the foundation. This is the main task of the blind area. If vehicles will pass over it, it is better to strengthen the base.
Recommended Posts
Construction of the foundation of a house.
Types of foundations Classification of foundations according to their design features
FBS foundation blocks: GOST, characteristics
DIY blind area around the house + video
Drain around the blind area
DIY foundation for a barn