The strength characteristics and durability of any future structure depend on the method of pouring the foundation. There are several ways to prepare it, but not all take into account parameters such as the weight and size of the structure. Undeservedly little attention is paid to the issues of soil testing at a construction site. For example, if the site is swampy and has loose and complex soil, then the best choice of material for the foundation of the house will be a pile-strip foundation, which will solve all the issues that arise in such cases.
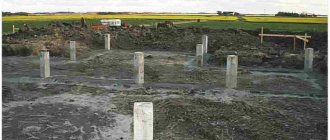
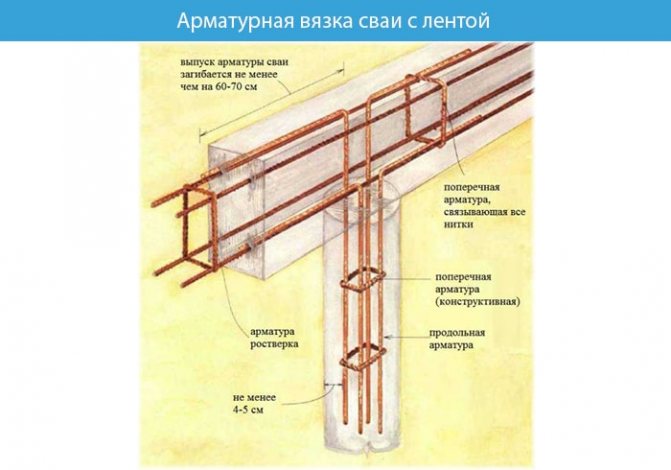
A pile-strip foundation looks like this - these are evenly distributed piles that are installed in accordance with the load-bearing load specified in the preliminary calculations of the future building. The upper part of the piles is attached to the strip base by reinforcement and concreting using prepared formwork.
Pile-strip foundations can be of several types, since the method of joint use of piles and strip foundations may differ from each other. In addition, various types of piles are used in construction.
Construction of a pile-strip foundation
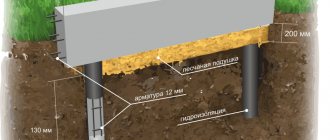
Design of pile-strip foundation:
- priming;
- sand-pillow;
- pile reinforcement;
- bored pile;
- tape reinforcement;
- concrete base;
- waterproofing.
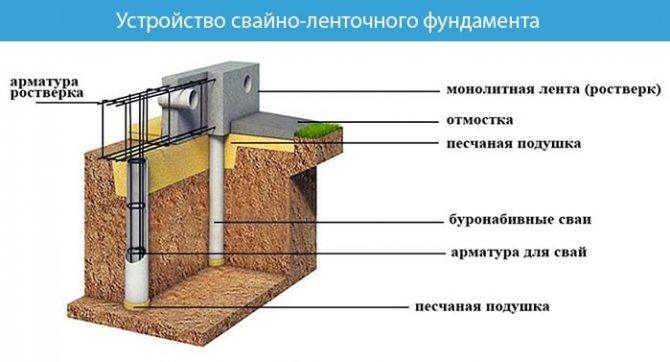
Table No. 1. Pros and cons of pile-strip foundation
| Advantages | Flaws |
| stability on heaving soils | lack of basements and basements |
| use of a small amount of building material, in comparison with a buried strip foundation | not suitable for the construction of multi-storey buildings, as they require stronger support, in this case the size of the piles increases and the profitability of suburban buildings is lost |
| quick installation that does not require additional equipment | additional costs for insulating floors in the house due to drafts |
Application area
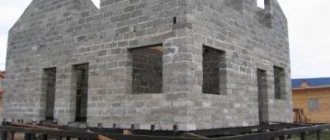
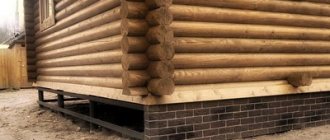
Pile-strip foundations are used for low-rise country houses. Private frame buildings or houses made of one- or two-story timber.
Pile grillage is a good replacement for an expensive, deeply buried pit foundation, which is often used on problematic soils, marshy areas and slopes.
Problematic soils:
- loose;
- layered (with complex composition);
- heaving (with a high groundwater level);
- with a large freezing depth.
Can it be used for frame buildings?
The construction of a strip-pile foundation for a private house is most successful in the following cases:
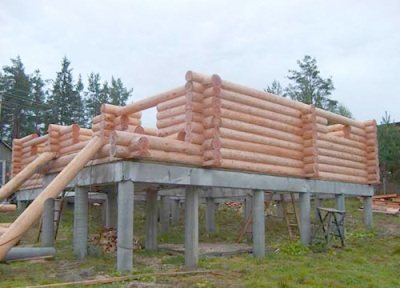
- during the construction of frame houses (with a height of up to 3 floors);
- for wooden houses (height 3-4 floors);
- for houses made of blocks;
- for brick houses (up to 2 floors).
Using small-sized equipment, piles are screwed or driven into the moving soil. They pass through moving layers of soil and rest against hard layers of soil to a depth of at least one and a half meters. They serve as the support of the entire building.
Each pile can withstand loads of up to 5000 kg. The upper part of the piles is connected by beams, resulting in a reliable structure. You can start building a frame house immediately after screwing in the piles.
Frame-panel buildings are distinguished by ease of assembly, ease of installation, excellent thermal characteristics, and a variety of finishing options. Learn more about building a frame-panel house with your own hands.
When constructing frame buildings, the design and all calculation work must be carried out by specialists - in this case, it is possible to build a building that is stable and not subject to deformation.
Correct calculation and installation will allow the building to serve for a long time and reliably in any climate.
Types of pile-strip foundation
Pile grillage is a combination of two foundations, pile and strip. Therefore, the type of foundation depends on the combination, type of pile and depth of the tape below ground level.
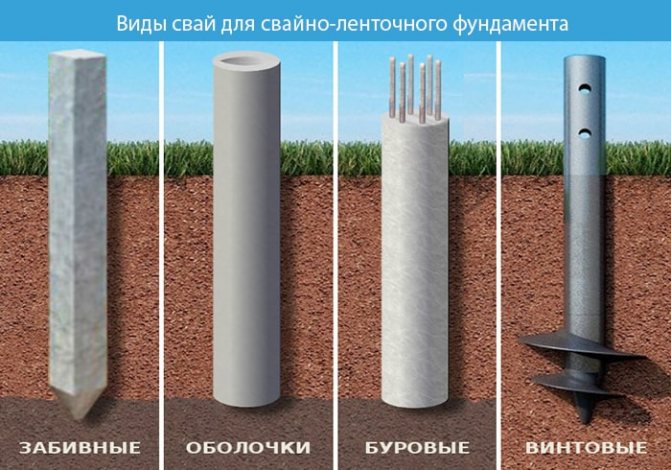
Types of piles
By type, piles are divided into three types:
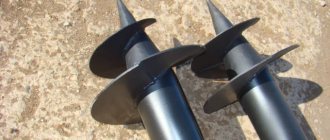
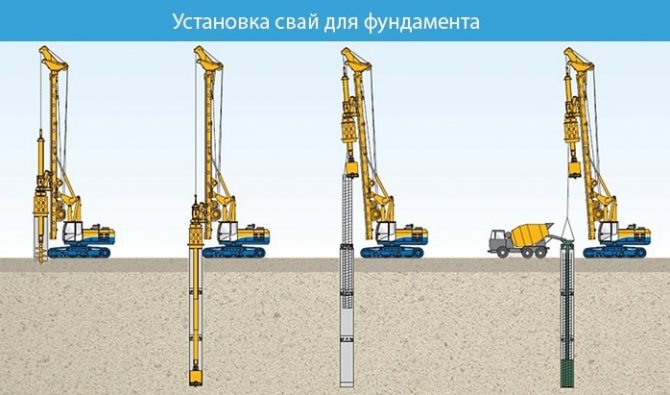
- Screw - made of metal. Pointed pipes with blades at the bottom. They are immersed in the ground using the screw method, screwing into the ground. You don't need any special equipment for this; you can screw it in by hand.
- Drilled - made of concrete at a construction site by pouring the solution into a pre-prepared well. Before pouring, a reinforcement frame is knitted and formwork is constructed with waterproofing from a polyethylene or asbestos-cement pipe. More often, well walls are used as formwork.
- Submersible - ready-made reinforced concrete piles. For installation to the required depth, a construction pile driver is used. This option requires the possibility of a special approach. equipment to the site. Therefore, there are restrictions on the degree of proximity to nearby buildings.
Depth level of the base tape
The grillage redistributes the load of the structure onto the piles and soil. The strength of the base depends on the degree of occurrence of the tape.
Based on depth, the grillage is divided into three types:
- Non-buried (NZFL) - the base tape coincides with the zero ground level or below no more than 0.1 m.
- Shallow (MZFL) - the tape is erected below the zero ground level by 0.3 - 0.7 m on top of the piles.
- Recessed (ZFL) - erected below the soil freezing level at a distance of 1 - 3 m.
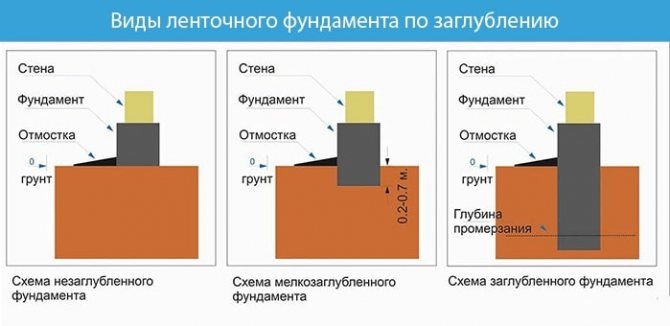
The most common is the shallow type, since there is no need to involve special specialists. equipment and specialists, and earthworks are reduced to a minimum.
Calculation of draft
Before determining the settlement, it is necessary to compare the stress under the sole (p) with the permissible soil load (R). If the condition is met, then you can use the linear model and calculate the settlement using the layer-by-layer summation method.
Calculate the ordinates of natural pressure diagrams for the first layer of soil:
Q_n=γ_n×h_n, where:
- γ_n is a coefficient depending on the type of soil;
- h_n- layer height;
- n – serial number of the layer.
| Coefficient value for various types of soil, kN/m3 | |
| compacted embankment | 17 |
| Packed sandy loam | 21 |
| Medium sand | 18,9 |
| Soil oversaturated with moisture | 10,25 |
| Tight-plastic loam | 19,1 |
The next step is to find the parameter value for each subsequent layer, adding to the basic formula: Q_(n-1).
Calculation of stabilized settlement is carried out according to the formula:
S=β/E ∑ (Q_n+Q_(n+1))/2 h_i, where:
- β – coefficient accepted on the basis of specified conditions according to regulatory documentation;
- E – soil deformation modulus (determined based on survey results).
More details about the calculations are described in the document SP 24.13330.2011, as well as in the guidelines for designing foundations for civil buildings, which can be downloaded from the link.
How to make a pile-strip foundation with your own hands: step-by-step instructions
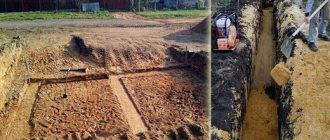
The installation of a pile-strip foundation begins with the preparation of the territory. We clear the site of unnecessary debris and remove the top fertile layer of soil.
Marking and excavation work

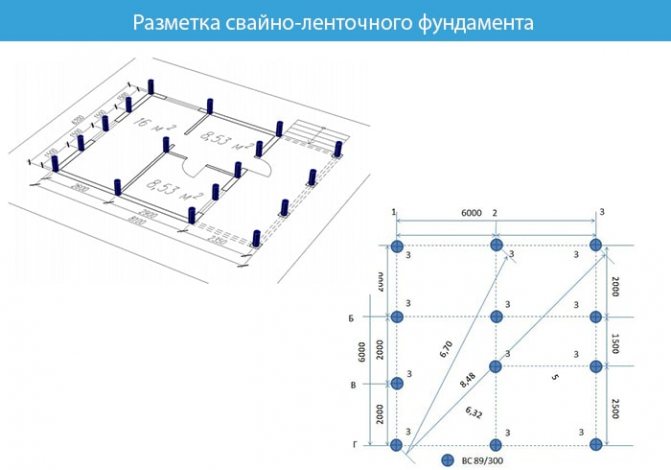
After preparation, we need to mark up our project.
The drawing and calculations should be ready by this time. We transfer the drawing to scale to the construction site. To do this you will need:
- stakes;
- rope.
We determine the first angle using a device (theodolite) or take a nearby structure as a reference point. We drive in the necklace. We mark the second corner opposite the first at the required distance and drive in the second necklace. We stretch a fishing line or rope between them.
Next, we do the same with the remaining corners. We mark for the outer and inner sides of the wall. The width between the walls will depend on the house you are building.
Important! For convenience, when digging a trench, move the stakes at a distance of 0.5 m from each corner.
We dig trenches according to the markings, for this you will need:
- bayonet and rock shovels;
- wheelbarrow (for removing soil).
As an example, we will consider a shallow foundation. Therefore, we make the width of the trench 0.5 m by 0.1 m wider than the future tape. So that there is a gap for installing the formwork structure. Using the example, we deepen it to a distance of 0.5-0.7 m.
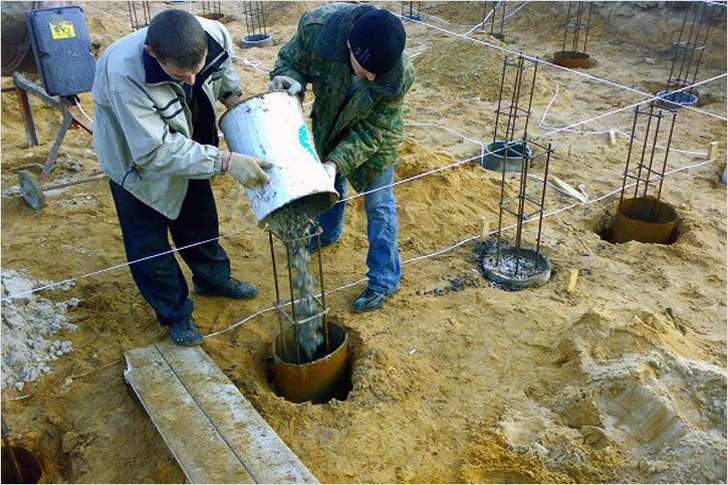
When the trench is ready, we proceed to drilling a hole for the piles. To do this you will need: a drill or a tractor with a drill.
We make a well below the soil freezing level, approximately 0.4 - 0.5 m (so that the pile rests on stable soils). With a diameter of approximately 0.1 - 0.15 m.
Installation of foundation piles
We use bored piles.
To install bored piles you will need to perform the following steps:
- We make a sand bedding 0.1 m thick and compact it.
- On top we install a difficult formwork made of asbestos cement (we select the pipes from the calculations as 1/3 of the width of the concrete strip).
- We strengthen the piles with a reinforced frame. We tie 4 rods together with wire. We take the thickness of the reinforcement to be at least 10–12 mm, and the length should be enough for tying with a concrete tape. The frame should not touch the walls of the formwork.
- The last stage is pouring. We prepare a concrete solution of grade M200-M300.
Important! For screw and submersible piles, you do not have to dig a well. Screw ones are screwed into the ground, and submersible ones are mounted using a special machine (pillar).
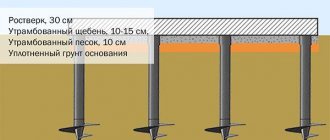
Sand and gravel bed

At the bottom of the trench, grooves are made on the sides, which will be 10–15 cm wider than the base tape.
We lay geotextiles, preventing the pillow from flooding with groundwater.
There are two types of bedding:
- Gravel-sand mixture. Proportion for preparation (gravel/sand – 2/3) The thickness of the pillow will be 20–30 cm.
- We fall asleep in layers. The first is a 15–20 cm layer of coarse sand, and the second is a 20 cm layer of fine crushed stone or gravel.
Important! Any non-metallic materials are suitable for backfilling. For example, expanded clay, blast furnace slag and others.
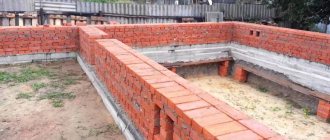
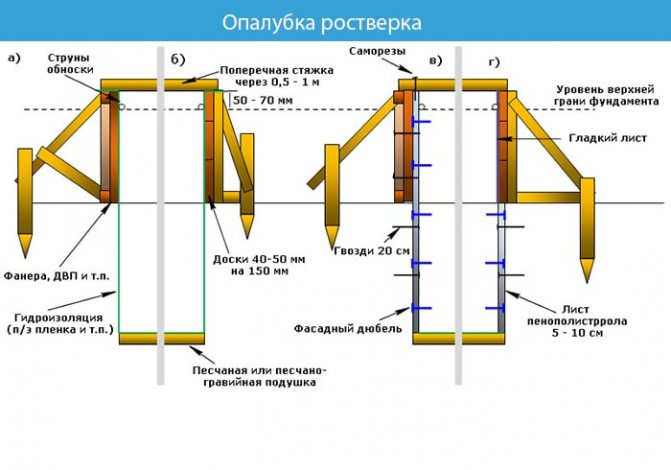
Grillage formwork
The formwork of the foundation strip is created from wooden panels. Boards, plywood or chipboard are knocked together. The thickness of the shield structure should be 3–5 cm to withstand the load.
We bury the shields into the bedding by 5–7 cm from the outer and inner sides. We strengthen the corners of the formwork, because the load acts on them the most.
Along the perimeter we strengthen the structure with racks every 0.5-0.8 m, and the outer and outer sides are fastened together with studs.
Formulas for calculating lumber for formwork can be found in the article.
To install the formwork you will need:
- plywood or board thickness – 3–5 cm;
- self-tapping screws;
- studs and posts (for strengthening).
Important! We install ventilation and communications.
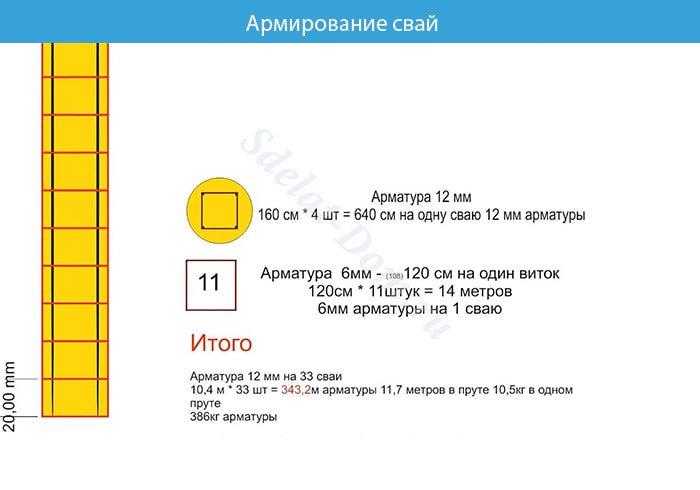
Grillage reinforcement
The reinforced frame is connected using spatial knitting. Strengthening the foundation with A3 class corrugated reinforcement with a diameter of 12–14 mm. The rods are placed longitudinally to each other, and connected to each other with 3–6 mm wire at a distance of 40–60 cm. At the same distance, reinforcement bars are installed vertically, forming a square.
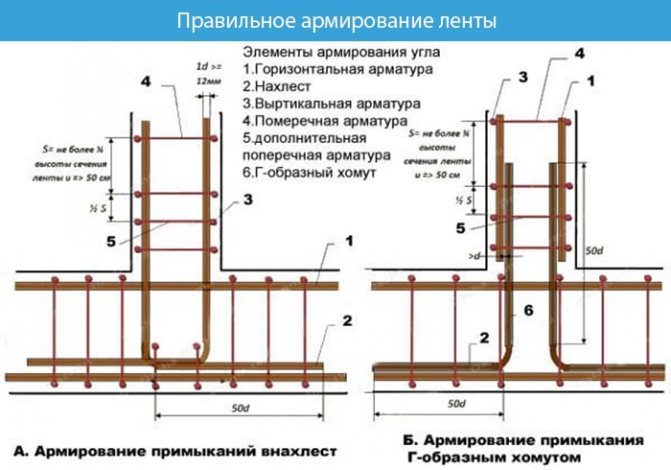
The corners of the reinforcing frame are connected by curved rods on the outer and inner sides at the bottom and top, the rods are connected with annealed wire.
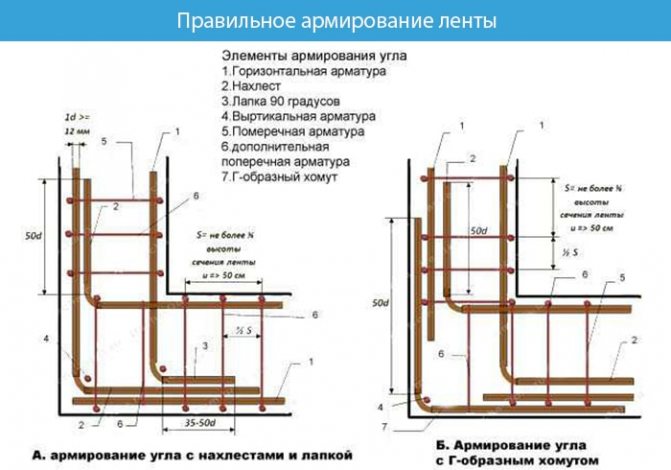
The finished design of the reinforcing belt is connected to the reinforcement of the piles.
Fill
We fill the pile-strip foundation with concrete of class no lower than B15.
To prepare cement you will need:
- cement;
- sand;
- crushed stone;
- water;
- concrete mixer.
Recipe! Preparation of concrete class B15 grade M200 per 1m3. Proportion for mixing in a concrete mixer: cement, sand, crushed stone - 1 / 3.5 / 5.6 (kg). Add water by eye to form a heterogeneous mass.
The finished concrete solution is poured into the tape in portions or layers, compacted. Compact with a deep vibrator for uniform shrinkage along the tape and expel bubbles (or use a bayonet shovel to go around the perimeter). After pouring, cover with film and leave to harden. From 25–30 days, the base takes a solid, solid form, ready for insulation and blind area.
Waterproofing and insulation
For the tape you need to make waterproofing and insulation. To increase its durability by strengthening the structure by reducing moisture resistance.
There are several types of waterproofing:
Coating. The tape is treated with bitumen or epoxy mastic - this is a moisture-proof material. Rolled. We cover the tape on all sides with roll materials: Bikrost, TechnoNIKOL: external, internal and on top. Penetrating. At the stage of creating a concrete solution, a special additive is added - a primer. The special properties of the primer additive can reduce the porosity of concrete, while reducing its moisture permeability.
Advice! A good result shows an integrated approach. A combination of penetrating injection into a solution with a coating or roll material.
The base tape is insulated from the outside with penoplex or extruded polystyrene foam. The material is attached with slabs to the foundation together with the plinth. The advantage of the materials is a high heat saving coefficient, as well as resistance to moisture and rodents.
Calculation using programs
Based on the above, it is obvious that it is quite difficult to carry out calculations on your own.
In practice, you can use online resources:
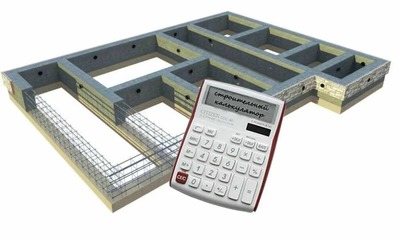
A service for calculating the dimensions of a load-bearing structure, selecting reinforcement characteristics, and determining the needs for consumable concrete.- Online calculator. The program helps you select the quantity and quality of reinforcement and find out the required volume of concrete. To do this, you need to enter in the appropriate fields such initial parameters as: concrete grade, number of piles, etc.
- A program for calculating foundation subsidence using the layer-by-layer summation method.
Arrangement of piles
When the holes for the piles are ready along the entire perimeter, then first of all it is necessary to fill them with a layer of sand, which is about 30 cm. Then asbestos-cement pipes are inserted into them, the diameter of which is the same as the diameter of the hole. It is very important to make high-quality waterproofing of piles, so they can often use ordinary roofing felt, which is sewn together with fishing line instead of asbestos-cement pipes (although they are also considered a good insulator). When the pile is waterproofed, reinforcing rods with a diameter of 12 mm are inserted into the hole, which are usually welded together with transverse reinforcement of a smaller diameter. It is also necessary to ensure that the reinforcement protrudes to the height of the foundation strip (that is, it is 15-20 cm above the bottom of the trench) so that it can be connected to the metal frame of the strip base.
Necessary materials
So, knowing the features and design, first of all, you need to prepare the necessary materials and tools. It will require the following materials:
- Sand.
- Gravel.
- Concrete solution.
- Fittings.
- Waterproofing.
- Primer.
- Antiseptic.
- Insulation.
- Asbestos-cement or metal pipes.
- Wooden panels or boards for formwork.
- Nails and screws for formwork.
As for the tools, you will need the following:
- Shovel.
- Boer.
- Level.
- Roulette.
- A concrete mixer for creating concrete, if you plan to make concrete yourself.
- Crochet hook and wire for reinforcement, or welding machine.
Having prepared everything you need, you can safely begin building the foundation, which is carried out using a special technology in several stages, which will be discussed further.
Excavation
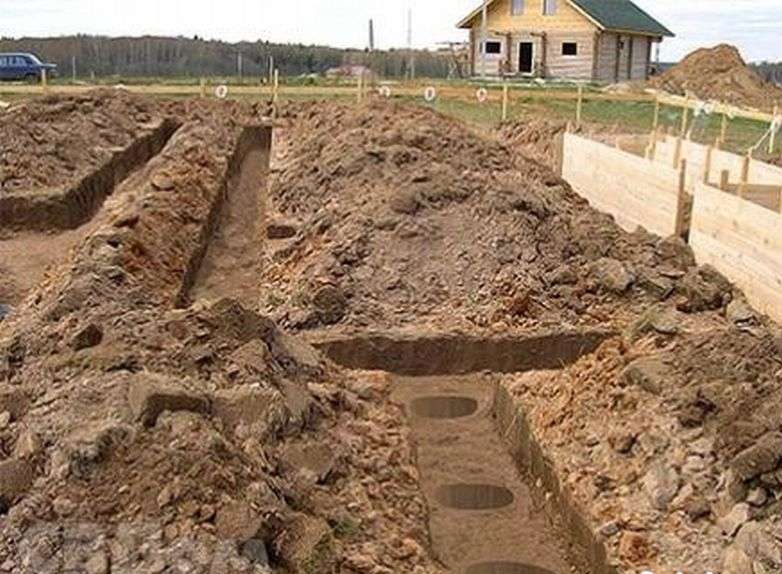
Excavation work for arranging a strip foundation with piles consists of digging a trench for the strip and holes for the piles. As a rule, the depth of the trench is not great and you can dig it yourself using a shovel. When the trench is ready, they begin drilling holes for the piles. Usually a hand drill is used for this, but when working with it it is necessary to pull the drill out of the ground approximately every 30 cm, otherwise it may get stuck there due to the soil sticking to it.
The depth of the holes for piles usually exceeds the depth of soil freezing and is about 1.5 m, however, for each specific region this value may be different.