What it is?
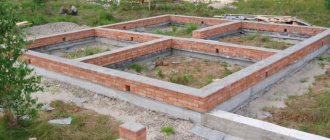
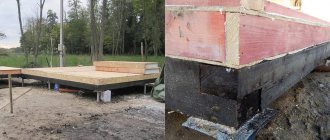
Laying a pile-tape foundation is a new technology that appeared in the late 90s of the last century and today is widely used throughout the world. The difference from a traditional foundation lies in the design of such a foundation - a reinforced concrete grillage is erected on bored pillars with an expanded heel.
Due to the increased supporting area, the foundation is resistant to increased loads, and the widening in the lower part eliminates the risk of lifting the load-bearing structure by frost heaving forces.
Load bearing capacity
The load-bearing capacity of the foundation is related to the diameter of the base of the piles, the resistance and composition of the soil:
| Soil type | Soil resistance, kg/m2 | Load-bearing capacity of the load-bearing structure depending on the diameter of the heel, t | |
| 50 cm | 60 cm | ||
| clay, coarse sand | 6 | 12 | 17 |
| loam, sandy loam | 3 | 6 | 8 |
| dusty sand | 2 | 4 | 5,5 |
| medium sand | 5 | 10 | 14 |
In practice, the load-bearing capacity of the TISE foundation can be 2 times higher due to the fact that cement laitance penetrates into the soil and hardens there, forming a layer of soil concrete 5–7 cm thick.
How is a pile foundation made?
Design begins with the collection of initial data obtained as a result of geological surveys of the soil. Then the foundation is calculated - the parameters of the structural elements are determined, including the pitch between the supports, and the need for building materials is calculated.
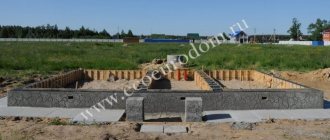
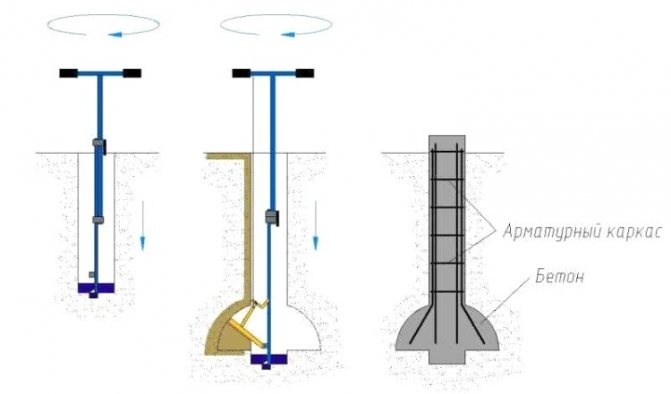
Field work begins with marking the pile field in the traditional way. Afterwards, wells are drilled to the designed depth. The widening is done one by one: first, a recess of Ø500 mm is formed, then the blades are straightened to the final position and the widening is brought to the maximum value.
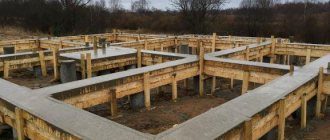
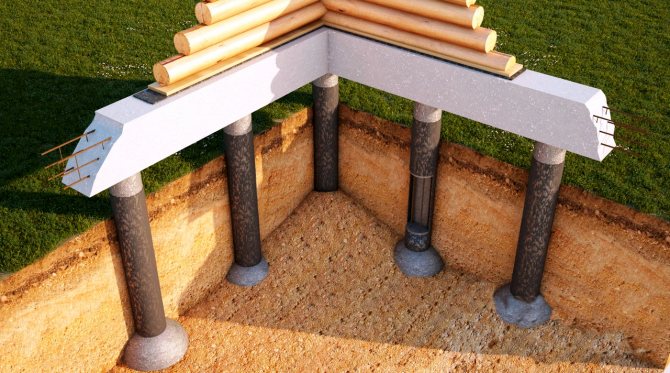
A reinforced frame is inserted into the finished fresh material, after which the structure is filled with concrete mortar . After hardening, the supports proceed to the construction of a reinforced concrete grillage in the form of a monolithic strip in the traditional way. In this case, a gap of 30–45 cm should remain between the lower plane of the grillage and the ground surface.
Work on the installation of the TISE foundation can be carried out with your own hands without the use of special equipment, which leads to additional savings.
Turnkey bookmark price
In the absence of construction skills and understanding of technology, it is advisable for the owner to turn to professionals. Average market prices for services are shown in the table:
| Parameters of the load-bearing structure with grillage parameters: width 40 cm, height 60 cm | Cost of one pile, rub. | Price, rub./m linear | The cost of a foundation with an area of 6x6 m | ||
| Ø support, mm | Heel Ø, mm | Depth, m | |||
| 250 | 600 | 1,5 | 3–4 thousand | 4–5.5 thousand | 150–200 thousand |
| 200 | 500 | 1,5 | 2.8–3.5 thousand | 4–5.5 thousand | 120–170 thousand |
Scope of application and service life
TISE piles are widely used in construction because they are universal load-bearing structures.

The technology is especially effective in such situations:
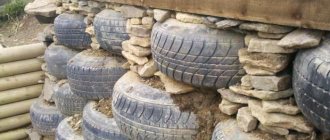
- during the construction of concrete and brick fences;
- for low-rise construction made of heavy materials;
- during the construction of two- and three-story residential buildings made of timber, foam concrete and frame panels;
- during the construction of baths and other heavy structures.
TISE piles can be built on almost any soil, except for rocks, namely in clay and sandy soil, sandy loam, loess and loam. The listed soil types account for 90% of the total area of Russian regions, which determines the popularity of this technology.
Due to the design features, the piles do not transmit vibrations and dynamic loads that occur near highways and railways to the structure they support.
The service life of a TISE pile-grillage foundation can exceed 100 years if construction is carried out strictly according to technology, and during the operation of the structure the load on the ground will not exceed the design value.
House projects
Number of projects 5671
- 5 rooms
- 2 bathrooms
House project MS-126/1
- To favorites
- 128.7² Total area
- 8 x 9m Construction area
from RUR 4,227,573
Construction time individually
- 6 rooms
- 2 bathrooms
Project of the House "Dahlia"
- To favorites
- 289.9² Total area
- 16 x 12m Construction area
from 7,225,000 rub.
Construction time individually
Available at the exhibition
- 2 rooms
- 1 bathroom
House Project New City 45/A
- To favorites
- 60² Total area
- 6 x 8m Construction area
from RUR 772,225
Construction period 14 days
Project 58-05
- To favorites
- 219² Total area
from 2,956,500 rub.
Construction time individually
- 5 rooms
- 3 bathrooms
House Project HPL-0020-N00xx-0242
- To favorites
- 242² Total area
from 5,481,300 rub.
Construction time individually
- 6 rooms
- 2 bathrooms
Project AS-454
- To favorites
- 190² Total area
from 2,565,000 rub.
Construction time individually
Project 57-63WK1L
- To favorites
- 317² Total area
from 4,279,500 rub.
Construction time individually
- 5 rooms
- 3 bathrooms
House Project DOK-196 / Avignon
- To favorites
- 196.5² Total area
- 14 x 8m Construction area
from 3,528,000 rub.
Construction time individually
- 5 rooms
- 3 bathrooms
Project AS-118
- To favorites
- 485.1² Total area
from 6,548,850 rub.
Construction time individually
- 3 rooms
- 1 bathroom
Project of the House "BK 15"
- To favorites
- 78.4² Total area
- 10 x 9m Construction area
from 1,097,600 rub.
Construction period 21 days
- 5 rooms
- 2 bathrooms
Nancy House Project
- To favorites
- 181² Total area
- 10 x 10m Construction area
from 2,443,500 rub.
Construction period 91 days
- 2 rooms
- 1 bathroom
House project Opalevo-M1 (one-story)
- To favorites
- 60² Total area
- 10 x 9m Construction area
from 810,000 rub.
Construction period 37 days
- 6 rooms
- 7 bathrooms
Grunin House Project
- To favorites
- 951.9² Total area
- 24 x 32m Construction area
from 12,850,650 rub.
Construction period 118 days
- 5 rooms
- 2 bathrooms
Münster House Project
- To favorites
- 224.9² Total area
- 18 x 13m Construction area
from 3,036,150 rub.
Construction period 123 days
- 5 rooms
- 2 bathrooms
House Project Ruby 8.5x8.5
- To favorites
- 118² Total area
- 9 x 9m Construction area
from RUR 759,738
Construction period 27 days
- 4 rooms
- 2 bathrooms
Project AS-916-1
- To favorites
- 117² Total area
from 1,579,500 rub.
Construction time individually
Project 57-26
- To favorites
- 163² Total area
from 2,200,500 rub.
Construction time individually
- 6 rooms
- 2 bathrooms
House Project MPL-0024-R0158-0234
- To favorites
- 234² Total area
- 15 x 15m Construction area
from RUR 3,975,292
Construction time individually
- 3 rooms
- 2 bathrooms
Tucson House Project
- To favorites
- 179² Total area
- 21 x 12m Construction area
from RUR 2,605,149
Construction time individually
Project 57-63M
- To favorites
- 151² Total area
from 2,038,500 rub.
Construction time individually
View all projects
Currently, a relatively new construction technology is gaining popularity - TISE.
. The technology has a large number of advantages, which are often talked about by builders and owners of housing constructed using TISE. But there are also skeptics who argue that this is not a completely suitable option for suburban construction, pointing out many shortcomings. Let's try to figure out whether this method of constructing buildings is really suitable for any situation, as its creators position it.
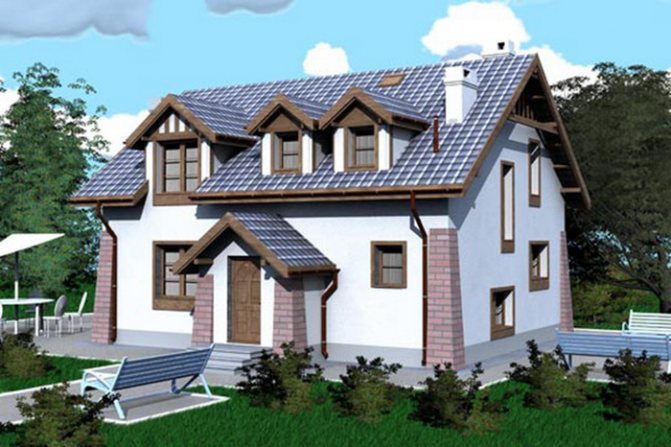
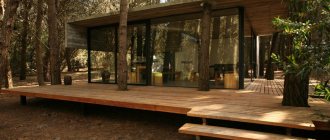
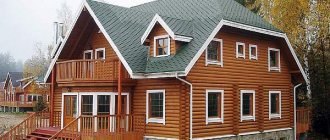
One-story house using TISE technology with finishing Source domavlad.ru
DIY base installation
After collecting data from the results of hydrogeological surveys, we proceed to the calculation of the foundation, which will allow us to select the optimal parameters for structural elements. Having the project and drawings in hand, you can begin construction work.
Material calculation
To find the need for piles, you need to know the total weight of the house and the load-bearing capacity of one support. The load from the structure consists of the following parameters:
- Weights of walls, partitions, ceilings, roofs and extensions.
- Payload, taking into account the mass of people, interior items and heavy equipment (the value is assumed to be 150–180 kg per m2 of all floor area).
- Mass of snow cover (average value for the region, equal to 100–300 kg per m2 of roof).
The found value is multiplied by the safety factor (1.1–1.4) and divided by the load-carrying capacity of one pile. In this way, the required number of piles is found. To calculate the pitch, the perimeter of the structure is divided by the number of supporting elements. The step should be within 1.5–2.5 m according to SNiP. The support placement points are marked on the drawing along the contour, starting from the corners.
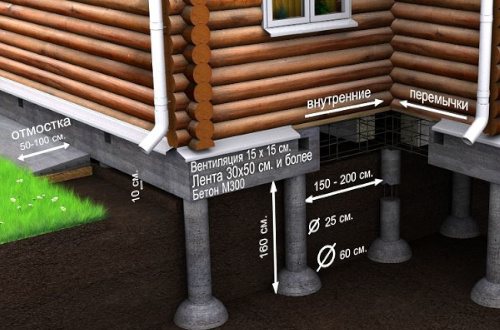
The foundation depth should be 20–30 cm below the soil freezing level (according to the results of geological studies). The height of the gap between the grillage and the ground level, according to TISE technology, should be 30–45 cm (depending on the amount of precipitation and the degree of frost heaving of the soil). The height of the piles is calculated based on this gap, adding to it at least 10 cm - the size of the immersion of the supporting element into the body of the grillage.
The width of the grillage is chosen according to the thickness of the load-bearing walls, but not less than the diameter of the piles, overhanging over which is allowed up to 10 cm. The height of the grillage is chosen in the range of 30–60 cm, taking into account the climatic conditions in the region.
To find the need for concrete, it is necessary to calculate the total volume of the foundation. To do this, break the power structure into simple figures. The volume of one support is found by the formula:
where H and R are the height and radius of the pile, respectively, and 10% is the heel margin.
The volume of one side of the grillage is found by multiplying the height and the supporting area. The obtained values are summed up and added with a margin of 5-7%.
Difficulties during drilling
Well development can be carried out using a hand drill or a special installation (rent from 1,500 rubles per drill). If the soil is dense and dry, then first make shallow holes, fill them with water and bayonet them with a metal rod. To apply less effort during the drilling process, you can increase the arm arm.
Stones larger than 5 cm must be loosened and removed using a crowbar. Large boulders are not removed, but a pit is buried and a new well is developed near the design point.
When working with dry soil, another problem may arise - shedding of the walls . In this case, the pit is moistened with water, due to which the soil is compacted and holds its shape better.
How to create an extension?
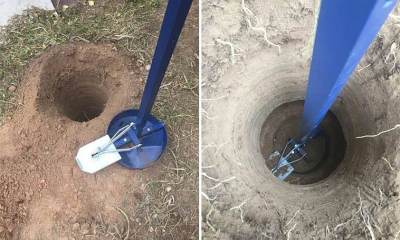
To create an expansion device at the bottom of the well, a drill is used, equipped with a plow, which can be set in two positions - 50 and 60 cm. The mined-out soil enters the soil receiver and is removed as it accumulates.
Plow movements are carried out clockwise , without applying vertical forces, in order to prevent excessive deepening of the pit.
When working with high-density soil, you cannot do without additional equipment - a rod with a curved end to destroy the hard layer of earth. You can also use a hoe or flat cutter for this purpose.
In such geological conditions, a reduction in the diameter of the heel is allowed, since the bearing capacity will already be quite high.
Reinforcement and pouring concrete
Before concreting, a reinforced frame must be placed in the well to impart rigidity to the structure, and the reinforcing bars protruding above the surface will be used at the next stage of construction to rigidly connect the supports with the grillage.
For pouring, concrete with a strength of M250–300 is used. First, the heel is poured, then a formwork made of sheet roofing material rolled into a pipe is placed in the well, which should protrude above the surface to a height equal to the value of the above-ground part of the supporting elements.
The circle in the upper part of the pipe is tied with wire and the structure is reinforced with crushed stone so that its walls do not move apart under the pressure of the solution.
It is convenient to pour concrete through the sleeve. When half the volume of the formwork is filled with concrete, the solution is bayoneted to remove air bubbles and voids in the heel area, which are often formed using this technology. The casing is then filled flush with the solution.
Calculation of TISE foundation
Thanks to accurate calculations, it is possible to correctly determine the number of supports, their depth and the distance through which they will be placed. To determine these parameters, the following factors should be taken into account:
- weight of the building;
- operational loads;
- snow load;
- bearing capacity of the pile.
To calculate the weight of a structure, you need to add together the mass of the roof, base, ceilings and walls. The weight of the foundation is calculated by approximate determination of the mass of materials used, taking into account the volume of supports. Floors are determined by the load of building materials:
- reinforced concrete - 500 kg;
- concrete slabs with voids - 350 kg;
- wooden with insulation - 100-150 kg.
For 1 square meter of roof there is:
- ceramic tiles - 89 kg;
- slate roofing - 50 kg;
- sheet steel - 30 kg.
To determine the operating load, you need to add up the weight of all living people, communications, household appliances and furniture.
The bearing capacity of a pile is determined based on the type of soil and its resistance per 1 square meter. The diameter of the support also matters. If the piles are installed in loam, the resistance of which is 3 kg per 1 sq.cm, then for a pile with a diameter of 250 mm, the load-bearing capacity will be 1.5 tons, and for 500 mm it will be 5.88 tons. It is recommended to take an average pile thickness of 500 mm . The calculation of drilling depth is determined by the level of soil freezing, then 20 cm is added.
For example, the installation step of the pillars of a house 5 by 10 meters (the perimeter of the house is 30 m) weighing 350 tons, erected on loam, will be calculated as follows. With a column base thickness of 600 mm, one pile can support up to 17 tons. Then you need to divide the weight of the house by 17 tons, then you will get 20 piles. Having this parameter and the perimeter of the house, you can calculate the pitch of the piles. In this example it will be 1.5 m.
Concrete structure care
Caring for a concrete structure is necessary to minimize plastic shrinkage of the material, provide protection against premature drying and destruction of structural bonds due to sudden changes in temperature.
To do this, create a moistened compress of sawdust on the surface of the concrete solution and cover it with a film on top . Once every three days, the protective layer is watered with water from a watering can (drip irrigation) and re-covered with polyethylene.
Winter maintenance of concrete involves forced heating using mineral wool or polystyrene foam. Sometimes, for this purpose, antifreeze modifiers are added to the solution when mixing.
After the concrete has gained the necessary strength, construction of the grillage begins using standard technology for a pile foundation with reinforced concrete strip.
How to make a TISE drill?
The main difficulty in carrying out work related to the formation of a foundation of this type lies in the formation of a special extension in the shape of a hemisphere.
A special device is required - a drill. It can be made without much difficulty from a regular circular saw. To do this, it is cut into two parts and then welded to the tip at the desired angle of inclination to the horizontal surface.
The result is two cutting edges that are diametrically opposed. The drill is equipped with a storage device, which has a cylindrical shape.
This part can be made of metal. In order to create a drill, you can use a piece of water pipe with a diameter of 25-30 cm.
TISE piles in winter without grillage
The drill will cut the edges and the earth will be easily brought to the surface. The simplest and most inexpensive way to make a drill for TISE piles is based on sequential welding of small pieces of pipe along the entire length of the drill rod.
A metal rod can move through these tubes. A loop is welded to the end of the rod, to which a strip of metal is attached.
This strip will subsequently serve as the cutting edge. You need to weld another loop to its middle, and a third to the end of the moving rod.
A metal rod should be welded in the section between the second and third loops. In the case when the rod rises upward, the plate equipped with a blade will lean against the rod and gradually deflect in the vertical plane.
Further, during the movement of the drill, the cavity of the hemisphere will be cut out, during this process the soil will crumble into the storage receiver and periodically fall onto the surface.
Features of installation of foundations and TISE piles
In order to properly build a foundation using TISE piles, a number of mandatory conditions must be strictly observed. The piles are installed in such a way that the base is located below the freezing mark of the soil.
All work related to the expansion of the base of the pile is carried out in accordance with construction standards, and mandatory reinforcement and subsequent compaction of the layers of concrete with which the structure is poured must be performed.
TISE foundation piles
It must be taken into account that the distance from the ground to the grillage should be 10-15 cm. First, the contour is marked. When carrying out such work, you cannot do without:
- Kolyshkov;
- Reek;
- Excavation boards;
- Metal tape measure;
- Construction bubble level.
In addition, the following rules must be observed:
- Equality of rectangle diagonals.
- The aspect ratio principle is 3:4:5.
- Pythagorean theorem.
Well expansion and drilling
In those places where it is planned to drill a well, holes are dug under the piles with a depth of 8-12 centimeters, after which the drilling process begins.
It is produced using a special TISE drill. In this case, the depth level is adjusted using a rod, and the soil is collected and subsequently loosened using a soil lift.
TISE pile
In order to optimize the drilling process, it is necessary to prepare five to six wells, and then carry out their sequential expansion.
Thanks to this sequence of actions, the time required to re-equip the drill will be significantly reduced.
To make drilling easy, approximately 5 buckets of water should be poured into the well in the evening. In the morning this will make the expansion process much easier.
When drilling expansion, the rod must be constantly rotating. To do this, a folding blade is put on it and attached to the soil lift using a pin. The blade itself is raised by a cord, and lowered under the influence of its own weight.
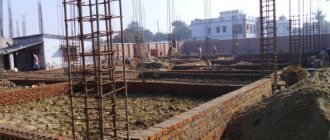
Pile reinforcement
In most cases, bored piles are used, and screw and drilled reinforced concrete products are also often included.
When carrying out reinforcement, the strength characteristics of products increase significantly. After the reinforcing bars are poured with concrete, reinforced concrete piles are formed, and at the same time the reliability of the entire structure increases.
Cement grade M300 is used to create concrete mortar. The diameter of the reinforcement is 10-12 millimeters; if you plan to create a strip grillage, then the diameter should be increased.
Roofing felt is used to form the formwork. Reinforcement of piles is carried out using lattice structures, where the cross-section has the shape of a square, circle, rectangle or polyhedron.
Creation of TISE pillars
Along with creating the main frame, you need to build a reinforcement frame intended for the grillage. After this, roofing material is lowered into the well with such an inclination that it forms a pipe.
A pre-fabricated reinforcement cage is installed in this pipe. Pouring concrete into the well is carried out in several stages.
First, a small part of the entire solution is poured in, then you need to carefully lower the deep vibrator and compact the concrete layer. All the above steps are repeated a number of times.
Concreting the grillage
In the TISE foundation, a grillage is used to tie the piles and evenly distribute the load level between them.
Due to the fact that the soil does not come into contact with the tape anywhere, heaving of the foundation is eliminated. After two adjacent piles are poured, concreting of the strip foundation begins.
The formwork is installed using TISE technology. The installed formwork contains waterproofing, which is made using polyethylene film, roofing felt or glassine. The grillage is waterproofed to avoid the sand becoming saturated with concrete.
Construction of TISE foundations - earthworks
The formwork is covered with a layer of sand, after which the reinforcement frame is laid and secured. At the same time, it is located on the formwork in such a way that the distance to the bottom should be 5-7 centimeters.
After this, the pouring of concrete begins, after which it is necessarily subjected to compaction under the influence of a vibrating plate or deep vibrator.
Reviews from private builders
Any construction technology requires a regulated sequence of technological operations. Novice builders do not always take into account all the requirements, so they make mistakes, which entails premature destruction of the foundation and the structure itself as a whole.
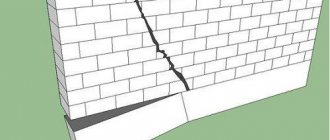
Typical mistakes in the construction of a TISE foundation:

Shallow grillage on a sand cushion in rocky soil conditions.
On the one hand, the drainage layer must protect the base from vertical loads. But the soil, under the influence of heaving forces, will one way or another expand and put pressure on the grillage through the incompressible sand cushion.The widened heel at the bottom of the base, in turn, will not allow the supports to rise, resulting in a rupture of the trunk.
For this purpose, one should adhere to TISE technology and erect a grillage at a certain height above ground level.
- Filling the well at one time leads to the formation of voids in the lower part of the foundation. In the process, groundwater seeps into the voids, which destroys the foundation and reduces its load-bearing capacity. To prevent this from happening, concrete is poured in portions, each time bayoneted with a rod to remove air bubbles.
- Refusal of a reinforcing frame for piles leads not only to a decrease in the strength of the load-bearing structure, but also to a possible rupture at the junction of the supporting elements with the grillage. To reinforce the piles, corrugated steel rods with a diameter of 14–16 mm are used. The load-bearing structure must be connected by transverse rods with the same pitch. Longitudinal rods will later be used to rigidly connect the upper and lower parts of the foundation.
You can find out what else a violation of the foundation laying technology can lead to on the forum on the topic “Building TISE piles.” Is it worth taking on the construction of a load-bearing structure, having little experience in foundation construction, decide the participants in the discussion “Reviews of those who built the foundation using TISE technology.”
The main pros and cons of using TISE pile foundations
The technology of building houses on TISE pile foundations has become widespread in private housing construction, and there are many reasons for this.
This is the foundation:
- allows the construction of buildings for any purpose and using various building materials. The recommended number of floors of the building is 3 floors;
- has a high ability to resist soil heaving forces;
- the presence of a powerful monolithic grillage made of concrete ensures uniform distribution of the load on the supporting structures;
- involves performing a small amount of excavation work, which can be completed without the use of special equipment;
- low cost of constructing a reliable foundation. This is due to both the smaller amount of materials used and the relatively small amount of work;
- high pace of construction;
- the possibility of using the space under the house for laying communications, the supply and connection of which can be made at almost any stage of construction and even during the operation of the building.
The foundation using TISE technology has advantages not only over a monolithic strip foundation, but also over a pile foundation, which in some cases is the only possible choice.
This is due to the fact that on problematic soils it is quite difficult to predict the “behavior” of each individual pile as a result of the influence of heaving forces and other factors on it.
The TISE pile can be considered devoid of such a drawback, since, having a powerful “fifth”, it has a reliable and stable support, the area of which is much larger (the expansion diameter is 600 mm) than that of a conventional structure.
Some difficulties and disadvantages of TISE technology
But, despite the advantages, the use of TISE technology:
- has limitations (or is not recommended at all) on swampy and silty soils. The presence of quicksand on the site is also a significant limitation for its use;
- the installation of a full-fledged basement under the house does not allow, although an ersatz version is allowed;
- presents a certain difficulty on rocky soils, since working on them manually is quite problematic: a lot of physical strength is required, which can be replaced by using a mechanically driven drill;
- involves the construction of an enlarged (wider) blind area.
There are also some technological difficulties, and first of all, this is the impossibility of reinforcing the expansion of the pile.
Another difficulty is related to the fact that the TISE driller used has an original design, and its operating principle is based on the fact that it drills by loosening the soil.
Therefore, a problem arises due to the fact that it is periodically necessary to lift the drill to the surface and free it from the soil that accumulates in a special container.