Calculation of trench volume
To lay communications, heating pipes, sewerage or install a strip foundation on your site, it may be necessary to dig a trench. You can invite specialists for this, or you can do this work yourself. But in both cases, you will need to know some characteristics of the trench. Our program will help you calculate them. Based on the length, width and depth of the trench, it will determine its volume and surface area. If the width of the top and bottom of the trench differ, the useful volume of the slopes will also be calculated. Calculating the volume of the trench will help you not only make your work easier, but also calculate the cost of earthworks if you decide to use the services of specialists.
Pit
| Pit area: | 24 square meters |
| Pit volume: | 36 cubic meters |
| Expenses | |
| Cost of digging a pit: | 18000 |
| Cost of soil removal: | 7200 |
| Total: | 25200 |
Program for calculating the volume of earthworks
Construction excavation work is digging a pit for a foundation, a swimming pool or a pond, trenches for an autonomous sewage system for a country house, a drainage system or water supply for a cottage.
When organizing excavation work, it is very important to correctly estimate the volume of soil being removed. The cost of excavation work consists of digging the pit or trench itself and removing the soil. It is worth planning to move the top fertile layer of soil for further use in the garden. The infertile part of the soil is used to level the site, backfill the foundation, or be transported off site. Places for soil removal are determined in advance. Please also note that prices for digging 1 cubic meter often increase with increasing depth of work. So the price from the surface to 1 meter deep and from 1 meter and deeper can vary even twice. Moving soil is often also a separate expense item. To avoid incurring unexpected expenses, discuss everything in advance with the contractor. Take into account the margin in the dimensions of the pit for installing the formwork when pouring the foundation.
By hand or excavator? Each of these approaches has its pros and cons. When working manually, the excavation can be done more accurately. With inexpensive labor and small volumes, the final cost of manual excavation work may be less than when renting an excavator and other special equipment. It is easier to control the size and geometry of the pit. However, with significant volumes of soil and speed of work, the excavator often wins. In any case, the decision is up to you.
The procedure for carrying out excavation work. Marking the pit. First you need to mark the area for the pit or trench. To do this, pegs and a thin cord mark the location of the work on the surface of the earth. To control the geometry, two diagonals of the future pit are measured - they must coincide.
However, this is an unprofessional method and is suitable for marking trenches or for a relatively flat piece of land.
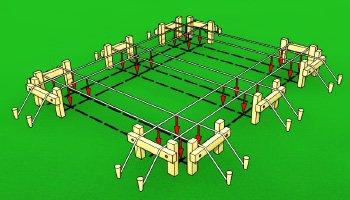
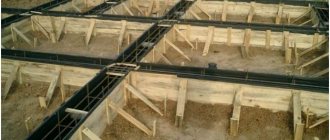
For more accurate design of excavation work, the following technology is used. At some distance from the proposed pit, wooden posts are dug in in groups of two (castoffs). Boards are fixed to them strictly horizontally, onto which cords are pulled. Try to secure the boards at the same level with each other. By moving the cords, accurate markings are achieved. These cast-offs are subsequently used for precise installation of strip foundation formwork.
A level, theodolite, laser tape measure or laser level makes the job very easy.
Digging a pit. If the soil is weak or the excavation is deep, pay special attention to the safety of excavation work. In this case, the walls of the pit are not made strictly vertical, but with a slope - to prevent the soil from crumbling.
The walls and bottom of the pit are controlled by a level and a sufficiently long batten.
Geometry control. There is one trick for an exact 90 degree angle. A triangle with sides 3:4:5 meters (or with sides that are multiples of these numbers) has one angle of 90 degrees. Place 3 meters on one side of the corner, 4 on the other, and the distance between the points should be exactly 5 meters.
Laying a trench
There are three ways to dig trenches. This is the digging of trenches by hand, using a hand trencher or a trench excavator. The first case is usually resorted to where there is no access to special equipment. This is a rather labor-intensive method of digging trenches, which is greatly influenced by the quality of the soil. Manual trenchers reduce the time required to carry out such work. It can be bought or rented. You can also order trench digging from a specialized company. Then it will be done by a professional. An excavator is used where construction equipment can access the site, as well as where a large volume of work takes place. Before renting such an excavator, you should find out the width of the bottom of the trench in order to select a machine with a bucket size that matches it. If you decide to dig a trench yourself, the first thing you should know is that different types of work require trenches of a certain depth. For example, for laying cables, as a rule, trenches about 70 cm deep are dug. And for sewerage, deeper trenches are required. In this case, it is desirable that this depth be half a meter greater than the depth of soil freezing. The width of the trench is also affected by the type of work being carried out. The smallest width of the trench is measured along the bottom and must correspond to the type and size of pipes laid in it.
What is a calculator for?
There are several types of trenches. Each type must be calculated according to its own special scheme. Trenches can have vertical or inclined walls, height differences, slopes, different top marks and even different shapes. Of course, you can always find detailed information about each type of trench and make the calculation yourself. However, in order to prevent people who have little to do with construction from delving into the intricacies of these calculations, wasting their precious time during construction, algorithms were compiled that allow the necessary work to be carried out by simply pressing a few buttons. Thus, experts have made life easier for those who want, for example, to simply build a bathhouse.
Who does the development?
According to the current urban planning legislation, mandatory documents in a project for the construction of an object involving the construction of a foundation pit are considered to be projects for the performance of work and the organization of construction, which are abbreviated as PPR and POS, respectively.
According to Code 12-136, issued in 2002, the above documents are developed as part of a complete project in order to coordinate design decisions with organizational activities during implementation.
The design of PPR for development and PIC must be carried out by professionals with the proper education and experience. The PIC is developed by the designers and included in the project, and the PPR is ordered by the general contractor and agreed upon with the customer, technical supervision and organizations to whose balance the object will be transferred.
Angle of repose
Angle of repose
- this is the largest angle that can be formed by a slope of freely poured
soil
in a state of equilibrium with a horizontal plane.
The angle of repose depends on the particle size distribution and shape of the particles. As the grain size decreases, the angle of repose becomes lower. In an air-dry state, the angle of repose of sandy soil is 30-40°, under water - 24-33°. For soils that do not have cohesion (loose), the angle of repose does not exceed the angle of internal friction
(9.25)
To determine the angle of repose of sandy soil in an air-dry state, use the UVT device ( Fig. 9.11, 9.12
), under water - VIA (
Fig. 9.13
).
According to Fig. 9.12
when the box is tilted, the sand crumbles and, loosening, forms a slope with an angle that can be determined with a protractor or using the formula
(9.26)
The concept of angle of repose
applies only to dry bulk soils, and for cohesive clayey soils it loses all meaning, since in the latter it depends on humidity, slope height and the amount of load on the slope and can vary from 0 to 90°.
Rice. 9.11.
UVT-2 device: 1 - scale; 2 - reservoir; 3 - measuring table; 4 — clip; 5 — support; 6 - sand sample
Rice. 9.12.
Determining the angle of repose by rotating the container (a) and slowly removing the plate (b): A is the axis of rotation of the container
Rice. 9.13.
VIA device: 1 — VIA box; 2 - sand sample; 3 — container with water; 4 - protractor; 5 — axis of rotation; 6—piezometer; 7— tripod
When developing and shrinking loosened soil
Cuts and embankments form natural slopes of varying steepness.
The greatest steepness of flat slopes of earthen structures, trenches and pits constructed without fastenings should be taken according to Table.
9.2. By ensuring the natural steepness of the slopes, the stability of earthen embankments and excavations is ensured.
Table 9.2.
The greatest steepness of the slopes of trenches and pits, degrees.
| Soils | Slope steepness at excavation depth, m (ratio of height to foundation) | ||
| 1,5 | 3,0 | 5,0 | |
| Bulk uncompacted | 56(1:0,67) | 45(1:1) | 38(1:1,25) |
| Sandy and gravel wet | 63(1:0,5) | 45(1:1) | 45(1:1) |
| Clayey: | |||
| sandy loam | 76(1:0,25) | 56(1:0,67) | 50(1:0,85) |
| loam | 90(1:0) | 63(1:0,5) | 53 (1:0,75) |
| clay | 90(1:0) | 76(1:0,25) | 63(1:0,5) |
| Loess and loess-like dry | 90(1:0) | 63(1:0,5) | 63(1:0,6) |
| Moraine: | |||
| sandy, sandy loam | 76(1:0,25) | 60(1:0,57) | 53 (1:0,75) |
| loamy | 78(1:0,2) | 63(1:0,5) | 57(1:0,65) |
The slopes of embankments of permanent structures are made more flat than the slopes of excavations.
The main stages of digging a pit
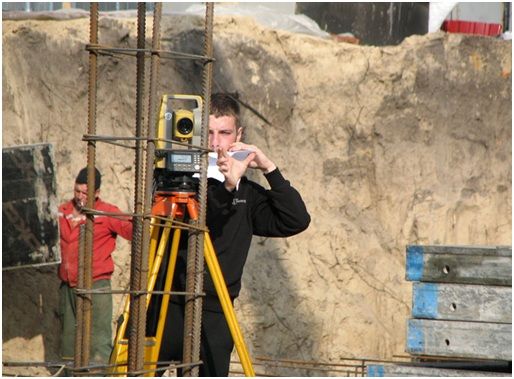
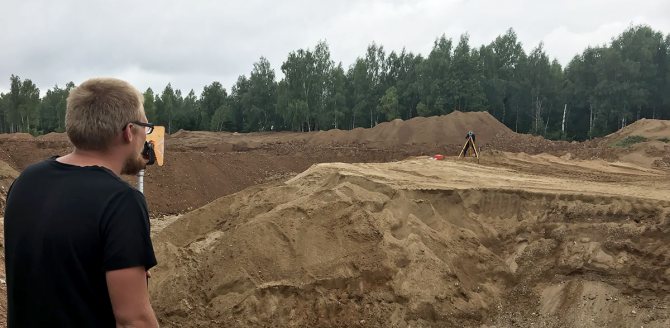
Geodetic survey
Preparing the foundation of a house begins with digging a reliable pit. This process takes place in several stages.
Before bringing equipment to the construction site and starting work, it is necessary to thoroughly examine the area: landscape, vegetation, soil type and depth of groundwater.
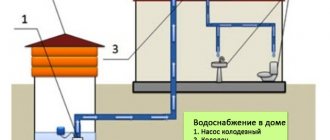
It is worth finding out whether there are communications at the site of future construction: water supply, electrical or sewer networks, and how to organize the process so as not to create inconvenience for those who use them. Most often, they try to disconnect and move old networks. At the same stage, the issue of connecting communications to the new building is resolved. All these tasks require approval, and the results are included in the project documentation.
After this, clearing of the area begins. The issue of where construction and other waste will be disposed of and how it will be disposed of is decided in advance. Soil removal is carried out in 2 stages. First, the fertile layer is removed, which is then used to fertilize the soil in other places or improve the surrounding area after construction is completed. Most often they try to dispose of the second layer of soil, since more durable materials are used to backfill the pit.
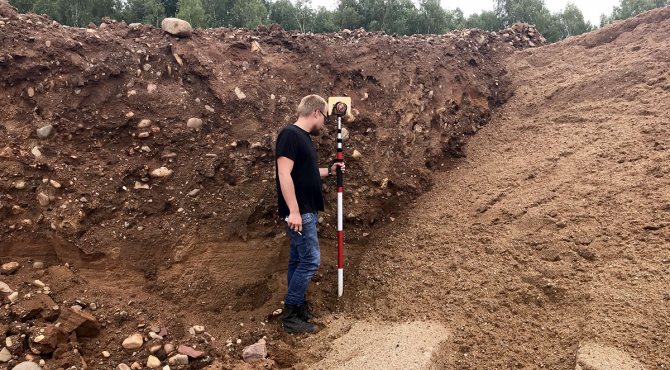
The depth of the pit depends on several parameters: the type of soil, its stability, the amount and depth of groundwater, the depth of soil freezing. Depending on the conditions, digging is performed mechanically or manually.
The first method is used for large volumes of work in places where equipment can be brought. In this way, you can quickly develop terrain and cope with obstacles that arise during digging.
Manual work is used where the approach of machinery is difficult, where the type of soil does not allow the use of mechanics or a small pit is required.
The importance of slope design
Any soil limited by slopes tends to move toward the slope under the influence of gravity, which can lead to uncontrolled collapse of the pit walls. Due to the collapse of soil masses, workers located at the bottom of the pit may be injured. In addition, this will lead to an increase in the amount of work and non-compliance with the calendar schedule. Since it will be necessary to restore the design contour of the pit and backfill the foundation in a larger volume.
To avoid injuries and not incur losses, it is necessary to calculate the steepness of the slopes of the pit and trenches at the design stage, in accordance with SNiP 111-4-80.
Calculation of the volume of soil in a pit with vertical walls
The simplest option is a recess on a flat (planned) area, which has a bottom in the form of a rectangle and vertical walls of the same size.
In this case, the formula used to calculate the volume of the pit is:
V = a ∙ L ∙ h
, Where:
- V - volume,
- a—width,
- h - height (distance from the bottom to the top edge),
- L - length.
When constructing a deep pit for a large-scale structure, the calculation of earthworks includes soil masses to be moved when preparing a transport trench (for one-way traffic - 4.5 m, for two-way traffic - 6 meters).
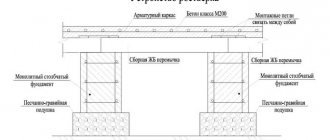
If the recess has vertical walls with a difference in height (house on a slope), a calculation is used based on the cross-sectional area of the walls having different heights:
V = (F1 + F2) / 2 ∙ L = (a∙h1 + a∙h2) / 2 ∙ L
, Where:
- V is the volume of the excavation,
- F1 is the area of the wall with height h1,
- F2 is the area of the wall whose height is h2,
- h1 is the height of the smallest wall,
- h2 is the height of the largest wall,
- a is the width of the recess,
- L - length.
The same formulas are used to calculate the trench if the structure is planned to be erected on a strip or slab foundation. For complex pit shapes, its volume is divided into simple geometric shapes, the cubic capacity of each is calculated, and then the resulting values are summed up.
The calculation of the land that is subject to backfilling is carried out according to design drawings (or as-built diagrams) taking into account the dimensions and geometric shape of the structure for which the excavation is made.
What it is?
If we consider the concept in more detail, the pit axils are the spaces formed between the slopes and the walls of the basement.
Backfilling of depressions is excavation work that directly depends on the volumetric dimensions of the building under construction , and solves the issue of recycling the earth removed from the pit.
The backfilling process is always carried out after completion of earthworks, installation of the foundation, laying and checking the functionality of communications, and with the completed completion of the preparatory stages. Backfilling should be carried out in accordance with the necessary precautions.
Despite the fact that filling gaps seems to be a rather primitive process, it must be carried out in compliance with construction standards, which are regulated by SNiP No. 3-02-01 (1987).
According to this document, backfilling should be carried out only after the concrete of the building’s foundation becomes 3/4 dense, which depends on the weather and the thickness of the pour. In this case, the waiting time can take from 2 weeks.
Filling the sinus plays an important role, since the used layers of soil support the foundation frame on all sides, which has a positive effect on the load-bearing surface and the building as a whole.
Why do you need to fill up holes?
Backfilling the pit sinuses is necessary in order to:
- ensure waterproofing of the foundation and underground communications;
- increase the durability and strength of the foundation;
- proceed freely to the next construction work (dismantling monolithic concrete formwork);
- attach waterproofing and thermal insulation materials to the external walls of the foundation (insulation occurs);
- install a drainage system around the property and prevent moisture from entering the basement.
Filling the sinuses ahead of time (before the foundation hardens) can be carried out only when the weather forecast warns of heavy rains, since bad weather can wash out the concrete from the base pouring.