The condition of a wooden house is assessed by the three lower crowns of the frame: if the wood is different in color, we can say with confidence that the house was not built correctly. Upon closer examination, a black mold coating will be found on the surface of the timber. The cause of these problems must be sought in the mistakes made during the construction of a wooden house. Professionals believe: only a correctly laid crown molding will ensure a long and trouble-free “life” of the building, and the owners will have comfortable living conditions.
Among the troubles that can arise as a result of improper laying of a log frame on a foundation are the following:
- The lower corners of the log house freeze, the floors in the house are cold in winter;
- There is high humidity in the underground space, condensation forms;
- Wetting of the lower crowns of the log house, the appearance of fungus and mold;
- Skewed structure.
All these troubles can be avoided or minimized by following the rules for laying the casing; this operation is called tying the foundation, and the casing is called strapping. The frame is the load-bearing base for the walls of the building; logs for the floor and for internal partitions are cut into this structure. For buildings erected on columnar or pile supports, the flashing crown can be used as a grillage. In this case, a double harness is needed.
Preparing the foundation for the casing
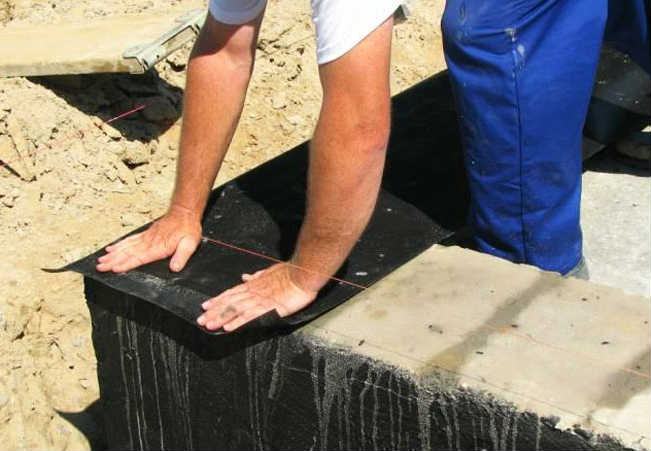
A layer of roll waterproofing on a bitumen basis is applied to the basement - upper surface of the strip foundation. The material is laid in 2-3 layers and filled with bitumen mastic. A thermal insulation layer is laid on the hardened waterproofing. Jute tape or construction felt is used as a heat insulator. It is best to place the waterproofing material on a dry base and carry out the work in dry weather. Before installation, it is recommended to dry the surface of the plinth with a gas burner.
When installing a pile foundation, the places where the grillage is laid on the racks are subject to waterproofing. The secrets and tricks of experienced craftsmen include the use of backing boards to minimize the consequences of seasonal movements of the structure. A hardwood board 40-50 mm thick is laid on the waterproofing layer. The bottom and side parts of the board are treated with bitumen mastic, and a heat-insulating lining is laid on top of the board.
Tools and materials used for applying waterproofing:
- Ruberoid or rolled bitumen-polymer membrane;
- Bitumen-latex mastics for hot and cold use with antiseptic and herbicide additives;
- Gas-burner;
- A brush with metal bristles, a corrugated metal spatula, a construction knife.
Preparatory work
Before the bathhouse frame is installed on the foundation, certain preparatory work must be performed. They are mainly related to waterproofing and leveling the surface for the subsequent installation of wooden structures and building elements. The sequence of operations in such a situation is as follows:
- Leveling the surface of foundation structures with cement-sand mortar. The layer thickness in this case is from 1 to 3 cm. The final coating is made using cement paste. Its thickness does not exceed 0.5 cm. The creation of a flat surface is checked using a regular building level;
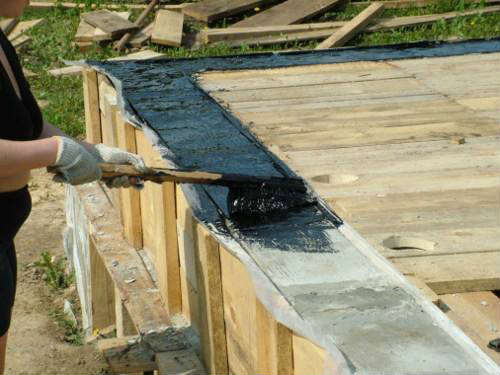
- Foundation waterproofing. Building codes require two types of such work. On the sides of the structure, the bases are treated with bitumen mastic, and two layers of roofing felt or other waterproofing material with similar characteristics are laid on top of them;
- Laying the basement of the building. This is not always done; only ceramic bricks are used for work, since the use of silicate bricks is not allowed;
- Basement waterproofing. It is carried out by analogy with similar work performed for foundation structures. In this case, roofing material is also used.
The importance of competently performing preparatory work is extremely great, since the durability of not only the foundation and the adjacent logs of the log house, but also the building as a whole directly depends on it. Particular care should be taken when performing waterproofing, since high humidity is always one of the most serious negative factors for any wooden structures.
Selection of material for strapping
For strapping, it is best to use timber made from hardwood; the additional costs for purchasing it are minimal; such a batch will amount to less than 5% of the total volume of lumber. If this is not possible, lumber blanks without visible defects with a smooth surface are selected from the entire batch; if necessary, the lower and upper sides are additionally planed.
When building a log house from corrugated timber, the casing crown is made from solid timber. The lower part of the first timber laid on the flashing is planed before the profile is removed.
Advantages of sauna log houses
A log bathhouse is a reliable and practical structure, the main advantage of which is the speed of construction. Other advantages of wooden construction include the following:
- availability of construction work without the involvement of third-party specialists;
- possible shrinkage of the finished log house does not exceed 11 cm;
- saving money when building a wooden bathhouse yourself;
- a large selection of ready-made bathhouse projects or the opportunity to develop your own project;
- confidence in the quality of the building material;
- useful experience in private low-rise construction.
How to lay a crown beam on a foundation
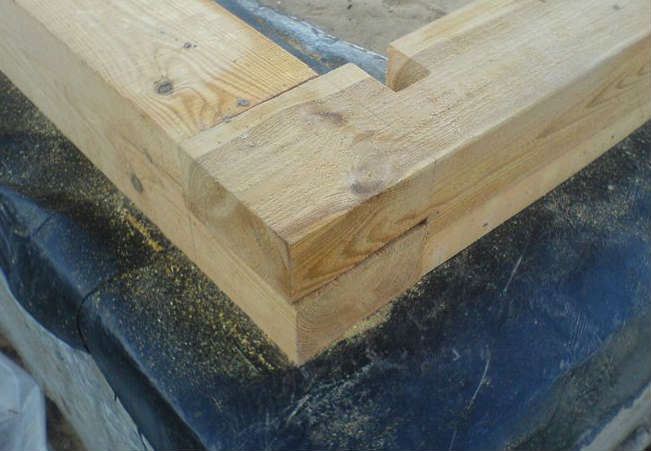
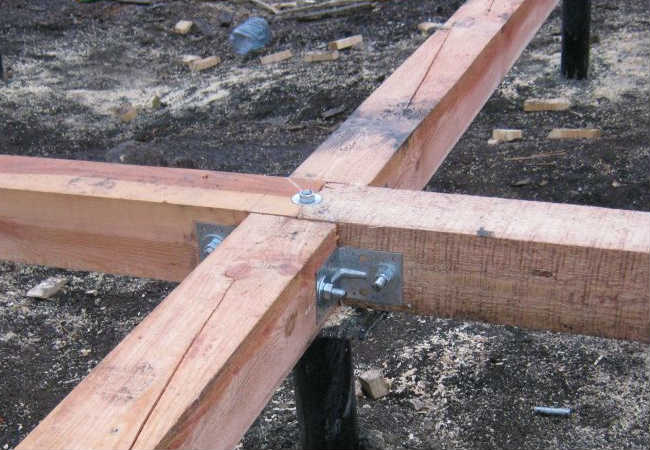
The strapping is cut using the half-tree method, the connection in the corners is made “in the paw”. This method of laying corner joints is the most reliable and can withstand multidirectional loads. The laying of corners and the connection of beams in subsequent crowns can be done in any way.
When laying the tying crown on a strip foundation, you may encounter unevenness on the base, reaching 10-15 mm. Such irregularities are eliminated by increasing the thickness of the mastic layer of waterproofing. The best solution for laying the first crown of timber on the foundation is an even and horizontal grillage.
Attaching a crown made of timber to a plinth is done in various ways:
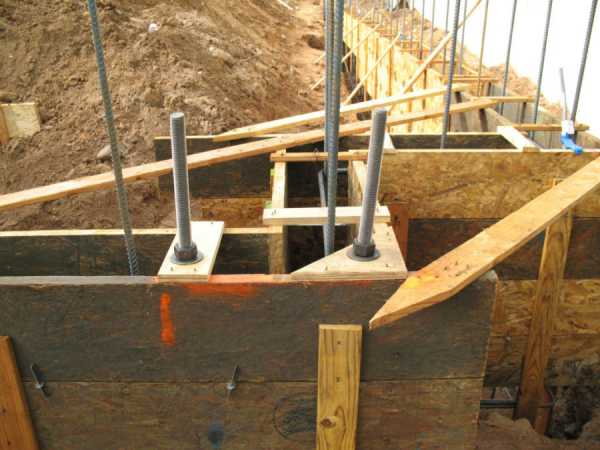
- In strip foundations and concrete grillages, anchors with a diameter of 12-16 mm are poured every 1.5-2.0 m; the crown is attached to the strip base with an anchor bolt with a nut;
- Square plates are welded onto metal piles, the grillage and frame row of timber are fastened to the plate with a through bolted connection, the nut is located in the lower part of the fastening.
Holes are drilled for the fasteners with a margin of 3-4 mm, and flax tow is stuffed into the gap.
The next crowns of the log house are attached to dowels, the dowels are installed vertically with tension in specially drilled holes, the edges of the dowels are recessed and do not protrude above the surface.
Professionals recommend paying attention to the leveling of the casing; when setting the horizon, the height is adjusted with wooden wedges between the plinth and the first beam, and the resulting voids are sealed. The operation is performed using a building level. After leveling is completed, the nuts on the anchor fastening are tightened and fixed.
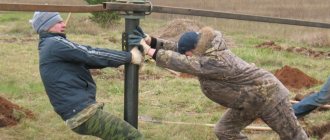
Construction of a log house for a bathhouse
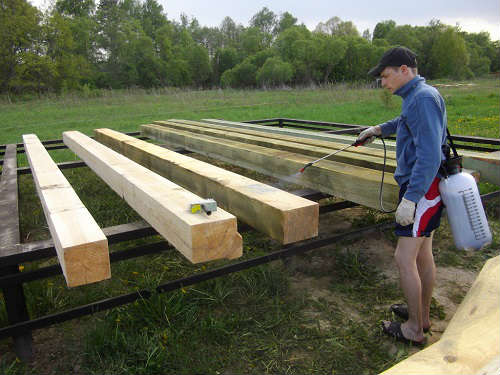
After preparing the lower trim, Sergei began assembling the frame. First of all, he laid two layers of jute tape on the binding. It was not needed for insulation; he wanted the logs to fit better on the lower frame. Before laying, I treated both the tape and the logs with XM-11 antiseptic (all this will be under the floor).
I started laying with half a log. After laying the lower crowns, he checked the diagonal. Due to the fact that all the shortcomings were eliminated when laying the lower trim, the installation of the crown went perfectly. Then everything went simply - like on an assembly line. In accordance with the markings, he dragged up the next log, cleaned it, covered it with an antiseptic, laid tow (they recommended moss), having previously sprayed it with an antiseptic, and laid the log on top of the tow in its place. To settle the log, I tapped the log with a sledgehammer from above, and from the ends to level it, and checked the vertical with a level. Then he laid the transverse rims, and to secure this row, he drilled holes with a diameter of 26 mm to a depth of 35 cm in three places, at the edges and in the middle, and hammered dowels 33 cm long into them.
How to make dowels
The log house lay disassembled for a long time, some of the logs were twisted, the width of the gutter on some logs was only 5 cm. Sergei decided to secure the logs together with dowels to be sure.
The cross-section of dowels can be round or square and in any case slightly larger than the diameter of the hole. If you have harder wood dowels, you need a square dowel section. Then the dowel crushes the wood and holds securely.
When dowels are made from softer wood, then a round cross-section is necessary. In this case, the product compresses the dowel, and it also holds well.
Due to the high cost, he refused to purchase new dowels and therefore decided to make them himself from what was available. He had either spruce or pine boards. As a result, he decided to make an intermediate option - octagonal. The one-inch board made a nice octagon with a 27mm edge spacing that would fit well into a 26mm hole.
The production of dowels began with the fact that he sawed 25x25 bars on a circular saw, then he tilted the saw blade 45 degrees and already obtained octagons, chamfered them, and treated them with an antiseptic. At the next stage, he drilled holes in the logs and treated it with an antiseptic using a garden sprayer. And when the wood dried out, he hammered in the dowels with a sledgehammer.
While drilling holes for the dowels, he was very exhausted, because the tow was laid in one piece and wound around the drill. Once it jammed badly, and he had to use a rope and a homemade lever to free the drill from captivity. Later, I had to avoid placing tow in the places where the hole was planned.
Construction of a log house
He made scaffolding on all 4 sides of the log house and tied them together with each other and the log house - so that they did not move. The neighbors told him that he could handle an elephant. At the beginning, Sergei lifted the logs onto the scaffolding, and then took one end and placed it on a stand, then the second end on the log house, and then the first end on the log house. Not fast, but reliable.
Of the two opinions, whether to saw the doorway right away or in a year - Sergei decided right away. On the left and right, at a distance of 10 cm from the future ends of the doorway, he installed dowels, shifting them in a checkerboard pattern by 5 cm, so that the upper hole would not fall into the lower dowel when drilling.
Looking at the cross-section of the doorway, he realized that more inter-crown insulation should have been placed under the triangular gutter compared to the round one. The fact is that the upper crown rests on the lower one with the sharp edges of the gutter, and thereby crushes the tow to almost zero thickness. Unfortunately, he paid attention to this only when the frame had already been completely folded. In some places, even a thin knife will not fit between the crowns. This is one of the errors that will have to be fixed.
Three weeks after cutting out the openings, mold appeared at a height of 1.5 m from the ground, where he did not treat the wood with an antiseptic. Sergey advises, if possible, to process the wood immediately.
After the log house grew, it was necessary to disconnect the scaffolding and lengthen its legs by 1 meter, and then the scaffolding was secured around the log house. Along the front there was also an “underbrush” and, again, a kind of stand-steps for lifting logs with small forces. The technology is the same.
By August 17, the log house was completely folded, all that remained was to install support logs-columns, floor beams and a roof.
Along the way, he cut two more logs under the doorway, and on the left side of the frame, two logs under the window. Naturally, additional pins were installed.
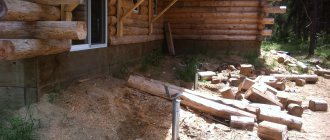
Veranda
The next thing Sergey started making was columns for the veranda. To do this, he took ordinary logs. I used a chainsaw to cut out a square profile at the bottom and cut the log to the required length. He also had to redo the “locks” of the lower beams of the stem and the one that crosses them. Then, in the places where the “columns” were installed, I drilled holes as for dowels, hammered in the shortened dowels so that they stuck out 5-7 cm. I drilled holes at the ends of the “columns” and placed them on the dowels.
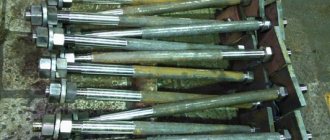
About the screw jack
To make a jack, Sergey bought a 2 mm iron plate in the store; a 25 mm high bushing with an M12 internal thread was pressed into the center. He thought about it and decided that he would endure it. I bought a 50 cm threaded rod, sawed it in half, screwed on the “thrust plates”, inserted two oiled body washers into the upper end of the log with a lining, lifted the log, placed it on the lower tenon, inserted the bushing of the upper plate into the hole in the log of the upper stem, marked along the plumb line tenon in the lower log, rotating and spreading the plates, they supported the logs and secured the upper plate with self-tapping screws. The screws protruding from the bottom plate are made to facilitate its further rotation when adjusting the height.
Finally, he laid all the logs of the log house, including the floor beams, also known as tie-downs for the rafters, which are not included in the delivery of the log house. Then he checked the ends of the beams with a hydraulic level - the difference in the levels of the right end of the far beam and the left end of the near beam is 8 cm. On the advice of members of the forum, the lowest end of the beam (excluding the left front), relative to which the heights of the others were no more than 3 cm, was taken as the base . I decided to lift the most sagging one with two 25 mm planks, securing it with self-tapping screws to the outrigger beam and the sagging floor beam. The protruding parts of the rest were planed with an electric planer. Then he pulled the rope to check and was glad for the work done.
Here he again noticed a flaw - the distance between the beams turned out to be 1.5 m, and he planned to make the attic habitable. We had to sculpt two additional beams and reinstall everything after 1 m.
There were no logs for additional beams, but there was a lot of theoretical knowledge about T-beams, I-beams, etc. from boards. He tried: a beam made of three 50x150 boards fastened with self-tapping screws and PVA glue. It turned out well. Finally, the log house is completely assembled.
Thus, the next stage of construction - the construction of the log house - has ended.
Posted by EsKor forum member
Start of the topic here: Construction of a bathhouse. Foundation
Editor: Adamov Roman
Installation of basement drip sill
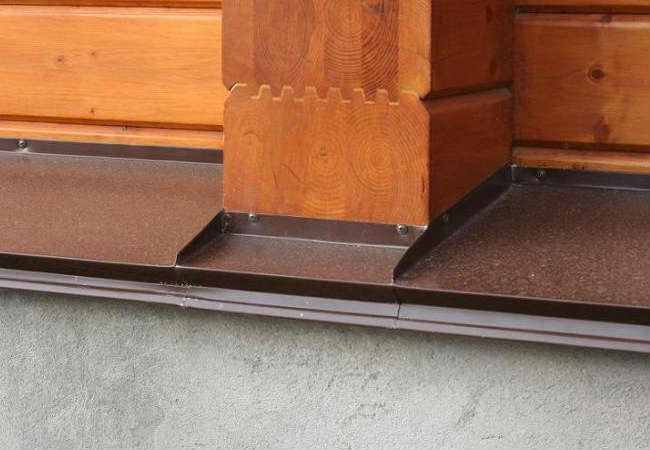
The gap formed at the place where the casing is laid on the waterproofing layer poses a serious danger to the entire structure; atmospheric moisture stagnates in this part. This drawback is eliminated by installing metal ebbs around the perimeter of the log house. On a strip of iron 20-25 mm wide, a bend is made at an angle of 120 degrees, the structure is fastened with self-tapping screws, and the area adjacent to the beam is treated with sealant. For the manufacture and installation of the drip sill, all the tools are available in the household.
Construction of log walls
The next stage of work is the assembly of the wall structures of the log house from round timber. Many novice developers are interested in how to cut down a bathhouse and what tools to use in the work? The standard set of tools includes:
- electric or gasoline saw;
- ax and hammer for wood;
- electric drill and plane;
- chisels of different sizes;
- measuring instruments - building level, tape measure, ruler, square and plumb line.
To assemble a sauna log house, classical technology is used, which is simple and easy to master. It involves the construction of a wooden structure in strict sequence.
- When erecting walls, it is necessary to make a binding (cladding) crown. It uses 4 logs, pre-treated with an antiseptic. To ensure a tight fit of the crown to the foundation, insulating material is used - tow or jute. The location of the logs is at right angles, the connection is in a bowl or paw. The optimal size of the log house is 9 sq.m.
- The next two pairs of logs are installed in a similar way, forming the second row.
- The joints between the logs are carefully caulked to prevent heat loss.
- The crowns are secured to each other with square dowels or round wooden dowels.
- When the required height of the log house is reached, ceiling beams and a rafter system are installed.
Preparation
Many people have probably heard that in the old days the framed (first) crown was often laid directly on the ground, wrapped only in birch bark. Now no one will dare to do this, and rightly so: a good foundation is one of the keys to the durability of a future building. Therefore, before assembling the log house on site, the support for the bathhouse must be completely ready.
We will begin the construction of walls by laying two “embedded” logs. Before assembly, they (and the others too) had to be marked accordingly. They can also be easily identified by diameter and length. Thicker round timber is always chosen as the basis of a log house, and if they are going to lay the foundation for a cold dressing room, then they are made much longer than the rest of the logs of the log house. Well, another sign of the constituent elements of the first row is the connection of the logs in the corners into the so-called “paw”. This, however, applies only to logs chopped “into a bowl.”
So, these logs have been selected, you can start working directly. And we will start with laying waterproofing. You can use the familiar roofing material as it, or better if it is possible to treat the foundation with bitumen.
How long does it take to kindle various baths?
If you have decided to build a bathhouse from a log house with your own hands, then it is worth considering that not only the susceptibility of wood to various negative impact factors is a “pitfall” in the ongoing construction process. A log house takes much longer to warm up due to the increased heat capacity of the material.
Despite all the usefulness of the procedures, we must not forget that kindling takes much more time and firewood, and if you also use an ordinary brick oven, you will have to spend from 3 to 5 hours. Few people would want to come to such a bathhouse for the weekend and spend half of their precious time solely on achieving optimal temperature indicators.
We suggest that you familiarize yourself with How to sheathe a bathhouse from the inside: what is better to sheathe a waiting room and a sauna, a steam room inside except for the lining, than can be seen in photos and videos
If a metal stove is used, then the problem becomes more obvious. Due to the lack of effective insulation of the walls of the steam room, the heating power is often not enough, and therefore it is necessary to use a more efficient and expensive device. And it is extremely difficult to maintain room temperatures between 50 and 60 degrees Celsius.
Naturally, no one forbids insulating a log house, but in this case all the useful qualities of wood come to naught. Simply, the inside walls of the log house are covered with a cake of thermal insulation consisting of several layers, which do not allow moisture to be removed naturally due to the effect of wood as a “breathing” material.
Basics of the layout of log baths
It is important not only to take into account all the positive and negative aspects of wood, but also to correctly assemble the material into a reliable and safe structure. The standard size is 6x6 meters, since logs and beams have exactly this length. Thus, it is possible to avoid the formation of a large amount of production waste or the need for additional cutting of materials if the linear dimensions of the log house exceed the length of one element being laid (read: “Correct layout of the bathhouse on the site and indoors”).
Inside, the bathhouse will have a final dimensions of about 5.2 meters, since the bowls formed at both ends of the log will take a certain distance from the length and width. Regarding the timber, we can say that the losses will be less, but not by much (45-50 centimeters). Several centimeters will also be lost due to the installation of finishing materials or wall cladding with ordinary clapboard.
Here you need to know not only how to properly build a bathhouse, but also how to allocate space in it. The size of the washing room should be reduced if a large font will not be installed in it. It is best to allocate a spare space for a locker room or an enlarged steam room. The choice, of course, remains with the owner. If the bathhouse will be used all year round, then you simply cannot do without allocating space for a vestibule. Otherwise, the cold air passing through the front door will negatively affect the temperature inside the bathhouse.
The article discusses the main nuances and features of how to build a bathhouse from a log house in order to obtain a high-quality, reliable and safe structure that will last for many years. It is important to take every piece of advice into account when carrying out work. You can also entrust all the work to specialists who will take responsibility for each stage - from the purchase of building materials and structural elements to the construction of the bathhouse and its commissioning.
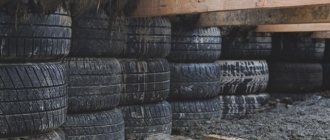
Backing board: to be or not to be
When constructing log houses, some builders practice laying a backing board or plank on the foundation. Their task is to separate the first row of logs from the cold stone, and accordingly, increase the durability of the wood.
Many, of course, consider this point controversial, because in their opinion this will in no way extend the service life of the log house. If engineering communications are carried out incorrectly or are absent altogether, then no lining will save the tree from damage. If the board rots, the crown molding will also rot.
In general, this is food for thought, but if you still think this is a necessary element, then treat the board several times with an antiseptic. Its thickness must be at least 40mm.
Arrangement of openings for windows and doors, caulking of buildings
The manufacture of door and window openings is carried out after the complete completion of the construction of the bathhouse. To do this, use a saw to cut gaps in the wall structures: four for windows, one for the front door and one for ventilation.
After this, all that remains is to insulate the finished structure in order to reduce possible heat losses during operation.
To eliminate inter-crown cracks and gaps formed after shrinkage, a log bathhouse requires mandatory insulation. For this, moss, ribbon jute and tow are used.
The insulation of a log house is carried out as follows:
- The insulation is laid out between the individual logs of the structure, starting from the bottom crown to the topmost.
- Next, corner joints, door and window openings are caulked.
- Finally, the ceiling surface of the log house is insulated.
After completion of construction work, the interior finishing of the steam room, washing room and other rooms of the bathhouse is carried out.