Advantages of automatic gates
Automatic sliding gates are easy to use every day. The main advantages of automation are:
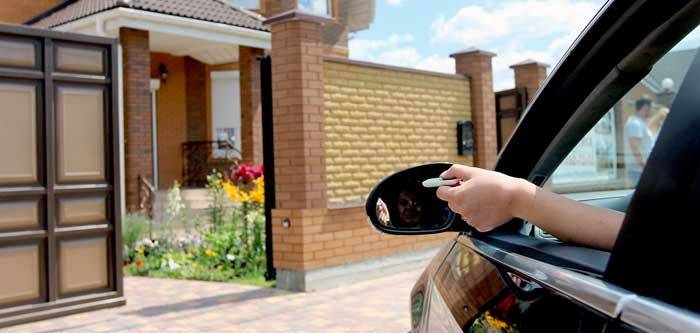
- Convenience: all automation systems can be controlled by just one remote control.
- Simplicity: you can open them without leaving your car or home, with one press of the remote control button.
- Reliability: automation devices extend the service life of the gate, because promote smooth acceleration and deceleration at the beginning and end of a maneuver.
- Safety: automated gates are equipped with a safety system and stop moving if there is a risk of collision.
Gates without automation are less convenient in everyday life, but will cost a little less. When making a choice in favor of automation, it is necessary to take into account the dependence of the engine power on the weight of the gate.
Engines have different power. Accordingly, for light structures, a conventional medium-power engine is suitable. A 700-800 W motor will do an excellent job with heavy forged structures.
Since when installing an automation system you will have to deal with electronics, not everyone can handle this work on their own. You can install a machine if you have certain knowledge in this area.
If you are confident enough in your knowledge and are ready to install the automatic system on the gate yourself, you will need the following materials and equipment:
- electronic drive for sliding gates;
- remote controls;
- safety elements;
- rack with teeth;
- warning lamp;
- welding machine;
- metal drills and drills;
- drives for connecting safety elements;
- electric drives for power supply;
- drives for connecting a signal lamp.
You will also need a channel and a pair of carriages, since the electric drive will be located on the channel.
Automation installation consists of several stages:
- choosing a location for the electric drive;
- laying the drive on the channel and securing it with a gear rack;
- welding the lath to the profile pipe;
- installation of limit switches;
- drive connection.
In addition to automation, you can install surveillance cameras, anti-burglary devices, intercoms and other options on the doors that can increase user comfort.
What materials to use
To make a good foundation for swinging or sliding gates yourself, you will definitely need:
- high quality concrete mix. The quality of the foundation and its service life depend on its quality. To produce a high-quality concrete mixture, you will inevitably need a good grade of cement (not lower than 500) and crushed stone (30-40 fractions are suitable). After making it, you can test your concrete mixture by hitting it as hard as you can with a hammer. A hardened block of good quality should withstand strong hammer blows and not crumble;
A few words about foundations in general.
It is assumed that the foundation rests on a non-freezing layer of earth. That is, on soil that does not experience freeze-thaw cycles. This is the “freezing depth”. Such a device significantly increases the lifespan, especially if the gate is made by hand. It is usually almost impossible to find clear explanations of what this depth is.
Foundation concrete is a different story. It is made from cement, from mixtures, crushed stone, and soon someone will realize that it can be made from plaster compositions.
More reinforcement. This is also an interesting set of facts, with references to standards, intimidation that you can’t reinforce it with your own hands without welding, and other horrors of the latest technologies.
There are several more “recommendations”, like that “the foundation needs to be strengthened”, however, they usually keep silent about how exactly, that the gate can “float”, without indicating the direction, and other stories of about the same cost.
So, what is a foundation for a gate, from the point of view of a practical person who is ready to do this not the most difficult job with his own hands?
Foundation design
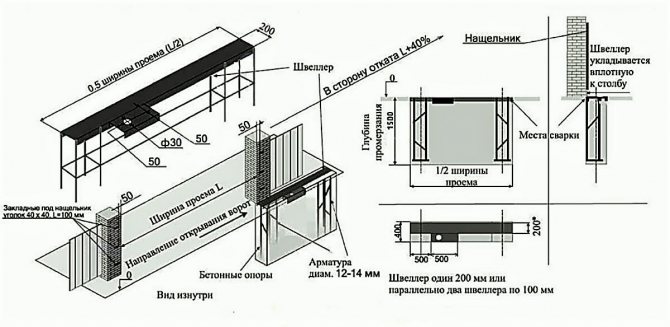
The very first stage of creating a foundation is design. When designing a foundation for a gate, you must know exactly the width, length and depth of the opening you need. So, the length of your foundation for the gate should correspond to half the width of the gate opening. The width is selected depending on the length, but in no case should it exceed 60 cm.
The depth of the foundation, in turn, depends on the depth of soil freezing, so there are no clear indicators here.
If you live in an average climate zone, then the depth of your foundation should be at least 180 cm.
Only by correctly calculating the dimensions you need will you be able to completely eliminate foundation distortion, and the gates you install will be able to last much longer.

Features of calculations
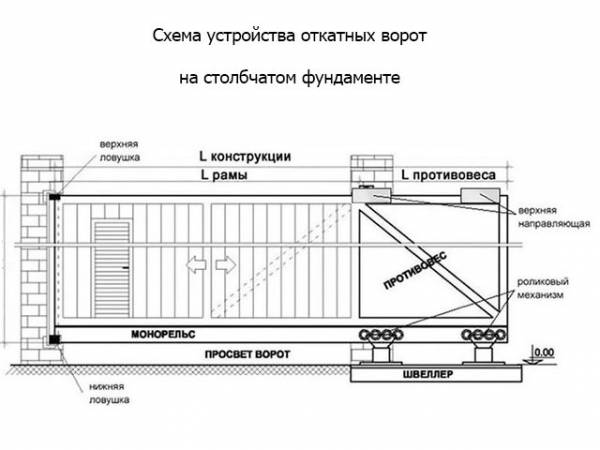
Before you start designing a drawing, you need to make all the necessary calculations. First of all, the height and width of the gate are calculated. If the height of the fence on the site is known, then the height of the future road surface can be determined as follows: the upper part should be at the same level as the fence, and the lower part should be 8-10 cm higher than the road surface. The width of the gate is equal to the distance between the support beams, the recommended value is 4 meters.
Calculating the counterweight is also quite simple - its length should be equal to 50% of the length of the opening. This value can be reduced to 40% only in cases where there is not enough fence space to fully open the sash and the leaf is lined with lightweight materials.
The length of the counterweight profile connecting the top of the canvas and the edge of the bottom profile should be enough to form a triangle.
The value is calculated according to the dimensions using the following formula:
sqrt{ func a^{2} + func b^{2} }
Or in a more familiar form, familiar from school
Where a is the length of the counterweight, b is the height of the canvas, c is the desired length.
Calculation of the weight of the structure is necessary for the correct selection of the guide beam, fittings and automation. Basically, the weight depends on the material with which the sheathing will be made, on the weight of the frame, frame and supporting beam, and on the wind load.
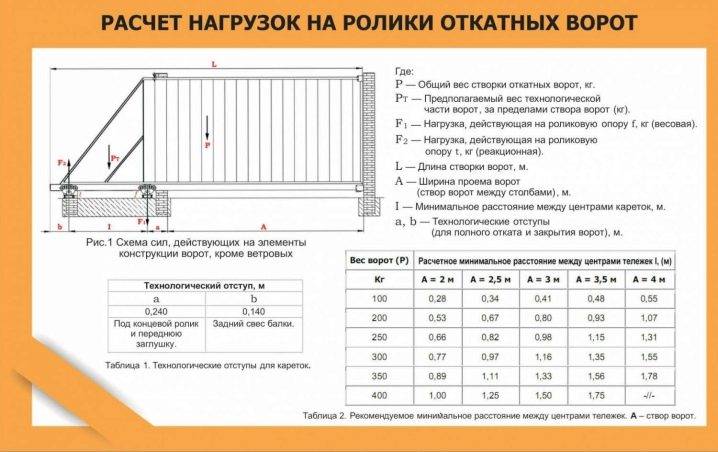
For gates weighing up to 300 kg, a supporting beam with dimensions of 9x5 cm and a metal thickness of 3.5 mm is suitable. The fittings must support the full weight of the structure. It can be purchased as a ready-made kit or all components can be purchased separately. When purchasing, it is advisable to have a drawing with all the calculations with you so that you can consult with a specialist.
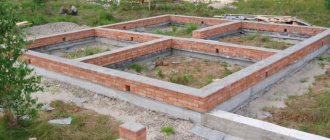
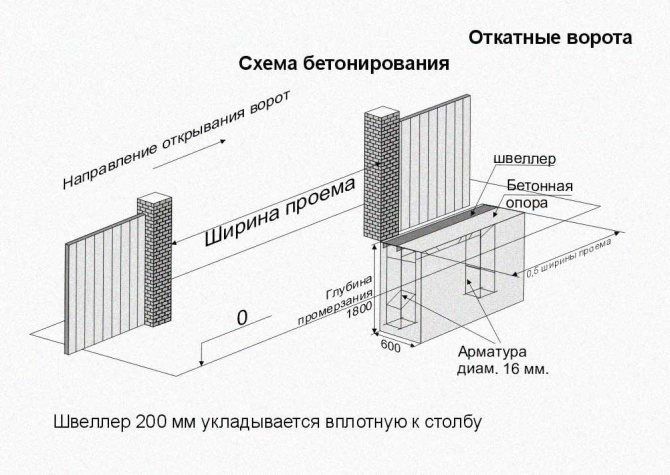
General description of the optimal foundation design
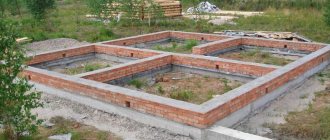
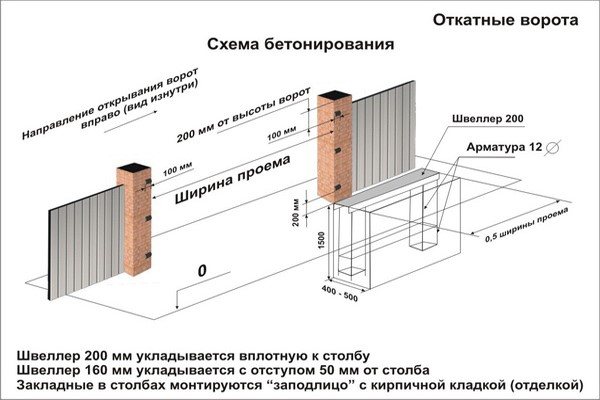
Practical experience has shown that the best foundation design for sliding gates is made in the form of the letter P, which consists of two support pillars buried in the ground and a reinforced lintel in their upper part. This form allows you to achieve optimal strength and reliability with the least consumption of building materials.
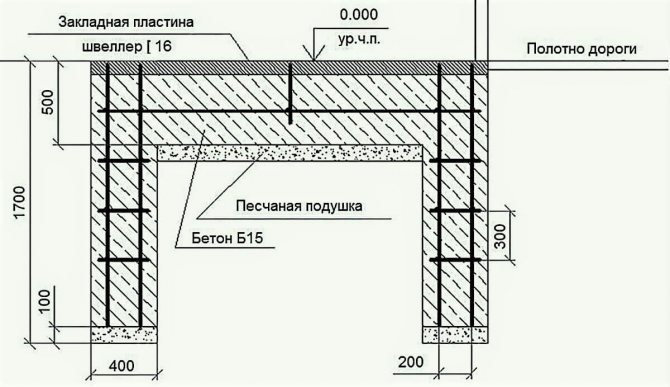
The first support post is mounted parallel to the axis of the gate post, towards which the opening gate moves away. The second foundation support should be located at a distance that is equal to the length of the side brace overhang. Most often, this length is equal to half the width of the gate.
Embedded anchors are installed into the array of the upper connecting sash in order to strengthen the drive mechanism and support-sliding rollers.
In the best, but also more expensive design, the surface of this beam is covered with a channel of the corresponding number. In this case, the fastenings of the rollers and the drive mechanism can be easily fixed using electric welding. The channel itself is installed using the same embedded anchor bolts.
A cheaper, but less durable replacement can be a steel strip 6-8 mm thick. Its rigidity is slightly lower than that of a U-shaped section, and therefore the number of foundation bolts must be increased.
General drawing 1.
General drawing 2.
If you refuse to use a load-bearing channel, a set of drive elements must be purchased before installation of the foundation structure. This will allow for accurate positioning of embedded parts and correct installation of equipment in the future.
Gate installation
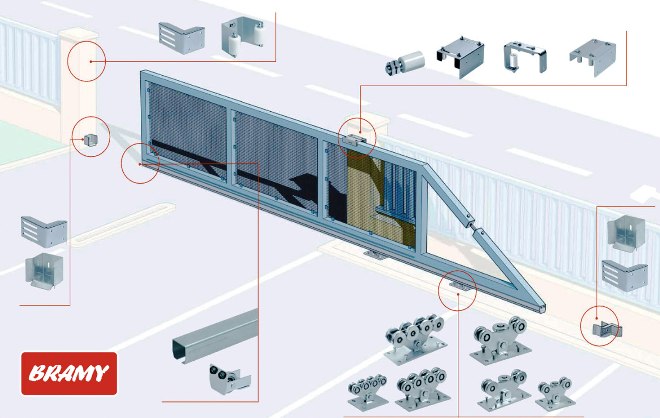
Installation of the door leaf is carried out in stages:
- Marking the required space for moving the sliding sash.
- Manufacturing of roller trolleys.
- Calculation of roller movement limits.
- Assembly.
- Adjusting the door leaf and checking the operation of the roller supports.
- End roller attachment.
- Installing the guide bracket.
- Response support device.
- Gate frame trim.
- Fastening of catchers and necessary automation.
When manufacturing sliding gates, the space to move and their installation are calculated. During the assembly of the structure, they are installed in the profile and slightly moved towards the center of the mortgage; the door leaf is installed on them strictly vertically.
The counter post is necessary for fastening the catchers, and at the same time makes it possible to cover the resulting technological gap. Mount it closely and fix it, securing it to the fence post opposite the embedded element.
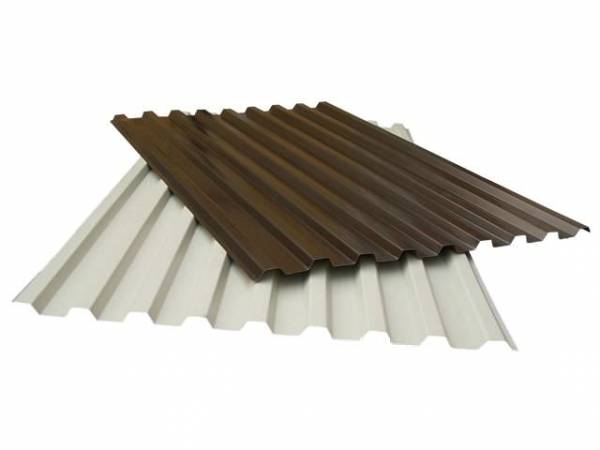
The door leaf can be sheathed using various materials, for example, corrugated board or wood. The cladding method is chosen taking into account the design of the structure and the material.
Five main stages of making a foundation
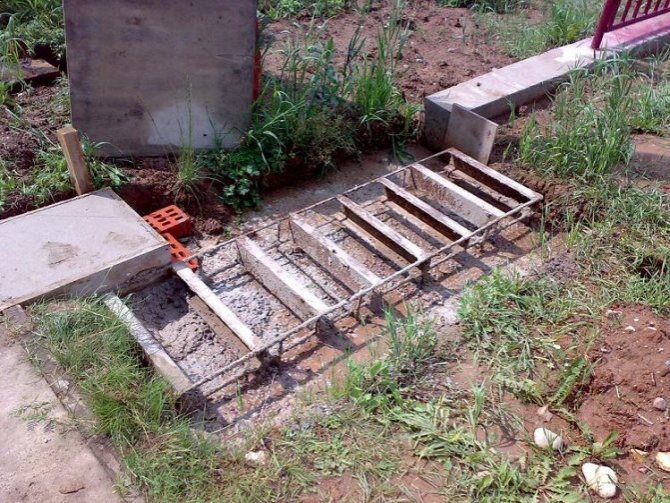
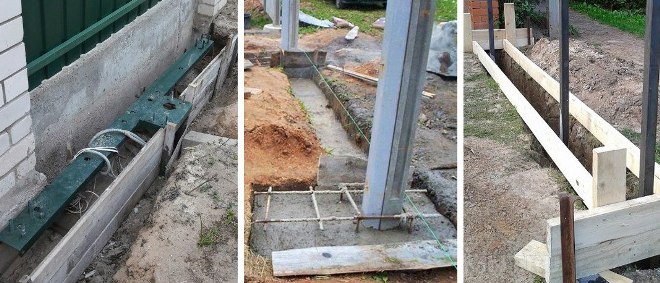
After all the mandatory and extremely necessary measurements, you can begin the main work. The preparatory stage is the procedure for digging a trench. Before you begin this task, it is necessary to conduct a soil analysis. This will help determine not only the degree of freezing. You will also be able to choose the best foundation option exclusively for your suburban area. You can dig a trench for the foundation using a shovel. Another option is to use special equipment. There is not much difference in this, because the main thing is not the process itself, but the result. If you are going to install sliding gates, then you will definitely need the above fittings. It must be installed in a hole dug for the foundation. The reinforcement frame must be laid exclusively horizontally. It also needs to be firmly fixed.
- Once you have fixed the frame, you can start pouring concrete. The hole needs to be filled 2/3 with concrete. After pouring, it will take some time for the foundation to harden. When the concrete hardens, consider that the first stage of laying the foundation for the sliding gates has been successfully completed.
If all the work you have done is done well and correctly, then the foundation you have made will serve you for many years.
Step-by-step installation of sliding gates
To avoid mistakes when installing sliding gates and get a reliable and durable structure, it is better to break the process into several stages and follow the plan. The following works can be distinguished:
- installation of supports;
- foundation production;
- construction of sashes;
- installation of the entire system.
At each stage, it is important to comply with all technology parameters and control the geometry. Correctly aligned gate guides will ensure minimal effort when moving them
Installation of pillars
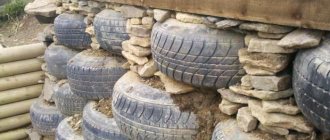
For the stability of the entire structure, it is necessary to make the support pillars as efficiently and accurately as possible. Installation features depend on their type. They can be made from:
- concrete;
- bricks;
- stone;
- rolled metal;
- tree.
When the supports are made of brick, stone or concrete, you need to make embeds in order to later secure the catchers and tires.
To ensure the stability of the post, before installing it in the hole, you can weld pieces of reinforcement, pipe or angle to it as cross members.
The pit must be at least 1 m deep and 0.5 m wide. The supports are leveled and filled with concrete.
Construction of the foundation for the gate mechanism
The correct operation of a sliding gate mechanism cannot be ensured without a foundation. When marking it, you need to take into account that it should be 0.3 m longer than the counterweight.
Work order:
- The width of the trench is marked by stepping back half a meter from the fence line.
- It is better to deepen the foundation below the freezing point of the soil. The depth must be at least a meter.
- Using a channel, which will serve as a mortgage for fastening the trolleys, and cut reinforcement, a U-shaped structure is made.
- It must be adjusted according to levels and height, since roller carriages are installed on it.
- An armored belt and formwork are constructed.
- Prepare and lay the concrete mixture.
Making the sash. Welding
You will need a flat area so that the structure does not move during assembly.
Installation sequence:
- The pipes are laid on transverse wooden blocks and leveled using a reliable level, preferably a laser level.
- Structural elements are cooked from bottom to top. First, every 0.5 m, a prepared profile pipe and a guide beam are connected with a 2 cm seam.
- Pipes that determine the height of the sash are attached perpendicularly to the resulting pair. If the counterweight is in the shape of a rectangle, then all crossbars are of the same length. To maintain the plane of the structure, it should not be overheated.
- Install the transverse upper beam.
- Stiffening elements are welded to the prepared frame base in accordance with the drawing. For this purpose, pipe blanks 40*20*2 are used.
Painting and installation of infill
You can make sliding gates from corrugated sheets. The industry produces it in different colors, wave shapes and metal thicknesses.
Before covering, it is necessary to clean the welding seams with a grinder and prime the finished frame. It is better to use a primer containing anti-corrosion additives.
Profile sheets are secured using rivets or self-tapping screws.
Installation of sliding gates
Before assembling the entire system, markings are made. To accurately install the cantilever supports, pull the cord along the sash. The distance from the pillars is 70 mm (the thickness of the canvas), and the cord is raised from the surface of the road by 15-20 cm.
Further procedure:
- The front roller trolley is recessed towards the rollback of the sash at a distance of 15 cm so that it does not go out onto the roadway.
- The second assembly is placed at a distance of 10 cm from the receiving post, so that it is possible to place catchers.
- The support areas are secured by welding, the carriages are installed and the fabric is rolled onto them for testing.
- If the system works well, then the sash is removed, the support is disassembled and finally fixed.
- Once the sash is installed, it is closed and leveled using a level and adjustment bolts.
- Install the limiter and the knurling roller. Install the catcher below, level it and install the top one.
- Final adjustments are made, plugs are installed, welding areas are cleaned and painted.
How to install a foundation on screw piles?
The foundation for swing gates in the form of screw piles acts as a reliable base for consoles on supporting carriages. In turn, swing gates are mounted on carriages. The carriage rollers are located in the inner part of the beams, due to which the dimensions of the opening become almost unlimited in height. Meanwhile, there is no roller in the opening.
The design feature of the cantilever foundation blocks on piles eliminates the possibility of the door leaf coming into contact with the surface of the driveway. Opening the gate does not block the opening at the edges due to the installation of cantilever blocks at the base of the foundation under the sliding gate.
It is only important to realize the need for an additional site before designing and installing the structure. Space is needed to roll back the gate leaf.
Let's find out how to make a foundation for a gate:
- The area is being marked.
- If necessary, frozen soil is removed using jackhammers.
- Screw piles are screwed into the ground. Based on the purpose, the depth can vary from 200 to 150 cm. From this depth, the soil will not be able to squeeze out the pillars, and therefore the gate will not be deformed. The distance between the elements should be 200-300 m. The sections are filled with corrugated sheets or chain-link mesh. The minimum diameter of piles is 76 mm. With a massive structure, it is necessary to choose larger supports.
- The inside of the pile reinforcement is filled with concrete. Concreting is carried out to increase the bearing capacity of the pile. Thanks to this, the support receives additional protection from deformation due to horizontal loads. In addition, concreting protects the metal from oxidation in wet soil.
- A channel is attached on top of the piles, which connects the piles into one structure.
How to pour a strip foundation for sliding gates
In order to properly fill the foundation, you must initially prepare the tools and materials necessary for the work:
- sand, crushed stone and cement for concreting;
- cantilever metal blocks;
- longitudinal metal channels;
- reinforcing bars and binding wire. The frame is assembled from them;
- unedged boards for formwork;
- concrete mixer;
- electric or gas welding;
- construction level;
- roulette;
- bayonet and shovel shovels;
- scrap;
- support channel;
- a hammer, a hacksaw for iron, as well as an ax and a corner for constructing formwork.
It is better not to skimp on raw materials, as this can negatively affect the quality of the structure, its strength and, accordingly, reduce the service life of sliding gates.
Let's start making the foundation:
- We dig a trench with the appropriate dimensions, which were correctly calculated in the drawing. Its depth should be 35 cm greater than the freezing point of the soil.
- We install the formwork. The solution consumption will be reduced if you make a cushion of sand and gravel 100 mm thick.
- From reinforcement we make the basis for the future foundation. We secure the rods together with wire or by welding. The distance between them should be about 30 cm.
- We install the prepared reinforcing belt horizontally. We deepen the protruding part 12 cm below the soil surface. We move its front part to the edge of the opening. The distance from the belt to the formwork is at least 2 cm in all planes.
- We weld a longitudinal channel to the belt, the shelf of which should be at the zero mark.
- We place a channel in the base and connect it to the frame. It is necessary for fastening the drive mechanism of the sliding structure.
- The control and power cords are installed through pipes located in the frame. They must be at least 25 mm in diameter, otherwise it will be difficult to install the wire.
- Mix the solution in the following proportions: 6 buckets of river sand, 2 buckets of cement, 2 buckets of crushed stone and the required amount of water so that the mixture does not turn out to be very thick. Crushed stone adds strength to concrete. If you plan to use ready-mixed concrete, it must be of a grade not lower than M200. To prepare the solution, we take M500 cement.
- We fill the hole with prepared concrete so that the belt does not move, since the possibility of using the gate depends on this. We do not use all the concrete at once, but only 1/3 of the volume of the trench. This method of pouring the foundation guarantees excellent fixation of the belt. It will be necessary to install 3 transverse channels into the reinforcement frame.
- We align the channels in compliance with the vertical and horizontal. Then we weld them to the reinforcing belt and fill them with concrete solution. It will take about two weeks or more for the solution to harden, depending on the time of year and weather conditions.
When installing any type of foundation, electrical wiring is immediately laid.
As a result, we get a foundation with three transverse channels located 7 cm below the roadway.
Please pay attention to the following points:
- when calculating the foundation, it is necessary to take into account the strength of the pillars and the weight of the structure, since the load of all parts of the gate on the base may differ;
- concrete must be poured both under the structure itself and under the supporting pillars;
- the reinforcement for the belt must be welded or tightly tied with special wire;
- After installing the embeds, part of the trench needs to be filled with concrete so that it does not completely cover them. This is necessary so that in the future the rest of the structure can be installed correctly;
- Initially, it is necessary to install pillars that serve as supports for the gate.
Be sure to follow the technology and the above rules, since an incorrectly made frame or foundation will not allow the sliding gate automation to work normally, which can lead to the destruction of some important parts of the gate structure.
Video: pouring the foundation for sliding gates
A properly manufactured support base determines the possibility of trouble-free operation and durability of sliding gates. The foundation is subject to significant loads in different planes (compression, torsion or bending). You can make it yourself, but only if you have the technical characteristics of the sliding structure, correctly drawn up drawings and some construction experience.
Site marking
It is important to mark the area correctly, so you should take this work responsibly. The outer plane of the gate is installed flush with the common fence, and the geometric longitudinal axis of the door is precisely the axis of the foundation structure.
Structurally, the size of the concrete support is taken within 400×400 mm, and using a tape measure, the contours of the trench are marked on the ground surface.
The size of the holes or trenches should exceed the size of the concrete supporting structure by 50 - 100 mm in each direction. When the support measures 400×400 mm, then the hole under it is dug approximately 450×450 mm.
The contours of the trench for the future concrete foundation (or individual supports) must be secured to the ground with pegs with a stretched cord. The direction of the cord should coincide with the edges of the pit: this makes it easier to carry out excavation work.
How to make and install a POV yourself
Today, ready-made kits for POV are sold. They also already have a guide. This set is designed for a specific weight, so before purchasing you need to calculate how much weight your POVs will have.
If you want to create a POV with two doors, then it is more rational to buy two sets.
Elements for design automation are also freely sold. The cost of automation varies and depends on the functionality. Thanks to this, you can choose the right option at a competitive price. If you do not want or have the opportunity to buy automation, you can use the gate using a manual drive.

When making POV you will have to use welding
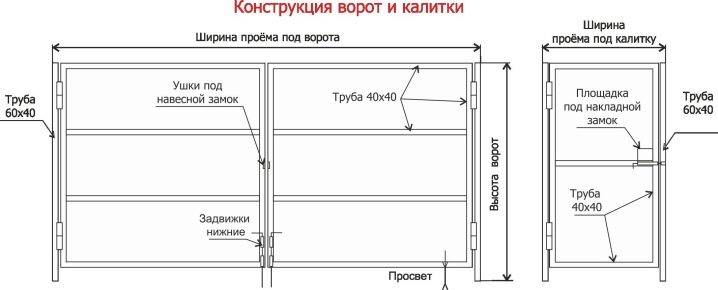
We make a frame
Lay the pipes in the desired shape. Secure the joining corners by welding. Be sure to measure the diagonals. Their unevenness can cause skewed POV.
Weld the seams so as to protect the inside of the frame from liquid penetration. Then take the internal dimensions and cut out the appropriate frame from a 2*2 centimeter pipe. Assemble it in the same way as the external one. Connect these two frames, aligning them on one side.
Remove debris from the frame and treat it with a soil mixture. After it dries, coat the structure with paint.
If you use a joint venture in the process, then it is more rational to use an Ω-shaped frame. The panel needs to be inserted into it. Gates made from profile decking need to be reinforced with corners.
We fasten the canvas and locks
First, cut off the heels of the carriages. Then connect the resulting structure to the frame. Determine the carriage spacing according to the width after the fact
It is important to ensure that the canvas covers the opening on the sides by twenty centimeters, and on top by ten centimeters. The gap between the surface and the floor should be about five centimeters
When cutting the canvas, you need to be guided by the internal size. The finished canvas should lie on the frame located inside, with as little gap as possible. Self-tapping screws and rivets are suitable for fastening.
If you are installing a mortise lock on the gate, then you need to first consider the location of its attachment.
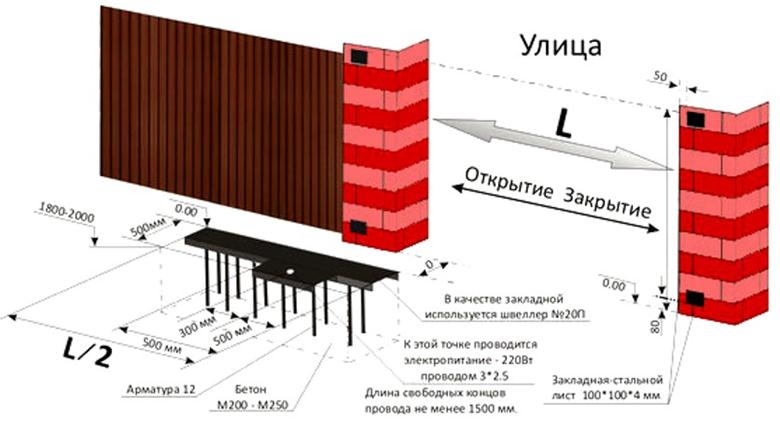
We make and install the frame at home
The frame is needed for POVs located at the entrance to the territory. Pipes of 12*12 centimeters are suitable for its manufacture. The size of the beam must exceed the size of the structure. Its length must correspond to the size of the gate in the open position.
Then the pipes that serve as vertical supports must be buried at least 125 centimeters into the ground and concreted. This process must be constantly monitored at the construction level. If even a slight misalignment occurs on the beam, unlocked POVs can open and close on their own.
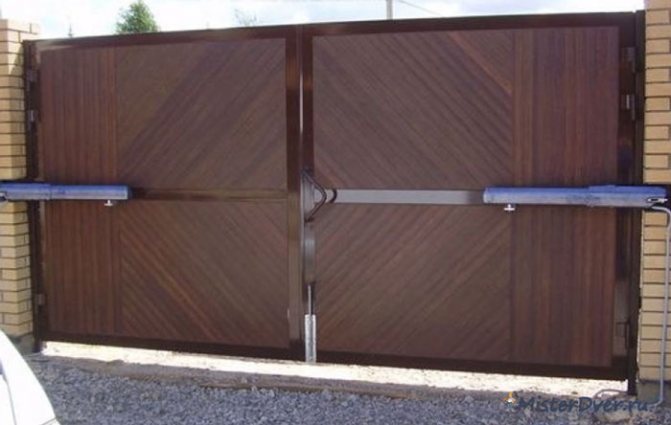
We install NE and accessories
Attach the NE of the hinged gate so that its working area “looks” down.
If a six-meter-long NE turns out to be short, you can simply weld the missing fragment. Alignment of the part can be done with special screws with brackets. During the work, the use of a building level is mandatory.
The rollers need to be attached to the top of the structure on both sides. Now you can hang the gate. The rollers need to be inserted into the middle of the guide and the plugs sold in the kit must be installed.
Now you can install the handle and locks.
Gates with top suspension are a modern option with high reliability. With proper use, they can last more than fifteen years.
Instead of a POV, you can install a cantilever-type structure. They are mounted according to the same scheme, but their guide beam can be placed at any height.
To prevent lateral swings, secure the gate leaf with a limiter.
The knurling roller included in the kit can serve as a stopper. You can use caps to cover the ends of the guide.
If you want to install a gate more than three meters, you need to use NE to fix the bottom of the gate.
Foundation design
The very first stage of creating a foundation is design. When designing a foundation for a gate, you must know exactly the width, length and depth of the opening you need. So, the length of your foundation for the gate should correspond to half the width of the gate opening. The width is selected depending on the length, but in no case should it exceed 60 cm.
The depth of the foundation, in turn, depends on the depth of soil freezing, so there are no clear indicators here.
If you live in an average climate zone, then the depth of your foundation should be at least 180 cm.
Only by correctly calculating the dimensions you need will you be able to completely eliminate foundation distortion, and the gates you install will be able to last much longer.
Foundation technology
Making the foundation for sliding gates with your own hands requires a fair investment of time and effort. For the correct installation of the support, it is necessary to perform accurate calculations and follow the technology recommended by professionals. The most common and rational is a frame-monolithic foundation; the sequence of its creation is given below.
Scheme development
To calculate the dimensions of the foundation, the following indicators are determined:
- soil type;
- opening width;
- weight and dimensions of the gate.
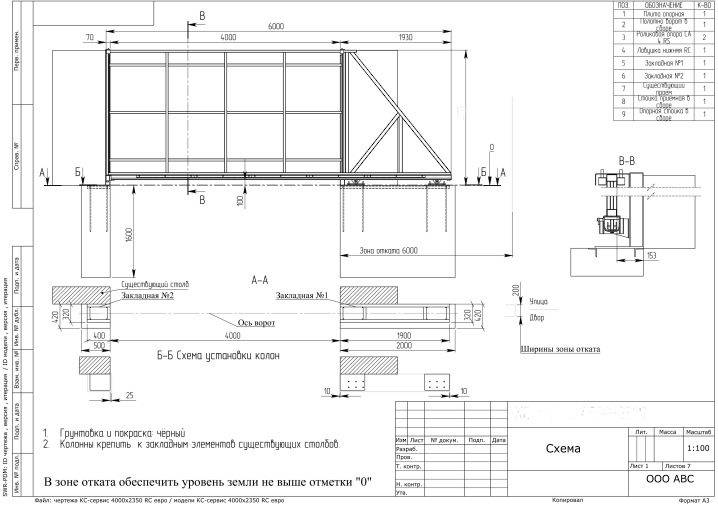
Foundation diagram for sliding gates
The optimal depth of the foundation is in the range of 150-250 cm, it depends on the level of soil freezing, a sufficient width of the foundation is 50-70 cm. At the entrance area on one side there should be an indentation necessary for rolling back the canvas. All dimensions and calculations are entered into the diagram, a drawing is drawn up, on the basis of which further construction activities are organized.
Preparatory stage
To create the base you will need the following materials and tools:
- crushed stone, cement and sand are used to mix concrete mortar;
- console blocks;
- wooden building materials (if the work will be carried out with formwork);
- concrete mixer or trough with a shovel;
- crowbar, tape measure;
- longitudinal steel channels;
- reinforcement that will be laid in the sheathing;
- welding machine;
- building level;
- hacksaw, axe, hammer.

To create a foundation for sliding gates, you will need a welding machine.
It is necessary to carefully level the area around the entrance, remove vegetation and extract roots. Next, they begin to dig a trench in accordance with the diagram; sand and gravel are sequentially laid and compacted at its bottom. This cushion will prevent the foundation from being pushed out in the spring when the ground is unstable.
Assembling a metal frame
To make the foundation reliable and strong, it is strengthened with the help of an embedded component - a U-shaped frame. The racks of the latter are made of reinforcement with a diameter of 12 mm; a horizontal channel 20 cm wide is used here - it will help to evenly distribute the load throughout the entire product. The length of the mortgage is determined by the dimensions of the opening - standardly this is half the same parameter of the entrance area, that is, for a 4-meter gate a 2-meter frame is required.
The U-shaped profile requires transverse reinforcement in increments of 30-40 cm; 2 methods are used for its assembly:
- welding of the reinforcement frame and further fixation of the channel;
- welding rods and angles to a metal workpiece.
To tie the reinforcement, welding or steel wire is used. The top of the metal pins should not protrude above the soil surface. The building level will help check the horizontal installation of the workpiece - this way you can avoid distortion of the structure.
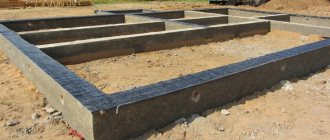
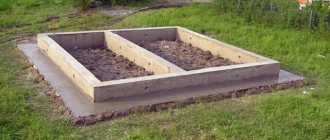
Pouring the foundation for sliding gates
To mix the solution, use sand and cement in a ratio of 3:1; adding crushed stone will increase the strength of the product. The trench is filled with concrete so that the reinforcement is approximately 2/3 covered with the mixture. In such conditions it will be easier to install the gate. It is necessary to install the pillars supporting the entrance group in advance; in this case, the foundation will cover the cantilever supports and the entire opening. Thus, the entire plane under the movable doors will be completely concreted.
It is important to prevent the frame from skewing
It is important to prevent the frame from skewing. For the structure to function properly, the space under the roller segments must be wide and level.
A stable and reliable foundation is formed by using high-quality cement, the optimal variety is M500, the permissible crushed stone fractionation is 30-40. The foundation will strengthen in 2 weeks, but before use it needs to stand for 28 days.
To make a high-quality base for sliding gates, special attention should be paid to the calculation stage: given the large weight and mobility of the structure, you need to find the optimal ratio of operational and strength characteristics. With strict adherence to construction technology, you can expect proper functioning of the automatic system in all seasons, the absence of distortions leading to jamming, long-term maintenance-free use and an impressive service life
Why do you need a foundation?
The main purpose of the structure is to secure all gate components. In fact, the foundation is a reinforced block of concrete, often rectangular in shape, placed in the ground. The structure is installed on the side of the travel line and on the inside of the fence. If metal gates are designed to swing to the left, then the foundation is located on the left side of the travel line.
The solid concrete structure is designed to hold the metal gates evenly. It balances the pressure of the metal on the ground, protecting against shrinkage or deformation.
You must clearly understand that the quality of the foundation is the same as the gate. For massive structures, solid foundations are used, for light ones, correspondingly lightweight options are used.
Remember to obtain a soil analysis before digging to determine the stability of the structure. For different types of soil, appropriate technologies for pouring the foundation under the gate are used.
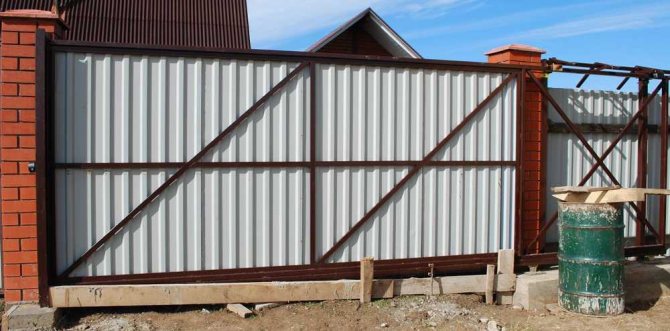
DIY sliding gates: photo report with explanations
These gates are made on the basis of a ready-made kit; they made the frame themselves and installed it themselves
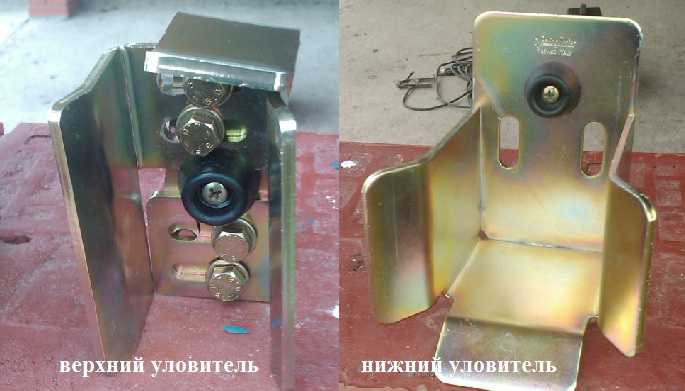
The gates were installed in Moscow, and accordingly the prices were in the capital. They were installed in 2010, since then the kits have become much cheaper. For example, the “fresh” price of a drive for a blade weighing no more than 400 kg (there are up to 1.2 tons) is about $100, but this is a budget option. During construction, components from Rolling Center (the best on the market at that time) were purchased with a 6-meter long drive beam. The upper catcher and bracket were also ordered separately. Everything with delivery cost about $600.
The following materials were also purchased:
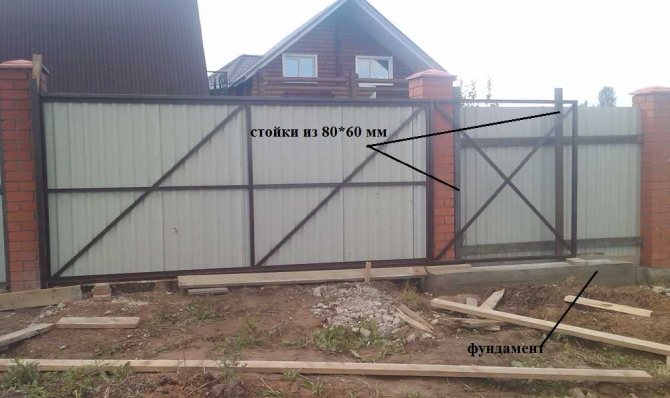
- profile pipe 80*60 mm - 6 m, 60*40 mm - 18 m, 40*20 mm - 36 m;
- channel - 180 mm - 3 meters, 200 mm - 2.4 meters;
- reinforcement 12 mm - 6 m;
- electrodes - 2 kg;
- paint - 3 cans, brushes, rivets;
- cement M-400 - 5 bags;
- The corrugated sheeting was purchased during the manufacture of the fence.
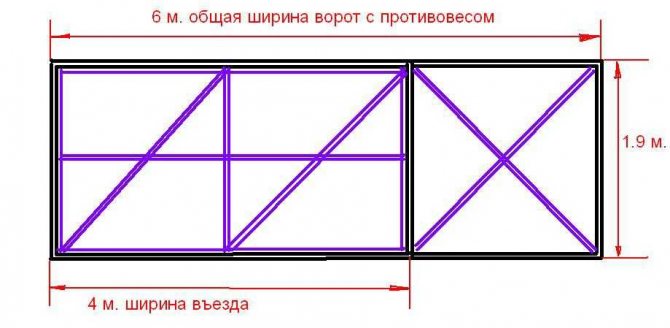
Sliding gate diagram with dimensions
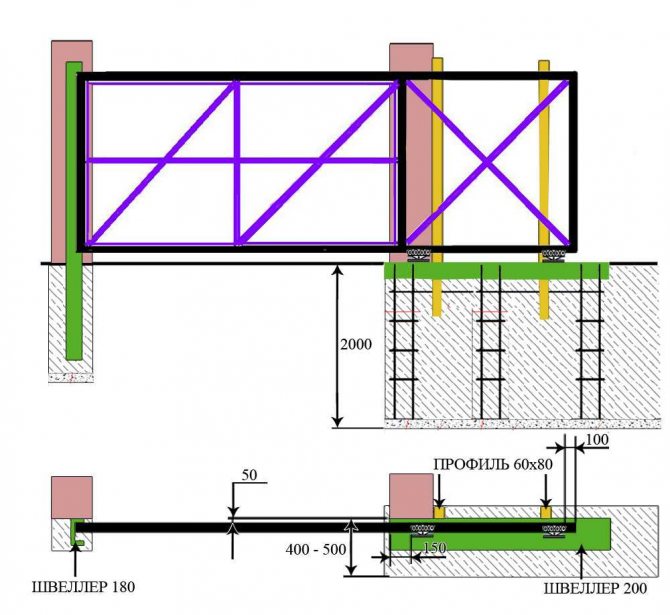
The first step was to weld the frame for the gate with a counterweight. The frame (black) was made from a 60*40 mm profile pipe, the lintels and internal frame (lilac) were made from a 40*20 mm pipe. A guide beam is welded at the bottom with the cut down.
How the frame was cooked
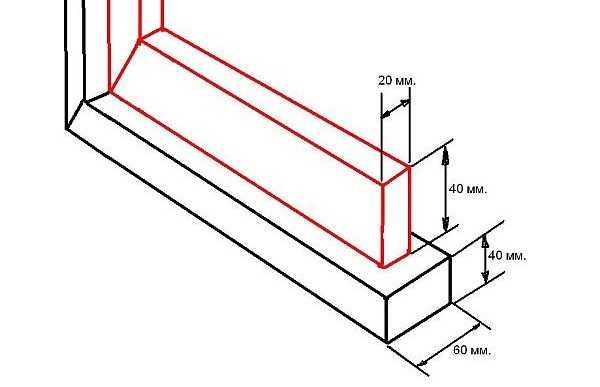
The inner frame was welded with an indentation from the edge - 20 mm on each side. This makes it more convenient to attach the corrugated sheet later; if desired, you can also sheathe it from the inside.
How to weld a 40*20 mm profile pipe
First the foundation was poured. Reinforcement was installed in it, with a channel on top with the back facing up. Close to the channel there are two racks made of profiled pipe 80*60 mm. One post is adjacent to the post, the second is set vertically at a distance of 120 cm. Rollers are then hung on them, which hold the canvas from above. On the other hand, a 180 mm channel was installed along the return post.
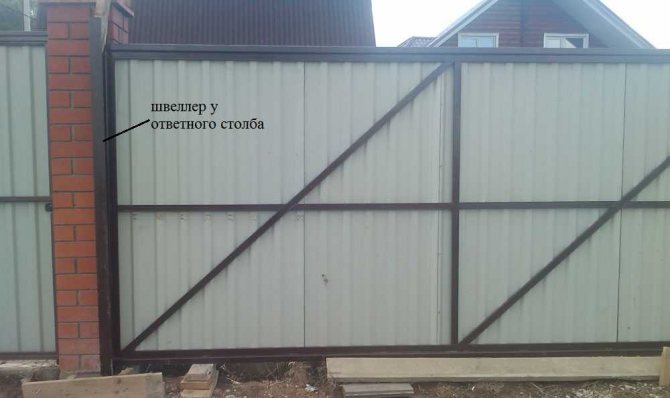
A 180 mm channel was attached to the return post
On-site fitting
On the counter part, catchers are attached to the channel at the top and bottom, which will prevent the gate from dangling in the wind.
Stops installed on the receiving post
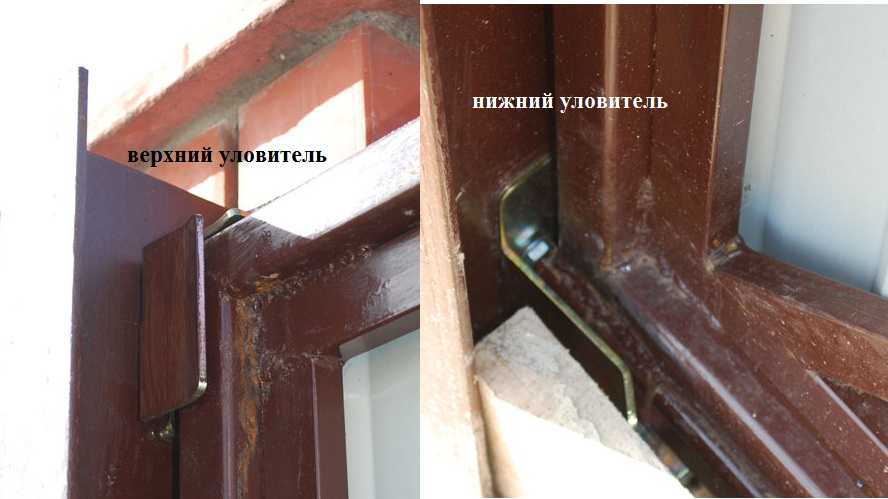
Upper and lower catchers
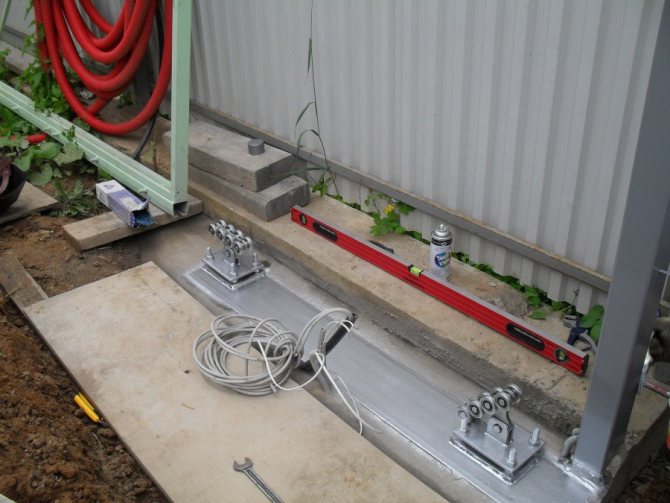
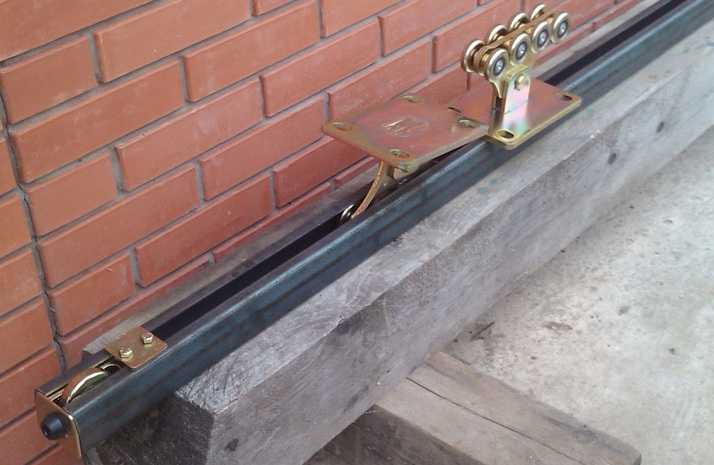
The next step is to install the roller plates. They are attached to mortgages. In this case it is a channel, so the space turned out to be large. When the foundation was made, it was made too high, so the plates were welded directly to the mortgage. This is impractical: if the roller breaks, changing it will be problematic. Usually a platform is welded, to which a platform with rollers is then bolted.
The roller platforms were welded and the rollers “ran over” them
The finished gate frame is simply rolled onto fixed rollers.
Photos of the sash on rollers from different angles
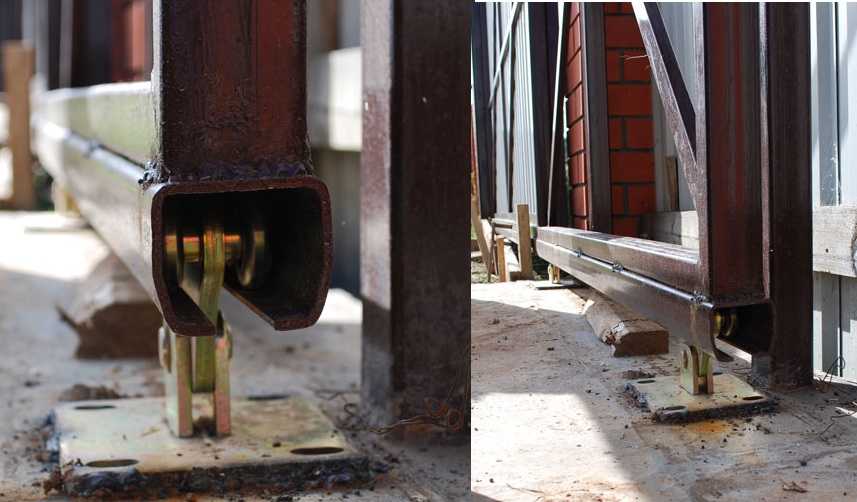
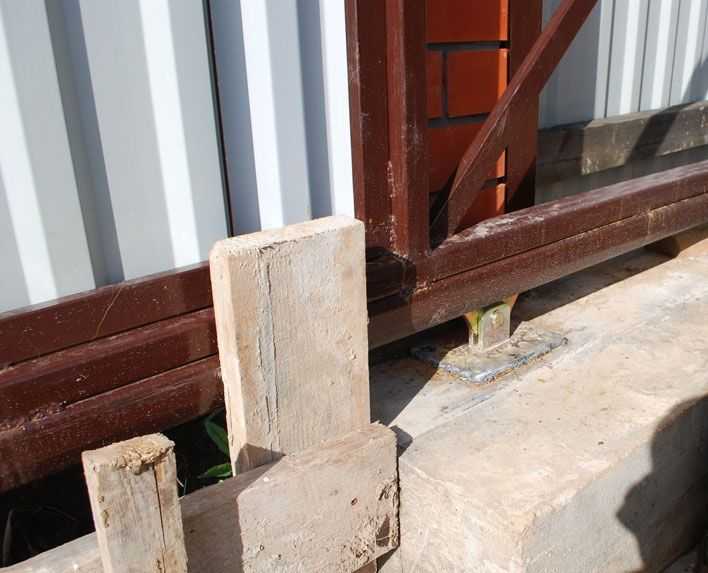
After installation, plugs are placed on both ends of the support beam. On the far side, a thrust wheel is installed, which in the closed position drives into the lower catcher, lifting the gate and removing the load from the rollers.
Installing the plug and thrust roller (the beam is upside down in the photo)
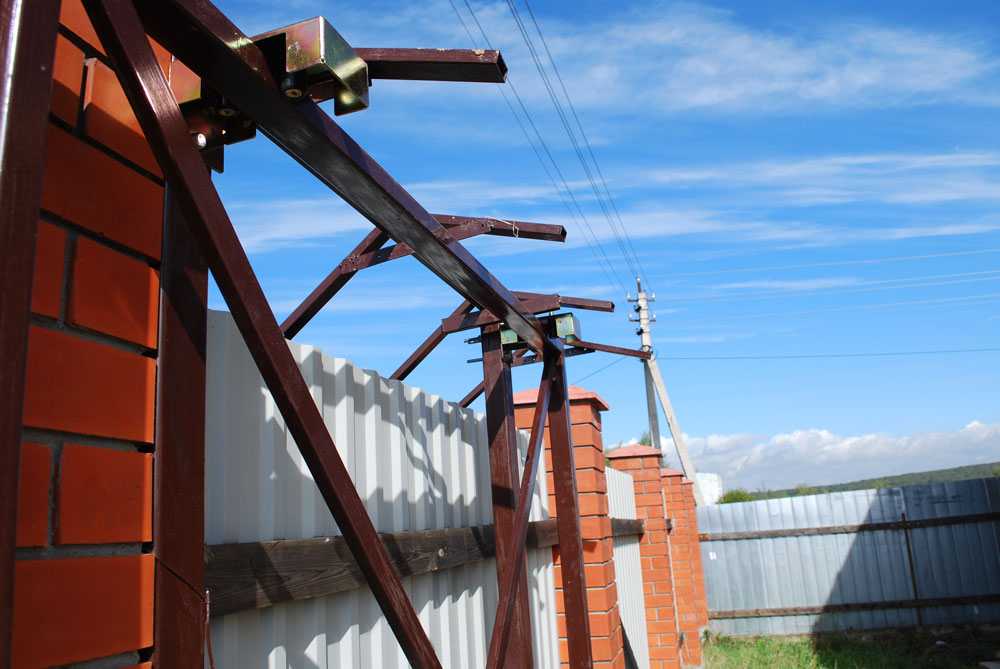
Now, to prevent the gate from “walking” in the upper part (they are currently not secured by anything), sets of upper rollers are attached to the posts (80*60 mm) - one per post. They are practically put on the frame. Now the rollers inside will hold it up.
The upper rollers are attached to the posts, gripping the top edge of the gate
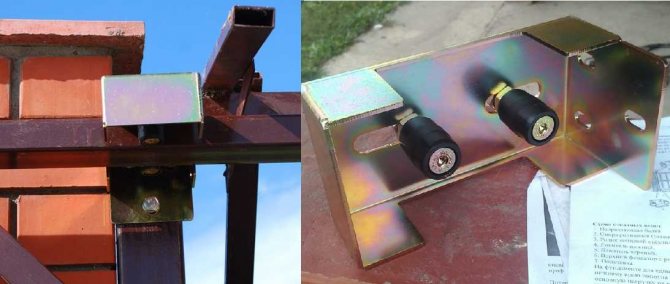
This is what the installed top rollers look like
That's it, the sliding gates are assembled with your own hands and ready for use.
What sliding gates look like from the yard
If you have any questions, watch the video. It assembles a ready-made kit, the whole process will become clearer.
What materials to use
To make a good foundation for swinging or sliding gates yourself, you will definitely need:
high quality concrete mix. The quality of the foundation and its service life depend on its quality. To produce a high-quality concrete mixture, you will inevitably need a good grade of cement (not lower than 500) and crushed stone (30-40 fractions are suitable). After making it, you can test your concrete mixture by hitting it as hard as you can with a hammer. A hardened block of good quality should withstand strong hammer blows and not crumble;
What types of gates are there?
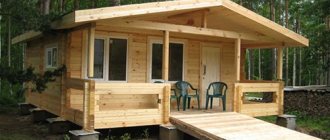
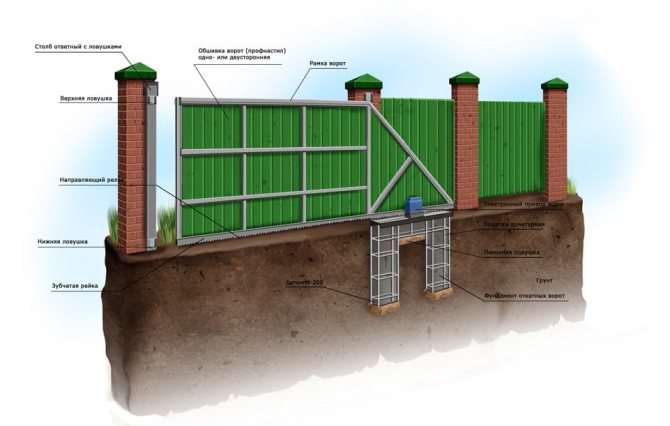
There are sliding gates of different designs. Cantilever structures are considered one of the best. The principle of fastening is that the canvas is attached to a beam installed on the foundation. Roller carts act as fastening elements. The features of this system are that the canvas is located at a height of 8-9 cm from the ground, does not come into contact with the ground and is able to move even in the presence of snow.
Console systems can be any size. The absence of a top beam allows vehicles of any height to pass through. Installation of the structure is relatively simple, pouring the foundation is inexpensive. The opening can be of any size; it does not have to be designed in advance. Opening can be manual or automatic.
Conventionally, the disadvantages of the design can be considered the complexity of the design, the need to align the side walls of the opening. The side of the fence along which the canvas moves must be free of foreign objects.
Suspended sliding gates are used mainly in enterprises. They are expensive and therefore not in great demand. The structure consists of a beam fixed above the opening. The canvas or canvases are suspended from the beam and move along it.
The advantages of the design are reliability, resistance to wind loads, no size restrictions and the ability to use heavy fabric. This design is not subject to hacking. However, the suspension beam determines the upper limit of the height of vehicles allowed through. The sashes are cumbersome and can only be installed in a pre-prepared opening.
The simplest of the structures is the rail one. Rails are mounted along the opening along which the canvas moves. The canvas is held in a vertical position by a bracket attached to a pole. With the help of such systems, large openings can be covered; they have good wind resistance. The sheathing can be made from any material.
The disadvantages are the need to prepare the opening and the need for the structure to periodically clean the rails.
Design options are possible, instead of a concrete foundation installed on several piles. Metal piles are screwed into the ground 1.5 meters; they become the basis of the entire structure. By choosing sliding gates on screw piles, you can avoid excavation and concrete work.
This option is worth choosing if you need to install the entry group quickly. Sliding gates on screw piles can be installed even in a day, and their reliability is higher than that of similar structures on a strip foundation. The production of a pile foundation can be done in winter.
Fire gates
The most important type of sliding gates are fire doors. Fire-resistant sliding gates are installed at facilities where there may be a need to isolate a burning room. The purpose of such products is to prevent the spread of fire to new territories.
The movement system is usually rail-based, and the thickness of the canvas is much greater than that of household options. A sectional or solid panel, consisting of 2 steel sheets with a non-flammable filler between them, ranges from 7 to 10 cm. The thickness determines the fire resistance, the weight of such a sheet is from 40 to 60 kilograms per square meter.

The design includes one or two doors, and can also be telescopic. In the latter version, there are two or more sashes, they all move to one side and are placed one after the other. Design features, requirements for the opening and the significant cost of the product dictate the need to calculate the structure used in each case separately.
Foundation on screw piles
To install gates, other foundation pouring technologies are used. One of them is the screw support system. The advantages of this option for installing a gate base are ease of installation, high technology and accessibility.
Advantages of screw supports:
- The support penetrates to a depth of about 2 m, is compacted into the ground and is additionally fixed with an auger. Thanks to this, the strength characteristics of the foundation are not inferior to their concrete counterparts.
- Installation requires one day, including the preparation period. In practice, the work is completed within a few hours. What is curious is that the notorious “human factor” practically cannot affect the quality of the design.
- Low cost allows you to save on installing the foundation. Often the costs do not exceed the cost of the cheapest option for hand-pouring a concrete base for fences and entrance gates.
- During the installation process, the work site looks quite clean than with traditional concreting.
Screw supports allow installation even in winter. Multi-turn screw piles have the ability to compact the soil, which has a positive effect on the reliability of the structure. When screwed in, the piles exert pressure on the soil. Thanks to this, such a foundation will never sag, because the soil will withstand high loads.
DIY sliding gate installation
Foundation
This is probably the most responsible and important element of the entire structure. To begin with, a foundation is required for the mortgage, where the support rollers will be fixed. Some companies and private builders offer a more economical foundation option than reinforced concrete, namely, they offer to screw in a couple of screw piles, where the embed is then welded on top and, by and large, almost everything is ready.
Then, next to it, another one is screwed into the bunch of piles, slightly obliquely (since many piles cannot be installed exactly next to each other), under the pillar. We won’t even consider this method. It will probably be suitable for light and small sliding gates, for example, 2.5 meters long with a light frame, but longer gates will “walk” on this basis.
We believe that in this case there is no alternative to a reinforced concrete foundation, but it can also be done in different ways. So, for example, it is often proposed to pour only one foundation - directly under the mortgage, or two separate ones, one of them - under the mortgage, the other - under the “receiving” pillar.
This option is much better than the solution of installing screw piles itself, but the presence of two separate foundations can end in failure, especially in cases where these foundations are not located below the freezing level of the ground. Simply, as a result of frost heaving, these individual foundations can move independently of each other. In this case, even with small displacements relative to each other, everything may end up in the fact that the gates will not fall into the catchers that are located on the receiving post, and you will need to reconfigure them all the time.
The solution to this problem is very simple (but more expensive than two separate foundations) - both pillars must be connected by one foundation. In this case, even if the base is displaced, both pillars will always be parallel to each other, moving in one bundle.
Pillars
Regarding whether it makes sense to install U-shaped pillars or ordinary ones, there is no general opinion. The components can be installed without problems on single poles. But the U-shaped option is better; this option is preferable in the case when in the future you plan to install not only the drive, but also a set of automation for the gate, which includes photocells. To begin with, it is much more convenient to install photocells on internal poles, rather than on external poles (taking into account anti-vandal considerations). And also, inside the poles it is quite convenient to lay hidden wiring to the signal lamp and photocells.
Five main stages of making a foundation
After all the mandatory and extremely necessary measurements, you can begin the main work. The preparatory stage is the procedure for digging a trench. Before you begin this task, it is necessary to conduct a soil analysis. This will help determine not only the degree of freezing. You will also be able to choose the best foundation option exclusively for your suburban area. You can dig a trench for the foundation using a shovel. Another option is to use special equipment. There is not much difference in this, because the main thing is not the process itself, but the result. If you are going to install sliding gates, then you will definitely need the above fittings. It must be installed in a hole dug for the foundation. The reinforcement frame must be laid exclusively horizontally. It also needs to be firmly fixed.
- Once you have fixed the frame, you can start pouring concrete. The hole needs to be filled 2/3 with concrete. After pouring, it will take some time for the foundation to harden. When the concrete hardens, consider that the first stage of laying the foundation for the sliding gates has been successfully completed.
- Now you need to install three transverse channels. This must be done between the protruding parts of the reinforcement cage. If you are doing this work on your own, without the help of specialists, you will need to carefully measure every part of your structure. The installed channels must be clearly aligned both horizontally and vertically.
- When you level the channels, they need to be filled with concrete and also left for some time to harden. It takes up to five days for concrete to completely harden in the summer, but in winter it may take two to three weeks. After the concrete has completely hardened, you must have a foundation with transverse channels, which will be located just below the roadway of the gate.
- When making a foundation for sliding gates, you must be prepared not only for digging a hole and pouring concrete, but also for welding. You will have to weld the main channel to the channel of the drive system. When welding, it is very important to consider the thickness of your gate. After all, if the channel you welded is very close to the fence, when opening the gate leaves, they may catch on the posts.
- Now the time has come to weld the drive channel to the structure. For this task, you need to place a metal embed on the top of the post. It is necessary to take into account the fact that without installing a mortgage during installation or operation, the upper part of the column may simply collapse.
If all the work you have done is done well and correctly, then the foundation you have made will serve you for many years.
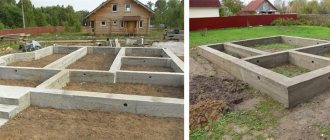
Foundation for swing gates
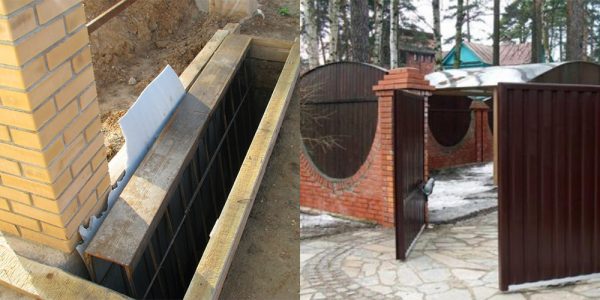
Gate foundation
The owners of private territories devote a lot of effort to their improvement, making beautiful and, most importantly, practical things on their own. One of these utilities can be called yard gates - the main elements on a private plot.
To make a gate that will stand at the entrance with your own hands, you should choose, as the simplest, standard swing gates. But in order for the result to be high-quality work, which will also last for several decades, you need to take care of a high-quality foundation.
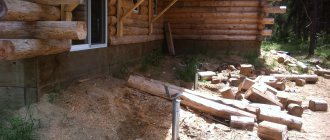
The foundation for the gate can be called one of the most important factors, because it is on it that the entire structure will rest. The evenness of the sashes and their normal operation without defects will depend on the strength of the base. And if there is no high-quality foundation, then after some time of use, the supports will sag and tilt, and also become very loose. As a result, the entire structure can become deformed at once.
Installation of the base for swing models
The main thing when installing swing structures is not strengthening the sashes, but a solid foundation. The foundation for swing gates consists of a pair of pillars. They need to be installed at the optimal depth, approximately 1.3 - 1.5 meters.
It is important to carefully calculate the depth of the hole in places where groundwater passes near the surface.
Pole installation
To install the pillars, the following sequence of actions is performed:
- The pit is dug or made with a special drill. The size depends on the depth of soil freezing and the dimensions of the supports.
- A sand and crushed stone cushion is erected under the concrete. It is intended to become the basis for concreting, as well as to prevent the deepening of the racks.
- The post is mounted and leveled using a level.
- Then the solution is prepared and the stand is poured.
Concrete structures must last for a week. During hardening, the concrete must be moistened with water.
If you use a brick or concrete support, the hole depth should be at least a meter.
Specifics of the tape method
To create a strong support, a strip foundation is used for swing gates. There are the following stages of this installation:
- A trench is dug with dimensions: width - 400 mm, depth - 800 mm. Its length should take into account the dimensions of the doors, gates and plus half a meter on each side.
- The bottom of the pit is covered with sand and watered.
- The pillars are mounted strictly vertically.
- Reinforcement with reinforcement:
- parts are fastened with tying wire or welding;
- the reinforcing system must exceed the dimensions of the gate;
- the reinforcement structure is filled with concrete.
- Formwork is in progress.
- The trench is filled with concrete mortar.
To ensure reliable bonding of concrete layers, it is recommended to pour in several stages.
We make the foundation for swing gates ourselves
The time that swing gates will operate will directly depend on the correctly created base, and not just on the quality of the materials used to create the gate. That is why, when building a foundation, you need to make a detailed drawing, which, of course, differs for the two foundations given above.
Having chosen the desired structure that any foundation for metal gates will have, you need to prepare a certain set of materials and tools. Typically, builders use a building level, a tape measure, a shovel, a hand drill if needed, a concrete mixer for large volumes of mortar, or an electric drill with a “mixer” type attachment attached. As for materials, you need to take care of purchasing crushed stone, two or three metal pipes of the required length and a diameter of at least 10 cm, sand, water, reinforcement to strengthen the base, a welding machine, brick and cement.
Once all the materials and tools have been prepared, the creation process can begin. First you need to measure the area and dig holes for support posts, or dig a trench. Further actions largely depend on what kind of foundation for the gate it was decided to use.
The depth of the holes should be at least a meter, and the diameter of the holes should be 10 cm larger than the cross-section of the pipes used. The same requirements apply to the trench: its depth must be at least a meter, but the width must also be left 10 cm on both sides from the ends of the support pipes. But if it was decided to make a trench, it is necessary to make holes for the pillars at its bottom.
Next, you need to compact the recesses well, and at their bottom you need to place a sand cushion 5-10 cm thick. After the pillow, pipes are installed in the openings, and their verticality can be checked using a building level. If the supports are mounted using a simpler method of strengthening, then the holes are filled up to half the depth with crushed stone, and now you can begin to make a building mixture.
To create a high-quality mixture and obtain from it foundations used for entrance gates, it is necessary to pour a cement-sand mixture into a container with a ratio of 1 to 3 parts and add water, the amount of which should be at least 25% of the total mass. To increase the strength of concrete, you can add some crushed stone to the mixture. To mix the solution, you need to use a concrete mixer or, in the absence of such special equipment, you can use a drill with a “mixer” type attachment. It should be mixed thoroughly, and when the process is finished, it should be allowed to brew for a couple of minutes.
After preparing the cement mixture, it is driven into the recesses that are located at the bases of the pipes. Thus, we have a simple foundation for the gate, which involves strengthening the strength of the supports. You need to leave it alone for several days until it dries completely and cover the supports with bricks for cladding, if necessary. And when the concrete has gained strength and the supports are securely fastened, you can install the gate.
If, for swing-type gates, a trench is used to place the foundation, then before installing the posts you need to prepare reinforcement, that is, reinforce that area. To do this, you need to stock up metal rods of the same size and connect them together by welding. It is necessary to weld so that the result is a rectangular parallelepiped. The completed frame is placed in a trench, and pillars are placed in the open holes, which are then filled with cement mixture.
After this, the entire trench is filled with cement, and several days are allocated to wait for the base to be ready. During this time, the foundation under the gate and gate will be able to dry out and gain strength. This method will help create the most reliable foundation that will last a long time without complaints.
By following the above recommendations, you can make the highest quality base for swing gates. And the most important rule for successful work will be to take correct measurements, as well as check the verticals of the supports using a building level and in no case violate the order of work.
Peculiarities
A properly designed diagram and building materials will help you make a high-quality base for a gate. First you should make a drawing and prepare the place. It is worth remembering that errors during installation work will lead to subsidence of the structure and gradual destruction.
The concreting scheme for sliding gates and swing gates assumes:
- cleared and prepared area;
- system drawing;
- dug trench;
- welding of frame structure.
It is important to calculate the correct dimensions of the base. The greater the weight of the canvases, the deeper the foundation is made.
The trench size varies from 1.2 to 1.8 meters.
Trench foundation
If the swing gates also have a wicket and are long, then they may have to be poured along the entire length. To do this, in addition to the holes for the pillars, you need to dig a solid trench along the entire length of the structure. The depth is 1 meter. Width - 10 cm larger than the diameter of the pipes. Compact the soil in the dug trench, then fill it with a sand cushion and reinforce the trench.
The ratio of cement and sand for concrete is 1:3. Also add a little bit of crushed stone. After the concrete has been poured and hardened, install the gate without worrying that it will warp or tilt over time.