DIY spiral staircase to the second floor + drawings
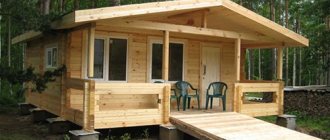
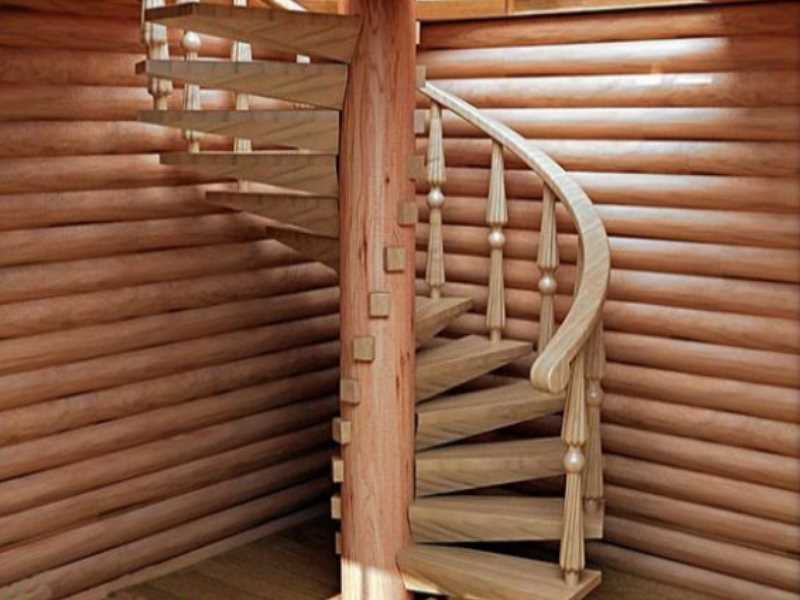
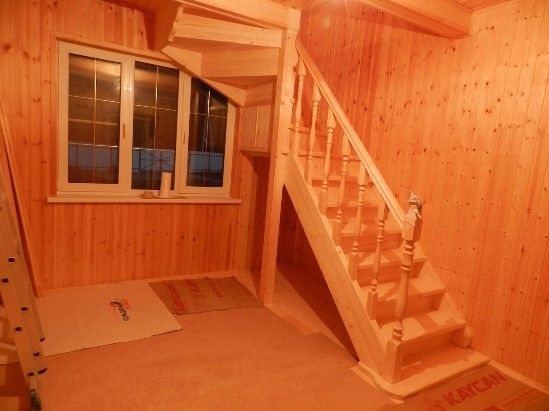
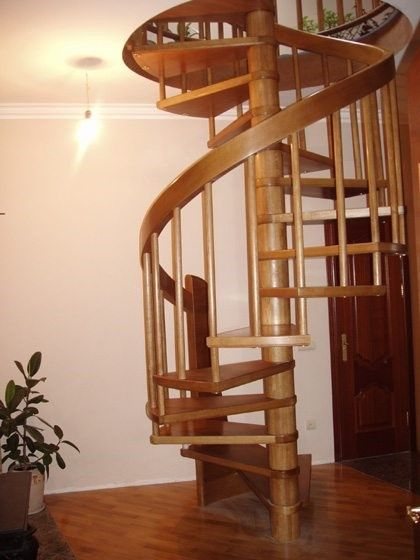
The spiral staircase is the most popular staircase design in cottages, apartments, and country houses. This demand for it is explained by its ability to significantly save space in the house, and at the same time bring certain features to the interior of the room.
Let's look at how to make a spiral staircase to the second floor with your own hands.
Pros and cons of spiral structures
You should not rush and purchase all the building materials to create a spiral staircase; first you should familiarize yourself with the advantages and disadvantages of such structures. Unfortunately, there are practically no ideal things, and even knowing how to make a spiral staircase, the owner of a house or apartment must learn all the pros and cons of such structures.
Pros:
- Small sizes. Which is most convenient, for example, if the area of a private house is small. At the same time, by installing the required number of steps and correctly calculating all the dimensions, a do-it-yourself spiral staircase will become much more practical to use than an ordinary marching structure. It also simplifies the calculation.
- An attractive design that allows any owner of a private home to awaken the designer in themselves. When creating screw structures, you can choose such an unusual appearance that it will become a real work of art.
- Affordable price. Of course, if you do not make the steps from stained wood or mahogany, then the cost of a standard spiral staircase may “pleasantly” surprise the owner of the house. The most expensive element will be the metal frame and its welding; the rest of the calculation (consumables, wood for steps, etc.) has an average cost.
Minuses:
- After the construction is completed, it is quite problematic to lift or lower any cargo along the spiral staircase (this could be furniture, household appliances, or other bulky things). Therefore, all large items should be moved to the second floor or lowered from it in advance.
- Lack of convenience. It takes some skill to quickly ascend or descend a screw structure. This becomes especially difficult if the number of steps and their sizes are incorrectly calculated.
Otherwise, spiral staircases to the second floor are no less popular than marching structures; it does not take much time to make them yourself.
Video from YouTube:
Details
What are their pros and cons?
Advantages and disadvantages of screw structures
Spiral staircases, like other types of structures, have certain advantages and disadvantages. The main advantages of screw structures include the following:
- The assembly of the product is compact - spiral staircases are much more compact compared to simple staircase structures. For this reason, they will take up much less space in the house. This indicator is extremely important for rooms of small area and size.
- Aesthetic properties - the helical spiral design looks very attractive from the outside. It can become a real decoration of any room.
- Low cost - installing such a staircase in a private country house will not be as expensive as building a simple staircase. To save money, you can do it yourself, without resorting to the help of professionals.
- Placement of the ladder - it can be mounted near a wall or in the center of the house.
- Flights of stairs can be made with the narrow part towards the center of the stairs, and the wide part should be near the wall.
The disadvantages include the following:
- Difficulties in lifting loads upward - in this case, frequent turns and a small area will become an obstacle. It is almost impossible to lift long objects up.
- Difficulties associated with walking on stairs - it is much more difficult to go up and down such stairs than a simple one. This mainly affects older people and children. If during the preparatory process of drawings of a given staircase, and also during installation, all proportions are not taken into account, the stairs can become dangerous.
It should be remembered that spiral staircases have another feature - narrowing the steps on the other side. If the staircase turns out to be very steep, then the narrowing also poses a certain threat when walking. This disadvantage can be easily corrected if you make reliable and strong railings.
Types of materials for creating screw structures
Drawings of spiral staircases to the second floor help the work. Truly durable for installation in your home. A reliable and at the same time beautiful screw-type design, first you need to choose what materials the structure will be made of. The material must always be of high quality and meet all safety requirements. Typically, spiral staircases can be made of metal or wood.
Wooden stairs - during the construction process, only wood is used, and here the supports are made from beams. Its cross-section should be 0.1 meters, and the steps are attached to the walls, using stringers for this purpose.- Staircase structures made from profiled metal pipes using welded work. Here they use metal, channels and corners for fastening.
- Forged metal buildings.
- Combined type structures - here only the base is made of metal, and all other elements are made of wood, plywood or MDF overlays. This combination is found in the form of a combination of MDF and stainless steel. Railings are usually made of plastic.
The simplest option for installing a spiral staircase in a building is a modular design that is ready for the assembly process. These include finished metal parts, steps made from natural wood, as well as supports made from profile pipes.
Calculation and drawings, development
Probably one of the most difficult parts of working on a screw design project will be creating the drawing. Professionals in this matter strongly recommend developing a drawing of a spiral staircase only after a detailed plan of the first floor of the building is ready. The installation location of the screw-type structure should be indicated there. The plan must also indicate the exact dimensions of the opening, and also take into account the scale of the building plan. In the staircase drawing you need to indicate in detail all the characteristics of the product. These include the width of the inclined plane of the structure, as well as the thickness of the material. On their basis, all the calculations that are required for the further installation of the staircase structure are made. Detailed calculations must be done very carefully, everything must be thought through to the smallest detail. Otherwise, errors can lead to unreliability of the product and the chance of injury when using stairs.
When making calculations, the following points must be taken into account:
- Selecting landings that are suitable for staircase construction, as well as developing drawings. The staircase entrance to the second floor is at least 2 square meters. It must be accessible in order to carry out structural assembly.
- Calculation of the number and placement of steps. Quite often, spiral-type stairs do not have risers. Because of this, it is necessary to make small steps overlap each other at the narrowing point.
- Calculation of the most convenient step width for ascending and descending a staircase structure. This is required in order to prevent stumbling over adjacent steps when walking. Usually, only 12 steps are enough to climb to the second floor.
- Increasing the dimensions of the minimum width of the stairs. According to the standard, the width of the staircase structure is 1.2 meters. The slope is 45 degrees.
Let's talk about documentation and standards.
Regulatory documents and requirements
When working on spiral staircase projects, it is necessary to comply with the requirements of documents with standards, such as SNiP and GOST. The parameters specified in them will take into account all the proportions and properties of the human structure. They are the ones who help to make a competent staircase drawing. In addition, they provide assistance in the installation of staircase structures. The documentation specifies the following characteristics:
- Dimensions of steps, their recommended ranges. The exact dimensions of the height, thickness, width and depth of the steps are indicated here.
- Indicators of the depth of the steps near the central support, and only the minimum possible values are indicated.
- Dimensions of the structure for which it is important to install additional fasteners (stair balusters, central stringers and fences, railings).
- Dimensions of staircases.
All requirements must be strictly fulfilled. Such documents will regulate the activities of both construction companies and ordinary people who have a desire to do all the work on installing spiral structures with their own hands.
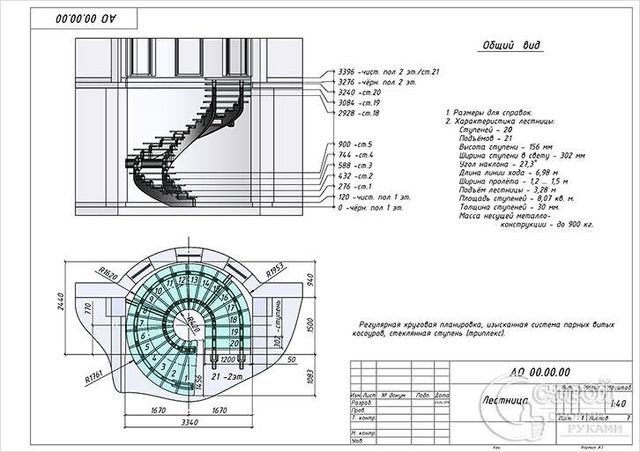
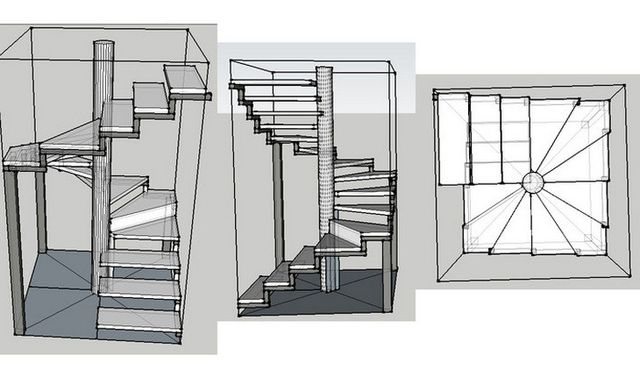
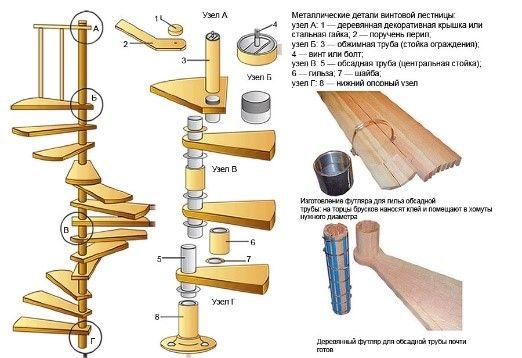
Drawing of a simple spiral staircase
Of course, you can not waste time on calculations and drawings, and purchase a ready-made structure that only needs to be assembled. But the cost of a finished spiral staircase (a drawing of which will be presented below) will be much higher than its independent production and installation. You also cannot trust the quality of the material from which the structure is made. If the quality of even the wood for the steps is insufficient, there is a high risk of injury to family members, for example, when a step breaks.
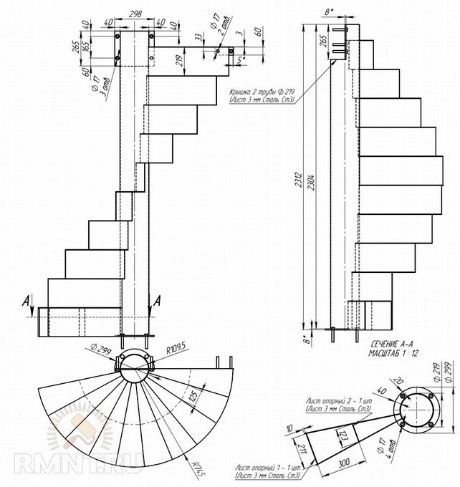
Drawing of a spiral staircase without support
The beginning of drawing up a drawing is to allocate free space, the area of which should be at least two square meters. These dimensions are designed for maximum comfort both when lifting a person and when descending. Also important is easy access to the top and bottom of the stairs. This is very correct and practical from the point of view of fire safety, and if a situation arises when a quick evacuation of all people in the house is necessary.
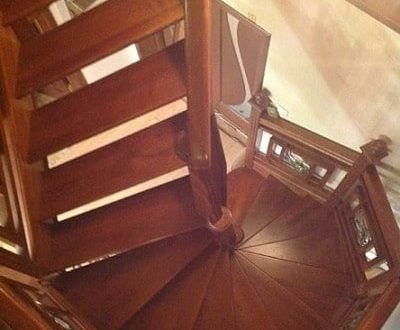
Standard spiral staircase
The next structural element of each screw structure is the steps. It is necessary to correctly select not only their number, but also the dimensions indicated in the drawing. On average, for greater convenience, the number of steps varies from 11 to 13 pieces. With more steps, it will be difficult for a person going up or down to take a full step.
Also, when making the calculation, you should pay attention to the degree of slope of the spiral staircase; you should not make it too sharp or blunt, the ideal value is 45 degrees. Then, when going up and down the steps, they will not be too raised up or down.

Drawing with assembly description
And lastly, the width of the staircase to the second floor, which according to generally accepted standards is 120 cm. Some home owners try to make the spiral staircase as narrow as possible, but this only leads to unnecessary inconvenience.
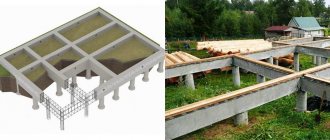
Manufacturing screw piles - step by step
When designing the above-mentioned SHS elements, it is necessary to rely on the drawings of any manufacturer of screw piles. This will allow you to avoid mistakes in the landing dimensions of the blades and minimize the number of welds, each of which weakens the metal in the immediate vicinity of the joint.
Pile body
The production of SHS begins with the selection of pipes that make up the foundation. Experts recommend adhering to the manufacturers’ specifications:
- St20 – corresponds to GOST 8732;
- 09G2S – corresponds to GOST 19281.
Pipes made from these materials are quite easy to cut and bend the petals when making the tip peaks. The standard length of the SHS is 2 - 3 m; if it is necessary to immerse to great depths to ensure that the bearing layers are reached, the pile is extended by a pipe after screwing in by 1.5 - 2 m.
Tip options
There are three tip options for a homemade screw pile. They all differ in manufacturing technology and part sizes. For dense soils, welded peaks or tips made from the pipe body are optimal. When screwing SHS into peat, sand or sandy loam, cross-shaped tips can be used. The design of the lance has virtually no effect on the service life of the foundation; only the tightening force on the levers changes.
Tip from the pipe body
Manufacturing using this technology will require an increase in the pipe body by the length of two of its diameters, since one end of the pile blank is turned into a tip. The method consists of a sequence of operations:
- making a template - a triangle is cut out of cardboard, paronite or pipe;
- marking - the end of the tubular blank is marked according to a template into several sectors;
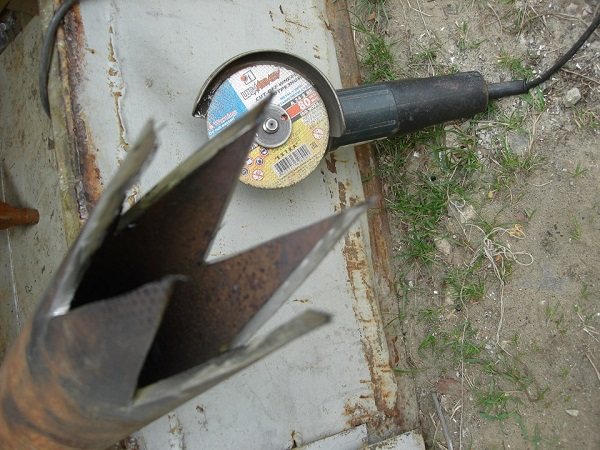
- cutting the pipe - serrated petals are made along the chalk lines at the end of the pipe;
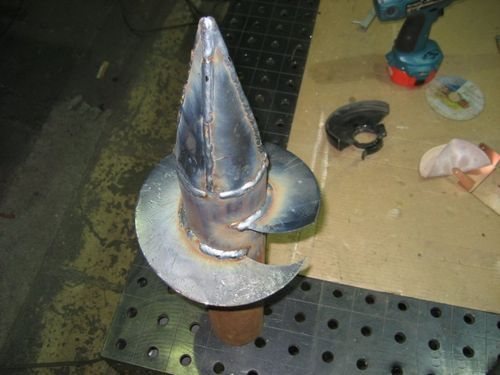
- bend – the petals obtained at the previous stage are bent into a cone, the top of which should coincide with the axis of the pipe;
- welding - the petals are welded to each other with a double seam.
Preparation of a screw pile tip from the pipe body.
When marking the template, you need to consider:
- for pipes with a diameter of 108 - 200 mm, it is better to make 5 petals;
- for 76 – 89 mm pipes, 4 petals are enough;
- the short side of the triangle is equal to πD/n, where n is the number of petals, D is the diameter of the pipe;
- the height of the triangle is equal to or slightly more than two outer diameters of the pipe.
The resulting peak has the shape of a cone, which is very convenient for welding the blade blank. To make SHS using this technology, you will need a welding machine (inverter), a plasma cutter/gas cutter or an angle grinder with metal equipment (cutting disc). The foundation is guaranteed to sink to the design layer, the peak easily moves apart small stones and crushes large boulders.
Welding tip
For foundations of small architectural forms and light buildings, welded tips can be used, manufactured using similar technology:
- cutting the petal - the development of the triangle is carried out in a similar way from sheet steel (4 - 5 mm) or a pipe of the same diameter as the body of the pile;
- tip assembly - the petals are installed close to each other, the resulting cone is tacked by welding;
- manufacturing - double tack welding.
The tip is welded from 4 triangular blanks (pyramid).
It is more convenient to join the blades to peaks made of petals cut from pipes rather than to pyramids made of sheet steel. In any case, the drawing below is used.
Cross tip
The third method of making the tip uses different designs. The technology looks like:
- cut of parts – triangle + stiffeners + round plate-plug for the pipe;
- assembly of the structure - a large triangle is installed on the plug, two stiffening ribs (at right angles to the plate), grabbed in several places;
- welding joint - all joints are welded with a double seam.
Pile with a cross-shaped tip.
The large triangle has dimensions:
- the bottom side is equal to the diameter of the round plug (the outer size of the pipe);
- height is π x D.
When choosing a cross-shaped tip, it is necessary to take into account that the blades (pile auger) in this case are welded above the peak. This is the only drawback of this design, which increases the tightening force.
Manufacturing of blades
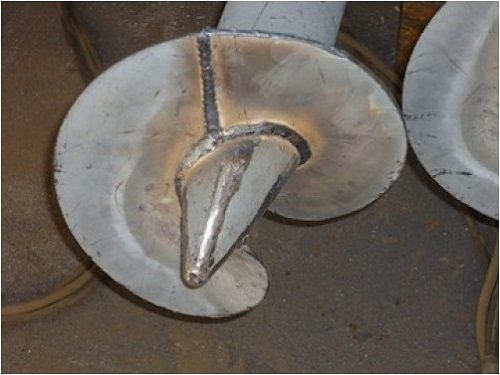
Single-throw blade.
The easiest way to tighten piles is the screw of which starts in the lower third of the tip, the pitch of the blade is 5 - 7 cm. This SHS element has a complex configuration, made of thick sheet steel from 5 mm. Therefore, you can make blades in several ways:
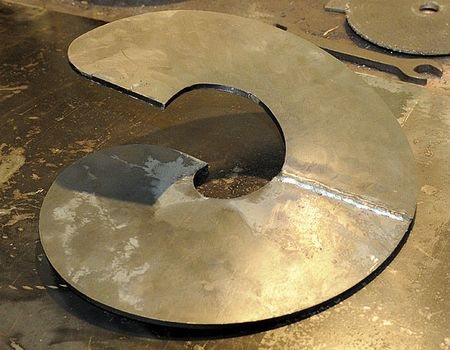
- solid single-throw propeller - cut the sheet blank according to the drawing shown, spread the blade with a crowbar or pry bar to the required pitch size;
- a prefabricated screw from several blanks - cutting individual segments (half a circle maximum), sequential welding of each of them onto a peak, the body of the pile.
In the first case, it is physically impossible to perform more than one turn of the propeller. But the element has maximum spatial rigidity and stable geometry.
In the second option, it is possible to assemble a multi-start screw, but it is difficult to maintain the spiral configuration.
A single-thread blade is created in the following way:
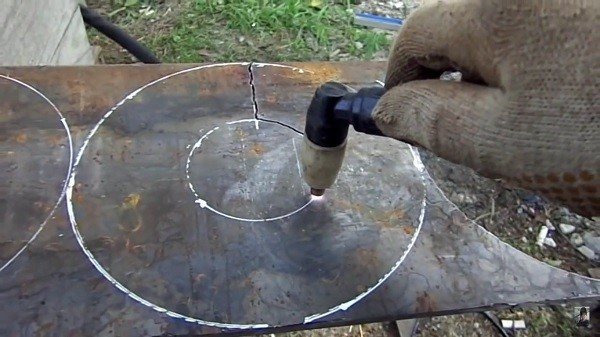
Cutting a blade for a pile using a manual plasma cutter along chalk markings.
- marking - the outer diameter of the workpiece is 15 - 30 cm depending on the load on the pile (usually 20 - 25 cm), the inner diameter is equal to the outer size of the pipe (for homemade piles, more often than not, 76 - 108 mm), a segment is drawn in an arbitrary place connecting the inner circle with external;
- cut - the part is cut from a 5 - 7 mm sheet using a plasma cutter, gas cutter or welding, taking into account the width of the cut, subsequent processing of the seat (inner diameter);
- routing - the area opposite the cut between the outer/inner diameter is clamped in a vice or slot in a massive structure (porch, gate, post with a fence section), the edges of the blade are unclenched with a mounting tool or a crowbar with constant control of the pitch of the auger turn.
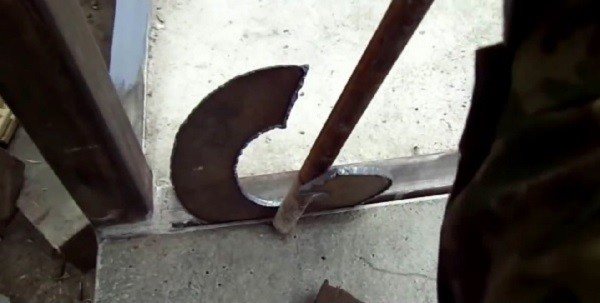
Bending a blade for a screw pile using a crowbar.
You can make multi-start auger blades using the following technology:
- marking - the internal diameter is equal to the outer size of the pipe (pile body), the outer diameter is 20 - 30 cm, the resulting ring is divided into two sections into identical half rings;
- figured cut – cutting according to markings in any sequence with a professional tool;
- installation on a pile - on the peak or pipe it is necessary to create a screw marking, attach the first half-ring, grab it, checking the perpendicularity to the body of the pile, then place the remaining half-rings along the line depending on the required number of turns of the SHS auger. If necessary, bend the half ring a little.
Multi-start blade.
The easiest way is to weld the auger or prefabricated screw segments to the body of the pile, since the cross-section of the pipe is constant throughout its entire length. The conical tip tapers, so the internal diameter of the blade must be smaller in this area. Therefore, the template for this element can be adjusted directly to the site, using sheet material of sufficient rigidity (paronite or cardboard).
Anti-corrosion treatment
For maximum service life, the elements of a pile foundation must be protected from corrosion. Every year, pipes and blades lose 0.01 mm of wall thickness due to rust of the metal immersed in the ground. Experts recommend coating SHS after removing scale from welds with the following compounds:
- polyurethane enamel - manufacturers Hempel, Masco, applied to VL05 primer, has a 30-60 year service life;
- two-component enamel - modifications IR02 or Zinga Metal, service life 60 - 90 years, created to protect underground metal structures;
- fiberglass - applied to a cold zinc coating (IR02 + VL05 primer), provides a 300-400 year service life, successfully resists electrochemical corrosion.
For budget buildings, two-component paint coatings based on epoxy resins are usually used.
Following the recommendations given, you can make screw piles on your own, ensuring the maximum possible service life of the foundation for home conditions.
Sequence of installation of a wooden spiral staircase
You should know that the installation and calculation of wooden and metal screw structures differ only in other components of the structure, as well as in the method of fastening all its main elements. The main element of such a staircase is the load-bearing support, on which the total number of steps will subsequently be installed. With a metal frame, the steps do not require additional fixation, and when using wooden materials, one side of them is fixed to the wall using anchor bolts.
Video from YouTube:
Installation of load-bearing support
The support post is the main element of the spiral staircase to the second floor, which requires not only correct and accurate installation, but also the use of reliable building materials and precisely measured height. Therefore, when choosing wooden components, it is necessary to pay special attention to wood processing.
Example of installation of a load-bearing support
As stated above, a wooden spiral staircase will require free space of at least 2 m2. The support post is installed exactly in the middle of this space. To measure the center of the site, it is necessary to connect the corners of the rectangle and install the support at this place.
How to install a load-bearing support:
- A wooden stand usually consists of several parts of a certain height, so initially its lower part must be securely fixed to the floor. This is done using anchor bolts. For better fixation, you will need 6-8 anchor bolts. A hammer drill is best for this job, but a less powerful hammer drill can also be used.
- Next, the remaining parts are installed on the wooden stand; metal strips are used to secure them. It should be remembered that for better fixation, grooves must be provided in the parts of the support. Then, after finishing the work, the structure will be more monolithic.
- After the wooden support is installed, additional fastenings should be installed on the walls, to which the steps will subsequently be fixed. To install the fastening, as well as for the stand, anchor bolts are used.
Compact wooden support
Installation of steps
Installing steps on a wooden spiral staircase is no less important than installing a central support. After all, the ease of movement up the stairs to the second floor depends on their correct location. In order for the steps to accurately fit the support, pieces of metal angles should be secured to it, which must first be accurately measured using a building level.
Correct fastening of steps
Holes are drilled in the pieces of metal corner, with the help of which the steps will then be fixed. It should be remembered that for better fixation of wood, in addition to bolts, you should also purchase wide metal washers. Two holes in the corner will be enough; for greater reliability, you can make three of them.
Now you can purchase ready-made small corners specially designed for this type of fixation. Holes are drilled in them; you just need to fasten such products at the bottom of the steps, and on the other side pull them to the central support.
A more labor-intensive option is to manufacture steps of a special design, in which they are simply placed on the central support. Typically, this form of steps is provided in custom-made spiral staircases; if you do them yourself, it will take too much time. Having installed the steps on one side on a support, on the other side they still need to be secured to the wall.
Example of stacking steps
Railings - safety first
Railings are an integral part of any spiral staircase, especially if it has a spiral design. For a more harmonious look, the railings or handrails should be made of medium height, and from the same material as the rest of the DIY spiral staircase.
Reliable and high-quality railings
Of course, many home craftsmen try to combine carefully crafted metal and high-quality wood species, but this leads to additional costs. Therefore, the same railings should be made on a wooden spiral staircase.
You can attach the railing posts to the steps using self-tapping screws, deepening the caps into the wood, and then opening them with a special wood sealant. An older (but very reliable and proven) method is the method of fastening a wooden structure using wooden nails or, in simple terms, choppers. The chopik is planed from a block, its diameter is no more than 0.8 cm. Then a hole is drilled in the lower part of the railing posts, which is also necessary for the steps. Next, the stand and steps are connected using a chopper, which must be driven in.
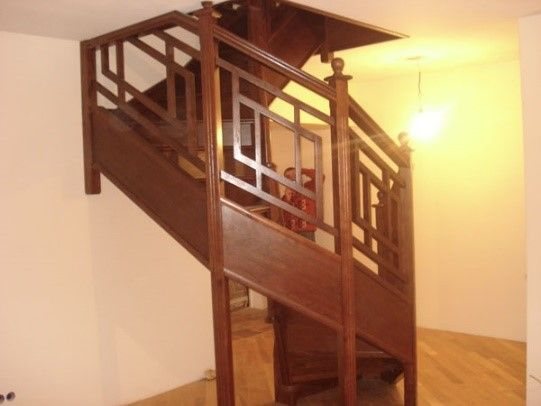
Expensive curved railings
You can also attach the railings to the posts using self-tapping screws or medium-diameter wooden nails. After the structure is ready, it can be opened with varnish, having first given the required color with mastic or stain.
Where to begin
The first thing you need to do before you start making screw piles with your own hands is a drawing. Let this be the simplest sketch, but on it you will be able to indicate the main dimensions of the product, and it will be easier for you to calculate the required amount of materials and mark the blanks of the support elements.
Indicate on the drawing:
- diameter of the pipe - trunk;
- pile length (including cone);
- cone angle or height;
- the distance from the top of the cone to the bottom edge of the blade.
If you are preparing piles for a wooden building, provide a head and stiffeners.
At this stage of work there is one snag - determining the length of the pile. By any means, you will have to find out at what depth the dense soil lies in the construction area.
The most correct, but also expensive way to find out this parameter is to order geological studies. Based on their results, a calculation of screw piles for the foundation is made.
But, since serious buildings are not erected on homemade piles, it is difficult to consider such costs expedient.
Most homeowners turn to experienced practitioners for information: there is always a person among the neighbors who has an idea about the composition of the soil in a given locality.
The length of the pile should be 300-500 mm longer than the depth of the bearing layer: by this amount it will protrude above ground level.
How to make a spiral staircase from metal. Pros and cons of the design
A DIY metal spiral staircase has a number of advantages that cannot be compared with wooden structures. For example, this is a longer service life, less time-consuming and costly processing, as well as high reliability of products mounted from metal. But if you skip all the advantages of metal stairs, then there are a number of disadvantages that you should also pay attention to:
- High price. Metal for stairs (even not of the first quality) is a fairly expensive type of material. In addition to purchasing it, you should also spend money on transportation and unloading.
- The need to use welding. Of course, you don’t have to hire welders or buy a welding machine, but simply use a drill, a set of metal drills and a large number of bolts with nuts, washers and grommets. But this not only disrupts the aesthetics of the entire structure, but also significantly reduces the reliability of the staircase itself.
- A metal staircase requires a concrete platform, otherwise the floor of the house may simply not support the weight of the entire structure.
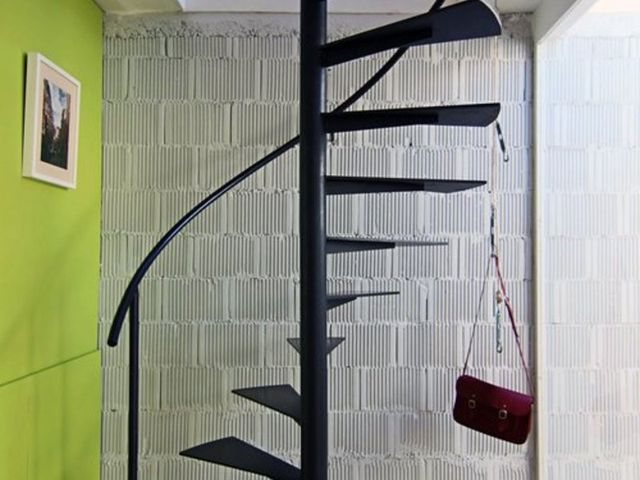
Simple Design Metal Spiral Staircase
Installation of a spiral staircase made of metal occurs in exactly the same order as a wooden structure. The main difference is the connection of all elements. If self-tapping screws, wooden nails and sometimes bolts are used for wooden stairs, then for metal ones it is best to use a welding machine.
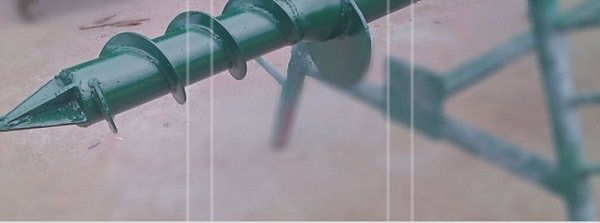
Screw pile design
Despite the variety of designs, factory-made and home-made screw piles have several elements:
- body – pipe with a diameter of 76 – 350 mm, a wall of 4 mm;
- tip - cast, welded peak (recommended length 2 diameters) or a cone made from the body of the pipe;
- blades - one double-start or single-start spiral or two screws at a distance of 0.4 - 0.7 m from each other (for layers with weak bearing capacity);
- cap - relevant for wooden grillages (log houses, frame, panel, panel houses), is a plate with holes, reinforced with stiffeners, welded to a pipe coil, the internal diameter of which is slightly larger than the outer size of the pile body.
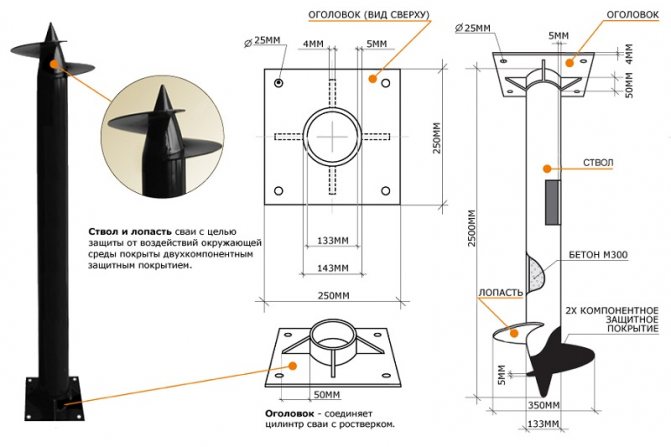
Screw pile design drawing.
The foundation from a metal grillage on screw piles is assembled without caps. The channel and I-beam are welded directly to the body of the pile protruding above the surface of the earth.