Making screw piles yourself is a serious matter, and we have taken on the difficult task of describing the technology of this process. Detailed drawings and photos of the work stages are attached, since without this it will be impossible to master the technology. In addition, at the end of the second section, you can watch a video instruction from a specialist with detailed explanations of all the nuances of the technique.
Most construction specialists do not recommend making screw piles yourself, emphasizing the complexity of the process and great responsibility. But, despite this, we can confidently say that having become familiar with the manufacturing technology and having the drawings of screw piles at hand, it is quite possible to make these products with your own hands.
Screw pile design
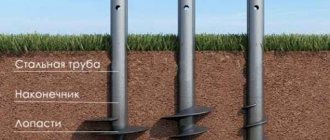
The screw pile resembles a ship's propeller in appearance. It is a hollow steel pipe, which on one side is equipped with a sharp tip equipped with a cutting spiral blade.
The drawing above shows the components of a screw pile:
- A barrel made of pipe with a wall thickness of at least 3.5 mm.
- The shoe, that is, directly the lower part of the pipe.
- Tip.
- A helical blade, the shape of which and the angle of inclination determine the force of twisting into the ground.
Thanks to the spiral blade, the pile is screwed into the ground to the required depth. On the other hand, when the screwing stops, the blade will prevent the pile from being pushed outward and securely fixed in the ground. This design of screw piles when arranging the foundation allows you to do without the use of lifting mechanisms.
Use of wide-blade piles
Broadband piles with several cutting blades are more widely used in construction.
The use of such piles when creating foundations allows you to double the compression and pullout loads, and also makes it possible to increase the loads on the foundation in the future.
Thus, when constructing foundations for the most important buildings built on slopes, for multi-story buildings, multi-blade piles are used.
Narrow-blade screw piles can be different:
- In the form of a pipe with a tip on which there is a blade. The tip is cast and welded to the steel pipe. This pile is excellent for use when creating foundations in rocky soils.
- Piles used in soils with periodic freezing or in permafrost soils. The bottom of such piles has a chamfer - straight or serrated.
Both in the first version of the piles and in the second, the number of blade turns is always more than two.
Making screw piles for a fence with your own hands
As you know, arranging a screw foundation is a relatively simple undertaking, so many are interested in the question of how to make screw piles on their own, because this will significantly save money.
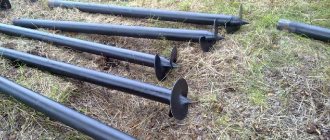
Most often, piles are made by hand for the construction of fences. To make your own piles, you first need to prepare the following individual components:
- Pipes with the required diameter.
- The screw part, in increments of about 5 cm.
- The tip is at least 15 cm long.
- Heads for fastening timber or beams.
The length and diameter of the pipes are the main technical parameters of screw piles. The length of the product is determined depending on the type of soil. Its value should be such as to ensure that the pile is immersed to the level of stable soil.
The choice of pile diameter depends on the magnitude of the forces created directly by the building structure. In accordance with the type of fencing, it is recommended to use pipes for the manufacture of screw piles of the following diameters:
- 55 mm - for installing lightweight fences, for example, from chain-link mesh.
- 76 mm – for mounting fencing made of metal corrugated sheets or slate.
- 89 mm – for arranging a massive fence made of bricks or light blocks.
For the production of screw-type piles, it is recommended to purchase special blanks with a cast tip. But if this is not possible, then it is made independently directly from the pipe used. For this:
- The ends of the pipe are cut into separate sectors of a certain size according to the pattern.
- They are welded into a cone.
- The seams are straightened.
The screw part can be made of steel 5-6 mm thick. Today you can purchase special blanks for screws, but their cost will be higher. The outer diameter of the installed screw should be selected depending on the characteristics of the soil, namely, the deeper the pile needs to be screwed in, the smaller the screw diameter should be.
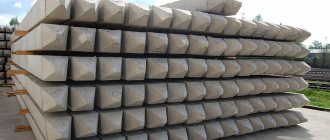
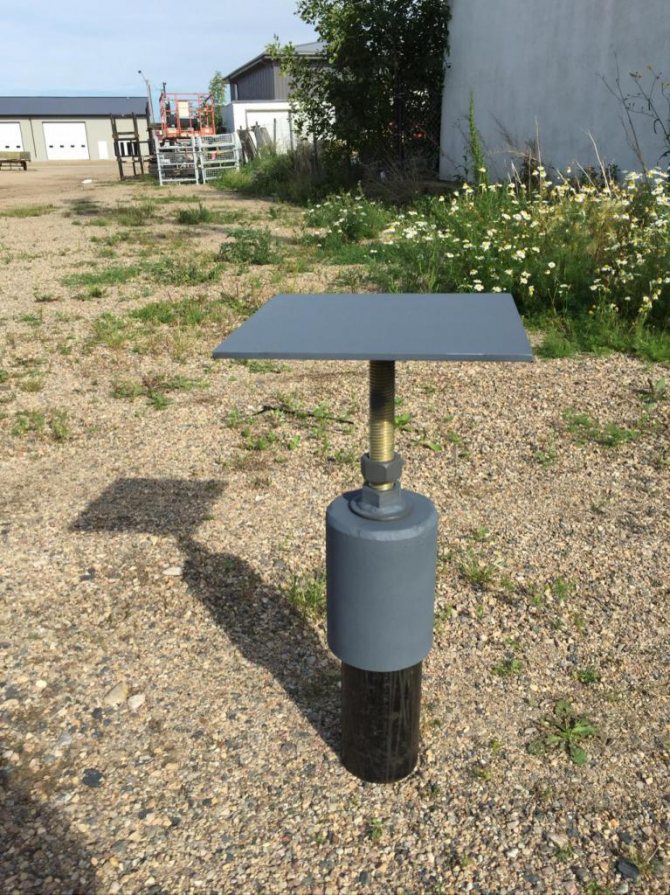
A cap must be installed as a base for securing the screw pile of a channel or beam on top. A correctly manufactured product looks like the photo below:
All prepared components are connected to each other by welding. It is very important to monitor the quality of the weld to prevent possible destruction of the structure during installation.
Detailed video instructions from the master with comments will help you clearly see the process of creating a pile with your own hands.
Video review: Homemade screw piles for a fence
Homemade screw piles for a fence
We also recommend: Screw supports for fence
Blade
The blades are made from one or two screws.
This is the main working part of the screw pile. It is made from sheet metal 5 mm thick. This is the most difficult part to make yourself.
It can be made in the form of a single or double-thrust spiral. For convenience, it can be made in the form of two screws. This type of blade is best suited for soils with low bearing capacity.
When making blades with your own hands, you first need to make templates according to which the internal and external diameters of the workpiece are marked.
When solving the problem of how to make a screw pile yourself, you can use the table, which shows that the outer diameter of the blade directly depends on the diameter of the pile itself:
Taking into account that the workpiece will be bent, to form a blade, its size will differ slightly from the diameter of the barrel.
Ready-made cast tips with a blade can be purchased at a specialized construction supermarket. They will shorten the process of home production and at the same time increase the stability and strength of the foundation for the building.
Screw piles for the foundation of a house
The process of making a screw pile for constructing the base of a building is similar to that described above. But if there is the slightest uncertainty about the quality of production and doubts about the correctness of calculations of the bearing capacity in accordance with the types of soil and load, experts do not recommend using home-made products for arranging foundations. That is, to produce screw piles you must have experience and relevant knowledge.
ATTENTION! To build a foundation, it is recommended to purchase ready-made piles from well-known manufacturers, since factory-made products in any case have a longer service life.
Manufacturing process
So, you have decided to build a small house, garage, or outbuilding on a foundation of this type. The length of each pile should not be less than 200 mm. Their manufacture will require the following materials:
- pipe of suitable diameter;
- blade of suitable diameter and pitch;
- cone-shaped tip (for example, 150 mm long).
For work you will need an electric welding machine and 3 mm electrodes. The blades and cones are cut from sheet steel, and the special configuration of the screws should be taken into account. The cone is marked in the form of an isosceles triangle with a base equal to the circumference. The length of the sides is equal to the length of the cone (Download the drawing).
Important: independent production and welding of parts must be carried out in strict compliance with the parameters. The slightest changes can lead to disruption of technology. For example, a slight shift in the angle on a screw leads to defects in the product and the impossibility of its use.
Trimming and concreting piles
After screwing in the piles, they must all be trimmed to the same level. A hydraulic level is used for marking, and a grinder or hand saw is used for cutting. It is important to make the cut clearly in a horizontal plane. The minimum cut size is 10 cm, along the length of which there are holes for the lever.
Watch the video on how to level the height of the piles yourself.
Concreting is not a mandatory procedure for buildings with a minimum weight.
Screw piles must be concreted with a solution no worse than M150. To do this, you need to mix it in sufficient quantities to fill a whole number of supports at a time. When pouring, one of the difficulties is the need to remove air. Therefore, when pouring, the use of vibrators or mixers will be required.
If the air is not completely removed from the pipe, then this threatens the emergence of corrosion processes that will significantly deteriorate the strength properties and shorten the service life several times. After concreting, at least 14 days must pass, after which you can begin installing the caps and installing the trim.
Hand tool
If the future building is small, then a few screw piles will be required. In this case, the work can be done manually. The design of such a tool is simple. Therefore, you can make it yourself. To do this, you will need a steel plate (the thicker the better), fittings, two two-meter pipes, an angle grinder with cutting wheels and a welding machine.
Manual pile installation
First you need to cut the plate into four parts. They need to be connected to each other so that the result is an equilateral glass. It must fit tightly onto the edge of the pile, otherwise it will slide off when tightened. Two eyes are made on two opposite sides. To do this, it is better to use reinforcement with a diameter of at least 12 millimeters. The pipes in this case will act as levers. The longer they are, the easier it is to tighten the pile manually.
The advantage of such a device is the ability to install the support for the building manually. This will save money on purchasing or renting complex equipment. This design is easy to make yourself. When performing work, there is no need to control the torque so as not to tear off the blades on the pile.
The disadvantage of the manual option is that it will require at least three people to complete the work. Two people tighten the pile, and the third guides it, focusing on the level. Another disadvantage is the large area for mounting one support. With little leverage, builders must be very strong. And if the building is located next to an already erected building, then the installation of supports will take much longer (it is necessary to rearrange the pipes into the eyes on the other side of the sleeve), or even become impossible.
Regardless of the type of soil, the pile will tilt during driving. This is due to the small number of blades on it. To level it, you need to tilt the pole in the opposite direction and make several turns of the mechanism. Then you should return the support to the vertical position and continue screwing. If the pole continues to tilt, repeat the procedure until it reaches the required position.
What to do if the pile cannot be tightened
Damage to the pile
If it turns out that the pile has fallen not just into dense soil, but into stone, then it is necessary to stop work, unscrew it and understand the situation.
If you continue screwing in, there is a high probability of damage to the blades, which will make the structure unsuitable for further use. There may be several possible solutions:
- If an ordinary stone gets in, the matter is resolved by simply removing it from the well in any convenient way.
- If the calculated depth is reached, then it is recommended to screw the pile back in and it will provide sufficient strength and performance characteristics.
- If you hit a rock formation, further work will require the involvement of a drilling rig that can break through it and provide the possibility of further deepening. The second option is to shift the construction site to a side where such a layer presumably does not exist. It is recommended to do this only when all the piles have been screwed in, except for the intermediate ones.
- You can take a risk and try to deepen the pile, assuming that the dense layer has a minimum thickness. However, damage to the blades will be guaranteed and it is not a fact that it will be possible to deepen it further, but it will definitely have to be changed or, at least, straightened.
We recommend watching a video of the process of installing a pile using a lever.
Making a cone tip
In factories, tips are made by casting. Do-it-yourself screw piles for the foundation are made “on the knee”, so it is easiest to form a cone from the body of the trunk.
Making a template
We start again by making a template. It is a triangle cut out of thin sheet metal or any other soft material (thick cardboard, plastic, etc.).
The height of the template is taken to be equal to two pipe diameters.
To determine the size of its base, you need to perform simple calculations:
- calculate the circumference of the trunk section: to do this, its outer diameter is multiplied by 3.14;
- divide the result obtained by the number of sectors from which the cone will be formed (for a pipe with a diameter of 76 mm, four are enough).
This will be the length of the base of the triangle - the template.
Cone design
Using a template, mark 4 sectors and cut them out of the pipe body using a grinder.
Carefully beat the remaining triangles on the pipe with a sledgehammer towards the center of the cross section until they are completely closed. Weld the joint lines with a continuous seam.
The weld must be of high quality. The number of sectors can be increased.
General recommendations for twisting
- Before drilling begins, the characteristics of the soil should be studied, in particular the depth of dense layers. Having this information, you can plan further work and select a tool;
- The installation locations of the rods must be marked in advance. The load from the building must be distributed evenly;
- Immediately before screwing in, a well is drilled at the installation site, acting as a guide;
- The height of the installed pile should be left with a small margin. The extra centimeters can be cut off later when leveling.
Installation of intermediate piles
When constructing large objects, corner piles alone are not enough and therefore it is necessary to install additional ones designed to reduce the load on one support. Using the tensioned threads and completed intermediate holes, it is necessary to check the vertical position of the structure with a level. If some deviations are observed, you will need to remove some of the soil with a shovel for clearer alignment. After this, we carry out the installation using a method similar to corner piles.
The intermediate screw piles must be manually tightened first around the perimeter of the building, and then in the center. This sequence is explained by the simplification of control of the position of the internal supports due to the tension of the twine through those piles around the perimeter.
Types of motor drills used
Well drilling devices are classified mainly by power and engine type. In order to screw in screw piles quickly and with minimal effort, you need to know for which category of soil a particular type of motor drill is suitable.
The lightest mechanical motor drills, weighing up to 11 kg, are operated by one person and have low engine power (up to 3.5 l/s). Such a manual installation can only be used for drilling in soils of categories 1 and 2 , which are characterized by low density.
A mechanical motor drill with an engine capacity of 3.5 to 7 l/s can be operated by one or two operators. The weight of such installations is up to 30 kg, so it can be difficult to hold such a device when working on heavy soils. Motor drills of this type can also be used exclusively on soils of categories 1 and 2.
There are mechanical motor drills consisting of two blocks - an engine and a drilling part, connected to each other by a rod. The weight of such a device is about 80 kg, the engine power is 5-8 l/s. Thanks to the connecting rod, which absorbs the kickback, you can operate such a machine alone; drilling soil of the 3rd category is allowed. It is convenient to carry out test screwing of piles with such a motor drill, because it ensures minimal deviation of the support axis from the specified parameters.
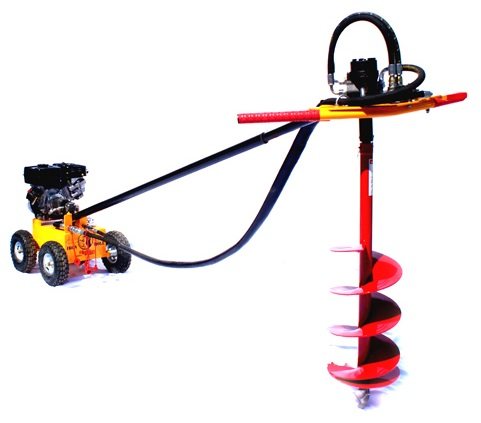
Drilling piles with a motor drill
Hydraulic motor drills with engines with a power of 11-15 l/s are used for drilling wells in soils of the 2nd and 3rd categories. The manual installation with a hydraulic drive is convenient to transport; its weight is about 80 kg. The device can be controlled by one operator, but in practice it is more convenient to operate such a fairly heavy device with two people.
On the construction equipment market, domestically produced Iron motor drills are popular, which are available with both mechanical and hydraulic drives. Comparing how much it costs to rent such equipment with the time costs, it is obvious that using a motor drill is profitable and practical.
Safety precautions when working with a motor drill
Before work, you should always inspect the equipment, check the reliability of fastenings and the functionality of all components. Particular attention should be paid to the cutting edge; worn knives are a common cause of overload and equipment breakdown.
During operation, the operator must:
- use protective equipment (goggles, helmet);
- make sure that clothing does not touch the rotating part of the drill;
- always assume the presence of foreign objects in the soil;
- Do not operate at full power without proper load.
Finished wells should be covered or marked before installing the piles.