At what temperature can the foundation be poured - construction in winter and summer
Rules for pouring the foundation in the summer months
High summer temperatures pose a danger to a newly built foundation. Under the influence of heat, the mixture may increase in volume. As a result of the formation of the finished foundation, the cement stone should form, but due to the excess volume this will not happen. Therefore, the owner runs the risk of putting into operation a foundation that can become covered with cracks at any moment. The first signs will be visible within a few hours after the formwork is removed.
Hot weather forces specialists to use quick-hardening cement mixtures. They are usually used if the air temperature is above 25 degrees and the humidity is less than 50%.
The grade of cement should be one and a half times higher than the parameters of concrete. To improve the performance characteristics of the foundation, special additives must be included in the concrete mixture, the use of which will slow down hydration. For high-quality concreting, it is better to carry out work in the morning or evening hours.
In order to protect concrete from dehydration you need:
- Use sand and shavings (sawdust) to protect the surface;
- Using a sprayer, moisten the foundation;
- Pre-wet the wooden formwork.
Winter work – construction at low temperatures
During the winter months, the hydration process slows down. As a result, the foundation is unable to gain the required strength. At zero temperatures, concrete hardening practically does not occur. Only inside the structure being built does hardening continue for some time until all components have cooled down. The liquid does not have time to react with concrete. It simply freezes, after which it expands and hardens. Subsequently, there is a high probability of rupture of the structure of the hardened solution.
It is no secret to experienced builders at what temperature the foundation must be poured so that the performance characteristics meet all requirements.
Frosts sometimes make adjustments to the progress of work, so in winter, responsible employees are required to use special means and adhere to the following technologies:
- Warm up parts of concrete immediately before pouring and heat the formwork;
- Lay a special cable inside the foundation;
- Supply the electricity necessary to heat all parts of the reinforcement frame;
- Install heating elements around the foundation for 72 hours after pouring;
- The entire perimeter must be covered with film;
- Add special additives to the solution to accelerate the hardening process.
The practical use of any of the listed technologies increases construction costs. Therefore, these methods are unlikely to be suitable for private owners. Also pay attention to other methods of grouting in sub-zero temperatures. For example, in winter it is recommended to use cement mixtures that can harden quickly. They are marked with the letter R.
The application technology is as follows:
- It is necessary to heat 2/3 of the water for the solution, bringing it to a temperature of approximately 75 degrees Celsius;
- Add sand and crushed stone to the water;
- Add the remaining third of water and cement to the mixture.
At the same time, keep in mind that the time for mixing the solution increases by two times, and the vibration compaction increases by one and a half times. After pouring the solution, you immediately need to cover it with a film, which will allow you to retain heat for a while.
Dependence of the cost of work on the weather - how to save on the foundation?
Modern construction organizations carry out work on pouring concrete in the summer or at the end of spring or autumn before the onset of frost. The explanation is simple: it reduces the cost of construction. Construction of the foundation in the winter months leads to additional financial costs, and it is also necessary to take into account that:
- Even under the most favorable factors, a 25% increase in construction costs is inevitable;
- You cannot do without the use of expensive reagents;
- For private buildings, it will be necessary to use the services of mixers, since it is not possible to prepare the solution in winter.
- Home electrical wiring may not be able to withstand the load of heating the base, so the owner will need an additional source of electricity.
The only advantage of building a foundation in the winter months is that it allows you to begin construction work right away in early spring. However, you need to weigh the pros and cons and think about whether this opportunity is worth the financial resources spent.
Negative aspects of the method
Before a decision is made to install pits to inspect the foundation, you should understand that such work will entail some inconveniences that can affect not only you, but also your neighbors. These include:
- loud noise during dismantling of a concrete floor or blind area;
- dust and dirt in the workplace;
- sudden flooding by precipitation;
- increasing humidity levels;
- violation of the integrity of the waterproofing material;
- complications in movement around the inspected object;
- inability to operate the area to be inspected.
There are certain difficulties, but they do not affect the importance and necessity of such verification.
Is it possible to pour a foundation in winter?
Using the advice and recommendations of visitors to construction forums on the Internet, we can conclude that in private construction, building a foundation in winter is impractical because:
- Additional costs for concrete are required;
- It is necessary to adhere to special requirements for laying and curing concrete;
- It is necessary to control the temperature of the solution and heat the concrete;
- Due to the short daylight hours, additional lighting of the area is needed;
- It is difficult to force hired workers to work in the cold.
When can you pour the foundation in the spring?
Some experts rightly believe that spring is the most favorable time to begin construction work. If you have enough financial resources and if you make every effort, starting construction in early spring, you can celebrate housewarming by next summer. Before starting the “construction of the century,” it is advisable to invite a surveyor to study the site to find out the features and characteristics of the soil.
Spring is usually the most optimal temperature for pouring the foundation. Unlike in the summer, the concrete will not dry out. And for the foundation to set well, 1 month is enough.
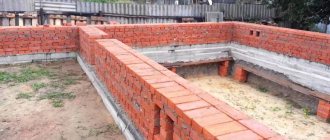
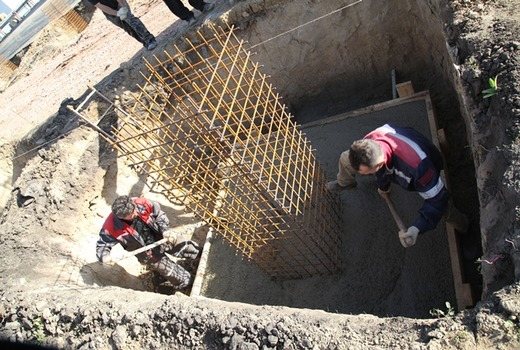
Preparing to pour the foundation
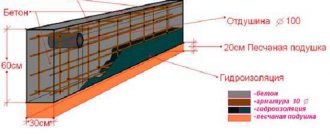
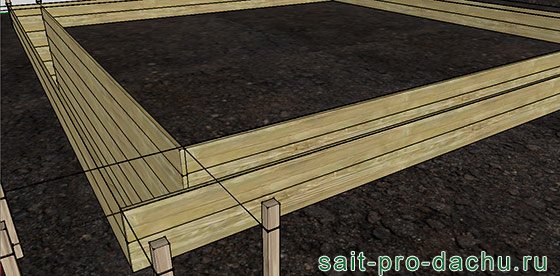
Initially, it is advisable to calculate the required amount of solution. Then you can roughly calculate the costs of construction work. Then begin marking the future foundation. Wooden pegs are driven around the perimeter outside and inside, and a cord must be pulled along them. Using the markings as a guide, they dig a pit. The depth depends on the freezing of the soil in the area. In the northern regions, the pit depth can be even one and a half meters. And, for example, in the middle zone - 50-70 cm. A small layer of sand is poured into the already dug pit. It is advisable to use coarse sand. Waterproofing is laid along the walls of the pit and to the very bottom. Then the reinforcement is laid, and the metal rods are tied together with wire. The finished formwork should protrude above the soil level. Usually boards are used to make formwork, but sometimes other materials are used (slate, sheets of metal, chipboard). Then they immediately begin to fill the pit.
The influence of the weight of the building
In many ways, the weight of the future house determines the depth to which the foundation must be dug. Thus, during calculations, the total weight of the house should be taken into account, which, in turn, depends on the main building material.
For a one-story building there is no need to make a complex foundation. It is enough to dig a small trench in accordance with the requirements for the type of soil.
In the case of two-story houses, it will be necessary to make a slightly greater depth than prescribed by the type of soil. If as a standard it is necessary to dig a trench with a depth of 1.3 m, then for a large building this value should be increased to approximately 1.8 meters.
It is important to note that the weight of the building greatly depends on the material chosen for construction. Therefore, when making calculations, it should be taken into account that a brick building will require a slightly greater depth than a wooden house. Typically, all these calculations are taken into account in projects drawn up by specialists.
Do-it-yourself foundation pouring
Pouring the foundation yourself is perhaps the most economical, but labor-intensive approach. This process requires a concrete mixer and at least three people. In this case, it is most rational to choose a larger volume concrete mixer. If you can’t pour the foundation in one day, you can stretch the work into two stages. It is important that the interval between stages does not exceed 12 hours. For example, we finished in the evening and started in the morning.
The first layer can be poured over the total area of the formwork. When finished, cover the filled part with some plastic wrap. The next morning, after washing off the cement laitance, you can continue working. This mode of filling in two parts is called “hot seam”. Most experts do not recommend using a “cold joint” (this is when a second layer of mortar is poured after the first has hardened).
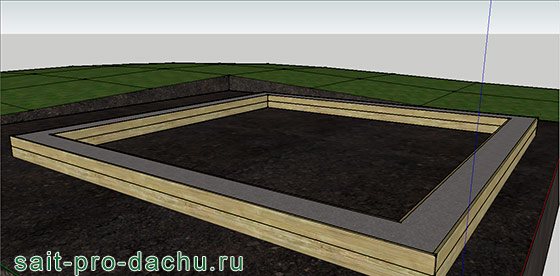
We must remember! The seam should be no closer than 50 millimeters from the longitudinal reinforcement bars. Each layer of concrete must be compacted so that cavities do not form near the reinforcement ties. After the foundation has been poured, it is covered with a protective layer of film, thereby protecting it from exposure to sunlight and possible precipitation.
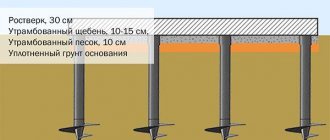
Puncture under the water supply with your own hands step by step
You can make a puncture underground for a water supply yourself, without involving specialists and contractors, if its length is no more than 30 m. Such work, with the exception of purchasing materials, will not cost the performer a penny, allowing you not only to save money, but also to gain useful experience in laying communications puncture.
Materials and tools
When piercing a road for a water supply with your own hands, the only materials needed are a thick-walled steel pipe with a diameter of 40 mm with a welded sharp tip of a pyramidal or conical shape. It is better to make such a working body from durable tool steel - a fragile material, when encountered in the soil with solid inclusions and layers of clay, can quickly fail by becoming deformed.
The tools for this work will be required:
Piercing stages
A simple puncture technology under a road or other obstacle consists of the following steps:
- Digging two trenches on either side of the obstacle. In this case, the trench from which the puncture will be made should be dug 1.5-2 meters more than the distance that is planned to be pierced under the obstacle. This is necessary for the convenience of working in a trench with a heavy sledgehammer.
- Laying a punching pipe at the bottom - using a level and bricks, the pipe is laid exactly in the center of the trench, resting the tip of the tip against the wall of the soil thickness that needs to be punched.
- Punching the soil layer under an obstacle - by hitting the end of the pipe with a sledgehammer, it gradually goes deeper into the soil until its tip appears in the trench on the other side of the obstacle. After this, the tip and the end flattened by blows of a sledgehammer are cut off using a grinder.
The pipe is removed from the puncture directly when laying a water pipeline into it, so that the earth around the made channel does not collapse and fill it up.
Is it possible to pour the foundation in the fall - technology features
Most people have a stereotype that it is necessary to fill the foundation only in spring and summer. Modern builders are proving that pouring concrete can be done in the fall if the necessary recommendations are followed. Such a properly executed foundation will not be inferior in performance characteristics to its summer counterparts.
Some information about autumn filling
Construction of the foundation is one of the main procedures of building construction. Depending on the correctness and accuracy of construction, taking into account all external factors, you can obtain a solid concrete base and begin building walls. If the construction process was carried out incorrectly, there is a risk of subsequent disposal of the foundation due to its unsuitability. The result is wasted time, money and effort.
In addition to the human factor, the pouring of the foundation is influenced by weather conditions. In autumn, as a rule, air humidity increases, temperature decreases, precipitation increases, the amount of groundwater increases, and so on. The listed factors may seem undesirable for pouring a foundation in the fall, however, most of them are advantages.
Taking into account the influence of temperature, we can conclude that it is advisable to fill the foundation in the fall, and not in the summer.
The best temperature regime for concrete hardening is from +15 to +25 °C. In most summer periods, the temperature significantly exceeds this range, which leads to anisotropy of properties, when concrete hardens, and the appearance of significant and minor defects. Therefore, from the point of view of the influence of temperature, it is better to fill the foundation in the fall. In the autumn, concrete hardens much more slowly, but the quality will remain high.
The process of building a foundation and its quality are affected by air humidity. Contrary to popular belief, increased humidity has a positive effect on concrete drying. When pouring in the fall, there is no need for additional moisture.
Precipitation negatively affects such construction work in the fall. You can pour concrete during this period, however, you should choose non-rainy periods. A large amount of water reduces the quality and performance properties of the solution.
An advantage for laying a foundation in the fall compared to summer is the groundwater level, which is often significantly lower than in the summer . There should be no water in the trench.
If water appears during digging, construction work must be stopped immediately and postponed indefinitely, depending on the terrain and weather conditions.
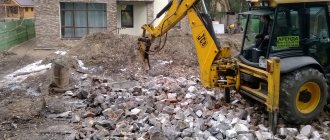
What technique is used when digging a trench?
Digging a trench with a shovel (manually) is effective for small-volume work and on hard soils (for example, loam). The method is optimal if it is impossible to fit the equipment to the construction site or if there is a need to dig trenches in conditions of abundant laying of utility lines. In all other cases, when digging by hand cannot be done, the following technique is used:
- bara (trencher or soil cutter);
- walk-behind tractor;
- excavator (mini excavator) and bulldozer.
The bara is effective for excavating narrow trenches (up to 40 cm), the depth of which is up to 2 m, for example, if it is necessary to lay a gas pipeline or water supply. Among other things, a bar costs less than an excavator. It is faster in operation and easier to dig a trench in a small area.
With a walk-behind tractor, if it is not possible to completely mechanize trench digging, then this method will be significantly simplified. They loosen the soil followed by its excavation with a shovel. The method is useful when carrying out foundation work, when you need to make a wide excavation to a shallow depth.
To do the digging correctly, it is convenient to work with a mini-excavator and a bulldozer. Small size and maneuverability allow you to quickly manipulate the bulldozer in small areas, for example, dachas. It is convenient due to the presence of tracks that do not damage the asphalt. You can work with a bulldozer if you need to make a trench, the depth of which is 2.5 m and the width is 28-38 cm.
Preparation before pouring the foundation in the fall
To carry out foundation construction work in the fall, it is necessary to carefully plan the entire process in order to make the most of the advantages and avoid the disadvantages of the autumn period as much as possible.
The first step in planning will be choosing the area and marking it. These jobs can be done in the summer. Experts recommend digging a pit by the end of summer, beginning of autumn, so that the soil is not sufficiently wet or frozen. This choice is aimed at making digging easier. Also, before digging a pit, it is necessary to check for the presence of groundwater below the surface. When part of the pit has been dug, it is necessary to drill a small test shaft, as before digging wells, but to a much shallower depth. A few meters will be enough. If there is no water, you can safely continue work. If a source of water appears, it is necessary to choose another place to build a house, since the groundwater level rises significantly in winter and spring.
Experienced workers recommend pouring the foundation closer to mid-autumn, at the end of September and the first half of October.
A significant disadvantage of autumn is the unpredictability of the weather, as rain can appear at any moment. You should use the most accurate available weather forecasts to select a period with minimal precipitation and no frost. The presence of frost spoils the foundation that has not yet hardened; it tends to collapse from the inside during frost. Precipitation is not dangerous if it appears at least 2 days after pouring the foundation, by which time the concrete will have partially hardened.
It is necessary to take into account the characteristics of the soil in order to avoid subsidence of the foundation in winter due to water crystallization. The foundation hardens and stabilizes, depending on the area, for up to 6 months. In most cases, you can start laying walls already in winter. According to these recommendations and modern construction methods, it is definitely possible to build a foundation in the fall.
In addition, the price of building materials most often decreases in the fall, which allows you to save money. But if you carry out such work in winter, it will be difficult to make concrete yourself. There will be a need to order concrete from the plant, which will increase the cost of work.
Useful video about what to do at a construction site in late autumn:
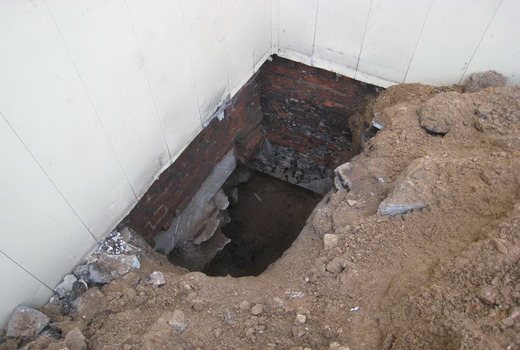
Rules for setting up pits
Taking into account that a pit is a hole built vertically or at a certain slope and completely exposing the foundation surface, it is necessary to know the rules of its construction.
Points for preparing the recesses are selected taking into account individual characteristics; priority is given to areas where damage is clearly visible. Such pits can be arranged in the form of long trenches, if it is necessary to check areas located adjacent to the strip base.
When choosing a place for a pit, you should not proceed only from the convenience of excavation work. The foundation must be completely inspected to completely eliminate the possibility of its further destruction.
The excavation work is temporary; after a few days, the holes are filled with earth.
It is recommended to carry out boring by examining areas with significant loads, under each independent section of a large object, in places where it is planned to install additional supporting elements.
The places where damage to the object is most critical need close attention. In this case, the pit is dug not only in the emergency area, but also near it in order to identify reliable places and balance the object, redistributing the load effects.
When reconstructing a house, the entire foundation is examined. If a superstructure is to be built, then holes are dug in specific places.
The number of holes is determined by the degree of damage to the foundation. For a strip or monolithic structure, the pits are arranged at a distance of one meter from each other and even closer. In addition, independent samples are taken in two to three places for control to check the condition of the soil composition and the foundation located on it.
If a planned inspection is necessary, two to three pits are dug for every ten meters of the foundation. If you plan to deepen the basement, it is enough to install one hole at the central points of the walls.
In case of obvious subsidence, holes are made on both sides to accurately determine the cause of the deformation.
The depth of each pit should be fifty centimeters greater than the foundation base.
Method of pouring the foundation in the fall
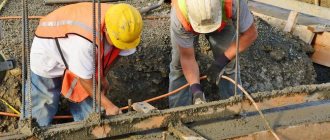
According to the recommendations of specialists and experienced builders, for the construction of foundations in the autumn and winter periods it is necessary to follow certain rules. These rules are also specified in SNiP, “Load-bearing and enclosing structures”:
- It is necessary to carry out work on mixing the solution in warm, enclosed spaces;
- during the mixing process, it is necessary to use heated water, at a temperature not exceeding +70 °C, the structure of the mixed concrete should be as homogeneous as possible;
- the concrete mixing time increases by a quarter relative to the mixing time in the summer;
- the reinforcement frame for the future foundation should be slightly heated to prevent the appearance of ice crystals on it;
- formwork, supports and foundations should also not be very cold in order to prevent pre-freezing of concrete;
- the time of pressing the foundation by vibration increases by a quarter, as well as the time of mixing concrete, relative to the time of pressing the foundation in the summer.
Filling should be done as carefully as possible, slowly. Any even minor defect can cast doubt on the normal operation of the building in the future.
There are times when the situation gets out of control. In the midst of work, it may start to rain. The situation is unpleasant, but not critical. First of all, it is necessary to prevent excess water from entering the concrete mixture. Protection of poured concrete is carried out using film, tarpaulin and other waterproofing materials, which are covered over the poured concrete solution in the formwork. Before starting work, it is necessary to prepare waterproof materials or build small portable shelters from wood and slate, for example. If detected late, excess water can be carefully removed manually when it accumulates on the concrete surface. If rain catches the foundation two days after it was poured, excess water will not harm the concrete.
Watch a video about the consequences of pouring a foundation in the rain:
Inspection results
We know how to drill a foundation correctly. But what can ultimately be clarified by doing this kind of work?
With the help of pits, you will establish the depth of the underground section of the foundation and find out its overall parameters. In addition, during the inspection, the type of structure and its strength indicator are clarified, defective areas and damage are inspected. Using selected samples of materials, the class of concrete composition and grade of stone are determined by laboratory methods. The waterproofing is checked, the presence of violations relative to the vertical level, the presence of various types of reinforcements.
The qualitative condition of the artificial or natural base is determined using soil samples taken from the bottom of the pits. If necessary, an additional number of inspection holes are arranged.
Frost protection measures
The most negative factor for foundation construction in the fall is frost.
Low temperatures not only reduce the strength of the emerging concrete structure, they can lead to complete destruction of the foundation.
If frost takes builders by surprise, it is necessary to use the recommendations from the set of measures for protection against frost.
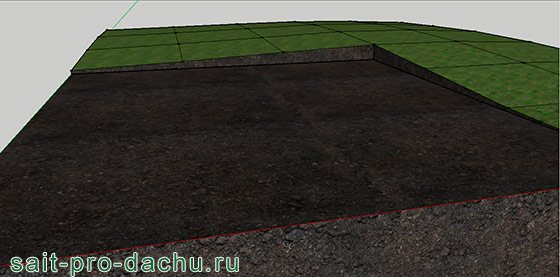
The simplest way is to simply cover the concrete with a heat insulator, which can be made from either special or improvised materials, such as straw, leaves, etc. The essence of the method is that during the first frost, excess heat remains in the ground. By using a thermal insulation layer, this heat can be retained longer. The method is very cheap and ineffective.
These additives allow concrete to gain strength, despite frosts at temperatures down to -20°C.
More serious protection against frost are special anti-frost additives in the concrete itself. Depending on the type of concrete used and the composition of the additives, they have different properties, dosages and prices.
The most effective protection is electrical heating of the foundation. Previously, pit and portable ovens were used for such purposes, but this method is quite labor-intensive. Electric heating provides high-quality protection from frost with minimal effort from builders. The disadvantage is the increased cost compared to other methods. The heating cable is installed on the foundation along with a heat insulator. It is important to prevent the foundation from overheating. The amount of cable and power of electricity depends on the area of the foundation, the ambient temperature, and the composition of the concrete. You can determine the required values yourself, but it is better to leave this work to professional consultants.
Typically, the solidification and initial formation of the foundation is carried out within a month, which is how long it is necessary to protect it from frost.
All methods of heating concrete can be used separately and in combination.
DIY trenchless pipe laying
![]()
- 1 Techniques for laying pipeline lines
- 2 Advantages of the “puncture” technique
- 3 How to make a puncture yourself
- 4 Videos
- 5 Photos
Construction specialists are well aware that one of the most problematic issues that arise when laying pipes is the method of overcoming artificial barriers. Such obstacles can be a variety of structures located along the route of the future pipeline (fences, sewer lines, roads, etc.). Generally speaking, the issue of digging trenches in such places (with subsequent laying of pipes in it) in the presence of an object that creates an increased load on the ground is specifically stipulated in the SNiP requirements. This is explained by the fact that such an operation can cause a collapse of the earth and destruction of the structure located above it. Do-it-yourself trenchless pipe laying becomes especially important when crossing routes with heavy traffic (including railways). It is in such situations that the so-called “puncture” of the earth is used, eliminating the possibility of unexpected soil subsidence at the work site.
Learn from the mistakes of others and choose the right time to pour the foundation
Hello, our dear readers.
We are glad that, despite your everyday worries, you still find time to visit us and, most likely, even recommend reading the Dacha Website to your friends. And you are doing the right thing, because here is only information that has been proven by experience and is one hundred percent useful for summer residents.
Today we also decided to join in the popular debate on construction forums on the topic: “When is it better to pour the foundation for a house and what mistakes can be made when pouring?”
We, of course, have our own opinion on this matter, which may differ from the polemics of the “sofa” masters, but we are ready to give reasons for every word we say. Let's read it, it's interesting.
Where do legs grow from?
One famous movie character once said that smart choices come with experience, but stupid choices lead to experience. When everything is done correctly, we sometimes don’t even think about what serious troubles we avoided, but we remember our mistakes for the rest of our lives.
It all started with the construction of a small garden house. The classic strip foundation was chosen. To tell the truth, I didn’t even know about anything else at the time, and it began...
Many people then advised me to pour the foundation before winter, so that for a good quarter of a year the foundation would stand and find its place. Then, they say, not only a house, but an entire house can be built without fear.
No sooner said than done, at least I had to work hard.
First, I cleared the selected area of debris and leveled it in a horizontal plane, and therefore had to take up the shovel even before digging the trench.
Then markings. For this purpose, I hammered pegs into the ground and pulled the lacing along the lines of the future foundation.
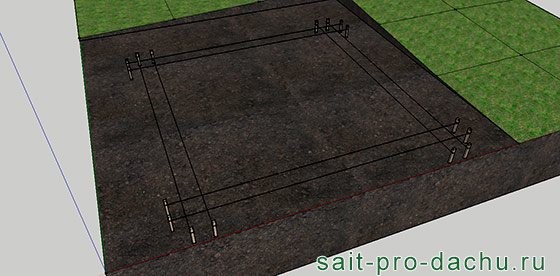
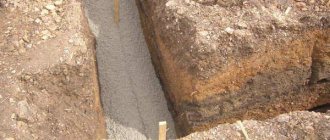
But we had to dig a lot. Our freezing depth is more than a meter, and the tape cannot be raised shallower.
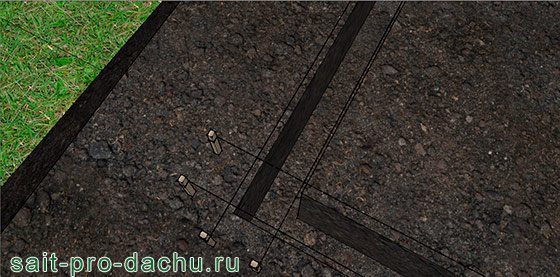
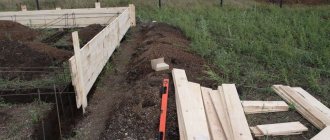
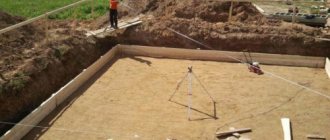
Then I put up formwork from the boards, poured out a small sand cushion,
And then I filled everything with homemade concrete grade M 350.
It’s a pity that at that time I was too green, and therefore, after listening to the assurances of my neighbors, I decided not to lay reinforcement in the foundation.
Let me remind you that all this happened in late autumn (oh, damn those advisors) and the first surprises were not long in coming. The frost hit exactly two weeks after pouring, while concrete needs at least 28 days to gain full strength. Not pleasant, right?
No, I knew that in the spring the hardening process would continue, but the result would still not be the same.
After wintering, another “gift” was waiting for me - this is the level, or rather, its complete absence (and I wasted so much time to clearly set the formwork).
“You see,” the friend continued. “And the house could have sunk!”
But the soils were reliable, and the weight of the foundation was not so significant that the difference after subsidence was up to 5 cm.
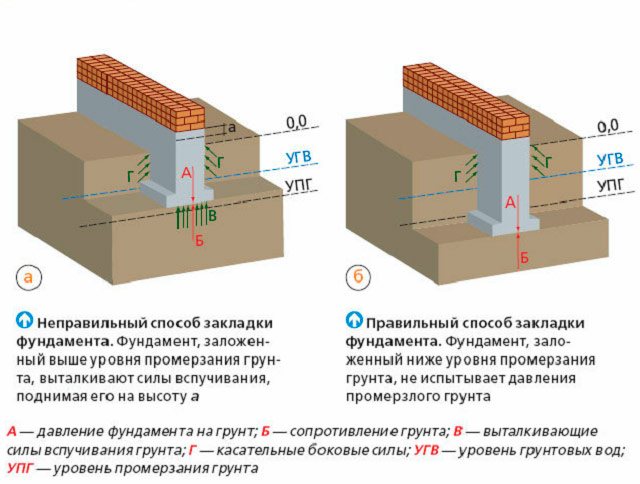
The enemy came from where they did not expect: frost heaving. I thought that if I put the foundation on non-freezing soil, I would be completely protected from it, but that was not the case.
It turns out that heaving acts on the foundation and through the side walls tangentially, however, these forces are insignificant and cannot lift the entire house, but they are quite capable of handling an unloaded belt. Therefore, the frozen soil twisted the foundation as it wanted. To top it all off, the base cracked in several places.
My “joy,” as you can guess, knew no bounds. How much cement was wasted, and how much labor... But I didn’t want to put a stone building on a defective foundation, and therefore, as soon as the soil melted, I started construction again.
I decided not to touch the old foundation, but simply pour a concrete strip along its outer perimeter. At the same time, the house increased in length and width by almost a meter, but the prospect of digging a concrete monolith out of the ground made me shudder.
Despite the fact that the foundation pit was dug in April and the formwork was installed, I only started concreting in mid-May. The lesson was learned, and therefore I did everything according to science. So, knowing at what temperature concrete sets best (which is 15-20 ° C), I took time so that the thermometer could reach this mark at night.
As for the workflow, some adjustments were also made here.
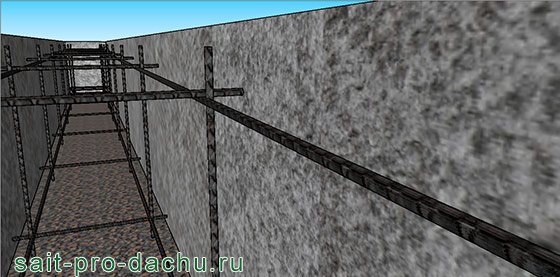
Firstly, I had to admit that saving on reinforcement is not the best idea, and even though I spent three days tying the reinforcement frame, but lazy people do it twice, and I definitely didn’t want to redo it a third time.
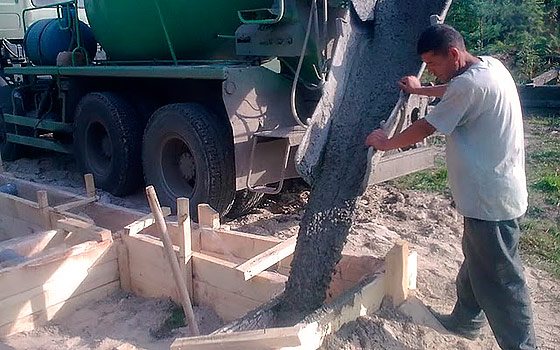
Secondly, I had to give up preparing concrete myself and buy commercial concrete. The fact is that the foundation needs to be poured not in separate sections, but as a whole and in one day, only then can you count on quality.
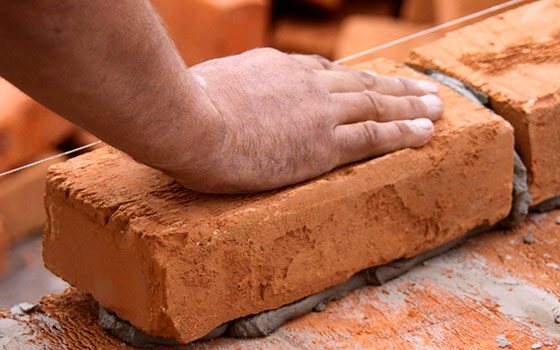
And most importantly, thirdly, this time I didn’t delay the construction of the walls too much. He waited the required four weeks and began laying bricks. By autumn the box was already covered. Therefore, this winter passed without any incidents.
To tell the truth, I sold that vineyard, but the house, as far as I can see, still stands today and I don’t think the owners have ever spent money on repairing the foundation.
Step-by-step execution of work
First stage.
First you need to dig holes on both sides of the road. Their depth should be equal to the depth of the installed pipe. You need to add another 20 centimeters to this figure to make it convenient to work.
All subsequent work is carried out from the pit. It continues the trench and its length must be no less than the minimum length of the section of prepared pipe, which must be driven into the ground using a sledgehammer.
The receiving pit should have the same dimensions. It should have enough space for comfortable placement. Approximate dimensions may be 60 by 60 centimeters. As a rule, this is quite enough.
Second phase.
Mark the axis of the future hole. To do this, take a steel rod, sharpen it with a grinder, like a pike, and drive it into the ground in the place where the pipe will pass. The length of the rod should not be more than two meters. Otherwise, it will simply bend. Having driven in a section, weld the next one to its end, and repeat these steps until the rod appears in the receiving pit.
The fittings or steel rod indicate the direction for driving the pipe. During work, you may encounter the bar hitting a stone. In this case, you don’t have to take it out of the ground, since this is practically impossible, but simply retreat some distance and start working again.
Third stage.
At this stage we plug the pipe. But before this, you need to make a special nozzle from a larger diameter pipe so that the driven pipe does not flatten.
In addition, the edge of the pipe that will go into the ground must be made sharp using a grinder or even teeth cut into it.
After completing the preparatory work, place the steel pipe on the rod. Then put on the attachment and hit this structure two or three times. After this, remove the nozzle, push a thin plastic tube into the pipe until it stops and turn on the pump. It is best to put a coupling on the tube, with the help of which its diameter will be narrowed in order to increase the pressure of the water flow.
Do not forget to prepare for the fact that all the washed-out soil will flow in the opposite direction, that is, towards you. Therefore, it is better to prepare a pit in advance and install a barrel in it into which all the dirt will drain.
In order for the soil to fall into the barrel, you will need a funnel onto which you need to put a two-meter hose. A funnel can be made from a five-liter bottle by simply cutting off the bottom.
After the receiving barrel is almost completely filled, the pump can be placed in it, but not at the very bottom, but only in the middle. To prevent the pump from breaking, it must be protected with a filter. A small plastic bucket with small diameter holes drilled in it is also suitable as a filter.
Fourth stage.
After washing some of the soil out of the pipe, take the sledgehammer again and repeat the third step. When the entire pipe goes into the soil, you need to weld the next section to it and repeat the entire cycle until the pipe appears on the other side of the road.
When the job is completed, the guide pin will be free of soil. It can be reused, which cannot be said about the pipe that was driven into the ground. It can no longer be used for its intended purpose, since the quality of welding during such work could suffer. Therefore, a steel pipe is used as an insulating casing for a pipe that has a smaller diameter and is made of other materials.
This method has proven effective when using steel pipe with a diameter of 57 millimeters. A PVC pipe for water supply was then installed into it, the diameter of which was 32 millimeters.
Of course, you can use pipes with a larger diameter, but then you will need to either drain the waste water into a prepared trench or install a container with a large volume.
conclusions
And now let’s actually move on to the conclusions, otherwise why did I tell you all this?
It is best to start pouring the foundation in the summer, when the constant air temperature no longer drops below 15 degrees. True, if it starts to warm up to thirty and the concrete begins to lose moisture too quickly, it will have to be watered. But if the filling has to be carried out in the rain, it will be necessary to cover the already filled areas with polyethylene. And don’t worry about how long such a foundation will take to dry. After twenty-eight days, you can safely begin construction work.
These standards are laid down in GOSTs, and advice like, let it stand for a couple of years and settle down, can do more harm than good. A foundation left unloaded for the winter will certainly be exposed to frost heaving, which means it has every chance of turning into a useless mass of concrete.
There is no need to listen to sofa masters, trust only regulatory documentation and then your foundation will survive centuries.
With this we say goodbye to you. See you soon on the pages of our website.
When is it better to build a foundation - attention to goals and opportunities
Experts distinguish two construction seasons: from April to December and from November to May. Needless to say that it is extremely difficult to build a structure in winter? But this is possible, especially with experienced and knowledgeable specialists. It goes without saying that starting in January, when the ground is already frozen, construction is quite problematic (special equipment, additional equipment for warming the soil, as well as protected places for storing building materials are required). But if smart calculations have been made and all the raw materials required for construction have been purchased in advance, it is possible to carry out work all year round, without delaying deadlines and saving the customer’s budget.
Video
The technique for puncturing the soil can be seen here:
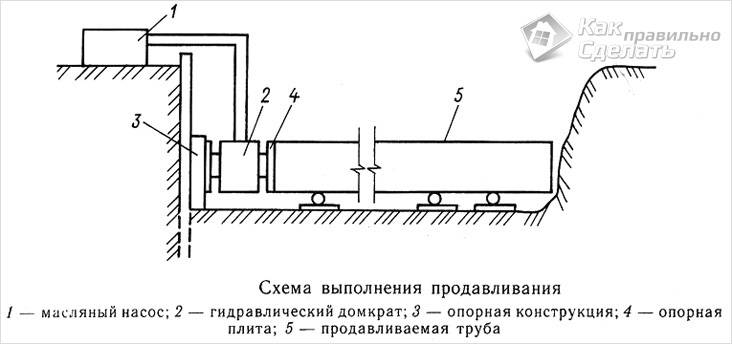
Pipeline pushing method - diagram
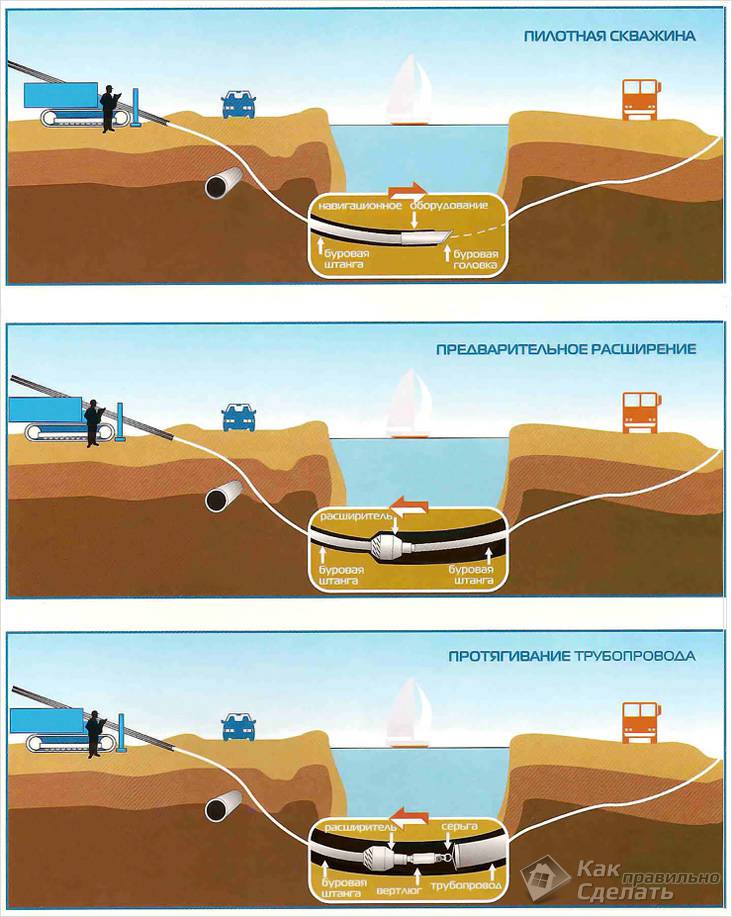
Drilling method
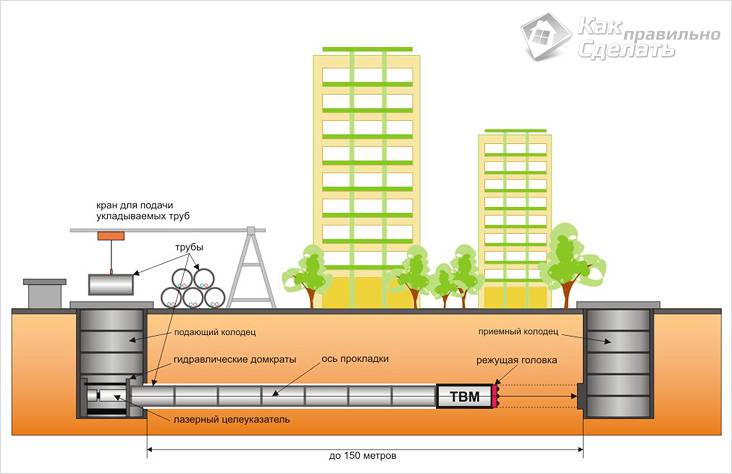
Shield penetration method
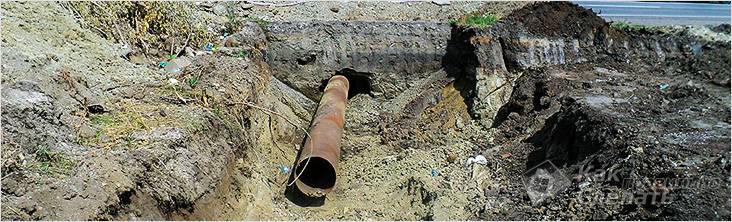
Completed puncture
Which foundation and when is it better to build?

The process of building a foundation is extremely simple if professionals do it. The InnovaStroy team knows what the customer needs, because each of you is connected by several things. Clients strive to get a comfortable, durable, strong home that will last for a long time and will not create problems in operation. At the same time, the goal is to minimize costs and bring the project closer to completion. Therefore, we offer cost-effective solutions regarding the choice of foundation for a house, focusing on the characteristics of the soil, climatic conditions, the depth of freezing and occurrence of groundwater, the weight and dimensions of the future building.
So, after specialists have carried out surveys on the territory allocated for construction, careful calculations are made and a specific type of foundation is selected.

If your site has sandy gravelly soils with deep freezing, then in this case a shallow strip foundation, lying to a depth of no more than 70 cm, is perfect. This is an excellent foundation in terms of price and strength, which does not require the presence of a cellar or basement. If dusty, fine sands are found, then a deep foundation is needed down to reliable earthen rocks.
For the construction of a serious, strong house on peat and clay soils with high heaving rates, experts offer a turnkey monolithic foundation. Excavation work for such a foundation is not needed, just filling a sand cushion of 20-30 cm. Professionals will not offer this option if they detect even the slightest slope of the site. In this case, the slab will gradually “slide”, and the solution will be a pile foundation at a price that is much more attractive than other types of foundations.
What time of year to lay a foundation is, of course, a difficult question. You can lay the foundation in winter. But is such a rush and additional costs necessary? Today, there is a lot of special equipment that can be used to warm the ground and build a foundation in the winter. But it is also worth considering that in the spring there will be a noticeable shrinkage, different from what is usual for the summer period.
In order not to get completely confused, you should not decide on your own. It is better to turn to the professionals of InnovaStroy, who, after a thorough analysis of the territory, weighing all the pros and cons, will provide a cost-effective solution regarding the construction of your new home.
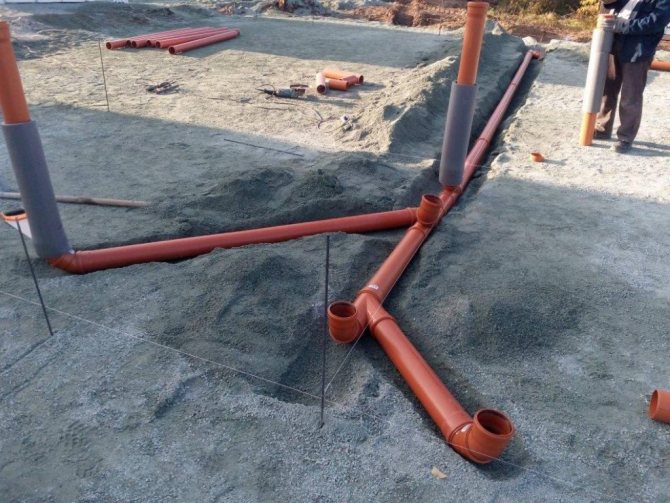
Exiting sewerage from a house with a strip foundation
Strip foundations are most often used for building houses. In this case, the base tapes are laid only under the load-bearing walls. Therefore, it is much easier to output communications here.
It is worth noting that the strip foundation can be recessed or not recessed. The first option is easier to work with, but the second is more practical.
In order to draw out the sewerage system with a non-buried strip foundation already built, it is necessary to destroy the blind area and dig a trench to the building at the required depth. Next, the required section of the subfloor is opened, and a pipeline in sleeves is laid under it.
If the foundation is deep, then it is easiest to work on the house if there is a basement. In this case, the work is carried out by analogy with the previous option. To lay communications in the foundation of a house without a basement, you can use several other methods:
- Making a hole to enter a house with diamond drilling is the least dangerous method for the foundation, which is used extremely rarely. The whole point is the high cost of such work. The cost can be reduced by renting the device and doing everything yourself.
- Some people use a hammer drill. However, this method is bad because the tool creates vibration, which can destroy the concrete from the inside. Therefore, professionals do not recommend using it.
- The non-impact drilling method is cheap and safe, but long and labor-intensive. In this case, holes are drilled around the perimeter of the desired hole. Then pieces of concrete are knocked out with a percussion tool, and metal reinforcement is cut out with wire cutters.
Before installing a sewer system, it is worth making a drawing of it.
Such methods of conducting communications through a strip foundation certainly have the right to life. However, in any case, it is better to do such work at the stage of formwork construction.