To set up a greenhouse for year-round use, it is important to install a foundation. There are several types of foundations. But before installing them, it is necessary to perform a number of preparatory works, which are the same for all types. It is also necessary to sensibly assess your own capabilities, because installing a foundation requires a lot of time and effort.
The need for a proper polycarbonate greenhouse foundation
Many gardeners are interested in whether a polycarbonate foundation is needed for a greenhouse. There is no need for a foundation for a temporary structure. But if you plan to operate the greenhouse for a long time, then it is worth building the right foundation.

Advantages of using a foundation:
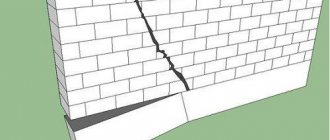
- The design becomes more durable and reliable. The greenhouse is affected by wind, precipitation and other unfavorable conditions. If you do not take care of the foundation, the greenhouse may move.
- With the right choice of base type, it becomes possible to protect seedlings from pests and weeds.
- The necessary thermal insulation is created for growing crops in winter.
Thanks to the foundation, the greenhouse becomes stronger and more reliable. It can withstand heavy loads and ensure comfortable growing of plants. It is imperative to install a foundation in winter greenhouses.
To properly equip the foundation, you need to choose the optimal type of foundation. Each of them has its own characteristics, positive and negative aspects.
At the same time, seasonal construction does not require a foundation. This is just an unnecessary waste of money, effort and time. Summer residents often build a small greenhouse only in the spring for propagating seedlings, after which they dispose of it. But for long-term use of a greenhouse, a reliable foundation is required.
Methods for constructing a wooden foundation
The process of constructing a wooden foundation for a greenhouse includes a number of standard operations, including design calculations, material processing, site preparation and the actual construction of the timber base. It is clear that if the basic version is to be mounted on supports, then they will need to be built before assembling the frame.
Getting started right – preparation
Design calculations are a purely individual matter, but it is impossible to do without them. The wooden base must clearly correspond to the dimensions of the lower trim of the greenhouse being installed. There are no exact instructions where the greenhouse frame should be fastened: along the central axes of the timber frame, along the outer or along the inner edge. It depends on the personal preferences of the master and on how it is more convenient for him to attach polycarbonate or polyethylene to the frame. However, this issue should be carefully thought through and carefully calculated in advance so that you do not have to resort to expensive alterations.
The timber for the foundation is selected depending on the installation method:
- material with an impressive weight of 150×150 mm (116 kg is the average mass of one coniferous element 6 m long), material with a size of 150×100 mm (the same criteria 77.47 kg) are purchased for the construction of shallow-buried wooden tape-type foundations. A large, heavy beam is used to ensure the stability of the greenhouse frame so that the structure does not overturn in gusty winds;
- lumber with a large cross-section is also preferable when building a large-sized greenhouse, if the length of the frame is more than 6 m and the height is more than 3.0 m;
- material measuring 100×100 mm (51.8 kg) and an even lighter material 100×50 mm (26.0 kg) are used to construct grillages attached to columnar supports. Because Since the main load falls on the supports, there is no point in using heavy, expensive timber.
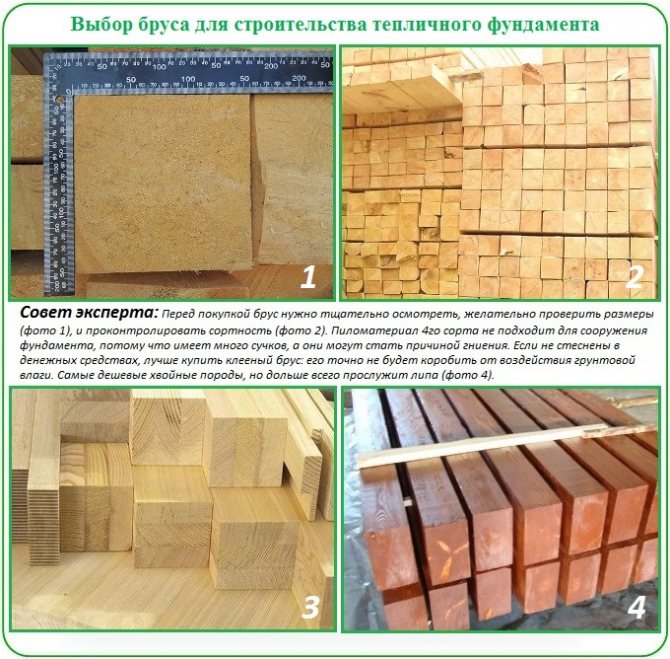
Timber made from softwood is the cheapest and easiest to process. But it cannot be considered one of the most wear-resistant representatives of wood products. Larch will last the longest; underground and underwater structures have been built from it since ancient times, but its price is slightly higher than pine. Regardless of the species, the moisture content of lumber should not exceed 22%. Otherwise, the wooden frame will warp, and along with it, the frame of the greenhouse will be deformed. There should be no blue discoloration or other signs of damage on the purchased timber. It is not advisable to buy grade IV with numerous knots.
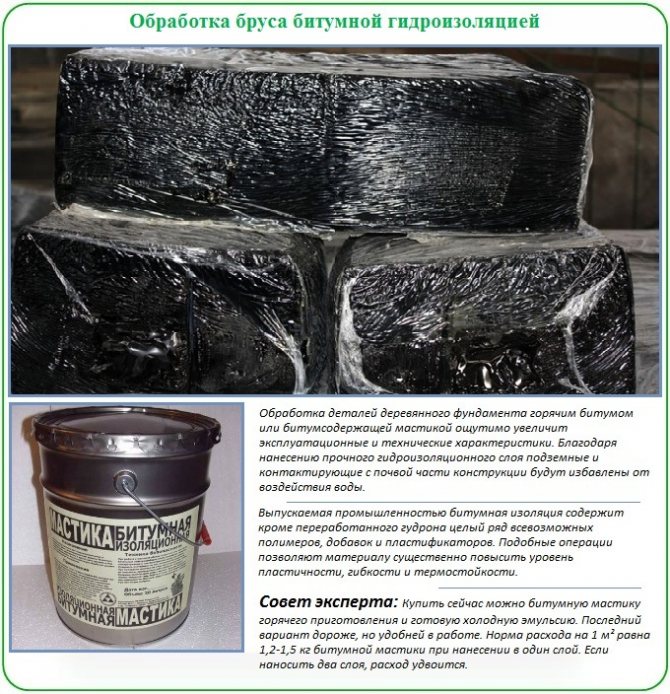
Before construction, it is recommended to protect the wooden foundation from destruction by fungal microorganisms and from the negative effects of ground moisture. A wide selection of bitumen mastics and antiseptic impregnations are now on sale. In addition to them, there are traditional methods:
- Copper sulfate. The prepared solution, often used in greenhouse farming, is impregnated with dry material and allowed to dry thoroughly. The timber will need to be brought to “condition” on an outdoor area protected from sunlight. It takes quite a long time to dry, at least two to three weeks, but then serves flawlessly. The readiness of lumber for laying is determined “by eye” and by touch;
- Firing with hot bitumen coating. The timber is first burned with a gas burner and then covered with heated tar. Particular attention should be paid to ends and knots. You can simply burn wood over a fire;
- Warm up working out. Cheap and easy to apply with a brush or rag. Used engine oil is not at all pleased with its environmental and fire-fighting benefits.
Greenhouse owners give justified preference to the first two of these methods. They will not upset the natural balance. However, the third option is also quite suitable for constructing a wooden foundation completely buried in the ground, installed in a trench with walls and bottom covered with roofing felt.
Next, we’ll take care of preparing the site. It is advisable to break it down before work, without relying too much on your own eye:
- According to the pre-calculated dimensions of the external outline of the frame, we will hammer in temporary pegs.
- We connect them with twine or fishing line at a height of approximately 40-50cm from the ground. We tie each pair of pegs with a separate piece of rope with a margin of 30 cm at both ends.
- Let's check the lengths of the diagonals and check the perpendicularity of the corners.
- If everything is correct, we will make a kind of cast-off. Let's kind of extend the imaginary lines of the foundation walls and hammer in two more at a distance of about 50cm from the existing peg.
- We will tie a fishing line or twine to the newly installed pegs so that the point of intersection of the two lines is directly above the planned greenhouse corner - i.e. over the first hammered peg. We do this 3 more times.
Casting for the construction of a foundation made of timber is an optional measure. Often they do without cutting at all, because the specifics of long-length lumber help to maintain dimensions. At first glance, the procedure itself takes time, but in reality it saves. After all, the master will not need to control the direction and dimensions dozens, and sometimes hundreds of times.

A simple foundation for a small greenhouse
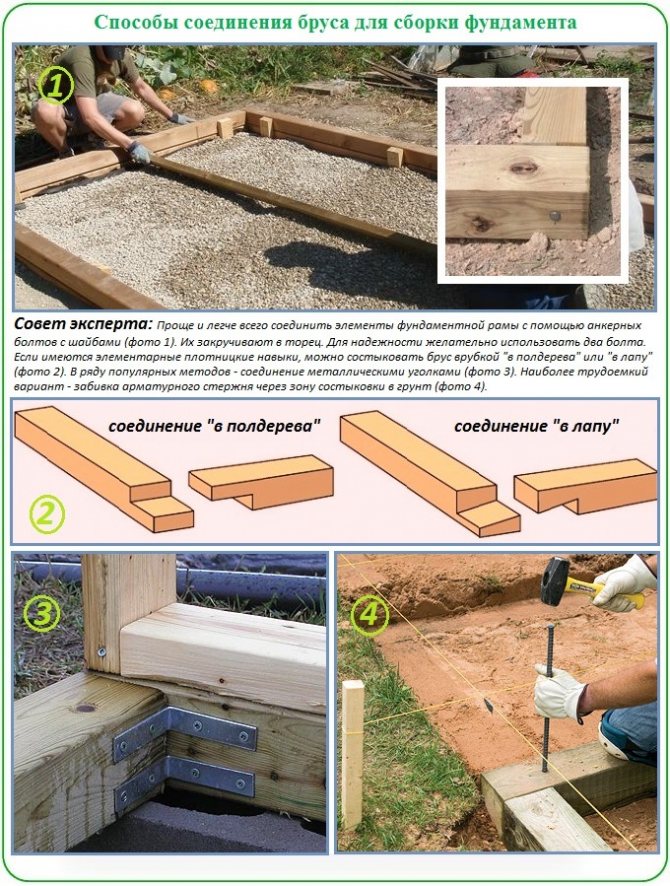
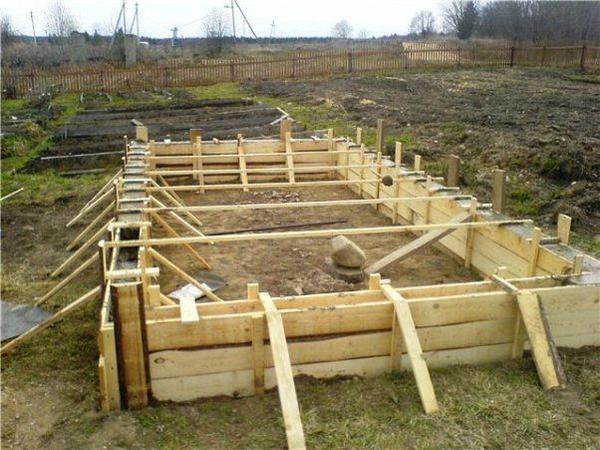
During active use, the basic strip version of a wooden foundation has acquired numerous varieties. Fundamentally, the design of its construction consists of connecting four sections of timber. The optimal type of connection is considered to be a “toe-to-foot” connection, because it can be made without the use of metal fasteners. It is recommended to duplicate the “half-tree” notch with a bolt or smooth reinforcement driven through the joining area. The reinforcement is driven into a pre-drilled hole with a diameter slightly smaller than the pin being driven.
An inexperienced contractor who has decided to build a timber foundation for a country greenhouse for the first time with his own hands should not bother with the cutting. Frame parts can only be fastened with two anchor bolts screwed into the end of the beam, iron brackets or metal corners.
A frame assembled from timber can be installed on a pre-leveled platform without unnecessary fuss. In this case, the breakdown of the site is excluded from the work cycle without any qualms. Assembly accuracy is checked by measuring the diagonals. If the values of the diagonal dimensions coincide, it means that the strip wooden foundation is assembled impeccably.
All that remains is to secure the base by:
- driving reinforcement into the ground from the inside of each corner and through 1.0-1.5 m of the long walls of the greenhouse;
- screwing screw supports with a length of no more than 70 cm at the same points;
- fastening by driving reinforcing bars into the ground through areas of corner and linear connections.
Lengths of reinforcement and screw supports driven from the outside or inside of the foundation frame are screwed to it using metal mounting plates. Instead of reinforcing bars, wooden stakes can be driven into the soil. They do not need to be screwed, just nailed. The stakes are pre-fired and treated with tar.
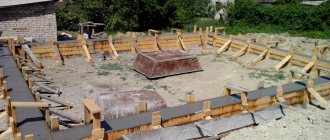
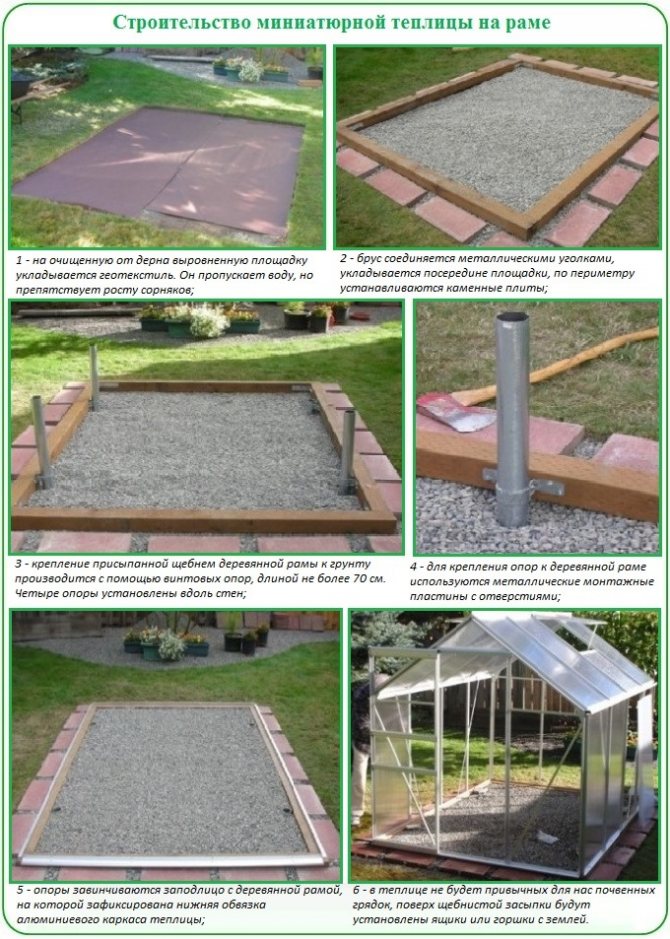
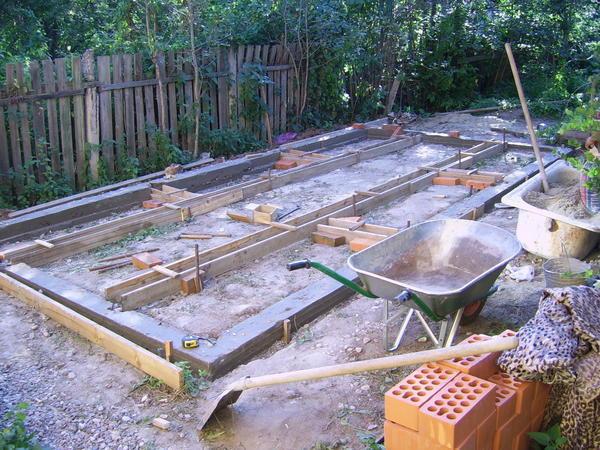
After fastening, the wooden foundation is sprinkled with sifted coarse sand without foreign inclusions or gravel. The standard algorithm for the construction and installation of a wooden base with the assembly of a miniature greenhouse is demonstrated by a photo selection:
Let's consolidate our knowledge by watching a video about constructing a timber foundation for a domestically produced greenhouse:
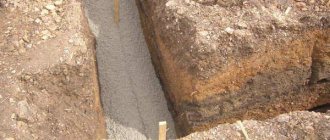
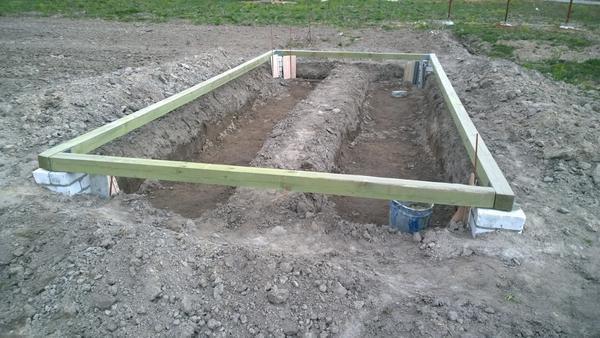
Installing a wooden frame in a trench
If the area is prone to heavy winds, the above scheme is not suitable. A more complex, but much more reliable method is to install a timber foundation in a shallow trench. To form it, a breakdown is needed. Digging a trench will not require much effort. The maximum depth of the groove is equal to twice the height of the beam, the width is equal to twice the width. A quarter of the bottom of the trench will be filled with sand or gravel. Opinions are divided regarding further actions:
- According to a large number of craftsmen, it is necessary to arrange something like a pallet made of roofing felt in the ditch in order to create a barrier between the wooden base and the external moist environment.
- According to their opponents, this is an unnecessary measure that can harm the wood. Water entering a “trough” constructed in this way will not infiltrate into the soil, which can cause the wooden frame to rot.
We admit that the second opinion is very reasonable. In addition, leveling the frame in a trench with roofing felt seems to be a difficult undertaking. And it is necessary to level it according to the spirit level readings, otherwise the skewed base will become the start of the construction of a skewed greenhouse.
The wooden base must be leveled in accordance with building codes using wooden wedges, scraps of timber, boards, etc. Minor deviations are eliminated by adding sand or gravel. If bricks or stones are used as a lifting element, there should be a spacer made of roofing felt, parchment or simply oiled paper between them and the wooden parts.
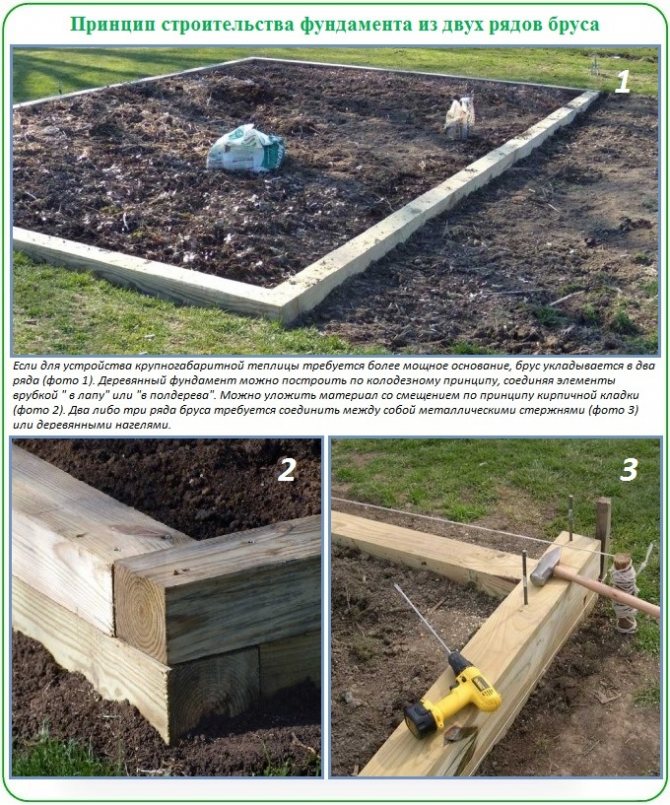
If the owner decides to build a more powerful wooden base for the greenhouse, the timber is laid in two or even three rows like well crowns. The rows are fastened together with wooden dowels or reinforcement sections. It is wiser to use reinforcement, because it will simultaneously play the role of rods driven into the ground. True, the service life of a foundation with a metal-wood combination will be reduced.
By the way, you can assemble the foundation according to the well principle, and according to it, bury the wooden foundation into the ground. First dig up the soil under the assembled walls approximately in the middle. Then place bricks or logs in the dug hole as temporary support. Then dig around the perimeter, after which these temporary supports must be removed. The foundation will settle on its own in its intended place.
Types of foundation for a polycarbonate greenhouse
First, you need to identify the purpose of building the foundation. Only then can you choose the right foundation. It is necessary to take into account the term of greenhouse operation. For year-round use you will need a strong base. Sometimes only a protective barrier is erected against insects and weeds.
Types of foundation:
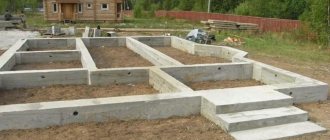
- Concrete strip;
- Pillars;
- Piles;
- Monolithic slab.
Each type has its own characteristics of use. Concrete foundations are the most popular among summer residents. Pillars and piles are a more economical type of foundation. A monolithic slab provides the most reliable foundation.
When choosing the optimal type of base, you need to take into account the type of soil, terrain, greenhouse area, climatic conditions and period of construction.
Many species may require preliminary leveling of the soil. This is especially true for a monolithic slab. It is necessary to install such a foundation on the most flat surface possible so that the greenhouse does not tilt during operation.
Greenhouse layout
The optimal width of the bed for planting tomatoes should be 80 cm, and 40 cm between the beds. And then we proceed to applying fertilizers.
- First of all: (taking into account that the soil is mostly acidic) add dolomite flour at the rate of 100-150 g. per square meter. We pour armfuls out of the bucket; you should have rubber gloves on your hands in any case. This is an additional feeding not only with calcium, but also with magnesium.
- Secondly: The next fertilizer that a tomato needs is superphosphate. They add 50-80 grams, sometimes up to 100 grams. per square meter. Superphosphate is a sparingly soluble fertilizer, but you should not be afraid that there will be a root burn of the system, because then we will mix everything and level it out. And even if the granules are visible, do not be afraid, the plant will not get burned.
- In the 3rd turn: Then we apply complex fertilizer Kemira Universal or Nitrofoska 50 g to the soil. per square meter. if you have a little fertilizer available, you can then apply it directly into the hole.
And mix the bed thoroughly. The soil must be pre-moistened so that fertilizers dissolve well, and tomatoes love a sufficient amount of moisture, especially when planting. The soil is wet not only in the bed itself, but even between the beds, the distance, more precisely 40 cm wide, in the place where you walk, should be wet. All soil in the greenhouse must be moistened.
Features: how to install a polycarbonate greenhouse without a foundation
If the greenhouse is installed only during the warm season, then a foundation is not needed and you can save on materials and time. But such installation has its own characteristics. First you need to choose the right place to install the greenhouse.
It is necessary to study the soil and choose a well-lit area. If the soil is sandy, then this is a good basis for planting vegetables. If the soil is made of clay, then the top layer will need to be replaced. The place itself should be well lit. There is no need to build a greenhouse next to buildings that will cast a shadow on the greenhouse. If the soil is wet, you will have to install a drainage system.
Installing a greenhouse without a foundation:
- Preparatory work. It is necessary to determine the perimeter of the greenhouse and mark it with pegs and ropes. Changes and unevenness on the ground are no more than 5 cm.
- You need to dig a trench 30 cm wide. The depth of the channel depends on the height of the support. The bottom must be compacted well. The trench must be covered with slate or roofing felt to protect the ground from weeds.
- Frame assembly. You need to start with the end walls. You also need to secure window and door frames. The wooden frame must be treated with antiseptics.
- Installation of polycarbonate. You need to start with the end walls. It is important to secure the layers on the correct side so that the protective layer comes out.
You can install a frameless greenhouse yourself. It is important to ensure that the building does not come out crooked. To do this you need to use special tools.
Most often, frameless greenhouses are used for seedlings. You can read about their arrangement at the link:
Why does a greenhouse need a solid foundation?
Polycarbonate, polymer films and glass are widely used materials that are successfully used in the construction of translucent structures. They are lightweight, strong and durable. Due to the small weight of structures made of polycarbonate and film, as well as the flexibility and fragility of sheet glass, the construction of a metal frame is required, which ultimately makes the building heavier. The weight of such a greenhouse must be evenly distributed on the ground to prevent subsidence of the soil and damage to the integrity of the shell.
The use of plastic or film for temporary greenhouses is justified by the low cost of materials and the absence of the need to build a solid foundation. Glass greenhouses with frame frames require the construction of more substantial supporting structures.
The greenhouse effect is created by maintaining a constant microenvironment atmosphere, for which the tightness of the building must be ensured. The foundation is an excellent way to strengthen the supporting part of the polycarbonate greenhouse and prevent deformation of the enclosing structures. Determining the most suitable type of foundation means making the most effective investment in a reliable structure that will last for many years.
How to make a foundation for a polycarbonate greenhouse: preparation
Any construction involves preparatory work. It is necessary to choose the right location and assess the condition of the soil. In some cases, the top layer needs to be replaced.
Preparatory work before installing the foundation:
- Cleaning the area. Clearing it of debris, stones, dry branches.
- It is necessary to measure the evenness of the surface. To do this, in several places you need to measure the ground with a building level. If necessary, it is necessary to level the soil. Add soil somewhere, remove it somewhere. The top layer needs to be replaced.
- Creating markup. Before work, you need to make drawings and, following them, you should place the pegs and tighten the rope.
After this, it is necessary to dig a trench and install reinforcement. The dimensions of the greenhouse depend on the frame itself. You need to take into account its weight and material of manufacture. If this is a classic greenhouse with a metal profile frame with polycarbonate sheets, then the depth should be 50 cm and the width should be 30 cm.
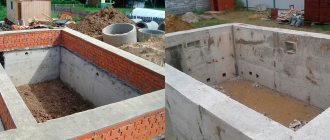
For a winter greenhouse, you need to make formwork for the base, the size of which should be 30-60 cm in height. The trench itself must be covered with waterproofing film.
To create waterproofing, you can use polyethylene film or geotextiles.
You will also need to install an armored belt. It is simpler to perform and looks lighter than the standard option for residential buildings. It is necessary to stick steel rods into the bottom. The length of one twig is 60 cm. 30 cm are dipped into the ground, and the remaining height is on the surface of the soil. The rods must be connected using thick wire.
Requirements
Before placing a greenhouse structure on a plot of land, it is necessary to lay a solid foundation. It can be manufactured using various technologies using any material.
When choosing the appropriate type of base, you should take into account some nuances.
Dimensions of the building. The larger its area, the stronger the installation becomes.
This is especially important if the dimensions exceed 40x40 m. Characteristics of the soil where the structure is planned to be installed. To do this, the type of soil, the depth of its freezing and the passage of groundwater are determined in advance.
Since the foundation will serve as the main protection for the building, it must meet the following requirements:
have high resistance to the negative influence of the external environment, this is especially important in the spring, when groundwater levels rise and snow melts; be resilient in supporting the structure and frame, strengthening it and supporting the weight of the structure; provide an indoor climate suitable for growing plants; be made of high-quality building material in order to perform all its functions to the maximum.
Pouring a foundation for a polycarbonate greenhouse with your own hands
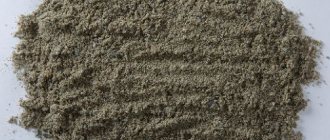
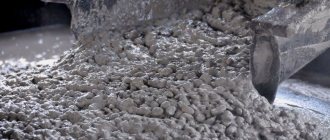
Pouring the solution can take place according to two scenarios. In the first option, you should make a sand base. You need to pour 15 cm of sand and compact the soil well. After this, reinforcement is installed and cement mortar is poured. In the second option, you need to fill in 10 cm of sand and 10 cm of crushed stone. After compacting and installing the armored belt, you can pour the solution.
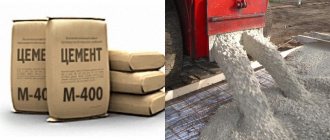
Brands of concrete for pouring the base for a polycarbonate greenhouse:
- M100. Together with sand and crushed stone, a solution is prepared that can withstand a load of up to 100 kg per 1 cm2.
- M200. With crushed stone and sand, you get a strong foundation that can support a weight of 200 kg per 1 cm2.
Most greenhouses are installed under the first grade of concrete. This turns out to be enough. The strength of the foundation depends on the proportions of all components of the solution.
We pour the solution into the trench, provided that 5 cm remains to the edge of the soil. The armored belt should also be covered by 5 cm. It is necessary to quickly pour the concrete so that the solution does not have time to harden before it is evenly distributed throughout the trench. After this, it is necessary to cover the foundation with polyethylene.
After 3 days, the solution will have time to harden. Then you can begin to install the polycarbonate greenhouse. If the greenhouses are heavy, you will have to wait a month. If these terms are not observed, the base will begin to deform.
You can install a ready-made polycarbonate greenhouse from the manufacturer on the foundation. The criteria for choosing a quality product are described in our material: https://homeli.ru/dvor-i-sad/teplitsy/teplitsy-iz-polikarbonata-ot-proizvoditelya
Pile foundation
The construction of any building, even the lightest one, on soft soils prone to heaving is a difficult task. Uneven changes in ground level that occur in such areas every season can lead to damage to the greenhouse. The solution to this problem is to build a foundation on piles.
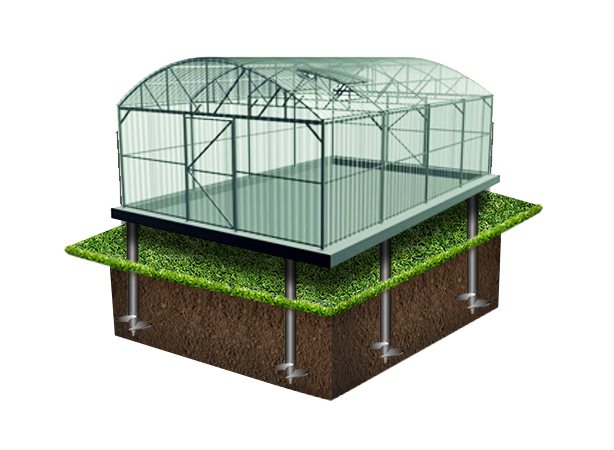
An example of a polycarbonate greenhouse using steel screw piles as support
Piles can vary in material (steel, reinforced concrete, wood) and installation method (driving, screwing, laying or pouring into drilled holes). Let's consider the two most popular methods of arranging a point foundation for a polycarbonate greenhouse - on screw piles and on concrete piles.
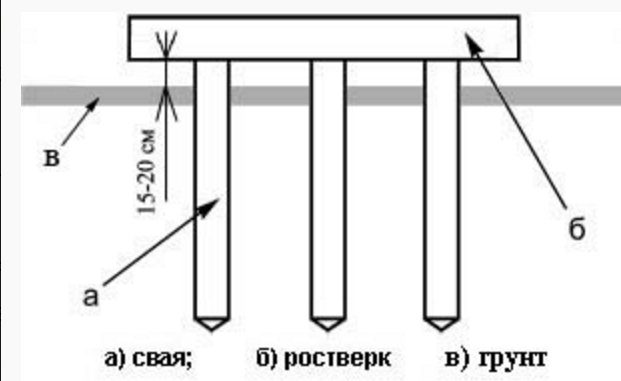
Pile foundation diagram
The main advantage of the first type of piles is ease of installation. The durability of steel screw structures is comparable to the service life of a polycarbonate greenhouse frame. Perform the installation process step by step as follows.
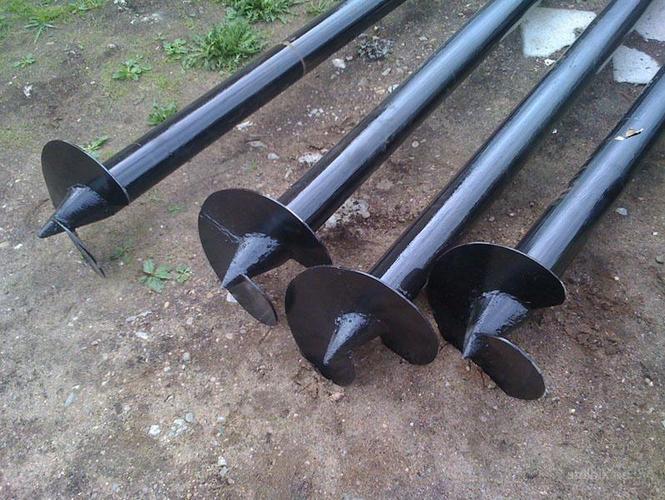
Steel screw piles
Step 1. Mark the area and places for screwing the piles. They should be located in the corners of the greenhouse and along its walls at intervals of 1-2 m, depending on the mass of the entire structure.
Step 2. Dig holes at the installation points of the piles with a depth of 20 to 50 cm and a diameter 3-4 times larger than that of the piles. This can be done quickly and efficiently using a drill.
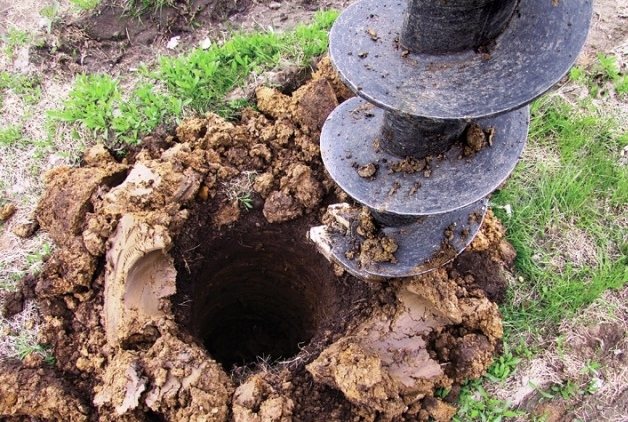
Drilling a hole
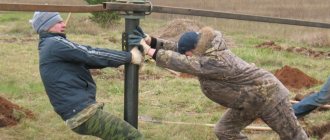
Step 3. Install the first pile and start screwing it into the ground. To do this, you can use both manual tools and special equipment. The screwing depth should be 1.5-2 m - it is necessary to go below the freezing line of the soil and get to its harder layers that are not subject to swelling.
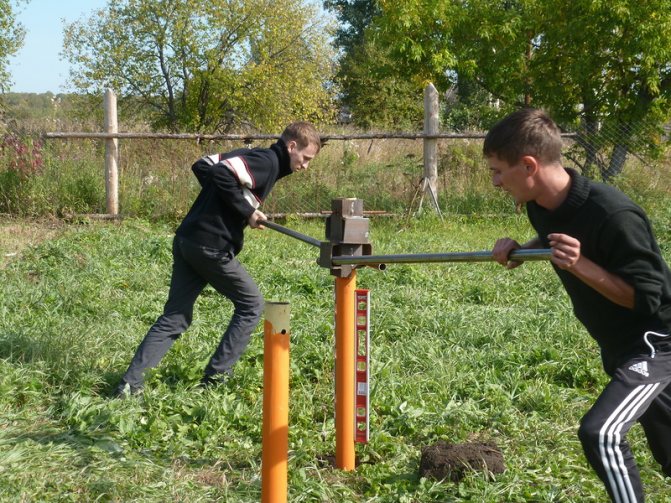
Screwing the pile
Step 4: Repeat the previous step with the remaining piles.
Step 5. Align the piles in height. The easiest way to do this is with a grinder. As a result, the piles should protrude 10-15 cm above the ground level.
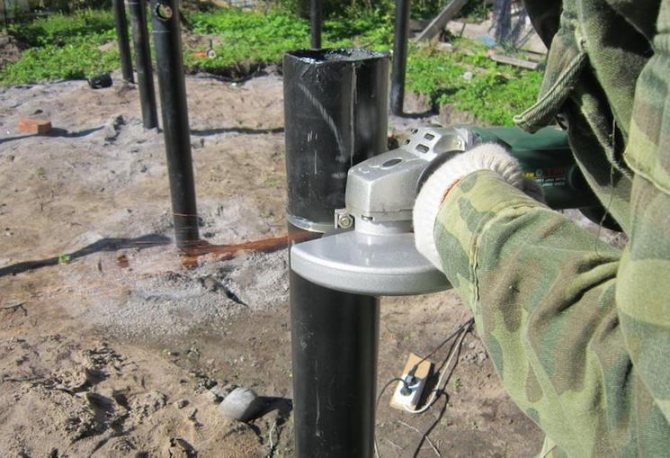
Trimming a screw pile with a grinder
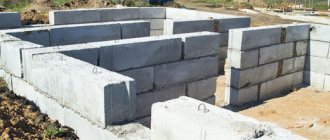
Step 6. Place a grillage on top of the piles, to which, in turn, the greenhouse frame will be attached. The most popular option is made from timber with a cross-section of 100x100 mm; use long self-tapping screws as fasteners. Other examples of grillages can be seen in the image below.
Examples of grillages
Advice! It makes sense to lay a layer of waterproofing between the pile head and the grillage.
![]()
An example of a pile foundation installed on a site with a large slope. Between the grillage and the piles you can see a layer of waterproofing
Reinforced concrete piles, unlike screw piles, are not screwed into the ground, but are poured into pre-dug wells. They are used in cases where, due to soil heaving, the construction of a shallow strip foundation is risky. Such reinforced concrete piles are also called bored piles.
Step 1. Mark the points where the piles will be located.
Step 2. Using a manual or automatic drill, drill holes 1.5-2 m deep.

Drilling a well using special equipment
Step 3. Install the formwork in the well. This could be an asbestos pipe or roofing felt.
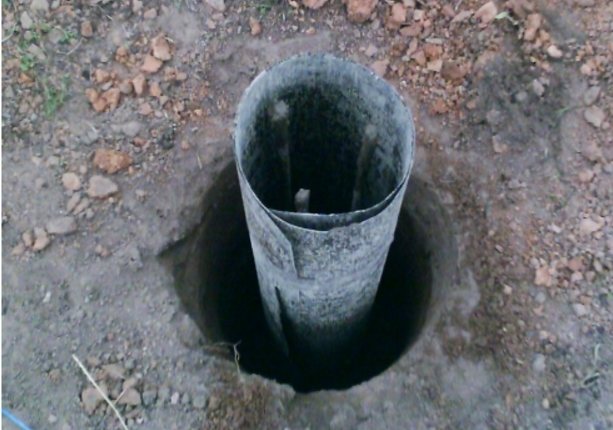
Roofing felt formwork

Use of asbestos pipes
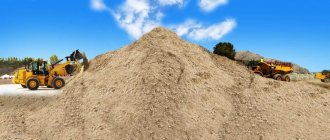
Step 4. Place layers of sand and gravel at the bottom of the well, then, if possible, compact it.
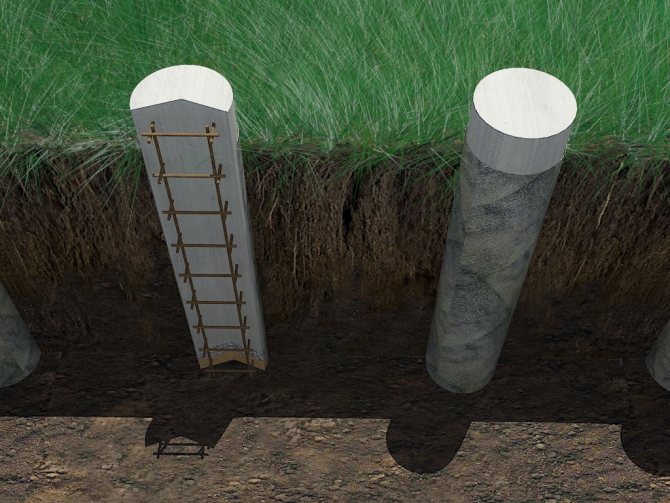
Foundation from the inside
Step 5. Place a pre-welded or wire-twisted reinforcement structure inside the formwork.
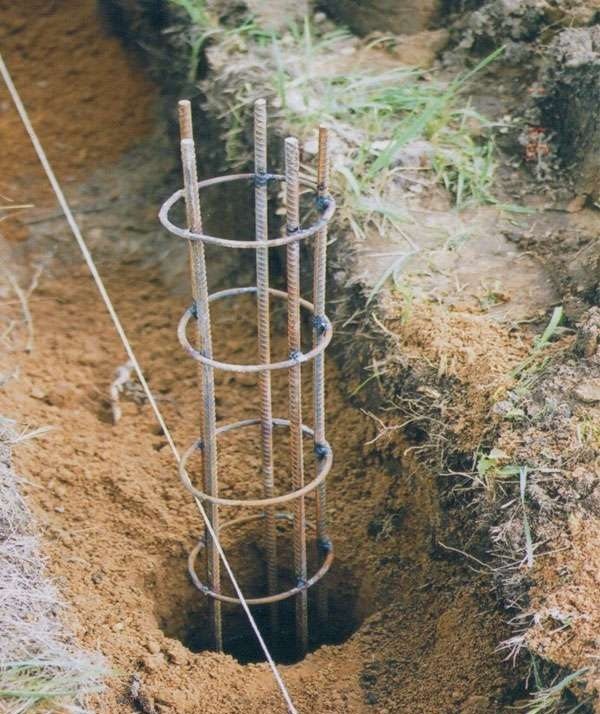
Laying the reinforcement structure
Step 6. Then pour concrete grade M200 or higher into the formwork. Carry out the process in separate layers, giving each of them time for initial setting. Usually this period is several days. After this, give the entire mass of concrete time to fully set and harden.
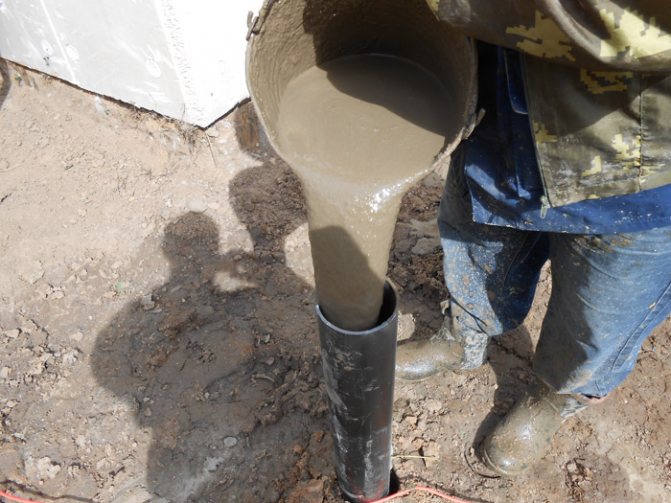
Pouring concrete
Step 7. Remove the formwork, level the piles in height and install the grillage.
Important! When thinking about choosing a pile foundation, you should always take into account one drawback - such a design does not provide good thermal insulation and protection of plants in the greenhouse from drafts and pests, and the soil from freezing. Give preference to piles only if installing another type of foundation on your site is impossible.
Prices for screw piles
screw piles
How to install a polycarbonate greenhouse with a monolithic foundation
First you need to do the preparatory work. To do this, you need to clear the soil, make markings, remove the top layer of soil and dig a pit. Its depth should be 30-40 cm. It is also necessary to cover the bottom with polyethylene or geotextile.
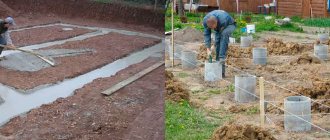
Sequence of installation of a monolithic foundation:
- Installation of concrete footing. You need to pour the solution onto the sand layer and level everything thoroughly.
- Creation of formwork.
- Lining walls and concrete bases with roofing felt or slate.
- Reinforcement. It is necessary to install steel rods and wrap them with thick wire.
- Pouring concrete solution. You need to do this procedure quickly enough so that it does not have time to harden.
All operations are similar to installing a strip foundation, only the scale will be larger. The coating of a monolithic slab must be periodically moistened. After a day or two, you need to install the anchors and leave the surface in this form until completely dry. After final drying, it is necessary to install roofing material on top of the slab.
The drainage inside the greenhouse must be taken care of before pouring concrete.
You can do all the work yourself. But you need to understand that installing a foundation requires a lot of effort, money and time. In this case, you cannot pour concrete gradually. You need to do this in one go.
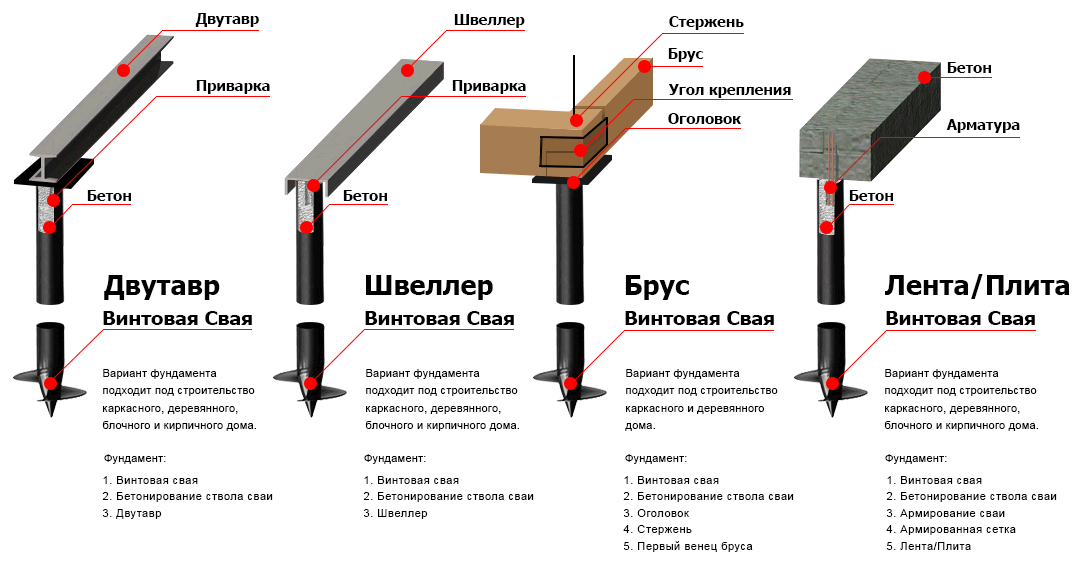
Frame mounting methods
Regardless of the type of foundation, several types of fastening greenhouses to the edges of supporting structures are used. The fastening scheme depends on the purpose of the building - temporary or permanent. Due to the need for seasonal dismantling of temporary greenhouses, dismountable fastening units should be provided. Watch the video on how to properly attach polycarbonate for a greenhouse.
Classification of dismountable fasteners:
- Anchor bolts with threaded elements embedded in the harness;
- Locks, latches and “latch” type fasteners are fasteners for small removable greenhouses, based on the principle of a bolt mechanism;
- Grooves in the foundation into which frame posts are inserted, secured with studs or bolts;
- Pins driven into the ground - hollow frame elements are strung on them.
When installing a greenhouse on open ground, driving brackets are used. With a certain step, metal pins are inserted into the mounting loops, driven into the ground to a depth of half a meter.
Fixed greenhouses are permanently attached to the foundation, and waterproofing of the piping is required. When constructing concrete foundation supports, the frame elements are cast in place even at the stage of pouring the concrete mixture. The use of embedded parts allows you to create welded joints, which also need to be treated with a hydrophobic compound. The possibility of installing a non-dismountable greenhouse using collapsible units cannot be ruled out.
Despite the fact that the greenhouse is a lightweight structure, it requires a reliable and solid foundation. Indeed, in the absence of a good foundation, there is a risk that it will “walk” around the site, and young plants may die from frost and wind. So, what kind of foundation is needed for a greenhouse and how to build it correctly?
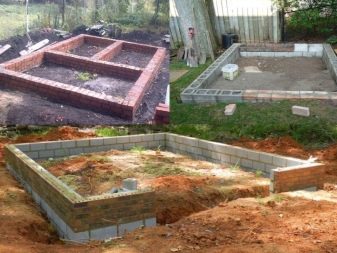
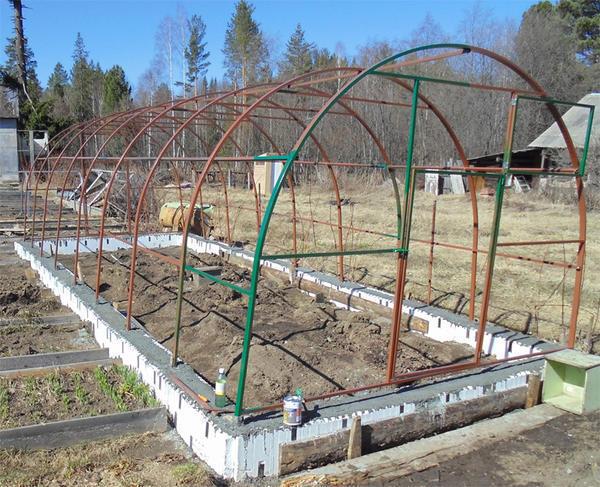
Examples of a polycarbonate greenhouse foundation (photo of ideas)
- Author: admin
Rate this article:
- 5
- 4
- 3
- 2
- 1
(0 votes, average: 0 out of 5)
Share with your friends!
About sowing dates
When should you sow seedlings? A lot of literature has been written on how long seedlings should be kept. Some people think it’s 50, others 60 days from the beginning. But there is no need to rush at all. Seedlings that are obtained later still catch up with the previously planted seedlings, and they turn out good and strong.
Good seedlings are grown in the right light and temperature, they are compact, the leaves are closely spaced, and they have a thick stem. Containers for growing seedlings can be different, plastic bags or pots, other devices, but a prerequisite is that the volume must be at least 0.5 liters. and not very high capacity.