Expansion of the foundation for brick cladding - stages of work
With the introduction of new standards for thermal protection of buildings, even stone houses with walls two bricks thick do not meet these requirements. Owners of private houses can leave everything as is, but it is better to insulate it and refinish the facade. And if the walls are made of bricks or building blocks, the problem arises of how to line the house with facing bricks if there is no space on the foundation.
Articles on the topic
Brick foundation for a wooden house - types, instructions, advice from masons
Repairing brick houses - how to do it, causes of destruction, instructions, advice from masons
Brick backing - how to make, insulation, protection, instructions, advice from masons
The size of a standard window in a brick house - Brezhnev, Khrushchev, Stalin, instructions, advice from masons
Preparing a brick surface for plastering - rules, instructions, advice from masons
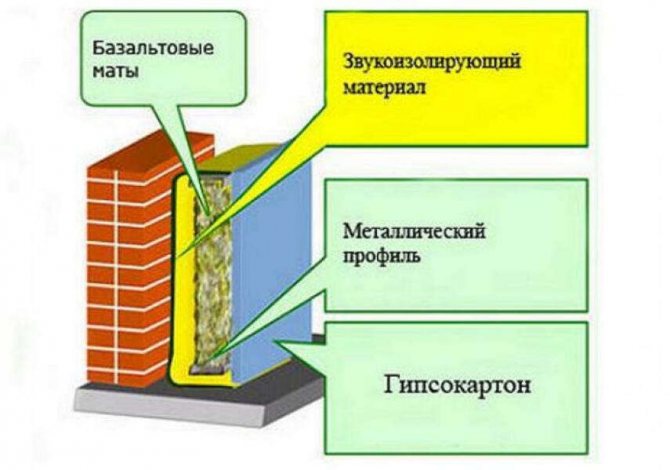
Soundproofing a brick wall - what can be done, instructions, advice from masons
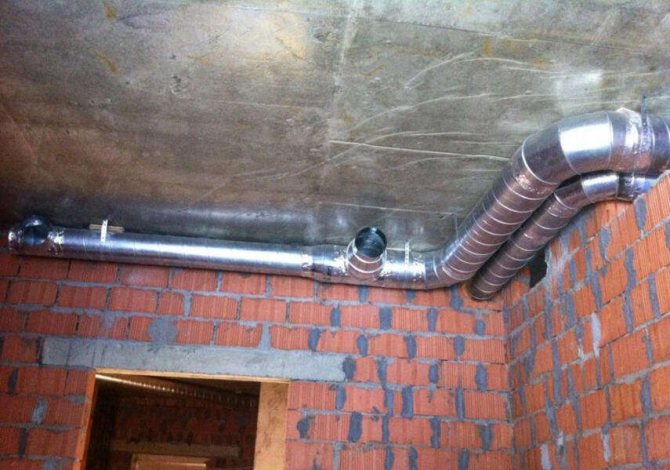
Ventilation in a brick house - diagram, purpose, instructions, advice from masons
How to renovate an old brick house - methods, preparation, instructions, advice from masons
Reviews ()
Choosing the type of foundation for expansion
Any residential building is erected on one of three types of foundation:
A columnar base is used only for light independent buildings (sheds, outbuildings, cabins), as well as for small extensions to the house in the form of a porch or terrace.
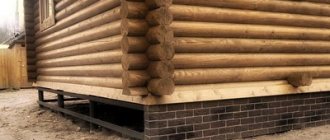
Cladding a house with brick is essentially an extension of the wall. Even taking into account the masonry of half a brick, taking into account its density (1300-1450 kg/m 3) and the size of the wall, for each square meter of the base there will be a load of several tons. It is easy to calculate that for one floor 3.5 m high, the pressure on the base will be more than 4000 kgf/m2. And if the foundation for the facing brick is not firmly tied to the old foundation, it will settle like a newly built “independent” structure. This will lead to excessive load on the flexible connections that connect the facing and ordinary bricks, and ultimately to the appearance of cracks on the facade.
On rocky soils the settlement is insignificant. But such cases are very rare.
At the foundation level, the cladding must be rigidly connected to the old structure and form a single whole. And flexible connections will only compensate for the shrinkage processes of facing bricks and masonry mortar.
Expansion of the foundation for brick cladding should be carried out using the same technology as the arrangement of the foundation of the house itself. And to some extent, these methods can repeat the methods of strengthening old foundations.
Cladding technology
The technology for forming the cladding is slightly different and depends on the building in which it is created - a new one or an existing one. It is worth considering each of them in more detail.
During the construction of a new building
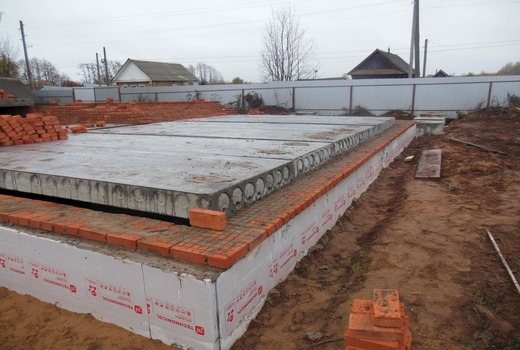
The foundation is laid across the entire thickness of the wall being built, i.e. for brick and gas block. Waterproofing the base is also done for the entire wall. Next you can start laying the walls. Decide for yourself what to put first: brick, gas block or all at the same time. But brickwork has a large number of seams in height, but you need to understand that they are noticeably thicker, but the blocks can generally be laid with glue. This creates a difference in shrinkage, but it is not significant unless we are talking about buildings with many floors.
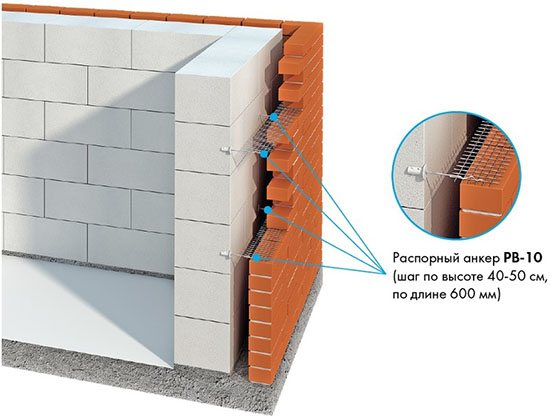
Fastening aerated concrete and brick when cladding a new building
Fastening facing bricks to aerated concrete is done using conventional reinforcement. You can make it yourself from a rod or wire of the required diameter. In addition, steel tape is suitable for these purposes.
But in any case, you need to pay attention to the following points:
- The sum of the cross-sectional areas of the reinforcement is no more than half a square centimeter per square meter of new masonry.
- The number of reinforcement products per square meter is 3-5 pieces.
- Near corners or openings at a distance of 20-25 cm, you need to make another row, the step of which is 25-30 cm.
Instead of connections, you can also use factory-made products, which at the same time provide for fastening the insulation.
When installing ties, it is necessary to ensure high-quality anchoring - that is, they should be immersed in the solution, alternating it at approximately a distance of 10 diameters.
Cladding the external walls of an existing building
In such a situation, it is necessary to build another foundation for the masonry. It doesn’t matter which type is chosen, the main thing is that it can cope with the additional load, i.e. withstood the walls, ceilings, roofing, etc., which are already supported by the foundation.
When forming such a cladding, the connections are secured with dowels. It is better to make through holes in the wall and mount the rods with washers from the inside. The rods can be attached to blind holes. Try not to use a standard solution; epoxy resin-based glue is suitable for this case.
Self-anchoring bolts are suitable for fastening, because they are almost instantly and quite efficiently attached to aerated concrete blocks and the seams located between them.
Methods for expanding foundations
Each type of foundation has its own expansion methods. But they all have a common approach - there must be a rigid connection between the old and new foundation using metal anchors and embedded elements.
Expansion of slab foundation
To “top up” the foundation for brick cladding of a house that stands on a slab, there is only one way of incrementing - driving anchors along the end of the slab.
Although there is a “classical” method, when concrete is broken along the perimeter of the base, choosing a “quarter” measuring 20-30 cm. In this way, the reinforcement is exposed in order to weld a new frame to it. But in this case it is not suitable.
To extract a quarter, the slab must have an equal protrusion beyond the border of the facade. And if it is there, then there is no need to build up the foundation. And the loads from the cladding are not as significant as if we were talking about an extension to the house.
The technology for expanding the slab using anchors looks like this:
- At the end of the slab, markings are made for anchors in two or three levels - depending on the number of meshes in the reinforcement cage. To prevent the anchors from getting into the reinforcement, indentations are made from the top, bottom and side edges by an amount slightly larger than the protective layer of concrete - about 6-7 cm. The distance between the anchors depends on the thickness of the rod and the size of the cells of the slab's reinforcement frame. In low-rise construction, with a rod thickness of 12 mm, the cell size is usually 200 mm, and the anchor spacing is the same.
- According to the markings, holes are drilled with a length equal to 35 diameters of the reinforcing bar (for 12 mm - at least 400 mm). The diameter of the drill should be 2-4 mm larger than the diameter of the rod. It is necessary to drill at a slight inclination towards the horizon and in different directions - in this form, the anchors jam better under load.
- The rods are cut to the required size - the length of the anchorage plus the width of the foundation overhang for facing the house with brick.
- Clean the holes from crumbs and dust - clean with a metal brush and blow through with a compressor.
- Fill the holes with a solution based on polymer-cement compositions or epoxy resins (chemical anchoring).
- The rods are inserted to which the new reinforcement cage will later be attached.
Expansion of strip foundation
A monolithic strip foundation is expanded using the same technology as a slab. But if two or three rows of anchors are enough for a shallow foundation, there will be more of them for a deep foundation.
A prefabricated strip foundation made of blocks or rubble stone is also expanded by pouring a monolithic strip around the perimeter of the house. Prefabricated foundations have a shorter service life and can withstand smaller loads, so this expansion method allows you to strengthen the foundation and improve its load-bearing capacity. A monolithic tape along the perimeter is akin to a reinforced concrete cage, with the help of which old foundations are strengthened.
It is not recommended to expand the prefabricated foundation using brick or rubble stone. The foundation can be faced with brick only in its above-ground part - on the plinth.
Expansion of pile foundation grillage

If a brick house stands on stilts, then solving the problem of how to clad a house with brick if there is no space on the foundation can be done in two ways:
- Additionally, install a bored pile foundation around the perimeter, and rigidly tie the grillages together. Steel beams - using welded connections from rolled steel. Drill holes in reinforced concrete beams, install embedded elements (reinforcement outlets, dowels, anchors) and weld them together.
- Strengthen each support and expand the existing grillage.
The second method is only suitable for a shallow bored pile foundation, and it is similar to the method of strengthening a pile foundation with a reinforced concrete cage:
- during the work, a jack is installed near the pile, which should take the load;
- Around the pile, soil is removed to a greater depth than the heel of the pillar (to the thickness of the crushed stone-sand preparation);
- in cross-section, the pit must have a margin of at least 40 cm than the corresponding size of the pile;
- pour a layer of crushed stone and sand onto the bottom;
- the support is drilled in several places;
- anchors are inserted and wedged into the holes;
- install formwork;
- install the reinforcement cage and tie it to the anchor outlets;
- Concrete is poured and compacted.
The formwork and reinforcement frame are arranged so that the base and top have additional widening. The lower part increases the bearing capacity of the support, the upper part is necessary to expand the grillage.
Stages of expanding a monolithic foundation
This type of foundation is most common for stone houses. And the expansion technology has the following algorithm:
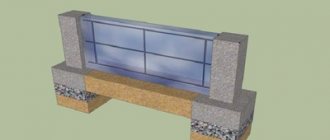
- Calculate the size of the expansion. For cladding with insulation, it is equal to the size of the butt of the facing brick (standard ceramic type - 120 mm), plus the thickness of the insulation board, plus the ventilated gap (according to SP23-101-2004 - at least 60 mm).
- They dig a hole to the heel of the base and determine the depth of the foundation.
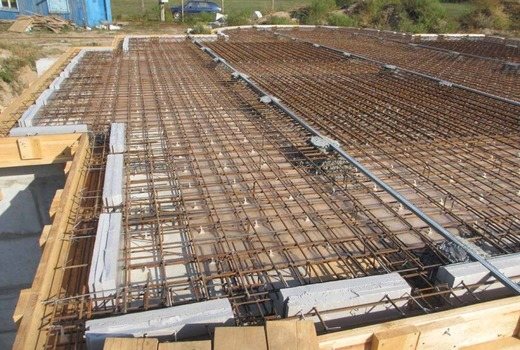
- Calculate the amount of concrete, crushed stone and sand for backfilling the cushion, planed boards and timber for formwork, reinforcement for anchoring and arranging a load-bearing expansion frame. The necessary materials and tools are brought to the site.
- Remove the blind area around the perimeter of the building. And if there is a ring or wall drainage, pipes and wells are dismantled.
- They dig a trench below the depth of the main foundation. The amount of additional bottom deepening should be equal to the thickness of the sand-crushed stone preparation. The width of the trench in relation to the expansion of the foundation should be with a margin of 40-60 cm - this is necessary for the normal installation of formwork and laying of drainage pipes.
- Clean the wall of the main foundation from soil and waterproofing. Clean off the top layer of concrete using burchard - this will create the surface roughness necessary for a “cold seam”.
- Mark the foundation wall and drill holes for anchors.
- Sections of reinforcement are driven in and wedged or filled with special solutions (chemical anchoring).
- Compact the bottom of the trench with a slight slope from the foundation.
- On weak and subsiding soils, crushed stone of fine and medium fractions is poured in a layer of 5-10 cm. Leveled and compacted.
- Fill in a layer of sand of at least 10 cm (mandatory for all types of soil). Level, wet and compact.
- The formwork is installed and the outer wall is additionally reinforced with spacers. Thick polyethylene or roofing felt is placed in the formwork - this will prevent water from leaving the concrete during its maturation.
- A frame is formed from reinforcement. Knitted to anchor outlets.
- Apply a bitumen primer or a “concrete contact” type primer to the surface of the foundation wall - this will improve the adhesion of old and newly poured concrete.
- Concrete of the specified grade is delivered, the foundation expansion is poured, and compacted with an in-depth vibrator.
- The concrete is left to mature until it reaches its design strength (28 days under normal conditions).
- Remove the formwork. Waterproofing the foundation.
- If there is a drainage system according to the design, pipes are laid along the perimeter of the trench with a slope towards the drainage well.
- The soil is backfilled.
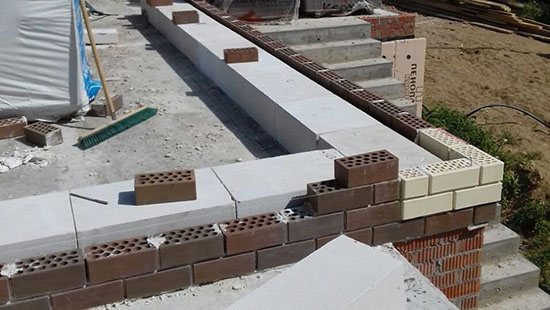
- They begin to cladding the façade with bricks.
Types and characteristics
Decorative facing bricks, which can be used to decorate the base of a house, are available in four designs. Depending on the raw materials used and manufacturing features, it can be:
- ceramic;
- clinker;
- hyper-pressed;
- silicate.
Each type is distinguished by certain properties and has its own advantages and disadvantages.
Ceramic
Ceramic brick
It is produced by firing a mixture of clay and pigment, which gives the material a particular shade. Ceramic bricks for cladding the foundation of a house can be either solid or containing voids. Due to their lower weight, products of the second type can reduce the load on the supporting structures of the building.
Ceramic bricks are characterized by the following:
- resistance to fire and low temperatures;
- strength;
- the ability to maintain its parameters for a long time;
- low thermal conductivity coefficient;
- environmental Safety.
Among the disadvantages of the material are the high cost and the tendency to form a whitish coating on the surface, which reduces the attractiveness of the building from the outside.
Hyper-pressed
It can be obtained from crushed limestone with the addition of cement and dye by pressing under high pressure. This type of brick is not fired, but is not inferior in strength to clinker and ceramic analogues. It is resistant to low temperatures and can be easily machined, and its low thermal efficiency is compensated by insulation. Thanks to its interesting texture, reminiscent of natural stone, finishing the foundation with hyper-pressed brick allows you to embody any design ideas for home decoration.
Clinker
Clinker brick is both beautiful and reliable
It is a modified version of ordinary brick, which is made from a special type of clay by processing at high temperatures. The result is a material of increased strength with a dense structure.
It absorbs a minimal amount of water, withstands intensive use and is used as a base finish, and is also used for paving paths and framing window and door openings. The main disadvantage of clinker is its high thermal conductivity.
The use of sand-lime brick is not advisable because, along with its low cost, it is characterized by increased moisture absorption and poor resistance to low temperatures.
how to expand the foundation for brick cladding
Good day to all! I have the following problem: I have a foundation (a 1.6m strip foundation in the ground and a 0.8m base, 0.43m wide, with a 0.18m monolithic floor slab poured on top). A box of 30 cm wide blocks was built on the floor slab. The actual problem is that the walls were raised without thinking about insulation with mineral wool and a ventilation gap + facing bricks. According to heat loss standards, 5 cm of insulation is enough, plus a vent. the gap is 3 cm plus 12 cm of facing brick - it turns out that you need a support area for all of this 20 cm. But in fact now 13 cm it turns out the facing brick will hang over the base by 7 cm, which I think is unacceptable. Can anyone advise a way out of this situation other than “Give up the brick?” I only have the following assumptions: 1. Drill into the base of the foundation, reinforce everything in a circle and fill/plaster 7 centimeters. But I’m afraid this structure may fall off from the main foundation and the whole the cladding will collapse. 2. Take a thin facing brick, but I read reviews on the forum that the facades made from such bricks look somehow flimsy.
1. Concreting only. 2. Make the reinforcement as follows. In the foundation, use a crown (80-90 mm) to drill two rows of holes (depth 10-12 cm) every 40 cm in a checkerboard pattern in the rows. In the center of the holes, drill holes and hammer in pieces of reinforcement (14-16) so that they protrude by 5 cm (plus a protective layer of concrete of 2 cm - you get the required 7 cm), weld the pieces together with reinforcement (can be 10-thread). 3. Concreting must be done in layers from the bottom up, increasing the formwork as you work. The concrete must be grade 400-450 (not lower), fine-grained. The main thing is to ensure that the holes are filled with concrete.. 4. The foundation plane must first be cleaned and treated with a deep penetration primer. 5. (CORRECTED) The cladding must be tied to the main masonry. How ? Read the next post with the link. It is much more difficult to redo and correct mistakes than to do it right right away. About 7 years ago, in my practice, there was a solution to a similar problem in exactly the way I described.
Can be insulated with foam plastic (excellent efficiency) inside or outside and sheathed with siding, block house or other material
Oksana, let me disagree. Polystyrene from the inside is not acceptable. The dew point in the wall immediately behind the insulation layer (moisture, bacteria, fungus), plus the release of phenols. Polystyrene foam outside under the siding, “not packed” in plaster, is an excellent habitat for mice.
Completely reinforce the formwork and fill it with M cm of any plaster as well as thin brick.
1. Concreting only. 2. Make the reinforcement as follows. In the foundation, use a crown (80-90 mm) to drill two rows of holes (depth 10-12 cm) every 40 cm in a checkerboard pattern in the rows. In the center of the holes, drill holes and hammer in pieces of reinforcement (14-16) so that they protrude by 5 cm (plus a protective layer of concrete of 2 cm - you get the required 7 cm), weld the pieces together with reinforcement (can be 10-thread). 3. Concreting must be done in layers from the bottom up, increasing the formwork as you work. The concrete must be grade 400-450 (not lower), fine-grained. The main thing is to ensure that the holes are filled with concrete.. 4. The foundation plane must first be cleaned and treated with a deep penetration primer. 5. (CORRECTED) The cladding must be tied to the main masonry. How ? Read the next post with the link. It is much more difficult to redo and correct mistakes than to do it right right away. About 7 years ago, in my practice, there was a solution to a similar problem in exactly the way I described.
That's right, but the dressing should not be made of reinforcement, but of fiberglass combined flexible connections. These same connections fix the minplate, for example these
Fill it with concrete and reinforce it to the foundation as you wrote (1) cm15-20 you say that it will hang 7cm into the butt, but in fact it will be 10cm, but it turns out that your brick will hang, that is, it needs its own support. If there are 2 floors, then you may have to pour thicker ones. The cladding will turn out to be lying on its support, here it is better to be careful than not to be careful. It’s better to consider that it would be more expedient to cover it with siding or other material on a frame base rather than pouring it under the cladding.
I suggest that you abandon facing bricks altogether, replacing them with clinker tiles that imitate brick. Before installing the clinker, the insulation must be reinforced with adhesives used for gluing the insulation, with a plaster mesh laid between two layers of glue.
It is necessary to make a new formwork around the foundation, plus drill the foundation for the reinforcement, make a piping from the reinforcement and pour it all. This is most likely the correct option.
Sergey, you shouldn’t think about any kind of expansion of the foundation. About some kind of thin brick. Make the cladding from ordinary brick, without insulation. For ventilation. There is enough gap. And you can insulate the house from the inside, however much you want. Moreover, there are problems with buildings from such a cake, moisture in winter crumbles the brick on the cladding.
To insulate from the inside means losing space and acquiring a bunch of problems. Problems with buildings with facing masonry occur only when the technology is violated, and efflorescence occurs when there is no hydrophobization.
Oleg, absolutely right. It should also be added that insulation from the inside is a shift of the dew point into the thickness of the wall immediately behind the insulation layer. And this is a favorable environment for the development of fungi (with all the ensuing “charms”). By the way, I agree about the fiberglass ligation.
Exceptional environment. ))) +1
It’s not true about efflorescence. There are a lot of reasons for the appearance of efflorescence, the most common, by the way, is the inept use of sodium alkyl siliconate (conscious or unconscious).
Of course, if you use a hydrophobe based on sodium alkyl siliconate, such consequences will arise. But without hydrophobization (with a high-quality hydrophobe, of course), efflorescence will creep.
It’s strange and surprising. To lose space from internal insulation (((((! And buildings with air chambers stand to this day with no problems, and especially without heaps. Is there a guarantee that the cladding with such a sandwich will hang securely, what if it doesn’t work out like yours?!
no big deal, just every square meter you need to attach the cladding to the wall, and the more often the more reliable it is
Major work is ahead. If you want to be 100% sure that your cladding will not float away or crack, my suggestion is the following: Along the perimeter of the slab under the level of the facing masonry, drill horizontal holes into the depth of the slab, every 25 cm, in two rows for 12th reinforcement, on depth 25-30 cm. Size between bottom and top row
12 cm. Drill in such a way that a protective layer remains, preferably 6 cm, to the top of the slab (so as not to chip off the concrete and break the reinforcement of the slab itself). In these holes, having previously “MANDATORY” filled them with chemical anchors for concrete, drive the reinforcement with a sledgehammer to the full depth with a release of 12-15 cm. (You may need a thermal insert to insulate the slab itself). With a high-quality chemical anchor (Hilti for example), it will hold better than native concrete! Next, make angular-shaped screens measuring 12x26x30 cm (for thermal inserts, make rectangular trapezoids to fit the size of the insert). Attach them vertically along the entire perimeter of the slab, at the level of the top row of outlets, every 25-30 cm with a sharp downward angle. Next, weld two reinforcements to the outlets for each row, in 7cm increments. their 10th reinforcement. After making the frame, place the formwork, taking into account a protective layer of concrete of at least 3 cm. Next, fill it with concrete b22.5 (m300). After drying, then everything goes according to the program. Insulation, membrane, air gap (4-5 cm is enough). Before starting masonry, do not forget to install waterproofing on the bottom row of blocks, and lay a flashing under the cladding to the block. When cladding, do not forget to install aerators in the bottom row of cladding, or do not fill vertical seams every 3rd brick. Flexible connections are best made from basalt-plastic reinforcement. That's it, good luck!
Expansion of the foundation for brick cladding
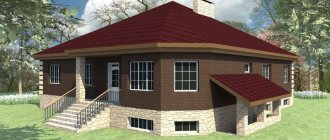
The facade not only protects the house from the harmful effects of external factors, but is also its calling card. Having decided to clad the facade with brick, you can be sure that the house will have an aesthetic appearance and will easily last for several decades without major repairs. Brick can be easily combined with other materials, such as wood, glass, aluminum. A brick wall “breathes”, has frost resistance and resistance to chemical corrosion. The house, lined with brick, has a rich appearance. It would seem that the choice of finishing material is obvious, but it often happens that the existing foundation for facing bricks is not suitable due to its small width.
Why is it important to finish the base?
It is wrong to think that finishing of this kind is only a design decision. It performs some other functions:
- Despite the fact that the foundation is the strongest part of the house, it also needs protection from external factors. Finishing minimizes the influence of precipitation, sudden temperature changes and high humidity, direct rays of the sun;
- Since the foundation is located closest to ground level, it is most susceptible to contamination, not only by dust and soil residues, which are harmless, but also by various aggressive substances that cause destruction of concrete joints. The plinth finish not only prevents this process, but also cleans well;
- This material also protects the base from biological life forms: mosses, fungus, mold;
- The basement finishing should also include insulation under the outer layer of material;
Insulating the foundation is an important point. On the one hand, the entire internal space of the building is located higher, and there is no need to insulate it. But that's not true. The foundation is a kind of cold accumulator. Even a well-insulated floor will not save you from penetration of low temperatures from the foundation. A significant part of the heating is wasted just like that. But that's not the worst thing. In winter, due to severe freezing, the foundation collapses regardless of the material, be it stone, concrete or brick.
Foundation and expansion of existing foundations
So how can you line a house with facing bricks if there is no space on the foundation? If it is advisable to entrust the facing work to highly qualified masons, then the work to expand the foundation can be carried out independently. Of course, before starting work, it would be useful to clarify what the foundation itself is, how to expand the foundation and outline the main stages of the work. The foundation can be:
- columnar/pile with reinforced concrete grillage;
- tape monolithic.
It is assumed that the existing foundation is not wide enough and needs to be expanded; for this, an additional foundation is “attached” to the existing foundation of the building.
Making a columnar foundation as an additional foundation is rarely practiced, since carrying out the work is associated with certain difficulties. If you plan to use a reinforced concrete beam as a grillage, you will need to use a crane. When pouring a monolithic grillage, a significant amount of work will be required to produce formwork.
The work on making a strip foundation is much simpler, therefore, as a rule, it is used. In addition, a monolithic strip foundation (made according to the rules) will subsequently become an additional foundation for the entire building.
The additional width is calculated based on the consideration that there should be enough space for facing brick laid with a spoon (15 cm), an air gap (3 - 5 cm) and insulation (10 cm), a total of 30 cm. This is the optimal width for comfortable manufacturing work foundation, and for subsequent brick lining of the house.
Work order
In order for the work to be completed in the shortest possible time, you should count and prepare consumables, prepare access roads, clear the work site and prepare tools.
Materials and tools
The set of tools and materials needed to expand the foundation are practically no different from those needed when carrying out standard concrete work to pour the main foundation. You should prepare:
- shovels (bayonet and pick-up), trowel;
- measuring instruments (tape tape, level, water level) and marking devices (pegs, construction cord);
- electric tools (grinder and hammer drill);
- axe, hammer, wood saw;
- cement, sand, crushed stone, reinforcement, formwork boards, binding wire.
The bricks for facing the house should be counted. It is advisable to deliver it to the construction site after the additional foundation is ready. This will allow you to move around the area more freely.
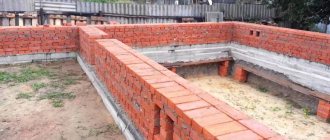
Making the foundation
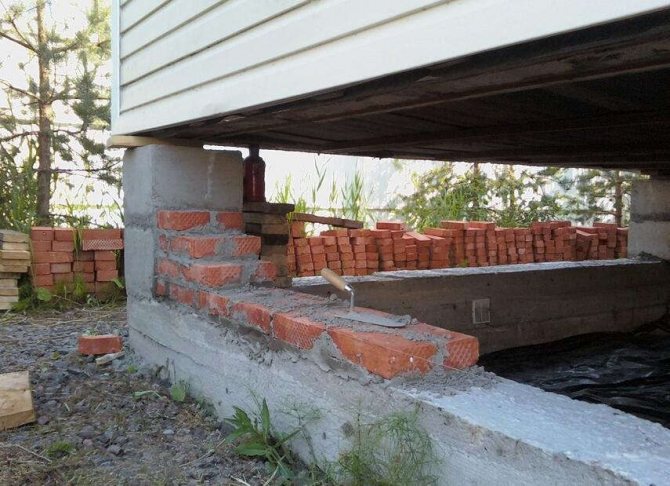
The place for the additional foundation is thoroughly cleaned, the formwork, if any, is dismantled, only cleaned soil is left, and markings are carried out. Add 20 cm to the width of the future additional foundation - this will provide space for formwork and simplify work in the trench. Using pegs and a cord, the building is demolished, focusing on the width.
A trench is dug to a depth of up to 0.5 m; this should be done carefully, trying not to “injure” the soil at a given depth, since loosened soil, even carefully compacted, subsequently gives sediment.
In the old foundation, at a distance of 10 - 15 cm from the upper boundary, holes for reinforcement are drilled with a hammer drill. The pitch between the holes is 50 cm, the depth is 15 - 20 cm, the diameter corresponds to the reinforcement (10 -12 mm). The reinforcement is cut into segments of 30 - 35 cm and hammered into the holes, leaving 15 cm outside. This reinforcement will serve as a kind of anchor fastening, ensuring rigid adhesion of the old and new foundations. After this, the trench is cleared of crumbled earth, a sand cushion is poured onto the bottom, which is spilled and compacted.
Preparing the reinforcement frame
The formwork is made from planed boards and installed at a given distance (30 cm), secured with struts. Then they begin to reinforce the future foundation. You can tie the reinforcement directly into the trench, but given its small width, it is wiser to prepare sections of the reinforcement cage at the top and then secure them in the trench.
After this, you can begin pouring concrete, which is best ordered from a specialized enterprise.
If the volume of work is too large and interruptions are inevitable, then concrete should be poured in sections to the full height, creating working joints perpendicular to the axis of the foundation. The working seam is placed at a distance of 1/3 from the corner. It is unacceptable to pour concrete in layers.
After 2 - 4 weeks, when the concrete has completely set, the formwork is dismantled. Then the foundation is protected with waterproofing, the remaining ditch is filled with earth, after which you can begin to clad the house.
Finishing the base with panels
Finishing with siding has a number of advantages that must be used during construction. As a rule, the panels are mounted on a steel or wooden frame, which creates additional volume. It is advisable to fill the empty space between the panels and concrete with insulation. For this purpose, polystyrene foam or basalt wool is used.
Decorative siding is made from metal, polyvinyl chloride, cement-based mixtures and composite materials. The front layer of the panels can be imitation stone, natural wood or colored fabric. The resulting surface is sufficiently durable and presentable in appearance. A brick building takes on a completely new style with siding trim.
Scheme of finishing the base with panels.
The sequence of panel cladding is as follows:
- Carrying out markings. For this, a tape measure, level and marker are used. The size of the frame mesh should be adapted to the parameters of the insulation material.
- Drilling holes in concrete. Installing plastic dowels in them. A puncher and a hammer are used.
- Frame assembly. To do this you will need a screwdriver, a hammer, a level and a steel profile. It is not advisable to use wood as it has a limited service life.
- Installation of insulation. The best option is to glue it to concrete. To increase the reliability of fastening the insulation, anchor bolts with wide heads are used.
- Fastening the panels. This is quite simple to do, since all siding models have a system for fixing parts together.
You can cover the base with panels in just 1 working day. This design is lightweight and does not weigh down the foundation at all.
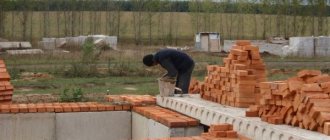
Cladding works
Having certain skills in working with bricks, you can cladding the house yourself. Moreover, facing bricks are made with more careful adherence to dimensions than ordinary building bricks.
Since it is desirable for a house lined with brick to be not only aesthetically pleasing, but also warm, various insulation materials are used for this purpose. The best option is sheet mineral insulation. It is produced in various thicknesses and is easy to install. The insulation sheets are attached to anchors appropriately located in the wall, which are driven into the wall every meter and every sixth row of brick. This could be wire cut into pieces. Its length should be enough for reliable fastening in the wall (5 - 8 cm), a layer of insulation (10 cm) and laying in the facing masonry, that is, about 30 cm. Also, the insulation sheets should be pressed with mounting dowels and umbrellas (5 pieces per 1 m. sq.). The anchors provide additional strength and stability to the façade wall.
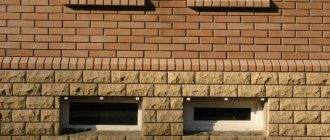
It is also necessary to ensure ventilation of the insulation. For this purpose, holes (vents) are left in the façade wall along the upper and lower cornices. They are protected with a mesh or special plugs are placed on them for ventilation. You should also worry about the eaves overhang - it should overlap the new wall by at least 25 cm, so you may have to cover the roof.
There are some subtleties when cladding a house made of wood, which relate to the structure itself. Before covering a wooden house, you should make sure that all its elements are in good condition - there is no fungus, signs of rotting, or serious damage. All these places need to be removed/repaired and, if necessary, replaced.
Creation of brick cladding
Before you start laying bricks, you need to mark the location of doors, windows and, if any, other architectural details.
This is necessary in order to minimize material costs. Based on these measurements, lay out the first row of bricks. Each brick laid with a butt must be pinned to the required size, since when cladding walls of half a brick, the masonry should be carried out no more than 8-10 cm. If the extension is more than 6 cm, the cladding and the wall are tied together with nails, the length of which is 100 mm. It happens that this length is not enough, then it can be increased using steel wire with a diameter of 2 mm.
When using sand-lime bricks for cladding a house, the offset should not be more than 6 cm, especially when laying the cornice. It is correct to cover the newly laid masonry with insulating material. This will protect the seams from the solution being washed out of them in case of rain.
https://youtube.com/watch?v=6kkwdNo3jkM
To create a solution with which the masonry will be carried out, the following proportions must be observed: cement - 1, lime paste - 1, sand - 4. To bring the mixture to normal, you need to add water at the end of the batch. All ingredients must be added in the following sequence:
- Water.
- Lime.
- Cement.
- Sand.
Having made the first batch, gradually adding water, you can calculate how much is needed to create the desired consistency, and next time fill the entire volume with water at once.
If you need to unstitch the seams, it is important to know that the surface of the mortar dries quite quickly. The correct seam should not be thicker than 13 cm
You can check the size using a ruler.
There should be lintels at the cladding openings; it is best if they are made of concrete, which ideally matches the color of sand-lime brick. In the absence of concrete lintels, hidden ones can be built. To create them, steel reinforcement with a diameter of 6-8 mm is most often used. The rods are inserted into each brick row under the opening right up to the eaves.
The gap that appears can be hidden with expanded clay or other heat-insulating material. Just don’t put roofing felt in the gap, which will interfere with the heating of the cladding in the cold season. The cladding work has its own characteristics and rules, so if you are not sure that you can do it yourself, it is best to contact professionals who will do it quickly and qualitatively. At the same time, your home will be reliably protected from cold, rain and other natural vagaries.
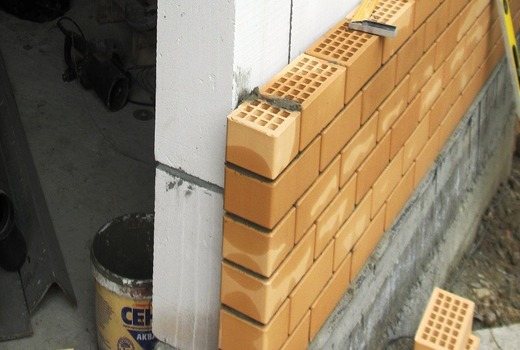
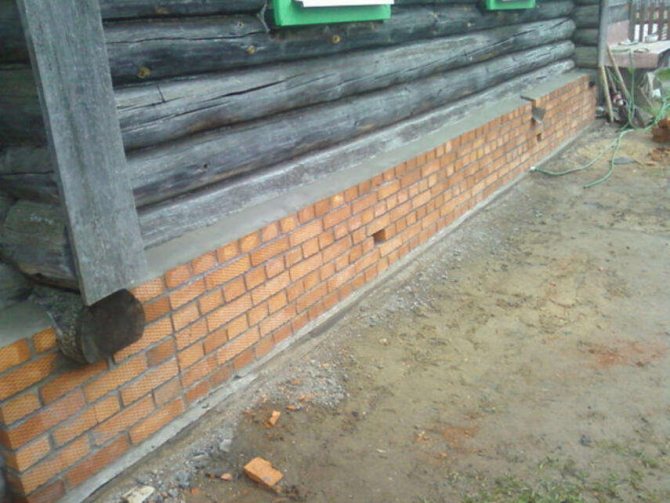
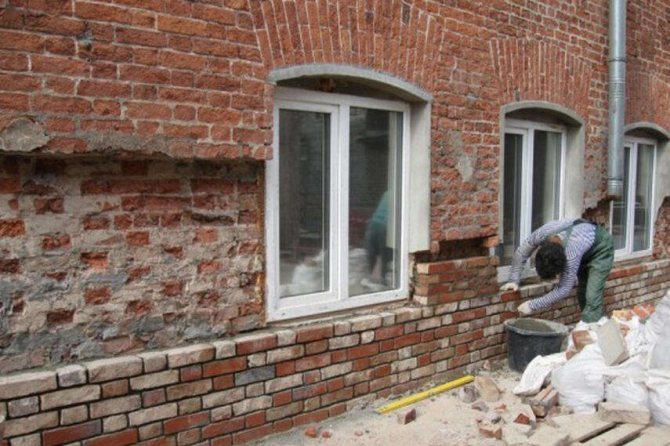
Finishing the foundation with bricks
Laying the foundation for the construction and finishing of a house is the most important, if not the most important, of all stages.
The choice of materials and the conditions for performing the work underlie the durability of the entire future structure of the house. For example, a protrusion for laying stone is not made for finishing siding, but for laying brick it is simply necessary. Here, the decision for carrying out the finishing work of the structure should be thought out in advance, at the pouring stage.
The foundation for facing bricks must have some differences in the structure itself.
But what exactly needs to be taken into account when carrying out such work? Let's try to look in a little more detail. After all, alterations are expensive.
Preparing the base for cladding
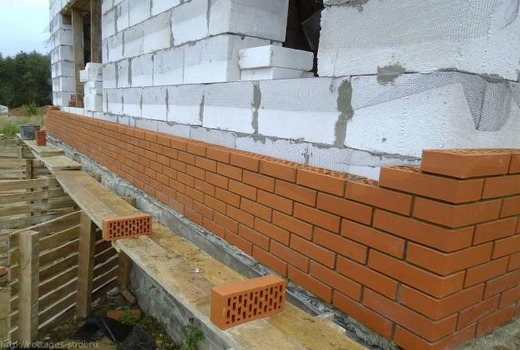
To reduce costs and time, there is an acceptable compromise. The foundation body can be made of any material. Most often, a reinforced concrete monolith or block structure is made, but the cladding can be made of brick. For this purpose, manufacturers have long mastered and launched the production of facing stones of various types, sizes and qualities.
The body of the base can be made of any material, and the cladding can be made of decorative brick
The decision to use these materials should be made at the level of foundation formation. This moment is very important, since it is not enough to just stick stone cladding on the wall; it also needs to be supported on something.
Of course, you can put a metal strip on the side of the foundation, but it will weaken the waterproofing and will collapse over time in wet conditions. Therefore, the surest way is to lay out a special ledge with your own hands.
When constructing formwork for pouring the foundation of a house, you need to correctly calculate the size of the supporting part for the cladding device. When carrying out measures to waterproof the foundation, the seat for the cladding cannot be missed. It must also be carefully insulated.
This process is necessary both for the finishing itself and for the entire building, as it will best protect the entire structure from moisture penetration. By the way, such work can be done with your own hands. Typically, waterproofing of vertical surfaces is carried out with bitumen-based mastics.
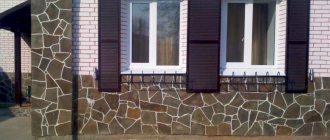
Selection of finishing materials
When choosing a particular material, you need to know the weather conditions of the region. What will this give you when choosing? Consistent performance, durability and will reduce additional maintenance costs.
In southern and dry regions, white sand-lime brick and ceramics work well, and in damp and northern regions, clinker cladding is used. At the same time, the cyclicity of the material, in this case brick, will be high.
Frost resistance. You can view such parameters in the certificate for the brick itself. For example, the frost resistance of red brick grade M-25 is 25, and high-quality ceramic brick M-75 is up to 75 cycles. A cycle is defined as freezing and thawing of material once.
Hardness and load-bearing capacity are marked as follows: M – 125, where the number indicates the pressure limit per 1 centimeter square. It should be at the level of 150-175 for cladding.
Thermal conductivity also matters. Hollow brick is a priority here. In terms of strength, it is better to choose solid and high-quality material for finishing the foundation. Manufacturers make plenty of types; there are no problems with color or texture at the moment.
How to choose facing material?
If the house stands on a standard monolithic foundation, lining with ordinary brick will do. You need to pay attention that the building material has smooth edges and does not crumble - a sure sign of a used stone. When choosing a material, weather conditions are taken into account: in the southern regions, white silicate is suitable, and in areas with heavy rainfall, clinker is suitable. To strengthen the foundation, it is better to take a solid version, and the design of the brick should match the style of the entire building. Characteristics of this building material:
- minimal water absorption (non-porous),
- frost-resistant (indicated on the certificate),
- lasting.
How to prepare the base and solution
Foundation and finishing in construction, main partners. Without preliminary surface preparation, high quality cannot be achieved.
Removing dust and solution residues is the first thing to do. The second stage is to consider drainage and waterproofing.
In lowlands or at close water levels, such measures are simply necessary.
Conducting geodetic research yourself is not a problem.
In the spring, after the snow has gone, drill 4 to 5 holes with a hand drill, to a depth of 1.5 meters; the absence of water is a good sign.
No drainage from pipes is needed.
Moisture protection
Waterproofing of the brick seat must be done in any case. To do this, use roofing felt or bitumen-based mastic. The mastic is applied in two layers, with a time interval of 24 hours. Before application, the surface is primed with hydrophobic primers once.
It will be a little easier with a solution. There are several points to consider:
- Hardness of water. It is better to soften the water with the help of additives.
- The temperature of use matters here. At a temperature of +8 Celsius, the necessary reactions in the solution stop. True, there are special mixtures and antifreeze additives on sale that allow work to be carried out even at minus 7.
- In hot weather +35, veneering is also not carried out. The strength of the solutions suffers due to the rapid evaporation of moisture. Lime-based solutions are covered with film and watered during work.
- The addition of coloring elements, graphite, carbon, affects the strength of the masonry. Losses are approximately 15%. Use certified additives and colors.
Reinforcement or dressing
The standard method of strengthening masonry involves laying a mesh between the rows in the solution at the run stage. The thickness of the soldered version of the mesh should be no thinner than 1 mm, with a cell of 25-40 mm, no more.
When finishing, corners are laid through a row, and purlins (straight sections) of brick are laid through 3 rows by 4. This way, maximum strength of the entire masonry is achieved.
When starting to pour the foundation, one more issue must be taken into account, the connection of the base with the wall. Laying strips of mesh 10 cm wide into the foundation so that they protrude up to the proposed brick wall is not a problem.
And already during the finishing process, insert them between the seams.
The distance from one dressing to another should be at least 80 cm.
Sometimes for such purposes, wire with a diameter of 3-4 mm is used, it is laid more often.
Organization of the work site
Having decided on the choice of materials, having carried out all the preparatory work, it does not hurt to think about the place where the finishing will be carried out. Correct placement of all containers, concrete mixers, pallets with bricks on the site will reduce the finishing work time by half.
The rules here are simple:
- The passage from the wall must be at least 1200 mm, along the entire perimeter of the foundation. Freedom of action, so to speak.
- Carry out a simple calculation of how much of all resources will be needed, group them for every 6 meters of masonry using pallets.
- Think about the water supply, interruptions in water supply happen everywhere.
- Use protective equipment, and think about additional lighting in the evening.
- When choosing an outside team, check their experience and professionalism. Ask the foreman about the previous place of work.
Marking
Brickworking skills are quite simple. The more thoroughly you prepare for the process, the better the result will be. You will have to do several stages of marking and checking.
The first stage includes checking the perimeter and levels. You will need a simple tool:
- Hydro level, a tube with flasks, 10-20 meters long, filled with water. Before use in the work area, it must be filled for at least 12 hours.
- The rule is 2.5 meters in length, measure individual sections of the bed (places of masonry).
- Tape measure, marker, pencil.
- Construction cord, fishing line. Take into account line sagging in hot weather.
- A hammer drill with a drill and dowels are useful when tensioning ordinary cords.
If the horizontal level deviates by more than 5 mm, make a leveling pad from cement mortar.
The second stage, we check the right angles. You can check the angle using a construction square or the “Egyptian triangle” method. On one cord we mark 3 meters with a marker, on the perpendicular cord 4 meters, the distance from point to point should be exactly 5 m. We make adjustments before starting the first and main row.