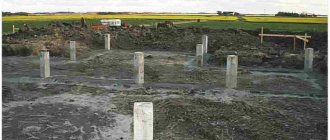
Trimming piles to level
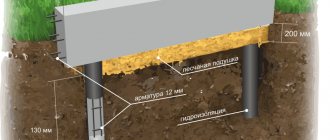
The installation of screw piles ends with cutting them relative to a single plane. Obviously, it is almost impossible to achieve the same level when screwing in several piles, so after screwing they are cut off so that the foundation plane is uniform. The plane is drawn out after all the piles have been wrapped.
Already when installing piles, you need to have an idea to what level the foundation will be raised and control the height of the end of the piles above the ground. After screwing is completed, one of the piles is selected, relative to which the height of the entire foundation plane will be selected.
It is cut perpendicular to the body of the pipe, and then all other piles are marked for cutting.
There are two main ways to derive the foundation plane:
- Using a water level
- Using a laser level
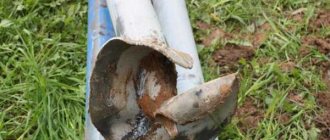
The first method is quite complicated and will require care and attention. The water level is a long transparent plastic tube filled with water. One end of the tube is brought to the reference pile so that the water level in the tube coincides with the cutting level of the pile.
Water level
Next, the tube is extended to the next pile and attached to it. The level to which the water in the tube has risen will correspond to the height of the reference pile relative to the horizon. A mark is made on the pile at which cutting will be done. The maximum deviation should be no more than 1-2 mm.
The cutting levels of all other piles are marked in the same way.
The next step will be cutting each pile itself. The optimal cutting method is using an angle grinder, the so-called “grinder”. The use of an abrasive cutting wheel makes the cut neat and even.
Before cutting the pipe, you need to make sure that the cutting plane is correct. To do this, it is best to use this technique. The pipe is wrapped in thick cardboard or similar material, so that the top edge coincides with the mark made on the pipe. Then a circle is drawn along the top edge of the cardboard with chalk or a metal marker. Before sawing off the pipe, it is recommended to make a preliminary cut along the entire circumference.
As a result of cutting the pipes, we get a set of even ends of screw piles above the ground surface. This will be the basis for forming the foundation piping.
Cutting pipes to level
After cutting all the pipes, it is recommended to double-check that they are level correctly. If an error occurs on any pipe, it must be taken into account in further work - mark the defective pipe and either trim it slightly, or later install an additional lining under the grillage - if the pipe is cut too low.
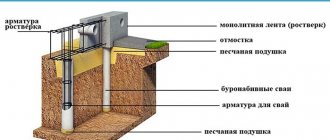
Adjusting the height of screw piles and the structure on them
One of the grossest and yet most common mistakes is unscrewing the piles in order to adjust the height. Such a violation leads to the formation of loose soil under the pile, in which it then sinks. The fact is that the pile is able to withstand high loads and avoid shrinkage precisely because during the screwing process the soil between the turns is not loosened, but compacted by the blades. If the work technology is followed, even loose soil eventually becomes dense and supports the pile. Accordingly, if you unscrew the pile even a little, the ground underneath it will no longer be able to withstand the weight of the structure.
Another incorrect way in which inexperienced builders try to level the height of the ground portion of the pile on a relief terrain is by screwing them to different depths. Often in such cases, the depth of the pile under the section of the building that rises above the ground is usually less than required. Note that the only acceptable way to maintain the same level of the structure is to trim the pile. By the way, the technological holes of the piles must be cut off in any case, otherwise the durability of the foundation will be greatly affected. If it turns out that the length of the pile is not enough, it can, on the contrary, be increased, and then the welding seam must be painted to avoid corrosion. The welded head should also be painted.
Functions of screw pile heads
There are several main types of tying a pile-screw foundation:
- Installation and fastening of support beams at the ends of pipes
- Connecting pipes with metal channels and beams to create a common frame
- Creation of a combined concrete grillage based on screw piles
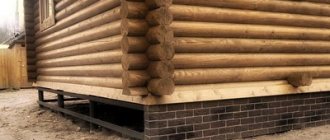
The first type of piping is considered the most common when constructing a foundation for most buildings - from residential buildings to light outbuildings, such as a bathhouse, summer kitchen or veranda. This type of piping requires caps at the ends of the pipes.
Why are pile heads needed?
These elements serve as support to support the slab. When installing, you need to ensure that they are located at the same level. Distortions are not allowed here, since the ability of the foundation to withstand the load is lost. The heads should be leveled after deepening.
The size of the heads depends on the dimensions and specific gravity of the material. To put a pipe on a pile, the diameter of the latter must be larger. The shapes of the screw heads are of the following types:
- Square.
- Polygon.
- Circle.
- Taurus
These types are used in the construction of frame houses and timber buildings.
Head functions:
- Installation and fastening of support beams to pipes.
- Construction of a building frame by fastening pipes with a channel.
- Used in the construction of grillages.
Head types
Heads primarily differ in their shape:
- T-shaped
- U-shaped
T-shaped heads are more common. They are a piece of pipe with a platform welded to its end. The foundation framing beam is subsequently laid on this site.
U-shaped heads are usually used for laying beams that require stronger fastening to resist lateral loads. They seem to be inserted into a square socket and fixed on the side with fastening material.
T-shaped and U-shaped heads
According to the method of connection with the ends of the screw pile pipes, the ends are divided into
- Welded
- Removable
From the name it is clear that in the first case, the heads are tightly welded to the pipe body at the stage of pile manufacturing. This is a rare case, since usually the foundation plane is leveled by cutting the piles after installation at the general level, as described above. After trimming, the head is put on the end of the pipe.
According to the shape of the platform on which the trim beams are installed, the heads can be divided into:
- Square
- Round
- Polygonal
The shape of the heads is mainly determined by their purpose. In most cases, square sites are used in the construction of buildings. Round head platforms are most often used to attach single pillars to them - in this case, the platform most evenly takes on the load from the weight of the structure. Platforms of a different shape are placed depending on the shape of the base of the structure, if necessary.
Heads with a square platform are considered the most common in construction.
The design of the head in general is a metal plate welded to a piece of pipe. The diameter of the pipe should be slightly larger than the diameter of the screw pile on which the head is attached. It is, as it were, put on the end of the pile, and thus the end of the pile is equipped with a kind of cap that increases the diameter of the base of the foundation. They are shaped like an inverted glass. The dimensions of the heads are usually in the range of up to 150x150 to 200x200 mm and a little more for corner piles.
To impart structural strength, the heads are equipped with stiffening ribs. These are metal strips welded onto the bottom of the platform. Stiffening ribs (kerchiefs) can have a wide variety of shapes and the number per head is from 3 to 6..
Standard head with square platform
Types and features
The pile heads differ not only in shape, which corresponds to the shape of the installed pile, but also in size. At the same time, do not forget that when using a screw or concrete pile, the tip will also be different.
An important nuance in choosing the head is its shape: it can be T-shaped or U-shaped. When installing a grillage on a T-shaped head, you can install both the formwork and the slab for pouring the foundation.
Only beams can be used with U-shaped heads, and their diameter must match the width of the tip.
Installation of heads
Installing pile heads consists of securing them to each support. Before installation, after trimming, the piles are cleaned of paint. You definitely need to check the level of the head. The site must be perfectly level relative to the horizon. Skewed heads can lead to uneven loads, skewed piping and, as a consequence, limit the durability of the entire foundation. If the platform does not fit horizontally, you should either check whether the pipe is cut correctly or the head itself. If there is a small defect, it is recommended to weld strong linings under one or another edge of the connection between the pipe and the head.
Checking the level of the site
Before welding, the edge of the head is processed with a file to remove the paint layer. It is recommended to clean the inner wall of the “glass” of the head with an angle grinder along a pre-designated line about 20 cm wide. To do this, put a cleaning disk or brush on the “grinder”. The paint on the edge of the head is better removed with a cleaning disc.
The welding process is carried out using a standard welding machine using conventional standard 3 mm electrodes. Welding current is used within 90-100A.
Thus, the work procedure includes:
- Installation of the head
- Control of the horizontal plane of the site
- Tack spot welding of the head in two or three places
- Welding around the entire perimeter
- Painting of cleaned areas for anti-corrosion protection.
It should be noted that it is necessary to leave a seam section of 10-15 mm to ensure ventilation of the head. Otherwise (since the body of the pile itself is filled with concrete), moisture will inevitably condense from inside the head due to temperature changes. If there is no ventilation, this area will become a hotbed of increased corrosion.
Welding of heads
After welding all the heads, the foundation plane will be checked again to ensure that it is level. If necessary, it is better to re-install the head or several heads in places where mistakes were made.
The pile field is ready for installation of the strapping
After all work is completed, the strapping bars can be installed on the heads. They are usually attached with bolts - for this purpose, corresponding holes are pre-drilled in the heads.
Head cutting methods
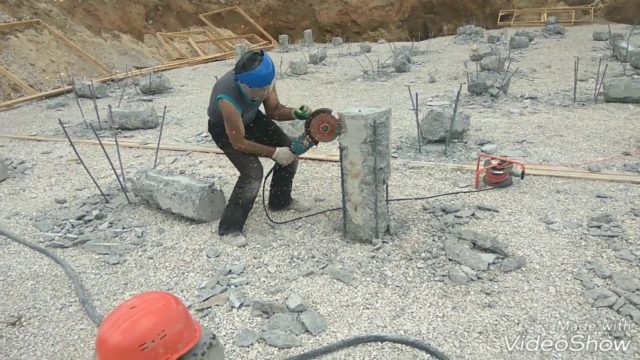
After pressing in the reinforced concrete supports, the heads are cut down - removing the excess part of the pile that is located above the horizontal grillage. The dimensions of the area to be removed are marked with a marker on the pile shaft.
To cut down the heads, two types of tools are used: a jackhammer (low cost) or hydraulic shears (excellent cut quality, high speed, but also a decent price - tens of thousands of rubles).
Manual method
If you use a jackhammer when cutting down, follow these steps step by step:
The head of the support can not only be chipped, but also cut off
- Mark the cutting line on the support;
- With a hammer you need to draw a furrow that encircles the cut line;
- Using gentle movements, break off parts of the concrete from the monolithic support without touching the reinforcing frame;
- Cut off the reinforcement.
The big disadvantage of this technology is its possible low quality. The tool can damage the support under the marked line.
Method of cutting heads using hydraulic equipment
Cutting with hydraulic shears is much better and faster; the method is distinguished by its versatility. During hydraulic cutting, pistons with cutters on the pile simultaneously remove the unnecessary part of the support. Such equipment can be installed on any equipment with a hydraulic drive of the required power - a tractor or an excavator, which will allow you to significantly save on hiring machines.
Features of the procedure
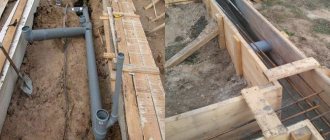
Piles are used as a support system for structures with walls made of lightweight structures . Helical metal beams are usually installed, but in practice wooden or concrete supports can be used.
Tying pile supports with a profiled pipe is considered one of the most effective technologies today, which can be done with your own hands. This method is effective if construction is carried out on soils with high heaving force and high moisture content in the soil.
But piles themselves cannot provide the necessary stability of a structure over many years of operation. To do this, they are equipped with a harness that combines individual supports into a single structure and evenly distributes the load between them.
When is it used?
Tying with a profile pipe is necessary:

When building a house on screw piles protruding above the ground by more than 0.8 m.- During operation, when deficiencies in design calculations are identified and periodic swaying of the house is noticeable.
- During reconstruction in order to add upper floors, which will increase the load on the supports, which can lead to deformation and destruction.
- Initially, the incorrect number of supports was calculated and the foundation currently needs strengthening.
- It is planned to equip the exterior of the building with decorative overlays imitating a plinth.
Positive and negative characteristics of technology
Pipes, I-beams and channels can be used as metal products.
Advantages of rolled profiles as a grillage:
- convenient for assembling structures;
- able to withstand large lateral loads;
- despite its low weight, it is not inferior in strength even to metal beams;
- can serve as the basis for arranging a beautiful base;
- withstands external loads (changes in the weight of the house, elevation changes, soil movements);
- resistant to damage and wear;
- has an affordable price;
- a wide selection of products with different section sizes and wall thicknesses.
But we should not forget about the undesirable features of the technology:
- susceptibility of a metal pipe to corrosion processes;
- regular maintenance in the form of applying polymer paint;
- seams remain a weak element of the structure, so initially a welder is involved in the work, who skillfully selects the operating mode.
Despite the presence of shortcomings, adherence to the technology of tying piles with a profile pipe allows you to increase the strength of the foundation several times.
In what cases is it recommended to use metal strapping?
Strapping with rolled steel is recommended in the following cases:
- in the project, small-format materials are planned for the construction of walls - blocks or bricks;
- a frame building is being built on a site with a height difference exceeding 500 mm;
- It is planned to erect a two- or three-story structure using frame technology or from wood materials - logs and timber.
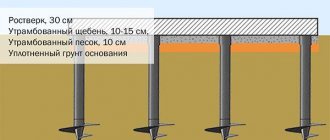
The height of the metal grillage is selected depending on the characteristics of the soil. On heaving soils it is placed at a height of 150-400 mm above the ground. The standard option is a harness lying on the ground. The upper contour of the tying tape is usually not buried in the ground.
Preparation for the process
The tying is carried out after the construction of the base itself . The main stage of preparation for arranging the strapping is the choice of lumber.
Selecting a board based on characteristics
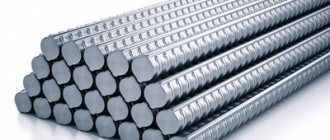
According to experts, the use of boards or timber is an equally correct method of strengthening the foundation on screw piles. If a solid wooden beam is used, then its size should be 150x150, 150x200 or 200x200 cm.
However, it is much more convenient to prepare timber made from several boards . Then its size should be 20x200 or 50x150 cm. Such stacked elements are not only not inferior to solid timber, but also surpass it in characteristics.
An element of size 50x200 cm made from boards is not inferior in strength characteristics to timber 200x200 cm.
To create a stacked beam, you need to connect several boards using nails (length up to 120 mm), which should go in two rows with a pitch of 20 cm. On each head you need to attach not one wood grouse, but four. In this case, the nails are nailed in a checkerboard pattern.
If 4 or more boards are required to create a 50x200 cm beam, then you first need to knock down the first 3 boards, and then attach the rest to them using additional nails.

If we talk about the type of wood, then preference should be given to coniferous species, such as:
- larch,
- fir,
- pine,
- spruce.
This type of wood contains resins. They are natural compounds that resist the formation of mold, rot and mildew.
In addition, this type of wood is hygroscopic (does not allow moisture to pass through or accumulate). Larch is the most expensive, but it has the longest service life. The best option for low price and high quality is pine.
Turnkey installation price
Before carrying out the installation yourself, it is advisable to familiarize yourself with the cost of turnkey strapping work in various regions of Russia:
| City | Turnkey starting price per linear meter of pipe, rubles |
| Moscow | 380 |
| Saint Petersburg | 350 |
| Kazan | 275 |
| Rostov-on-Don | 250 |
| Volgograd | 300 |
If you do not have skills in constructing pile foundations and working with electric arc welding, you should contact a specialized company. Errors in calculations, as well as insufficient competence in construction and welding work will inevitably lead to deformation and distortion of the structure during operation.